For the Best Results, Use the Latest Version.
-
Preparations
-
Account
-
Get Started & Basic Settings
-
Compatibility & Tech Specs
-
Performance Settings
-
-
Creating Projects
-
Creating New Projects
-
-
Importing & Recording
-
Video Editing for Windows
-
Basic Video Editing
- Enable/Disable Clip in Windows
- Magnetic Timeline for Windows
- Dual Monitor Setup for Video Editing on Windows
- Select All Clips on Timeline for Windows
- Manage Timeline and Tracks on Windows
- Auto Ripple for Windows
- Split & trim video
- Crop & Pan & Zoom Video
- Compositing
- Change video playback speed
- Playing videos in reverse
- Mark In and Mark Out for Windows
- Markers for Windows
- Group editing
- Customizable Backgrounds for Videos and Images in Windows
- Video snapshot
- Using freeze frame
- Logo Reveal For Windows
- Apply auto enhance
- Applying drop shadow
- Adjustment layer for Windows
- Transforming
- Video Editing Ruler – Windows
-
Advanced Video Editing
- Drawing Tools for Windows | Filmora Guide
- Create Multi-Camera Clip
- Compound Clip for Windows
- Multi-Clip Editing for Windows
- Filmora Motion Blur | Windows
- Filmora Flicker Removal Guide | Windows
- Apply mask to video
- Creating a PIP effect
- Keyframe Graph Editor for Windows
- Add animation keyframing for Windows
- Keyframe Path Curve for Windows
-
AI-Powered Video Editing
- Smart Scene Cut for Windows
- Smart Short Clips for Windows
- AI Face Mosaic for Windows
- Filmora AI Eye Contact- Windows
- AI Video Enhancer for Windows
- AI Text-to-Video for Windows
- Planar Tracking for Windows
- AI Idea to Video for Windows
- Filmora Image to Video for Windows
- Filmora Image to Prompt for Windows
- Instant Cutter Tool for Windows
- AI Extend
- Filmora AI Relight - Windows
- Filmora AI Image Enhancer Guide - Windows
- AI Script to Video Guide for Windows
- AI Text-Based Editing for Windows
- AI Mate Editing for Windows
- Create with instant mode
- ChatGPT Plugin - AI Copywriting
- AI Smart Cutout
- Lens correction on Windows
- Auto reframe video
- AI Portrait Cutout
- Scene detection feature
- AI Smart Masking for Windows
- Make motion tracking
- Video Stabilization for Windows
- AI Video/Photo Object Remover for Windows
- AI Smart Search for Windows
- AI Skin Tone Protection for Windows
- AI Image for Windows
- Chroma key (green screen)
- Super Slow Motion with Optical Flow for Windows
- Video Denoise for Windows
-
-
Audio Editing for Windows
-
Basic Audio Editing
-
Advanced Audio Editing
-
AI-Powered Audio Editing
-
-
Text Editing for Windows
-
Basic Text Editing
-
Advanced Text Editing
-
AI-Powered Text Editing
-
-
Video Customizations
-
Video Effects
-
Audio Effects
-
Transitions
-
Stickers
-
Filters
-
Color Editing
-
Animations
-
Templates
-
Asset Center
-
-
Exporting & Share & Cloud Backup
What is Proxy Video Editing
Once all the video clips you'd like to use in your next video are transferred from the camera to a computer and organized properly, you can start thinking about the most efficient way of piecing them together.
That's where the creation of proxy files comes in, as you don't have to work with the original size RAW files. Instead, you can create proxies that are significantly smaller than the video files your camera has captured and still export the video in the 4K or UHD resolution.
How Does a Proxy Work
- Proxy video editing is a great option if the computer you’re using for editing has a modest amount of RAM or if its processor is not powerful enough to support the demanding tasks of applying complex visual effects.
- Even though proxy files can shorten the amount of time you need to spend in the editing room, this video editing technique is only useful in a particular context.
How to Create and Use Proxy in Filmora
Video content creators who often shoot their videos with action cameras and other devices that can record video in 4K resolution can easily create proxy files in Filmora.
- Install the software and create a new project.
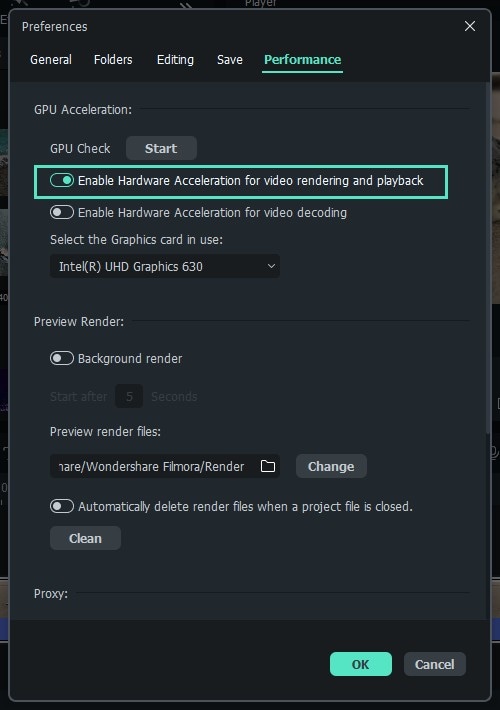
- Head over to the File menu, and find Preferences option. Alternatively, you can use the shortcut “CTRL+SHIFT+,” to bring up the Preferences window and then click on the Performance tab.
- First, Click Enable GPU Acceleration and Hardware Acceleration. Run a GPU Check if can’t find the Graphics card you’re using.
- Scroll down and option and Automatically create proxies when media resolution is higher than: option in the Proxy menu, and pick either 1280x720p or 1920x1080p resolution.
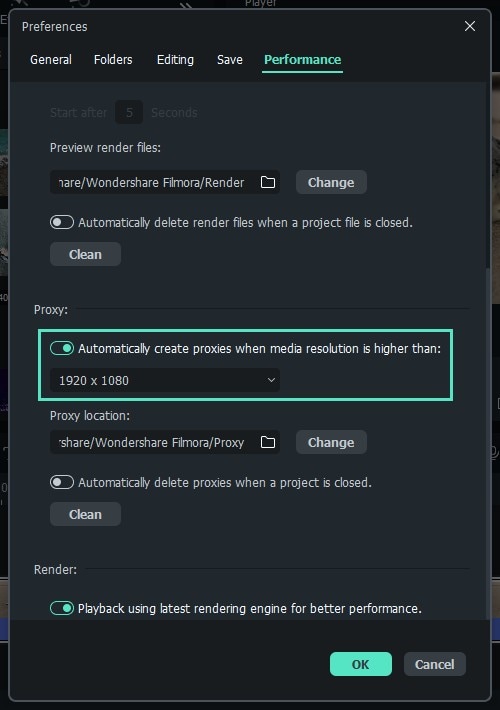
- You can also choose a folder on your computer's hard drive where all proxy media files are saved.
- In case you want to delete all proxy files you created after you've completed a project, you can enable the Automatically delete proxies when a project is closed option and then click on the OK button.
- Go to the Media Panel to start importing media files you'd like to use in your project and Filmora will automatically create proxies for each file that has a resolution that is higher than the resolution you've specified earlier.
Note:
Filmora is going to need to create proxy files depends on the size of source files and the number of files you are transcoding at the same time.Related Posts
Featured Articles
The Best MOV to GIF Converter: A Detailed Guide to Convert MOV to GIF
Do you want to convert your videos into GIFs? This article covers all the necessary steps to make high-quality GIFs quickly using the best MOV to GIF converter.
What is Pinterest? Everything You Need to Know to Get Started
Wondering what is Pinterest? Read on to know all about this popular social media platform. Use Wondershare Filmora to create captivating Pinterest video pins.
From Raw to Refined – Everything You Need to Know About Instagram Video Editing
Learn how to edit an Instagram video and create engaging content that will stand out in other videos. Pick up some beginner-friendly tips and tricks, and step up your Instagram game today!
Recommended User Guide
HDR
The HDR (Highly Dynamic Range) function mainly targets semi-professionals or professionals whose devices support HDR. HDR materials shot by users or obtained from other channels can be edited, previewed, and exported in Filmora.
GPU Driver Requirements and GPU Accelerated Rendering
This article provides insight into GPU Accelerated and Hardware Decoding/Encoding in Filmora and Filmora Media Encoder.
