For the Best Results, Use the Latest Version.
-
Preparations
-
Account
-
Get Started & Basic Settings
-
Compatibility & Tech Specs
-
Performance Settings
-
-
Creating Projects
-
Creating New Projects
-
-
Importing & Recording
-
Video Editing for Windows
-
Basic Video Editing
- Enable/Disable Clip in Windows
- Magnetic Timeline for Windows
- Drawing Tools fo Windows
- Dual Monitor Setup for Video Editing on Windows
- Select All Clips on Timeline for Windows
- Dual Monitor Setup for Video Editing on Mac
- Manage Timeline and Tracks
- Auto Ripple for Windows
- Split & trim video
- Crop & Pan & Zoom Video
- Compositing
- Change video playback speed
- Playing videos in reverse
- Mark In and Mark Out for Windows
- Markers for Windows
- Group editing
- Customizable Backgrounds for Videos and Images in Windows
- Video snapshot
- Using freeze frame
- Logo Reveal For Windows
- Apply auto enhance
- Applying drop shadow
- Adjustment layer for Windows
- Transforming
- Video Editing Ruler – Windows
-
Advanced Video Editing
-
AI-Powered Video Editing
- Smart Scene Cut for Windows
- Smart Short Clips for Windows
- AI Face Mosaic for Windows
- AI Video Enhancer
- AI Text-to-Video for Windows
- Planar Tracking
- AI Idea to Video for Windows
- Image to Video for Windows
- Instant Cutter Tool for Windows
- AI Extend
- AI Script to Video Guide for Windows
- AI Text-Based Editing for Windows
- AI Mate Editing for Windows
- Create with instant mode
- ChatGPT Plugin - AI Copywriting
- AI Smart Cutout
- Lens correction
- Auto reframe video
- AI Portrait Cutout
- Scene detection feature
- AI Smart Masking for Windows
- Make motion tracking
- Stabilization
- AI Video/Photo Object Remover for Windows
- AI Smart Search for Windows
- AI Skin Tone Protection for Windows
- AI Image for Windows
- Chroma key (green screen)
- Super Slow Motion with Optical Flow for Windows
- Video Denoise for Windows
-
-
Audio Editing for Windows
-
Basic Audio Editing
-
Advanced Audio Editing
-
AI-Powered Audio Editing
-
-
Text Editing for Windows
-
Basic Text Editing
-
Advanced Text Editing
-
AI-Powered Text Editing
-
-
Video Customizations
-
Video Effects
-
Audio Effects
-
Transitions
-
Stickers
-
Filters
-
Color Editing
-
Animations
-
Templates
-
Asset Center
-
-
Exporting & Share & Cloud Backup
ChatGPT Plugin - AI Copywriting
Copywriting is a powerful tool for selling your products or services through a copy leveraging call-to-action text. Humans have been using this tool for a long time; however, the introduction of AI Copywriting has just transformed the overall scenario with its quality and speed.
Similarly, the new version of Filmora on Windows now offers AI Copywriting to auto-generate your video scripts, captions, and more with ChatGPT. In this guide, you’ll learn how to use AI Copywriting in Wondershare Filmora:
Before Video Creation
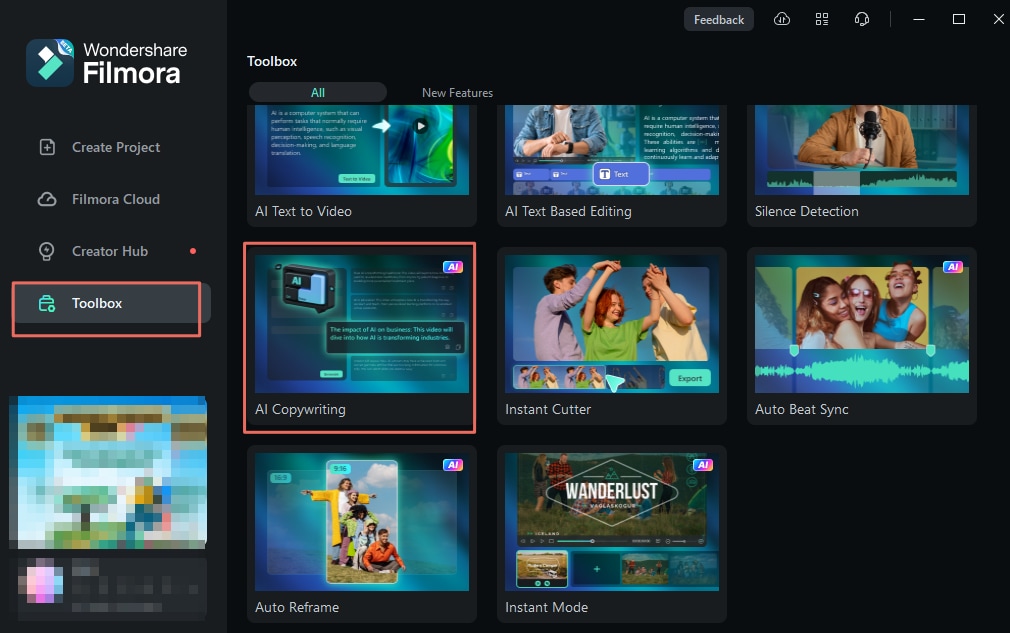
Step 1: Launch Wondershare Filmora and Access AI Copywriting
First, start Wondershare Filmora ( 12.1.8 above) on your Windows computer and proceed to the "Toolbox" category from the left panel. Then, continue to select the "AI Copywriting" button on the available screen to open another window.
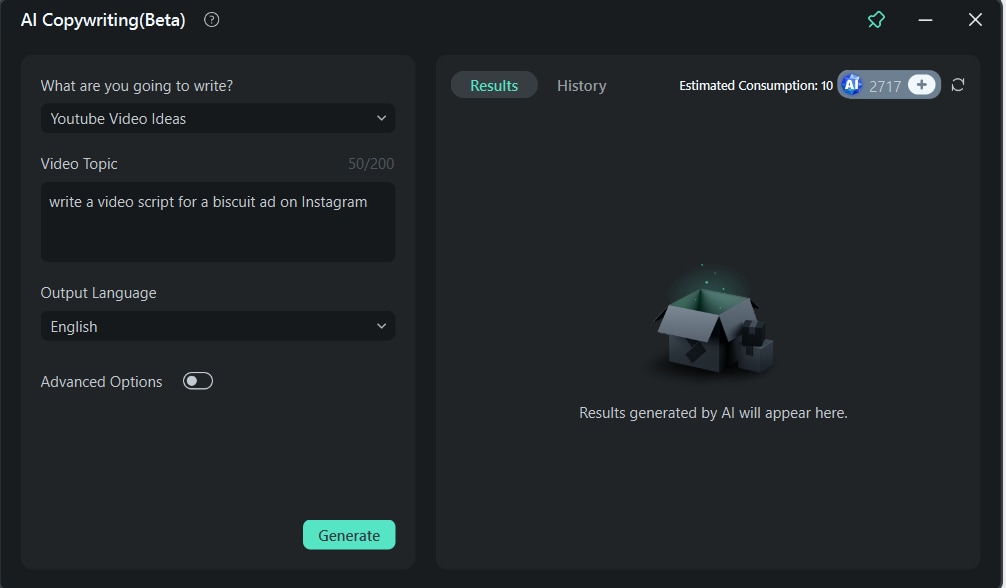
Step 2: Ask Questions to Generate Pre-Video Content
Select your content type, enter your video topic, choose the output language, generate the text, and then review and edit it as needed.
During Video Editing
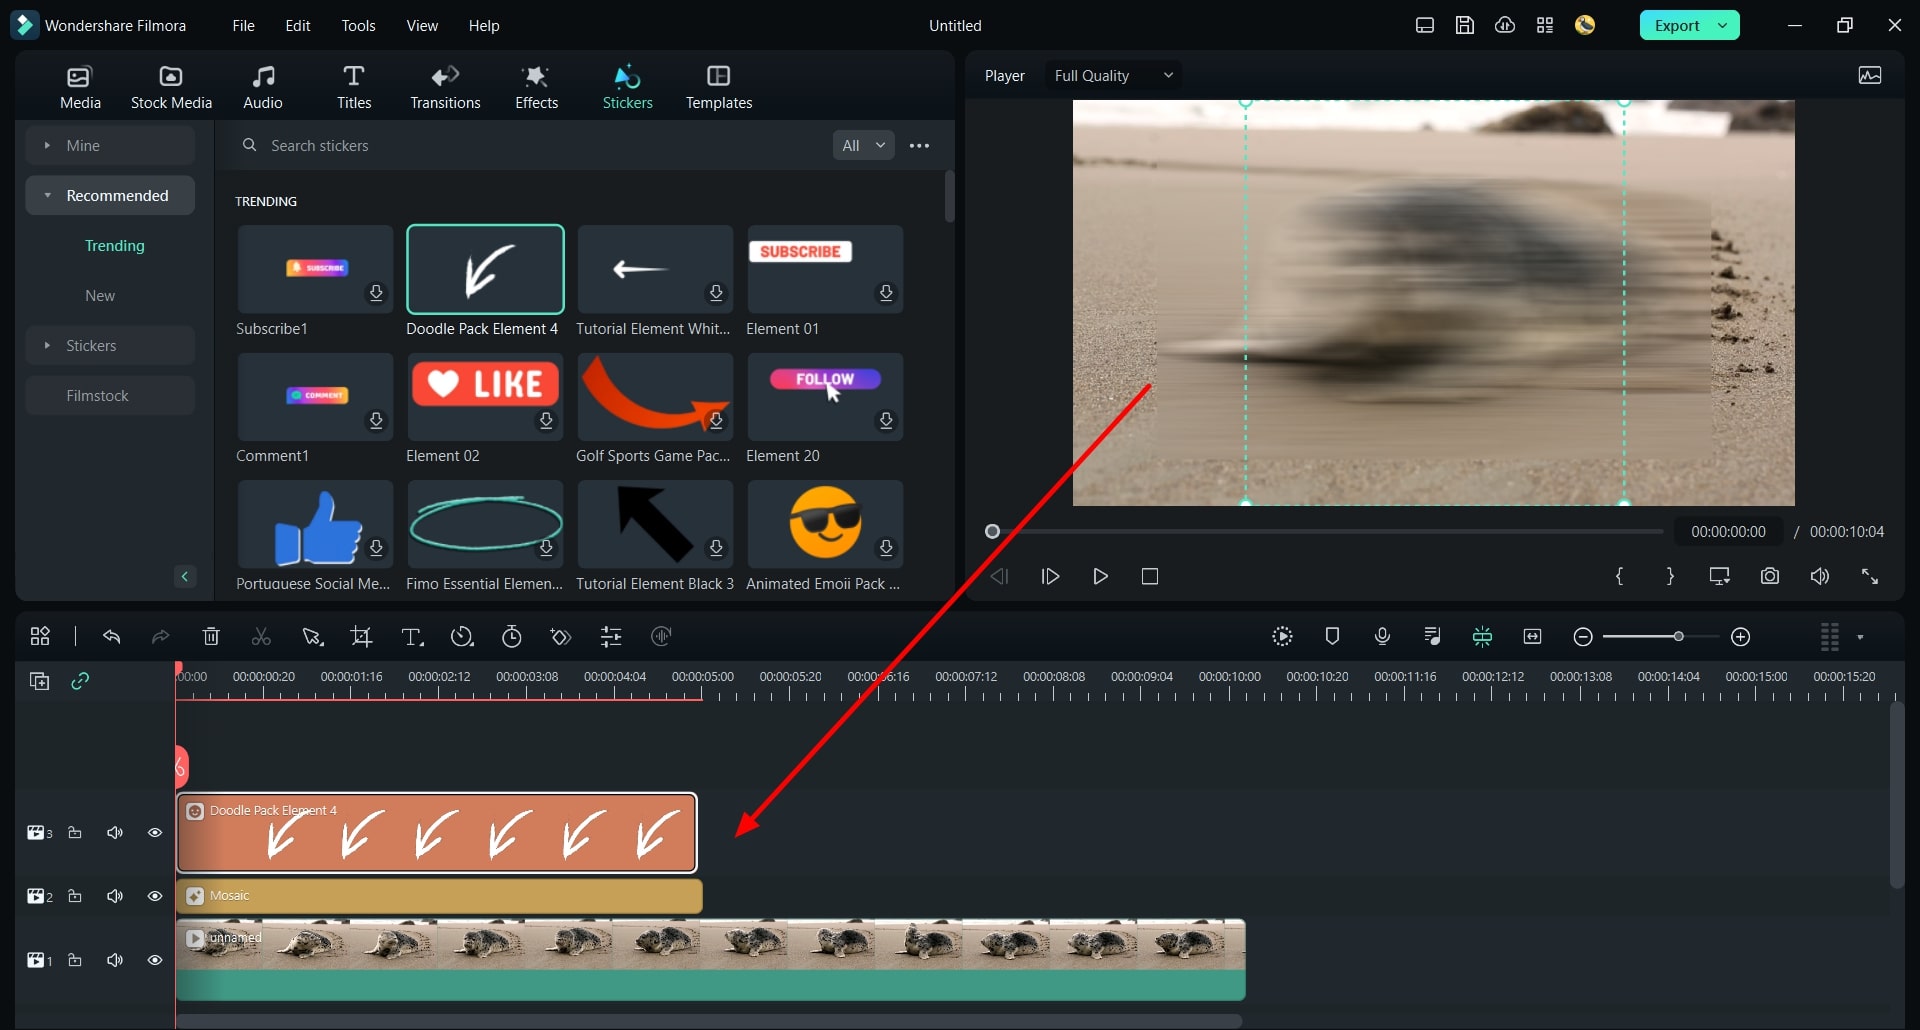
Step 1: Open Filmora and Create a Project
The first step involves launching Wondershare Filmora on your Windows device and continuing to select the "New Project" button in the "Create Project" section. This will launch the editing interface of Wondershare Filmora, where you can apply necessary effects, elements, stickers, and transitions to your video, apart from other numerical adjustments.
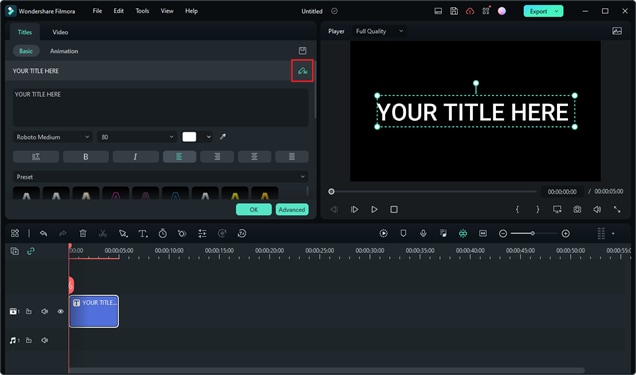
Step 2: Open AI Copywriting Alongside Filmora Project
Along with creating a new project, you have two options to access Filmora’s AI Copywriting. You can launch the "AI Copywriting" tool before creating a new project or get access to it when you are editing the Text in the Timeline. Double click the Text element in the Timeline and a customization panel will pop up. You can tap the AI icon in the top right corner of the Title tab.
After Video Editing
Step 1: Create a Project and Export the Final Video
In another scenario, you can create an entire video on Wondershare Filmora and proceed to the "Export" window to save the edited file. For such cases, you can make use of AI Copywriting for the optimization of the video name and generate social media titles for your created videos. Hence, after completing a video, click the "Export" button to open a new window.
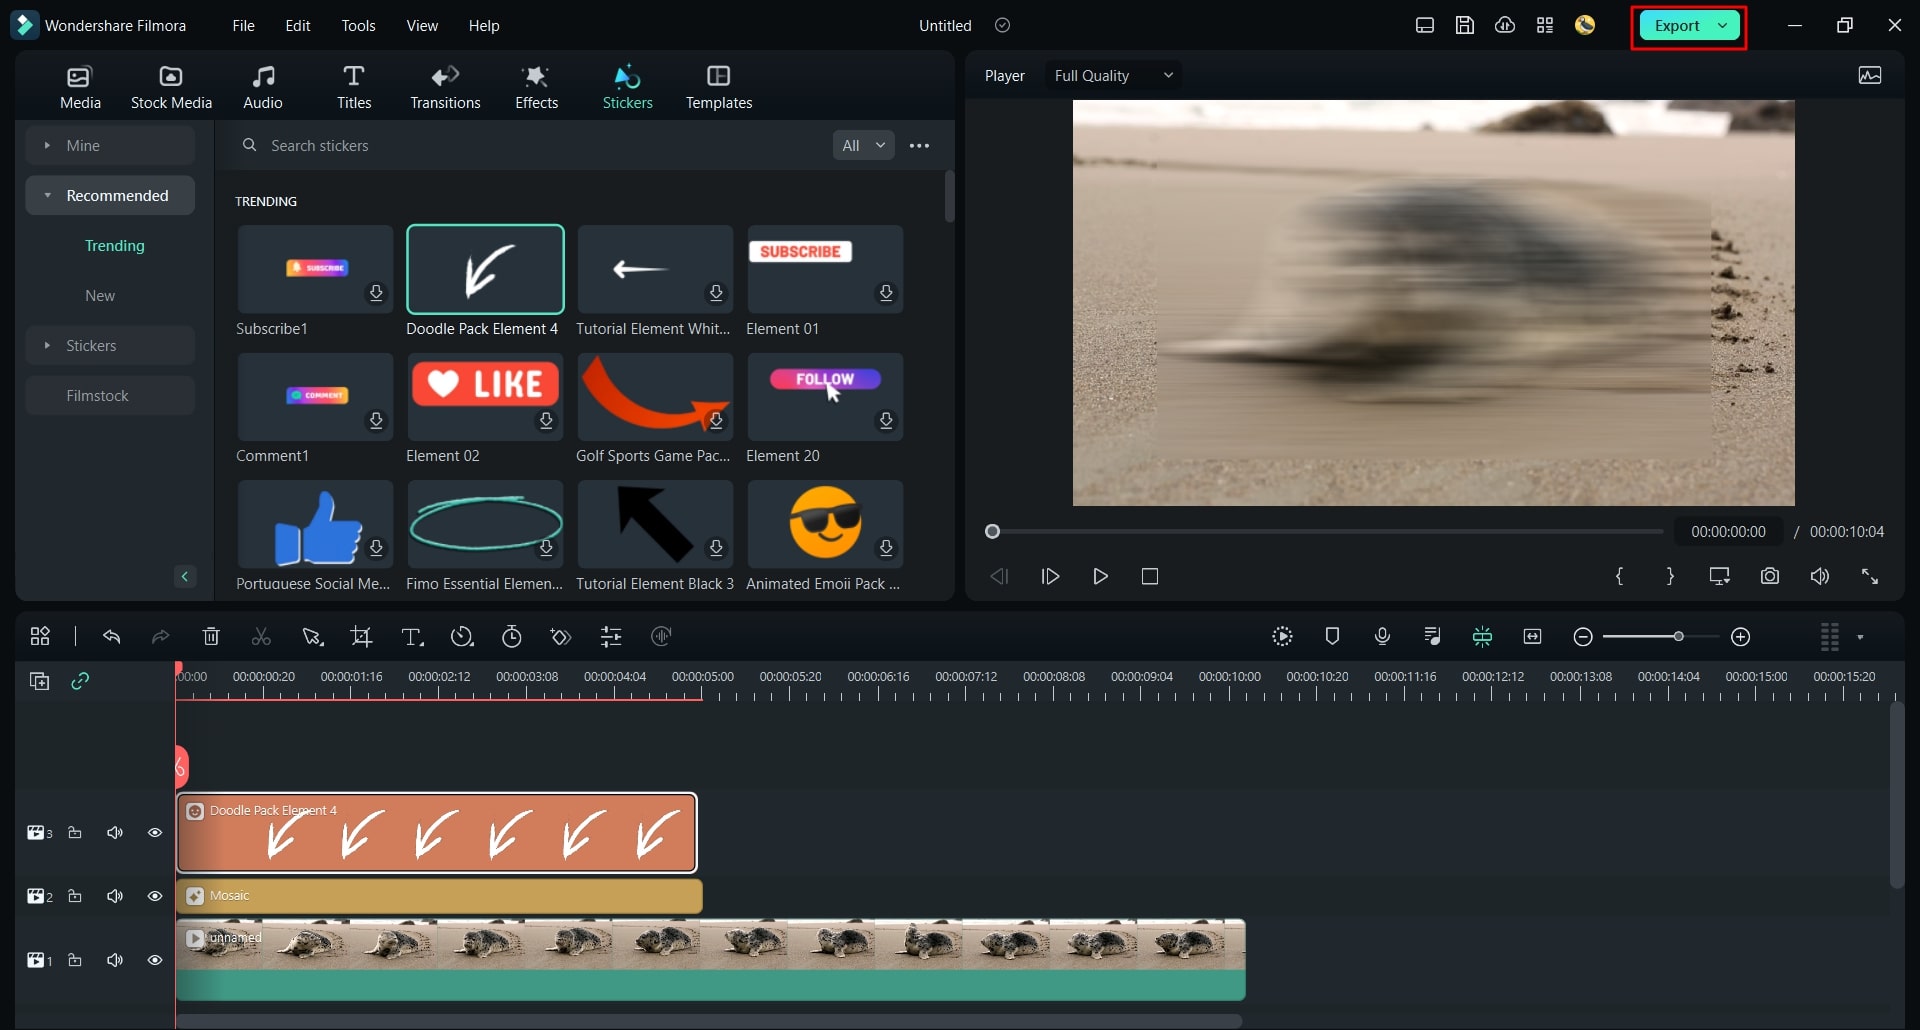
Step 2: Open AI Copywriting Tool in Export Window
As you find yourselves in the “Export” window, click the “AI” button appearing adjacent to the “Name” option in the window. This will launch the AI Copywriting tool where you can ask a question against the video title and click “Submit.”
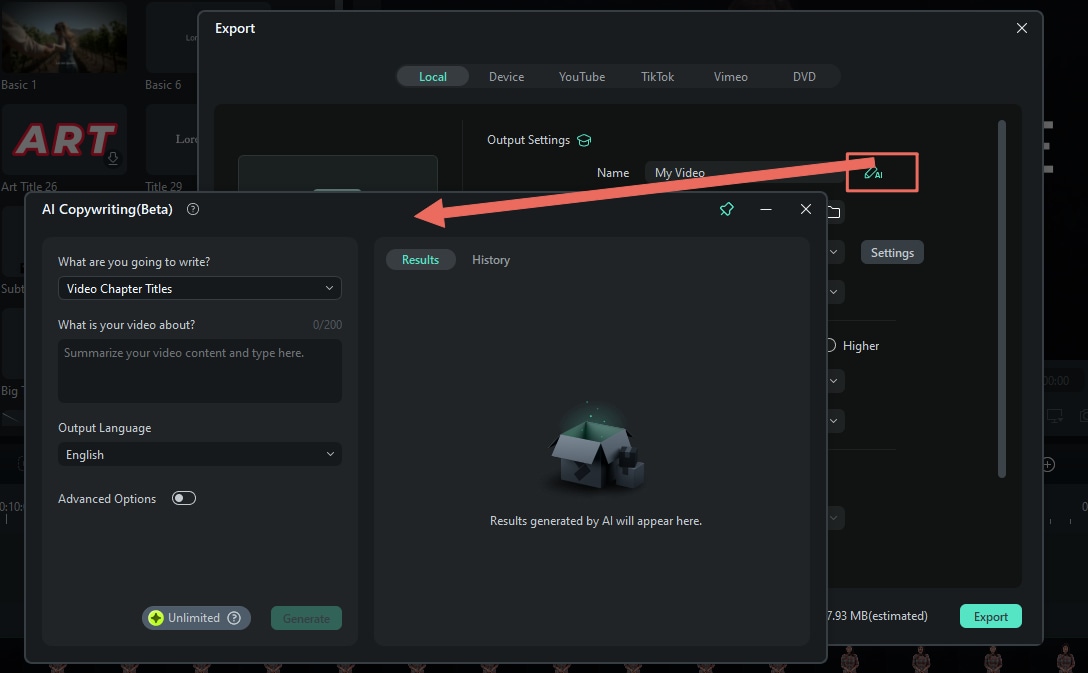
Step 3: Use AI Copywriting While Exporting Video
Even if you have tapped on the "Export" button and proceeded to conclude the creation of your video, you can still utilize the AI Copywriting tool for a title and description for your social media. As you select the AI Copywriting option appearing on the video exporting screen, the window opens where you can ask the respective questions.
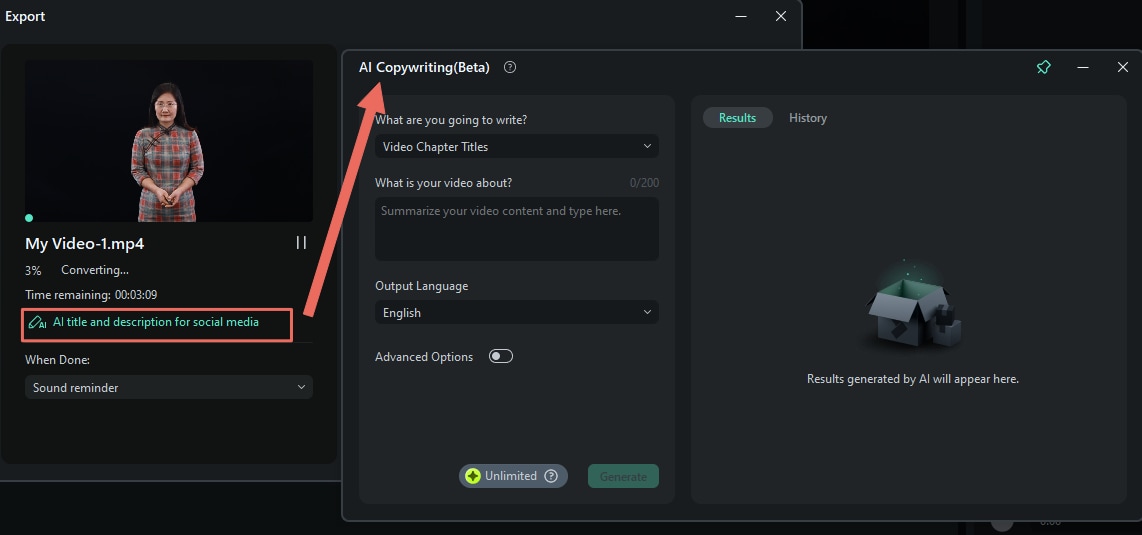
Related Posts
Featured Articles
Top Ways To Execute YouTube Logo Background Remove [2025]
Do you want to make the logo of your video look aesthetic? Read this article to learn how to execute the YouTube logo background removal using the right tool.
How to Schedule a YouTube Video?
Explore the quick method to schedule a video on YouTube and other social media platforms in this guide.
Video Editing Tricks: Duplicate an Actor Using Green Screen
Learn how to duplicate actors in videos using Wondershare Filmora's green screen or split screen features. Create engaging content with ease!
Recommended User Guide
Chroma key (green screen)
Learn how to use Chroma Key( Green Screen) in Filmora 11.
AI Portrait Cutout
Learn how to add AI portrait effects.
Smart Scene Cut for Windows
This guide explains how to use Smart Scene Cut in your videos on Windows.
