For the Best Results, Use the Latest Version.
-
Preparations
-
Account
-
Get Started & Basic Settings
-
Compatibility & Tech Specs
-
Performance Settings
-
-
Creating Projects
-
Creating New Projects
-
-
Importing & Recording
-
Video Editing for Windows
-
Basic Video Editing
- Enable/Disable Clip in Windows
- Magnetic Timeline for Windows
- Dual Monitor Setup for Video Editing on Windows
- Select All Clips on Timeline for Windows
- Manage Timeline and Tracks on Windows
- Auto Ripple for Windows
- Split & trim video
- Crop & Pan & Zoom Video in Filmora for Windows
- Compositing
- Change Video Speed on Windows
- Playing videos in reverse
- Mark In and Mark Out for Windows
- Markers for Windows
- Group editing
- Customizable Backgrounds for Videos and Images in Windows
- Video snapshot
- Using Freeze Frame in Filmora for Windows
- Logo Reveal For Windows
- Auto Enhance in Filmora for Windows
- Applying drop shadow
- Adjustment layer for Windows
- Apply Transforming for Windows
- Video Editing Ruler – Windows
-
Advanced Video Editing
- Drawing Tools for Windows | Filmora Guide
- Create Multi-Camera Clip in Filmora for Windows
- Compound Clip for Windows
- Multi-Clip Editing for Windows
- Filmora Motion Blur | Windows
- Filmora Flicker Removal Guide | Windows
- Apply mask to video
- Creating a PIP Effect for Windows
- Keyframe Graph Editor for Windows
- Add animation keyframing for Windows
- Keyframe Path Curve for Windows
-
AI-Powered Video Editing
- Smart Scene Cut for Windows
- Smart Short Clips for Windows
- AI Face Mosaic for Windows
- Filmora AI Eye Contact- Windows
- AI Video Enhancer for Windows
- AI Text-to-Video for Windows
- Planar Tracking for Windows
- AI Idea to Video for Windows
- Filmora Image to Video for Windows
- Filmora Image to Prompt for Windows
- Instant Cutter Tool for Windows
- AI Extend
- Filmora AI Relight - Windows
- Filmora AI Image Enhancer Guide - Windows
- AI Script to Video Guide for Windows
- AI Text-Based Editing for Windows
- AI Mate Editing for Windows
- Instant Mode in Filmora
- ChatGPT Plugin - AI Copywriting
- AI Smart Cutout for Windows
- Lens correction on Windows
- Auto Reframe Video for Windows
- AI Portrait Cutout
- Scene detection feature
- AI Smart Masking for Windows
- Motion Tracking on Windows
- Video Stabilization for Windows
- AI Video/Photo Object Remover for Windows
- AI Smart Search for Windows
- AI Skin Tone Protection for Windows
- AI Image for Windows
- Chroma key (green screen)
- Super Slow Motion with Optical Flow for Windows
- Video Denoise for Windows
-
-
Audio Editing for Windows
-
Basic Audio Editing
-
Advanced Audio Editing
-
AI-Powered Audio Editing
- Auto synchronization
- AI Sound Effects in Filmora for Windows
- Smart BGM Generation on Windows
- AI Voice Enhancer in Filmora
- AI Voice Cloning in Wondershare Filmora
- AI Music Generator for Windows
- Audio To Video
- AI Vocal Remover for Windows
- AI Auto Beat Sync for Windows
- AI Audio Stretch for Windows
- AI Audio Denoise for Windows
- Silence Detection on Windows
-
-
Text Editing for Windows
-
Basic Text Editing
-
Advanced Text Editing
-
AI-Powered Text Editing
-
-
Video Customizations
-
Video Effects
-
Audio Effects
-
Transitions
-
Stickers
-
Filters
-
Color Editing
-
Animations
-
Templates
-
Asset Center
-
-
Exporting & Share & Cloud Backup
AI Text-Based Editing for Windows
Filmora now offers dedicated AI Text-Based Editing to make video editing easier. It is a progressive step in video editing because users can auto-remove the silent clips from a video and trim or cut a video through text. To explore more about this function and its utility, check the detailed guide for it:
Index
How to Enable Text-Based Editing for Windows
There are several alternative approaches to enable text-based editing on Windows, and this guide is going to reveal all of them for you below:
Method 1: Using the AI Text Based Editing from the Main Menu
Step 1: Launch Filmora and Select AI Text Clipper
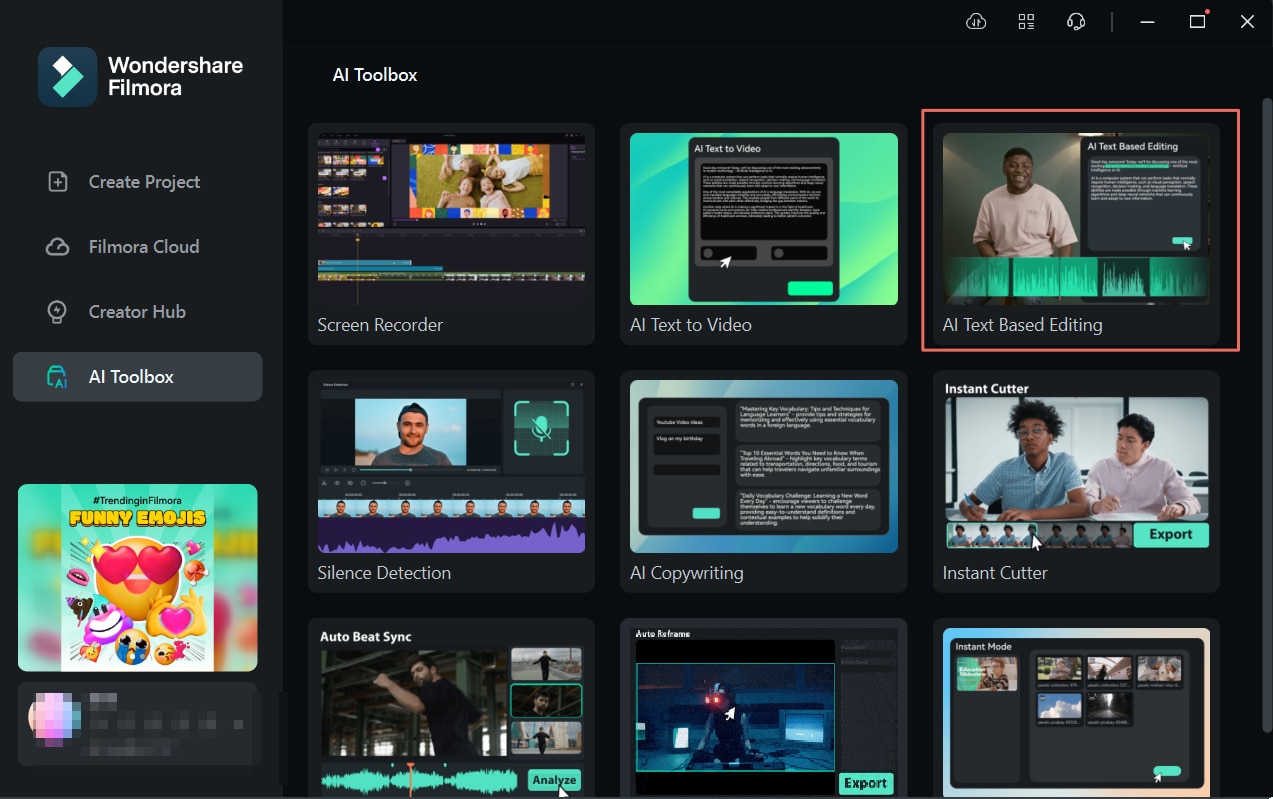
Before using this feature, download and install the Filmora V13 software on your PC. Once it is successfully downloaded, launch it and login or sign up accordingly. Hover the mouse towards the settings panel and select "Create Project". Then, from the options appearing on the main screen, select "AI Text Based Editing".
Step 2: Import Files and Enable Text-Based Editing
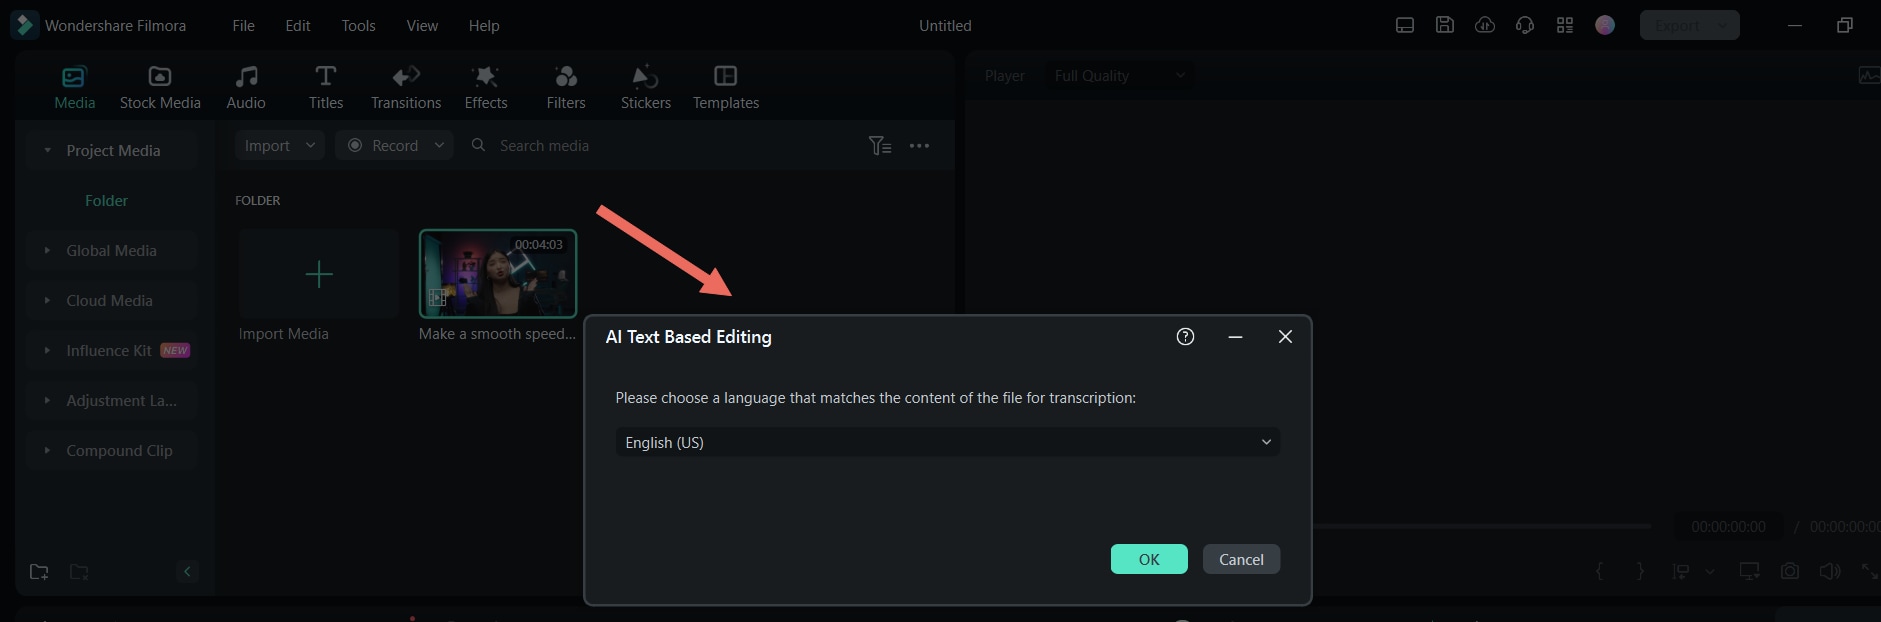
After selecting the AI Text Based Editing, your device's "File Explorer" will appear. Double-click on the clip you want to edit, leading to a mini-window. Select "Text-based editing" from the available options and choose your preferred language. By clicking on the "OK" button, the video will start transcribing for editing through texts, and you'll be able to see the conversion progress.
Step 3: Start Text-Based Editing
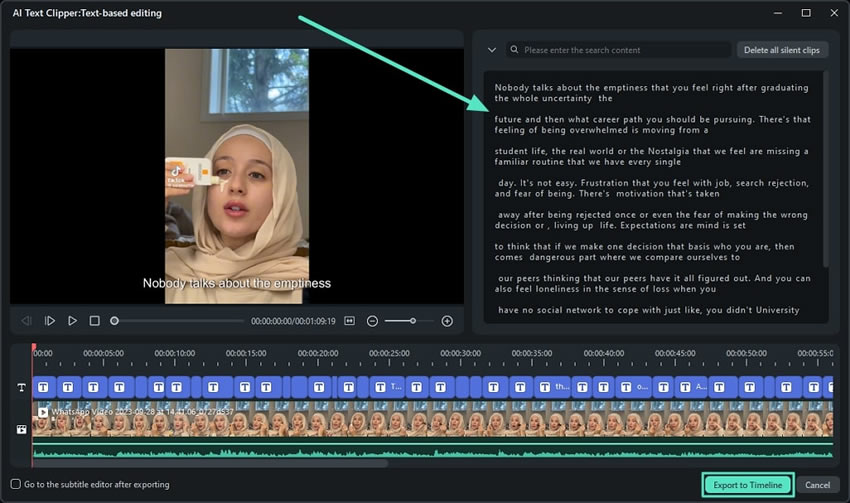
Once the conversion is complete, the editing window will appear. Users can eliminate a portion of the video by removing a text by utilizing the text box on the right side. In addition, they can search for a particular word or phrase or apply the "Delete all silent clips" option for further optimization. Upon making the desired edits, click the "Export to Timeline" button at the bottom right corner.
Step 4: Additional Adjustments and Export
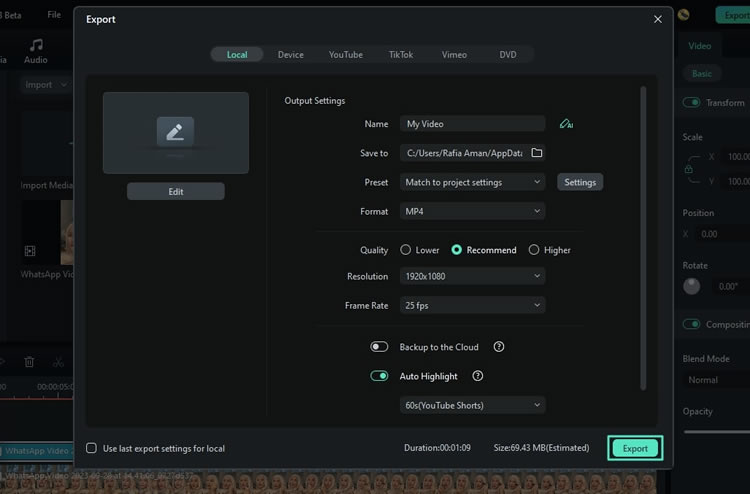
Now that your video is in the timeline panel, you can experiment with the visual and audio elements of the clip. Users can enhance audio quality, adjust color, and add multiple effects or transitions. Once the desired settings are made, navigate towards the top right corner and tap on the "Export" button. From the export window, adjust settings and click "Export" again to finalize.
We will be looking into some techniques that can be used to access the similar AI text-based feature in Filmora:
Method 2: Using the Timeline Dropdown Menu
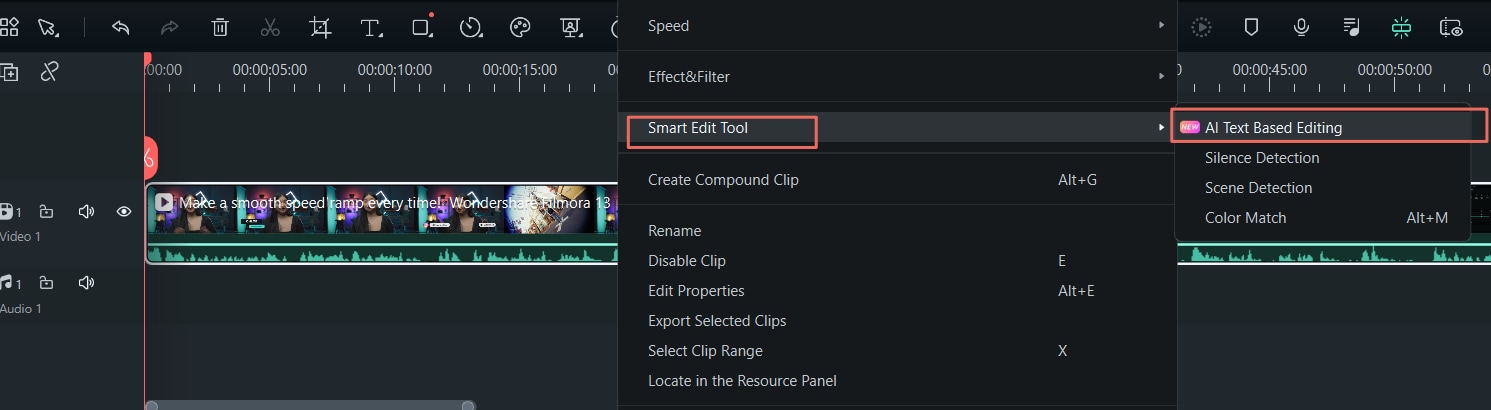
Another way of accessing this feature is from the timeline toolbar. After importing media into the timeline panel, select and right-click on it. A dropdown menu will appear; scroll down and choose the "Smart Edit Tool" option from the available ones. Furthermore, select the "AI Text Based Editing" option. Furthermore, follow the same process of editing and importing the video.
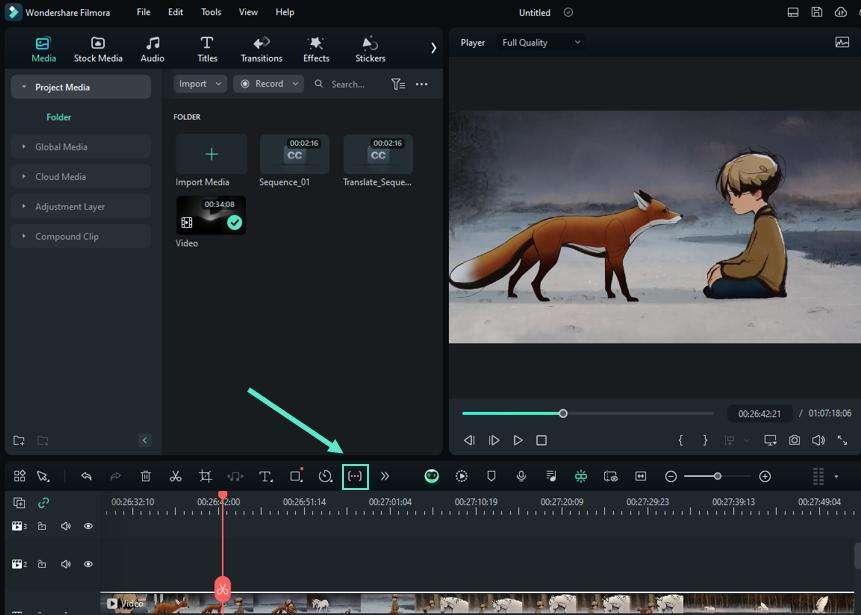
Method 3: Using the Timeline Toolbar
Select the clip in the timeline, and navigate towards the timeline toolbar to select the "More" icon. Select the "AI Text Based Editing" option across the dropdown menu. Continue to select "Text-based Editing", after selecting a language, click "OK". Afterward, the process of editing and importing this edited clip is the same as before.

Related Posts
Featured Articles
Pop Art Filter: How to Turn Photos into Pop Art?
Turn ordinary photos into bold, vibrant pop art creations using AI-powered filters and apps. Learn styles, tools, pro tips, and workflows to unleash your inner Warhol.
How to Convert a Video into a Cartoon or Anime with Video Cartoonizers?
If you want to transform your video content and make it look like a cartoon, check out this guide for the best ai video cartoonizer to turn videos into cartoon or anime.
How to Record A PowerPoint Presentation With Audio
Do you want to record a PowerPoint presentation with audio? Explore this article if you want to record PowerPoint with audio and find out the easy ways to do it!
Recommended User Guide
AI Idea to Video for Windows
Here is the guide on how to master the AI Idea to Video feature using Filmora on the Windows version.
Filmora AI Eye Contact- Windows
Here is the guide on how to use the AI eye contact feature in Filmora for Windows.
