For the Best Results, Use the Latest Version.
-
Preparations
-
Account
-
Get Started & Basic Settings
-
Compatibility & Tech Specs
-
Performance Settings
-
-
Creating Projects
-
Creating New Projects
-
-
Importing & Recording
-
Video Editing for Windows
-
Basic Video Editing
- Enable/Disable Clip in Windows
- Magnetic Timeline for Windows
- Dual Monitor Setup for Video Editing on Windows
- Select All Clips on Timeline for Windows
- Manage Timeline and Tracks on Windows
- Auto Ripple for Windows
- Split & trim video
- Crop & Pan & Zoom Video
- Compositing
- Change video playback speed
- Playing videos in reverse
- Mark In and Mark Out for Windows
- Markers for Windows
- Group editing
- Customizable Backgrounds for Videos and Images in Windows
- Video snapshot
- Using freeze frame
- Logo Reveal For Windows
- Apply auto enhance
- Applying drop shadow
- Adjustment layer for Windows
- Transforming
- Video Editing Ruler – Windows
-
Advanced Video Editing
- Drawing Tools for Windows | Filmora Guide
- Create Multi-Camera Clip
- Compound Clip for Windows
- Multi-Clip Editing for Windows
- Filmora Motion Blur | Windows
- Filmora Flicker Removal Guide | Windows
- Apply mask to video
- Creating a PIP effect
- Keyframe Graph Editor for Windows
- Add animation keyframing for Windows
- Keyframe Path Curve for Windows
-
AI-Powered Video Editing
- Smart Scene Cut for Windows
- Smart Short Clips for Windows
- AI Face Mosaic for Windows
- Filmora AI Eye Contact- Windows
- AI Video Enhancer for Windows
- AI Text-to-Video for Windows
- Planar Tracking for Windows
- AI Idea to Video for Windows
- Filmora Image to Video for Windows
- Filmora Image to Prompt for Windows
- Instant Cutter Tool for Windows
- AI Extend
- Filmora AI Relight - Windows
- Filmora AI Image Enhancer Guide - Windows
- AI Script to Video Guide for Windows
- AI Text-Based Editing for Windows
- AI Mate Editing for Windows
- Create with instant mode
- ChatGPT Plugin - AI Copywriting
- AI Smart Cutout
- Lens correction on Windows
- Auto reframe video
- AI Portrait Cutout
- Scene detection feature
- AI Smart Masking for Windows
- Make motion tracking
- Video Stabilization for Windows
- AI Video/Photo Object Remover for Windows
- AI Smart Search for Windows
- AI Skin Tone Protection for Windows
- AI Image for Windows
- Chroma key (green screen)
- Super Slow Motion with Optical Flow for Windows
- Video Denoise for Windows
-
-
Audio Editing for Windows
-
Basic Audio Editing
-
Advanced Audio Editing
-
AI-Powered Audio Editing
-
-
Text Editing for Windows
-
Basic Text Editing
-
Advanced Text Editing
-
AI-Powered Text Editing
-
-
Video Customizations
-
Video Effects
-
Audio Effects
-
Transitions
-
Stickers
-
Filters
-
Color Editing
-
Animations
-
Templates
-
Asset Center
-
-
Exporting & Share & Cloud Backup
GPU Driver Requirements and GPU Accelerated Rendering
1. GPU Driver Requirements
To get the best video editing experience with Filmora for Win, it is recommended to make sure your GPU meets the below requirements:
- Processor: Intel i3 or better multicore processor, 2GHz or above (Intel 6th Gen or newer CPU recommended for HD and 4K Videos).
- Operating System: Windows 11/Windows 10/Windows 8.1/Windows 7 (64-bit OS).
- RAM: 8 GB RAM (16 GB required for HD and 4K videos)
- GPU: 2GB GPU Memory
Also, keep your Win system updated to ensure your GPU Driver is up-to-date.
2. GPU Accelerated Rendering
This guide provides insight into GPU Accelerated and Hardware Decoding/Encoding in Filmora and Filmora Media Encoder.
GPU Acceleration reduces the stress that video editing software applies to the CPU and improves the speed and efficiency of this software.
Enabling GPU acceleration for video rendering, and playback saves you from waiting and improves the playback quality.
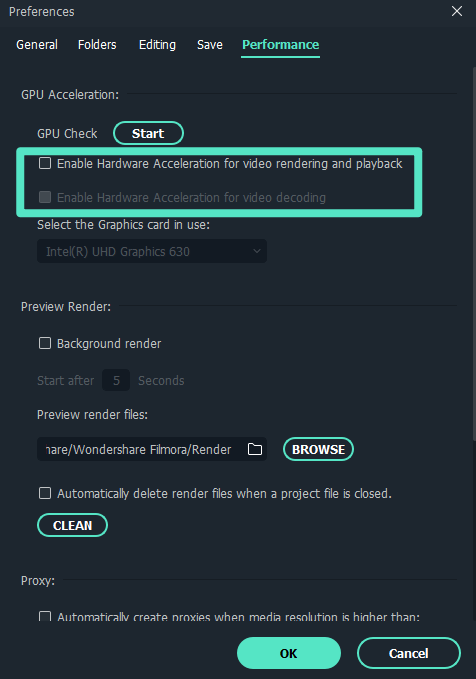
How to enable GPU Acceleration in Filmora for Win?
- ❶ Click File > Preference
- ❷ Choose the Performance Tab
- ❸ Under the GPU section, check the boxes in front of "Enable Hardware Acceleration for video rendering and playback".
- ❹ If you would also like to enable hardware acceleration for video decoding, you can also check the box in front of it.
 GPU acceleration
Related Posts
Featured Articles
How to Add Motion Graphics and Animated Stickers to Photos and Videos on Mobile?
Are you curious about how to do motion graphics in Android? Check out filmora and learn how to do it on mobile.
How to Setup a Green Screen Like A Pro
Learn how to set up a green screen like pro with this complete guide from selecting essential equipment, detailed setup instructions, and post-filming tips. Whether you’re a business, content creator, or video editor, this is the perfect blueprint for you to create stunning content!
How to Use Green Screen in Blender In Easy Steps
Are you looking for the perfect and quick guide on using the Chroma key in the Blender video editor? Open the Blender, switch to the node editor, and follow these steps!
Recommended User Guide
Proxy video editing
What is Proxy Video Editing
HDR
The HDR (Highly Dynamic Range) function mainly targets semi-professionals or professionals whose devices support HDR. HDR materials shot by users or obtained from other channels can be edited, previewed, and exported in Filmora.
