For the Best Results, Use the Latest Version.
-
Preparations
-
Account
-
Get Started & Basic Settings
-
Compatibility & Tech Specs
-
Performance Settings
-
-
Creating Projects
-
Creating New Projects
-
-
Importing & Recording
-
Video Editing for Windows
-
Basic Video Editing
- Enable/Disable Clip in Windows
- Magnetic Timeline for Windows
- Dual Monitor Setup for Video Editing on Windows
- Select All Clips on Timeline for Windows
- Manage Timeline and Tracks on Windows
- Auto Ripple for Windows
- Split & trim video
- Crop & Pan & Zoom Video
- Compositing
- Change Video Speed on Windows
- Playing videos in reverse
- Mark In and Mark Out for Windows
- Markers for Windows
- Group editing
- Customizable Backgrounds for Videos and Images in Windows
- Video snapshot
- Using freeze frame
- Logo Reveal For Windows
- Apply auto enhance
- Applying drop shadow
- Adjustment layer for Windows
- Transforming
- Video Editing Ruler – Windows
-
Advanced Video Editing
- Drawing Tools for Windows | Filmora Guide
- Create Multi-Camera Clip
- Compound Clip for Windows
- Multi-Clip Editing for Windows
- Filmora Motion Blur | Windows
- Filmora Flicker Removal Guide | Windows
- Apply mask to video
- Creating a PIP effect
- Keyframe Graph Editor for Windows
- Add animation keyframing for Windows
- Keyframe Path Curve for Windows
-
AI-Powered Video Editing
- Smart Scene Cut for Windows
- Smart Short Clips for Windows
- AI Face Mosaic for Windows
- Filmora AI Eye Contact- Windows
- AI Video Enhancer for Windows
- AI Text-to-Video for Windows
- Planar Tracking for Windows
- AI Idea to Video for Windows
- Filmora Image to Video for Windows
- Filmora Image to Prompt for Windows
- Instant Cutter Tool for Windows
- AI Extend
- Filmora AI Relight - Windows
- Filmora AI Image Enhancer Guide - Windows
- AI Script to Video Guide for Windows
- AI Text-Based Editing for Windows
- AI Mate Editing for Windows
- Create with instant mode
- ChatGPT Plugin - AI Copywriting
- AI Smart Cutout
- Lens correction on Windows
- Auto reframe video
- AI Portrait Cutout
- Scene detection feature
- AI Smart Masking for Windows
- Make motion tracking
- Video Stabilization for Windows
- AI Video/Photo Object Remover for Windows
- AI Smart Search for Windows
- AI Skin Tone Protection for Windows
- AI Image for Windows
- Chroma key (green screen)
- Super Slow Motion with Optical Flow for Windows
- Video Denoise for Windows
-
-
Audio Editing for Windows
-
Basic Audio Editing
-
Advanced Audio Editing
-
AI-Powered Audio Editing
-
-
Text Editing for Windows
-
Basic Text Editing
-
Advanced Text Editing
-
AI-Powered Text Editing
-
-
Video Customizations
-
Video Effects
-
Audio Effects
-
Transitions
-
Stickers
-
Filters
-
Color Editing
-
Animations
-
Templates
-
Asset Center
-
-
Exporting & Share & Cloud Backup
Video Denoise for Windows
Video Denoise is typically used to remove visual noise from video clips. With the magic of AI, Filmora's video denoise works great on clips that were shot in low light and high ISO environments and supports customizing the smooth level from weak, normal to strong. Let's learn how to denoise video to enhance visual clarity and quality now with a simple click today!
How to Denoise Videos in Filmora?
Index
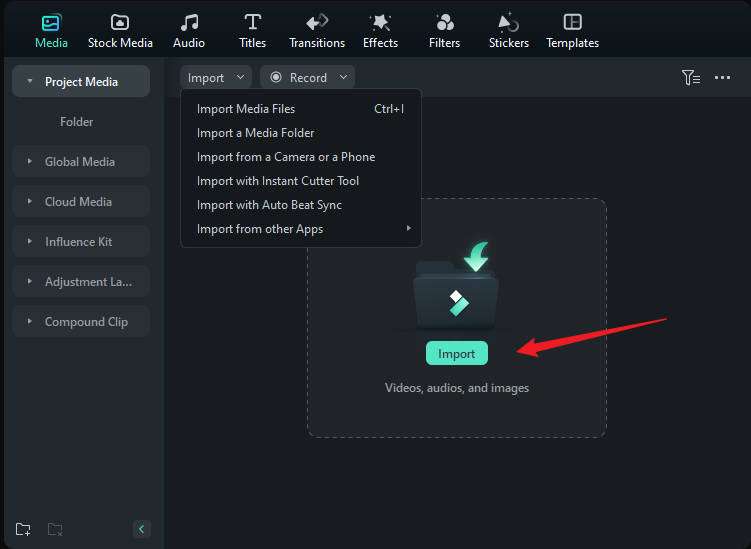
Step 1:Import the Video to Wondershare Filmora
Go to Media > and click Import to upload videos to Wondershare Filmora.
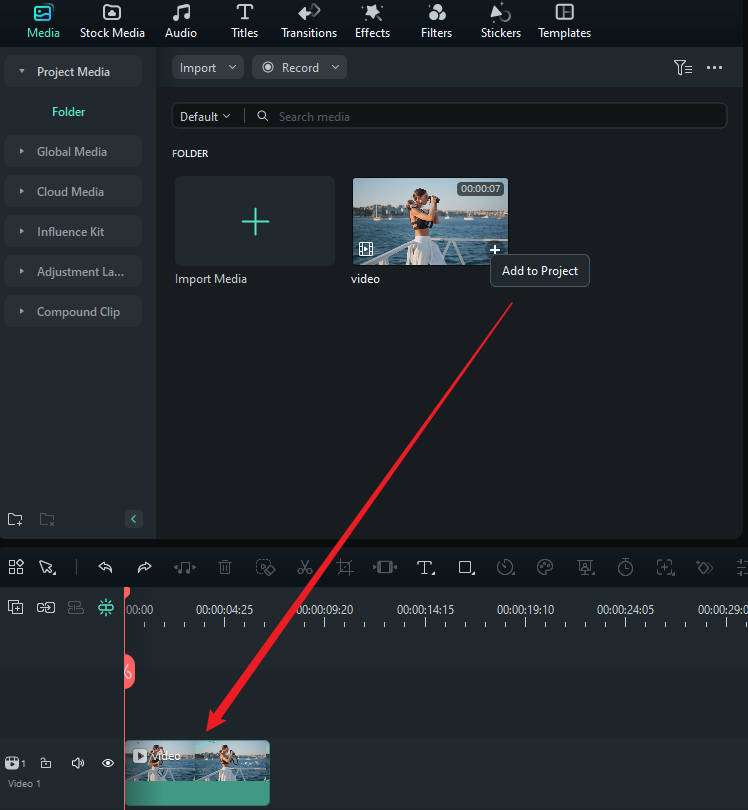
Step 2: Add the Uploaded Clip to the Timeline
Click the "+" button to add the clip to the timeline, or simply drag and drop it to the timeline.
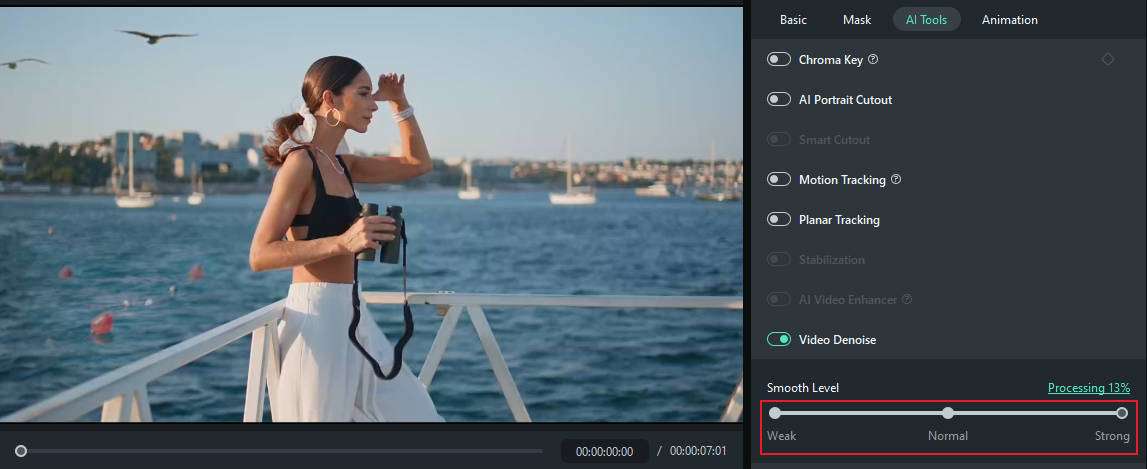
Step 3: Navigate and Switch on Video Denoise
To denoise videos, select the video clip on the timeline, go to Video > Basic > Video Denoise, and switch on the option.

At the same time, you can move the slider to adjust the smooth level to enhance visual quality. Here, you can customize it from weak to normal to strong.
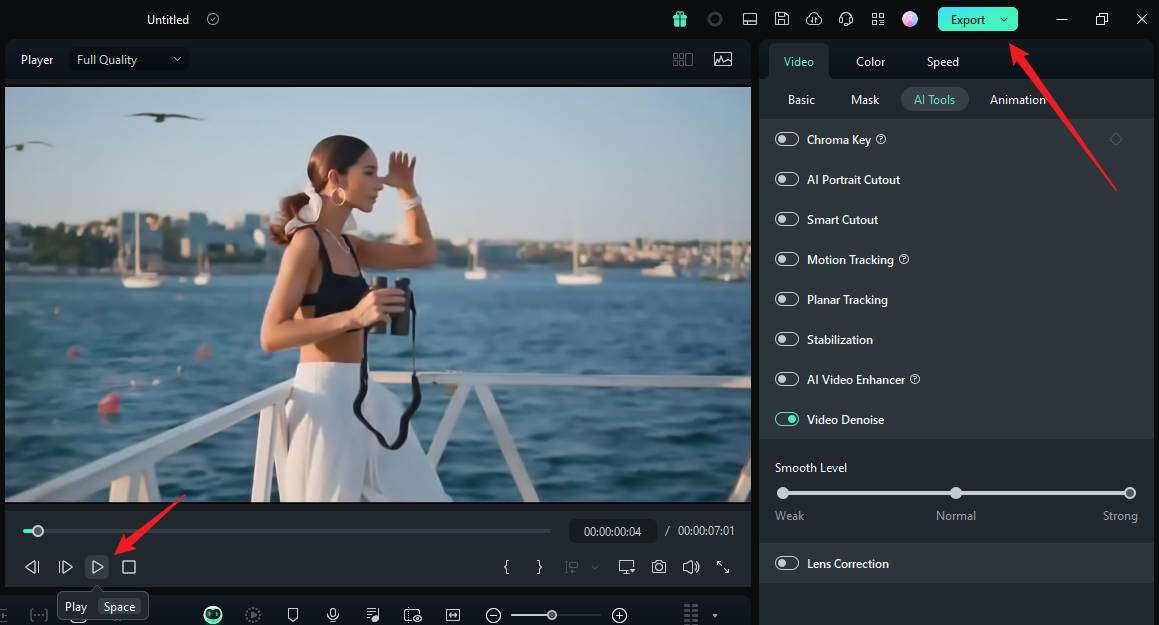
Step 4:Preview and Export the Video
Wait until the process finishes. Then, preview and export it to save.
Related Posts
Featured Articles
20 Best Stable Diffusion Pose Prompts for Beginners (Realistic & Creative Ideas)
Looking to generate realistic Stable Diffusion poses? Learn the best prompt writing practices for beginners to create AI-generated pose images.
Best Mobile Apps to Make Lyric Videos: Top 7 Picks
Ever wanted to sync visuals with your favorite song lyrics? With today’s lyric video maker apps, you can. Here are 7 of the best apps to get started.
Vertical vs Horizontal: Which Facebook Video Format Gets More Views?
Do you want to learn how to post landscape videos on Facebook while ensuring quality? Read this article to discover different methods that serve the purpose.
Recommended User Guide
AI Smart Cutout
This guide helps you remove the background of an image or a video. The AI Smart Cutout is good at cutting an image out and performs well in identifying needed sections in a continuous clip.
AI Mate Editing for Windows
AI assistants play an essential role during editing, and with Filmora's new AI Mate Editing feature, users can ask for valuable insights about their videos.
AI Extend
This is a guide for how to extend your video with our AI
