For the Best Results, Use the Latest Version.
-
Preparations
-
Account
-
Get Started & Basic Settings
-
Compatibility & Tech Specs
-
Performance Settings
-
-
Creating Projects
-
Creating New Projects
-
-
Importing & Recording
-
Video Editing for Windows
-
Basic Video Editing
- Enable/Disable Clip in Windows
- Magnetic Timeline for Windows
- Dual Monitor Setup for Video Editing on Windows
- Select All Clips on Timeline for Windows
- Manage Timeline and Tracks on Windows
- Auto Ripple for Windows
- Split & trim video
- Crop & Pan & Zoom Video
- Compositing
- Change video playback speed
- Playing videos in reverse
- Mark In and Mark Out for Windows
- Markers for Windows
- Group editing
- Customizable Backgrounds for Videos and Images in Windows
- Video snapshot
- Using freeze frame
- Logo Reveal For Windows
- Apply auto enhance
- Applying drop shadow
- Adjustment layer for Windows
- Transforming
- Video Editing Ruler – Windows
-
Advanced Video Editing
- Drawing Tools for Windows | Filmora Guide
- Create Multi-Camera Clip
- Compound Clip for Windows
- Multi-Clip Editing for Windows
- Filmora Flicker Removal Guide | Windows
- Apply mask to video
- Creating a PIP effect
- Keyframe Graph Editor for Windows
- Add animation keyframing for Windows
- Keyframe Path Curve for Windows
-
AI-Powered Video Editing
- Smart Scene Cut for Windows
- Smart Short Clips for Windows
- AI Face Mosaic for Windows
- AI Video Enhancer for Windows
- AI Text-to-Video for Windows
- Planar Tracking for Windows
- AI Idea to Video for Windows
- Filmora Image to Video for Windows
- Filmora Image to Prompt for Windows
- Instant Cutter Tool for Windows
- AI Extend
- Filmora AI Relight - Windows
- Filmora AI Image Enhancer Guide - Windows
- AI Script to Video Guide for Windows
- AI Text-Based Editing for Windows
- AI Mate Editing for Windows
- Create with instant mode
- ChatGPT Plugin - AI Copywriting
- AI Smart Cutout
- Lens correction on Windows
- Auto reframe video
- AI Portrait Cutout
- Scene detection feature
- AI Smart Masking for Windows
- Make motion tracking
- Video Stabilization for Windows
- AI Video/Photo Object Remover for Windows
- AI Smart Search for Windows
- AI Skin Tone Protection for Windows
- AI Image for Windows
- Chroma key (green screen)
- Super Slow Motion with Optical Flow for Windows
- Video Denoise for Windows
-
-
Audio Editing for Windows
-
Basic Audio Editing
-
Advanced Audio Editing
-
AI-Powered Audio Editing
-
-
Text Editing for Windows
-
Basic Text Editing
-
Advanced Text Editing
-
AI-Powered Text Editing
-
-
Video Customizations
-
Video Effects
-
Audio Effects
-
Transitions
-
Stickers
-
Filters
-
Color Editing
-
Animations
-
Templates
-
Asset Center
-
-
Exporting & Share & Cloud Backup
Adjustment Layer for Windows
This guide shows how to create adjustment layers and use them to apply the same effect to multiple clips on the timeline.
Adjustment layers apply color, animation, and effects to the video without complicated changes or settings.
Usage Scenarios
When you wish to edit a video but not directly destruct the original one, Adjustment Layer is the best solution for you. It allows you to make different settings and re-edit at any time without tampering with the original clips. Besides, the layer can be saved as a preset template and used directly several times for variable objects.
Apply Adjustment Layer to Videos on Windows
Here is how to apply the layer to the video on Windows:
Step 1: Add video to the processing interface
Launch the Filmora application. Then, drag your needed media to the timeline at the bottom of the page.
Step 2: Activate Adjustment Layer
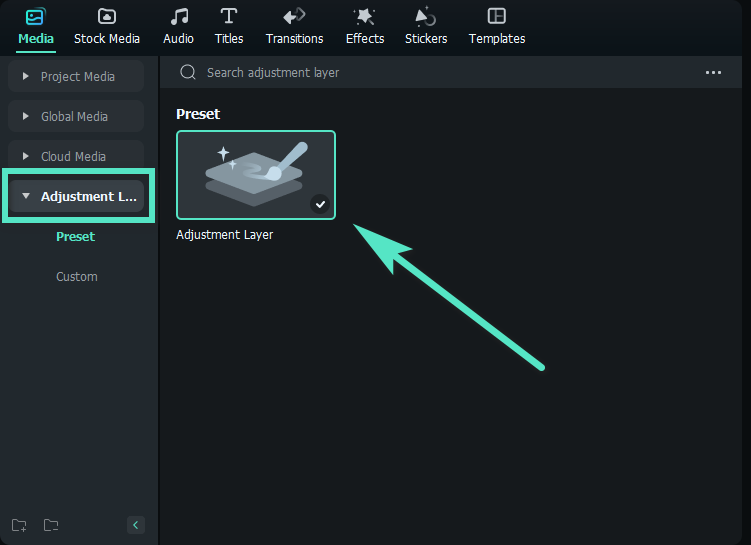
Select Media>Adjustment Layer, then click Preset to create a new adjustment layer. Alternatively, you can click Custom if you want to find a saved adjustment layer as the preset. Drag the Adjustment Layer to the timeline above the video clip.

Step 3: Change the settings
Drag the Adjustment Layer in the timeline back and forth to cover some or all parts of the video clip. Then, click the Adjustment Layer to launch the settings. The settings window will appear on the right side of the page.

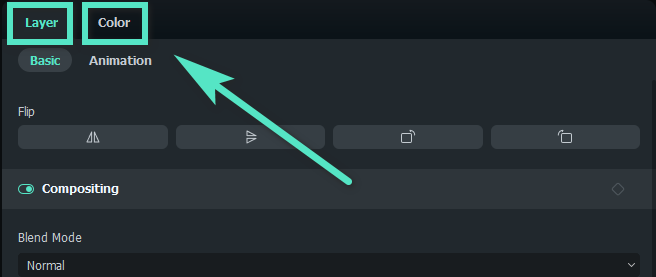
You can adjust the layer from two aspects, Layer and Color. The Layer section contains Animation and Basic settings, such as Transform — Scale, Position, Flip & Rotate, Rotate, Compositing — Blend Mode, Opacity, and Auto Enhance. Plus, you can modify the color from aspects of Basic, HSL, or Curves.
When you are done, click Save as Custom.

Tip: In the Color>Basic tab, a variety of presets are built into the system, offering you multiple convenient choices.
Step 4: Add more effects
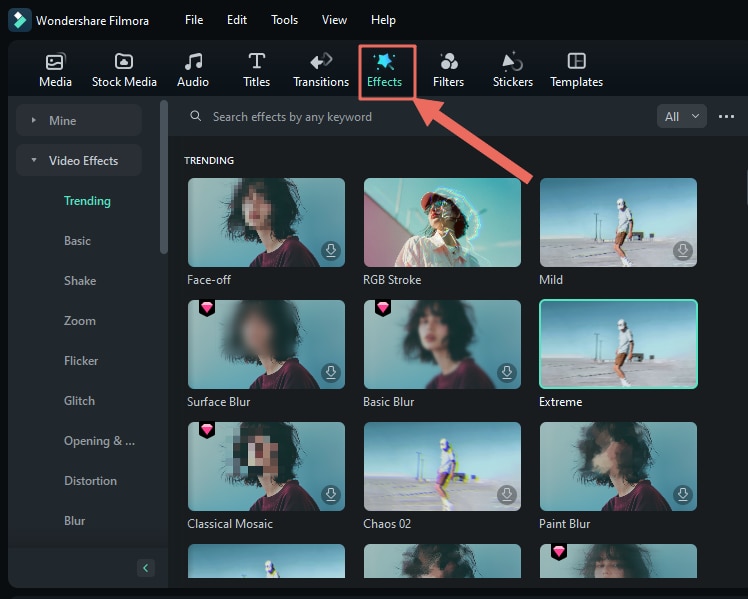
Click Effects in the upper left toolbar. Discover what you like from various options in Filmora. You can select the one from Mine>Download or find an ideal one from the online stock. Then, drag the effect to the Adjustment Layer in the timeline.

If you want to adjust the effect, go back to the Adjustment Layer on the right side of the screen. The Effects column is automatically shown on the interface.
Remove Adjustment Layer
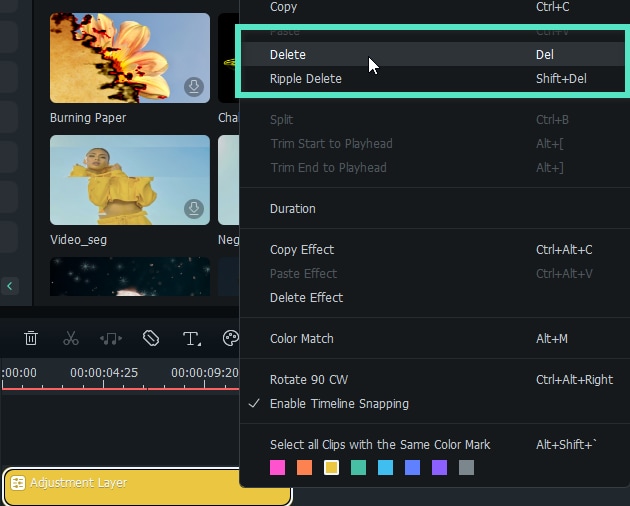
If you want to remove the Adjustment Layer, right-click the mouse on the Adjustment Layer in the timeline and select Delete. Alternatively, you can click Reset in the settings window to delete the specific modifications.

Related Posts
Featured Articles
How to Transcribe Spotify Podcasts in 2026: Free and Easy Tools
Are you looking for a solution to Spotify podcast transcripts that is free and convenient? Check out this article now, as it covers it in detail.
Best 5 Tools to Restore Old Photos with AI
Discover the best 5 tools to restore old photos and learn how to fix fading, scratches, and discoloration to bring your precious memories back to life.
Trending Twitter Videos: Discover the Hottest Clips on X (Twitter) Today
Explore the exciting world of trending videos on Twitter (X). From funny memes to breaking news, discover viral clips and learn how Filmora can boost your content!
Recommended User Guide
Video snapshot
Learn how to use Video Snapshot in FIlmora.
Using freeze frame
Learn how to use Freeze Frame in Filmora 11
Logo Reveal For Windows
Do you seek a way to quickly create brand value with your product logo? Learn how Wondershare Filmora automatically creates impressive logo reveal animations.


