For the Best Results, Use the Latest Version.
-
Preparations
-
Account
-
Get Started & Basic Settings
-
Compatibility & Tech Specs
-
Performance Settings
-
-
Creating Projects
-
Creating New Projects
-
-
Importing & Recording
-
Video Editing for Windows
-
Basic Video Editing
- Enable/Disable Clip in Windows
- Magnetic Timeline for Windows
- Dual Monitor Setup for Video Editing on Windows
- Select All Clips on Timeline for Windows
- Manage Timeline and Tracks on Windows
- Auto Ripple for Windows
- Split & trim video
- Crop & Pan & Zoom Video
- Compositing
- Change video playback speed
- Playing videos in reverse
- Mark In and Mark Out for Windows
- Markers for Windows
- Group editing
- Customizable Backgrounds for Videos and Images in Windows
- Video snapshot
- Using freeze frame
- Logo Reveal For Windows
- Apply auto enhance
- Applying drop shadow
- Adjustment layer for Windows
- Transforming
- Video Editing Ruler – Windows
-
Advanced Video Editing
- Drawing Tools for Windows | Filmora Guide
- Create Multi-Camera Clip
- Compound Clip for Windows
- Multi-Clip Editing for Windows
- Filmora Flicker Removal Guide | Windows
- Apply mask to video
- Creating a PIP effect
- Keyframe Graph Editor for Windows
- Add animation keyframing for Windows
- Keyframe Path Curve for Windows
-
AI-Powered Video Editing
- Smart Scene Cut for Windows
- Smart Short Clips for Windows
- AI Face Mosaic for Windows
- AI Video Enhancer for Windows
- AI Text-to-Video for Windows
- Planar Tracking for Windows
- AI Idea to Video for Windows
- Filmora Image to Video for Windows
- Filmora Image to Prompt for Windows
- Instant Cutter Tool for Windows
- AI Extend
- Filmora AI Relight - Windows
- Filmora AI Image Enhancer Guide - Windows
- AI Script to Video Guide for Windows
- AI Text-Based Editing for Windows
- AI Mate Editing for Windows
- Create with instant mode
- ChatGPT Plugin - AI Copywriting
- AI Smart Cutout
- Lens correction on Windows
- Auto reframe video
- AI Portrait Cutout
- Scene detection feature
- AI Smart Masking for Windows
- Make motion tracking
- Video Stabilization for Windows
- AI Video/Photo Object Remover for Windows
- AI Smart Search for Windows
- AI Skin Tone Protection for Windows
- AI Image for Windows
- Chroma key (green screen)
- Super Slow Motion with Optical Flow for Windows
- Video Denoise for Windows
-
-
Audio Editing for Windows
-
Basic Audio Editing
-
Advanced Audio Editing
-
AI-Powered Audio Editing
-
-
Text Editing for Windows
-
Basic Text Editing
-
Advanced Text Editing
-
AI-Powered Text Editing
-
-
Video Customizations
-
Video Effects
-
Audio Effects
-
Transitions
-
Stickers
-
Filters
-
Color Editing
-
Animations
-
Templates
-
Asset Center
-
-
Exporting & Share & Cloud Backup
Create Multi-Camera Clip
Create Multi-Camera Clip lets you combine footage from multiple cameras into a cohesive sequence. You can sync clips by setting in-and-out points or using audio-based syncing for precise alignment. This feature simplifies multi-camera editing, making crafting polished, dynamic presentations from various angles easy.
Multi-Camera Editing Tool
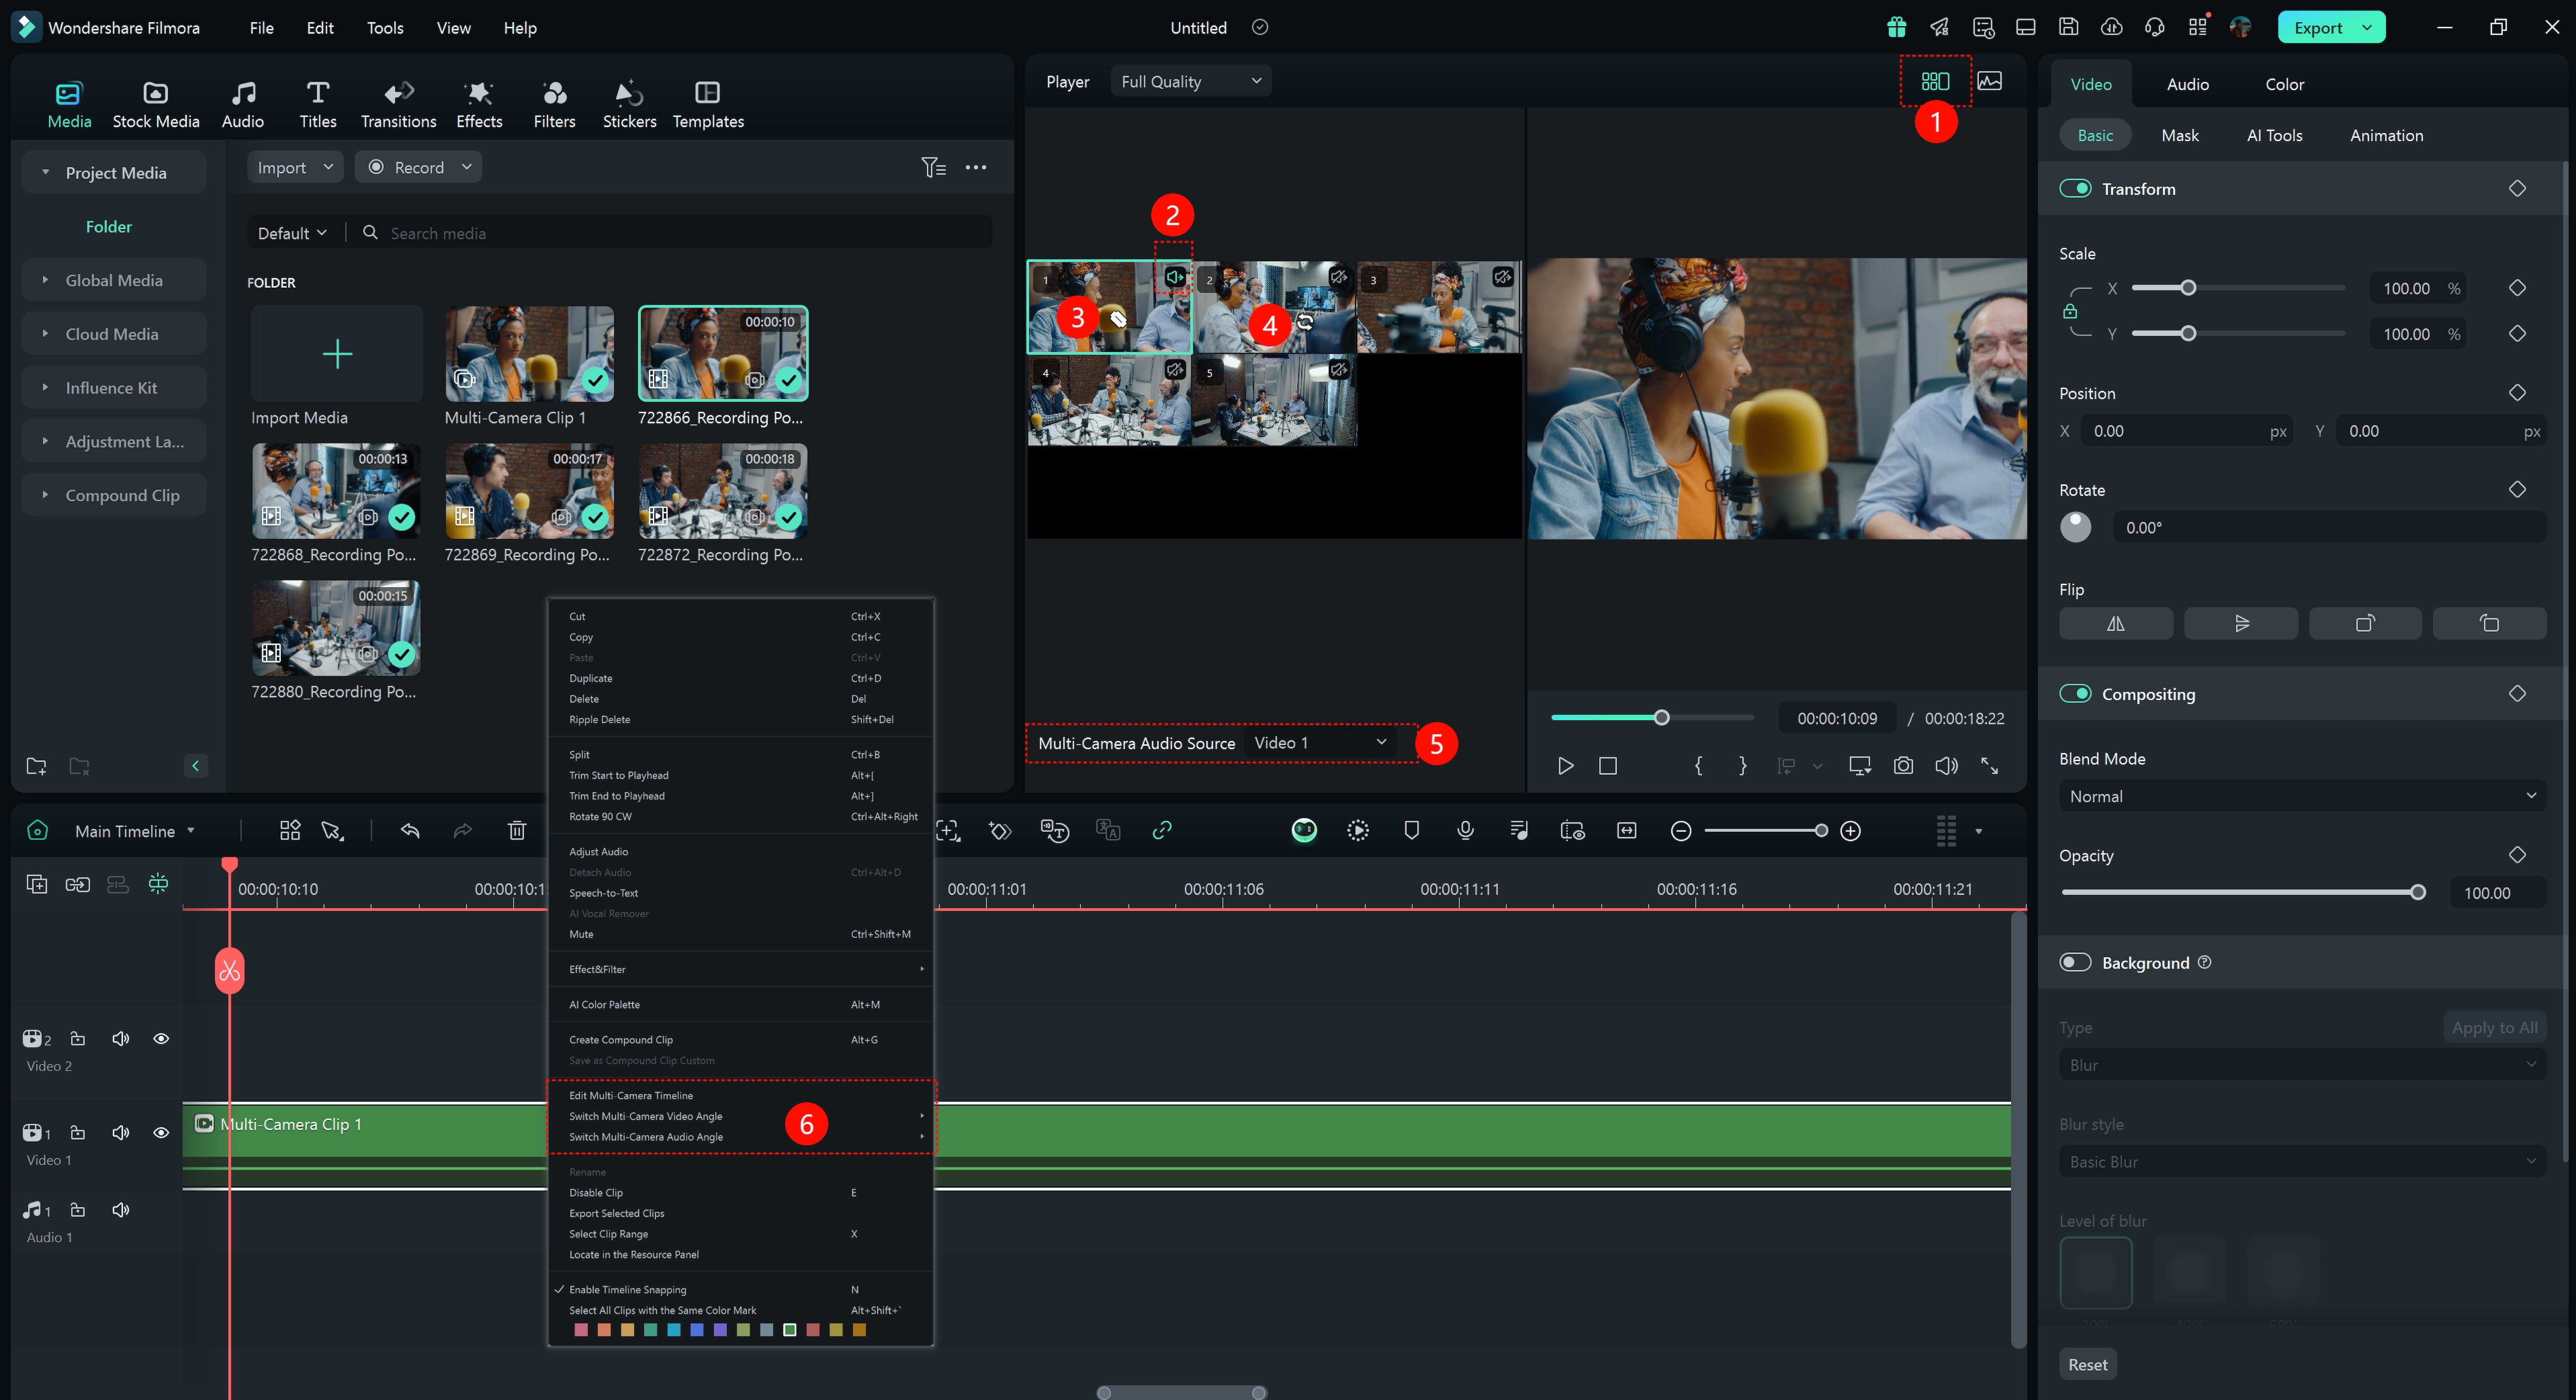
① Multi-Camera View Button: Click to open the multi-camera view.
② Multi-Camera Audio Source: Activate the icon to export the audio from the selected camera angle to the multi-camera editing.
③ Multi-Camera Trim Cursor: During playback, hover the mouse over the multi-camera view to switch between multi-camera clips.
④ Multi-Camera Replacement Cursor: In pause mode, select a multi-camera clip. When the cursor is over the clip, clicking on a different view in the multi-camera interface will replace the currently selected camera angle.
⑤ Multi-Camera Audio Source: Display the audio sources of the audio tracks.
⑥ Timeline Right-Click Menu Options:
- Edit Multi-Camera Timeline: Click to open the multi-camera timeline, similar to double-clicking the multi-camera clip. (Note: double-clicking the clip is ineffective in classic layout)
- Switch Multi-Camera Video Angle: Replace the camera angle of the selected clip, similar to the Multi-Camera Replacement Cursor.
- Switch Multi-Camera Audio Angle: Switch the audio track of the multi-camera clip, similar to the ②and⑤.
Multi-camera editing workflow
If you want to easily import footage from multiple cameras and seamlessly switch between angles for an efficient and convenient editing experience, follow the detailed steps below:
Step 1: Create a New Project
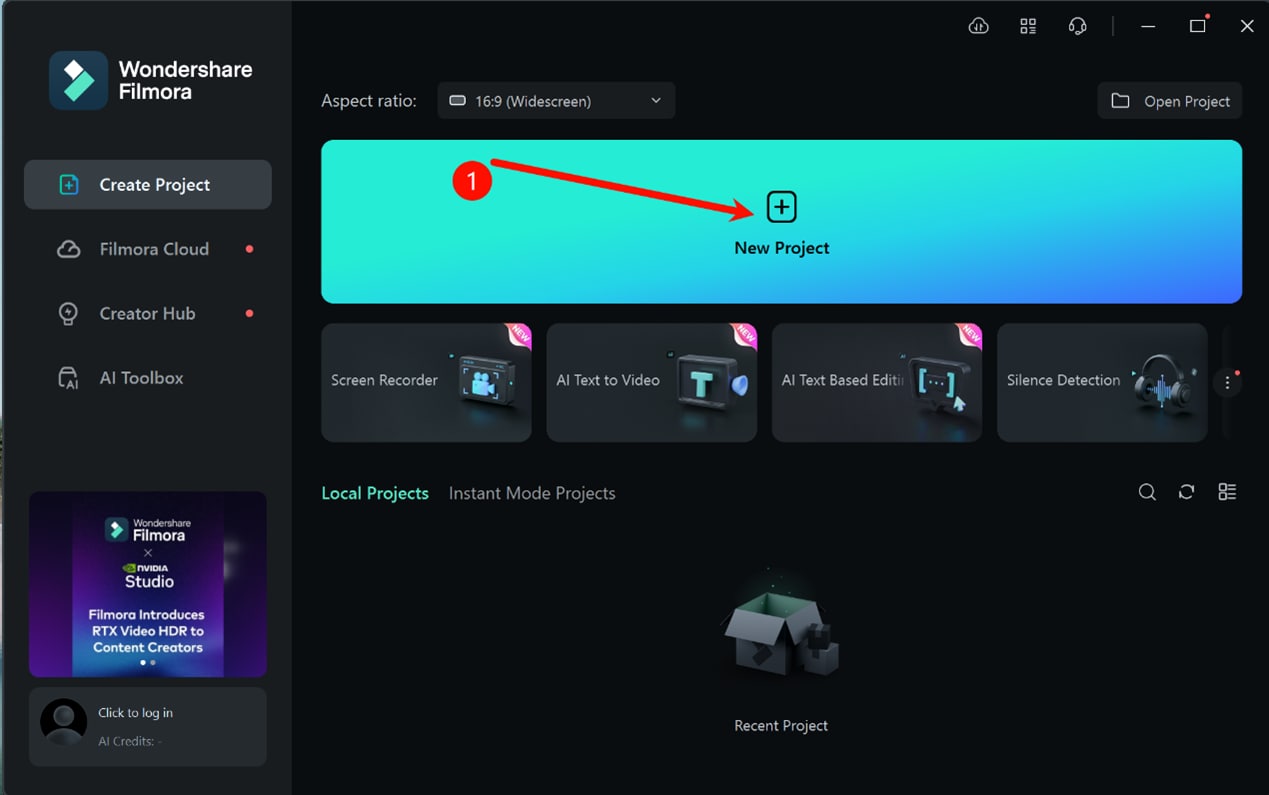
Once you download Filmora and log in to your account, navigate towards the left side panel and click the "Create Project" option. This will bring up many tabs on the main screen; find and choose the "New Project" option.
Step 2: Import footage
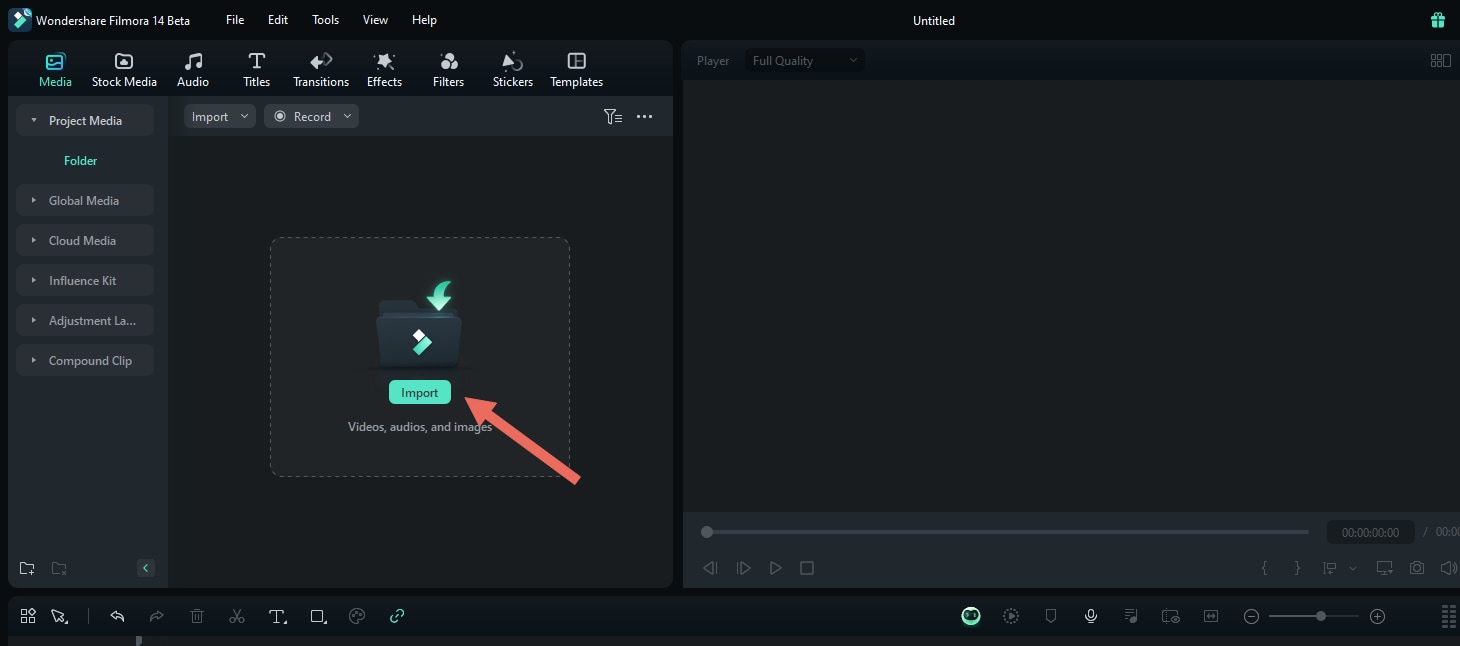
From the editing window, go to the "Media" tab in the custom toolbar and then select the "Import" option on the media screen to import media.
Step 3: Create Multi-Camera Clip (Two Methods)
Method 1:Select multi-camera video or audio clips in the media bin, right-click, and choose "Create Multi-Camera Clip."
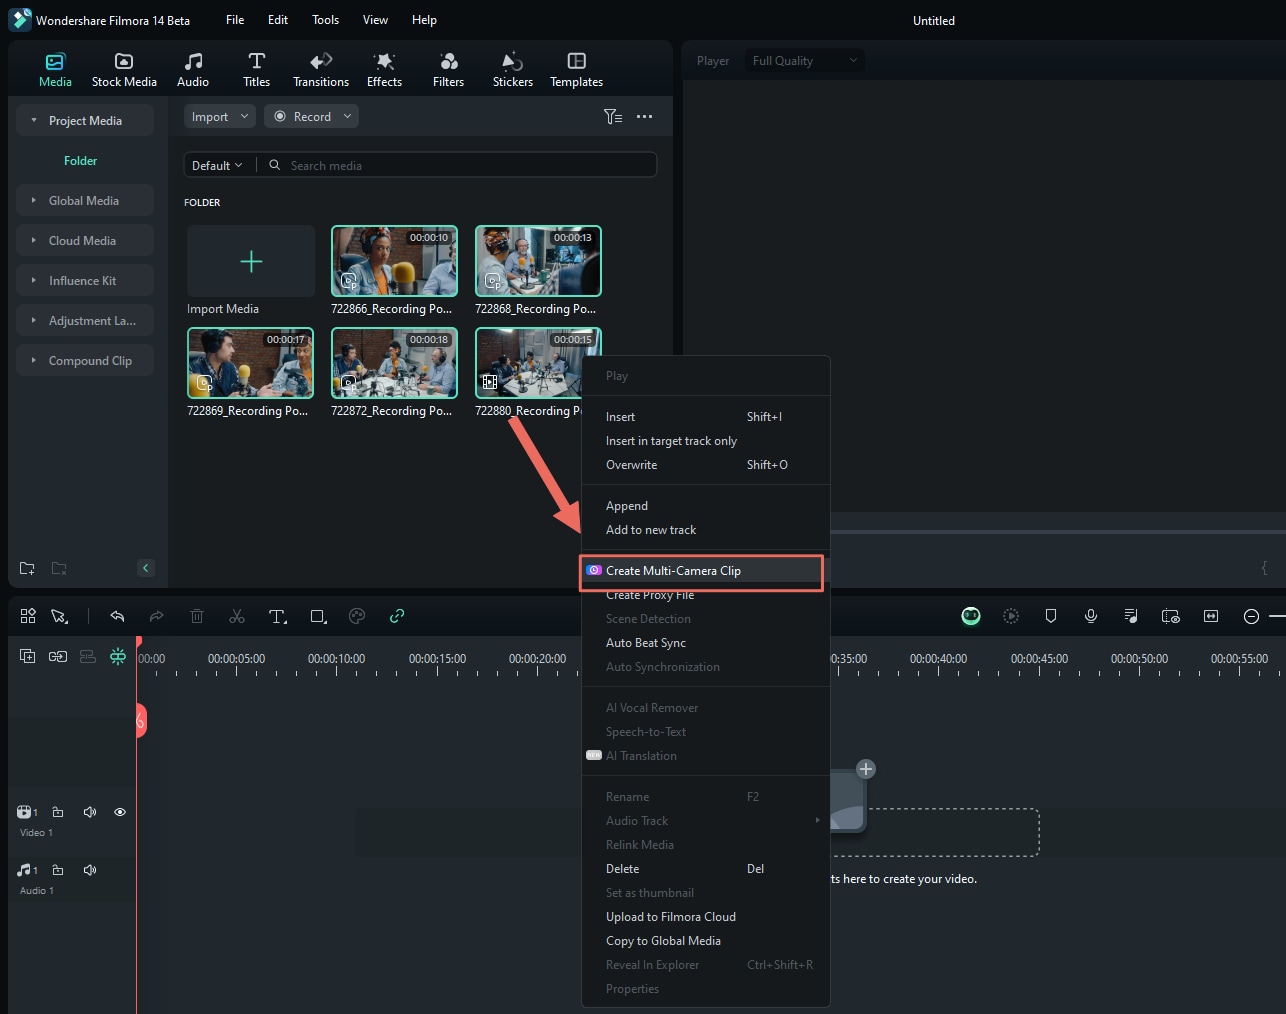
Method 2:Select multi-camera video or audio clips in the timeline, right-click, and choose "Create Multi-Camera Clip."
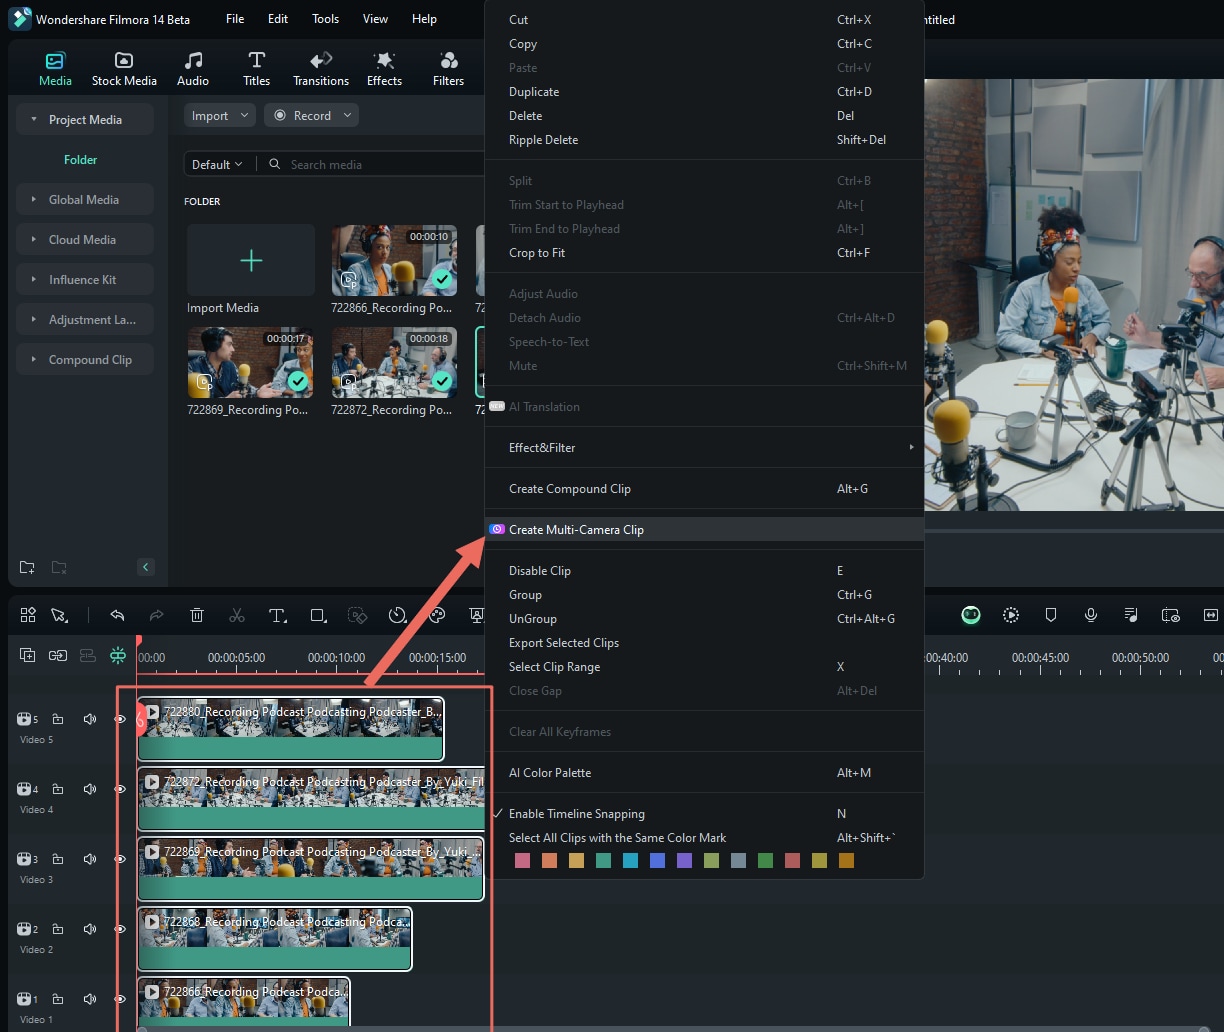
Name your compound clip and choose how you want to synchronize your clips.
(When creating multi-camera clip from the media bin, there are two synchronization methods; when creating a multi-camera clip from the timeline, there are three synchronization methods.)
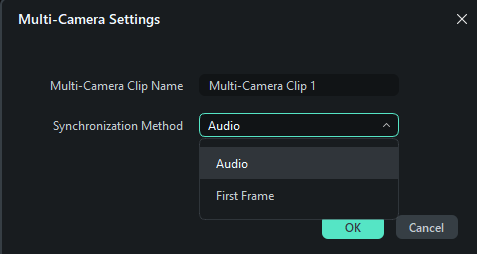
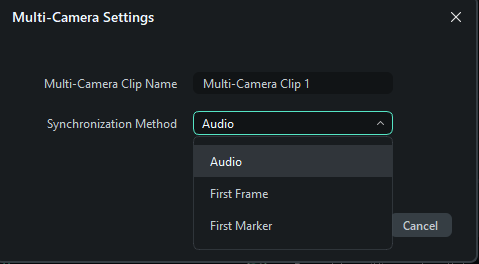
- Audio: Use the audio waveforms from each camera angle for precise synchronization adjustments.
- First Frame: Use the first frame of each camera angle as the synchronization point.
- First Marker: Use the first marker in each camera angle as the synchronization point.
Step4: Enable Multi-Camera View
In the player window, you can click “Switch Multi-Camera View ” to enable the multi-camera view.
In this mode, you can simultaneously view footage from all cameras and switch between them to select the desired footage for the final edit.

Step5: Edit the multi-camera clips
Press the spacebar or click the Play/Stop in the player/timeline panel to start playback. While the clip is playing, clicking on the multi-camera view screen will switch the timeline to the corresponding camera angle.
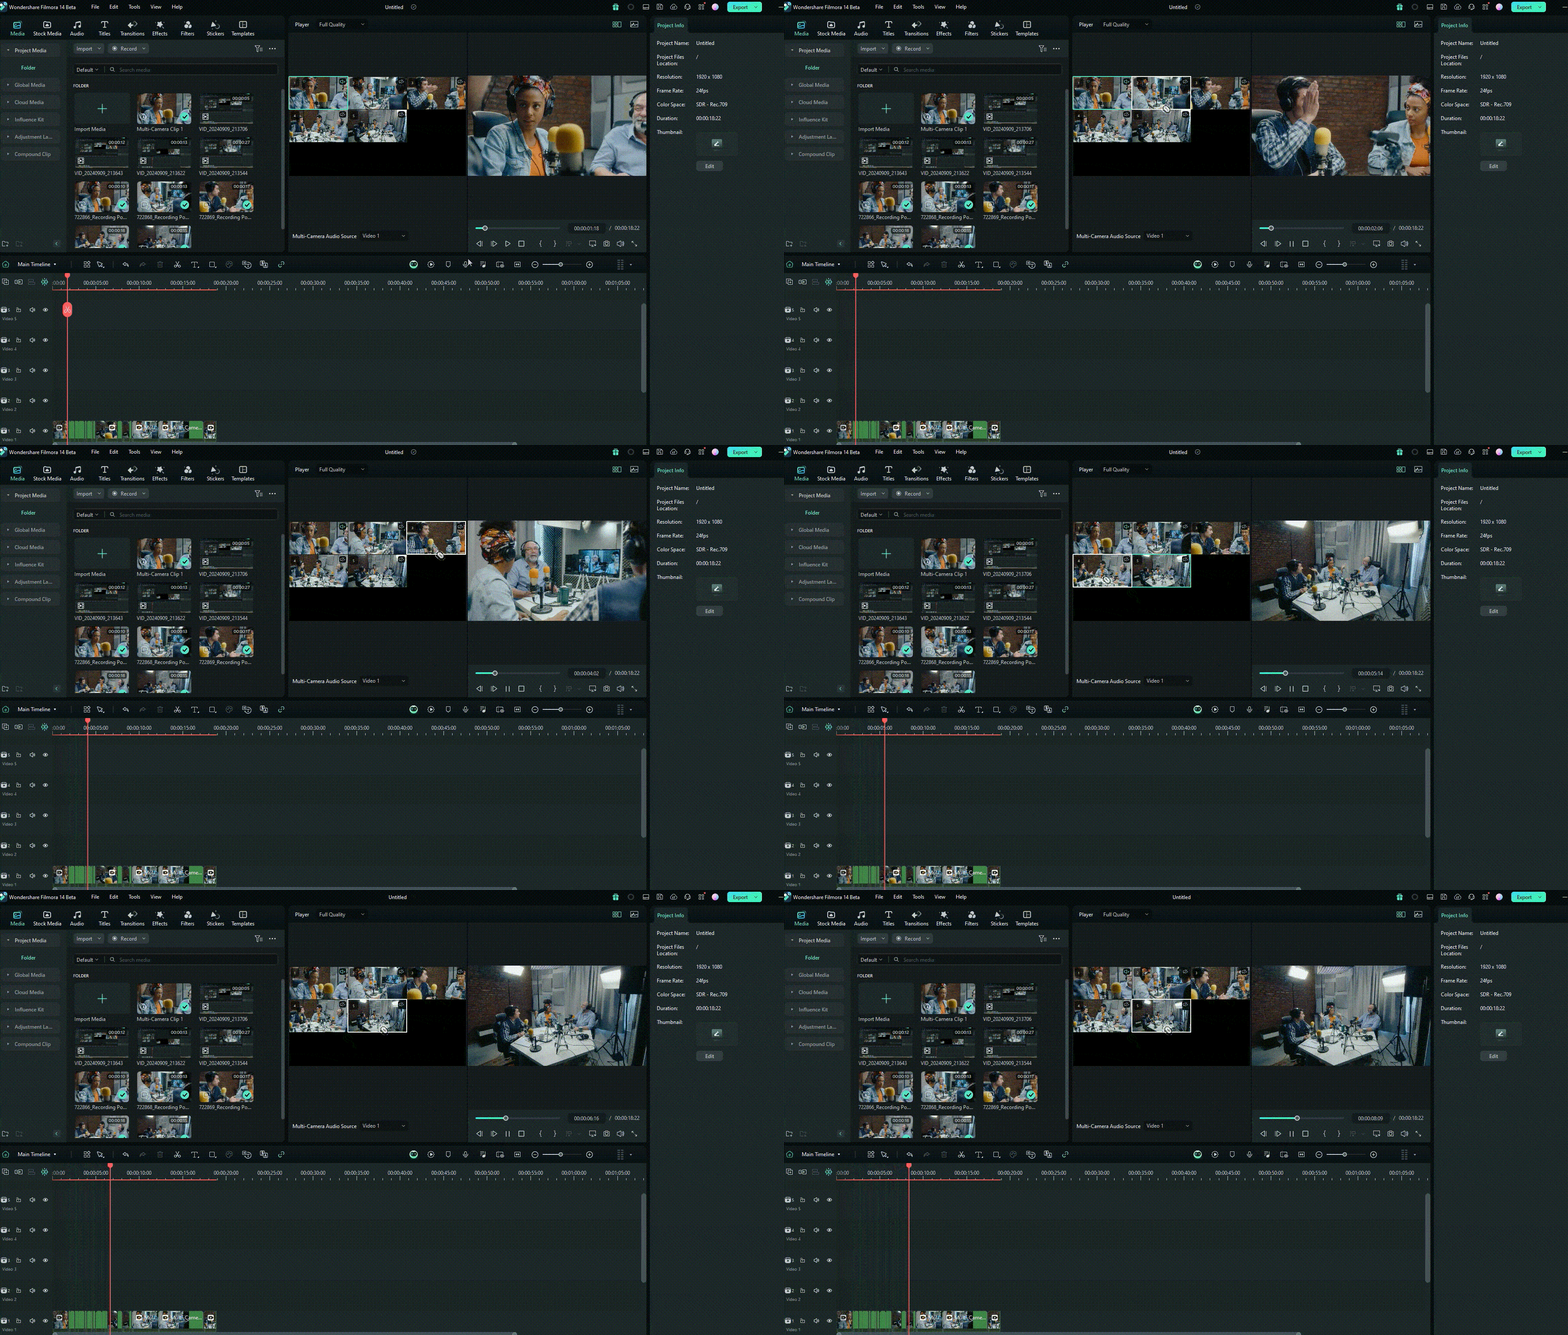
Note:
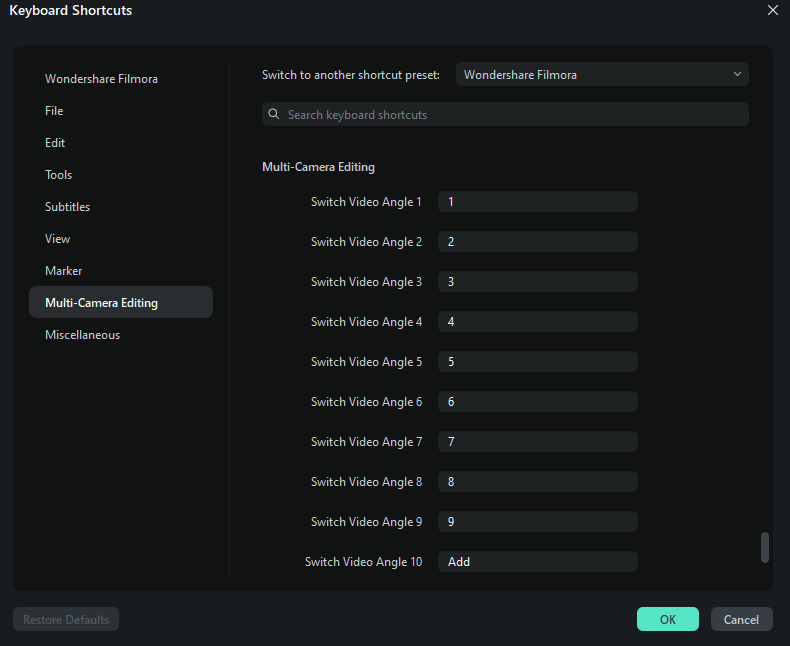
- You can also use Keyboard Shortcuts to switch between multiple video angles: File>>Keyboard Shortcuts
Step6: Adjust and refine edits
- Adjust the multi-camera timeline:
Timeline: Double-click or right-click to edit and adjust the multi-camera timeline within a multi-camera clip.
Media Tab: Right-click to edit and adjust the multi-camera timeline within a multi-camera clip.
- Modify Multi-Camera Clips:
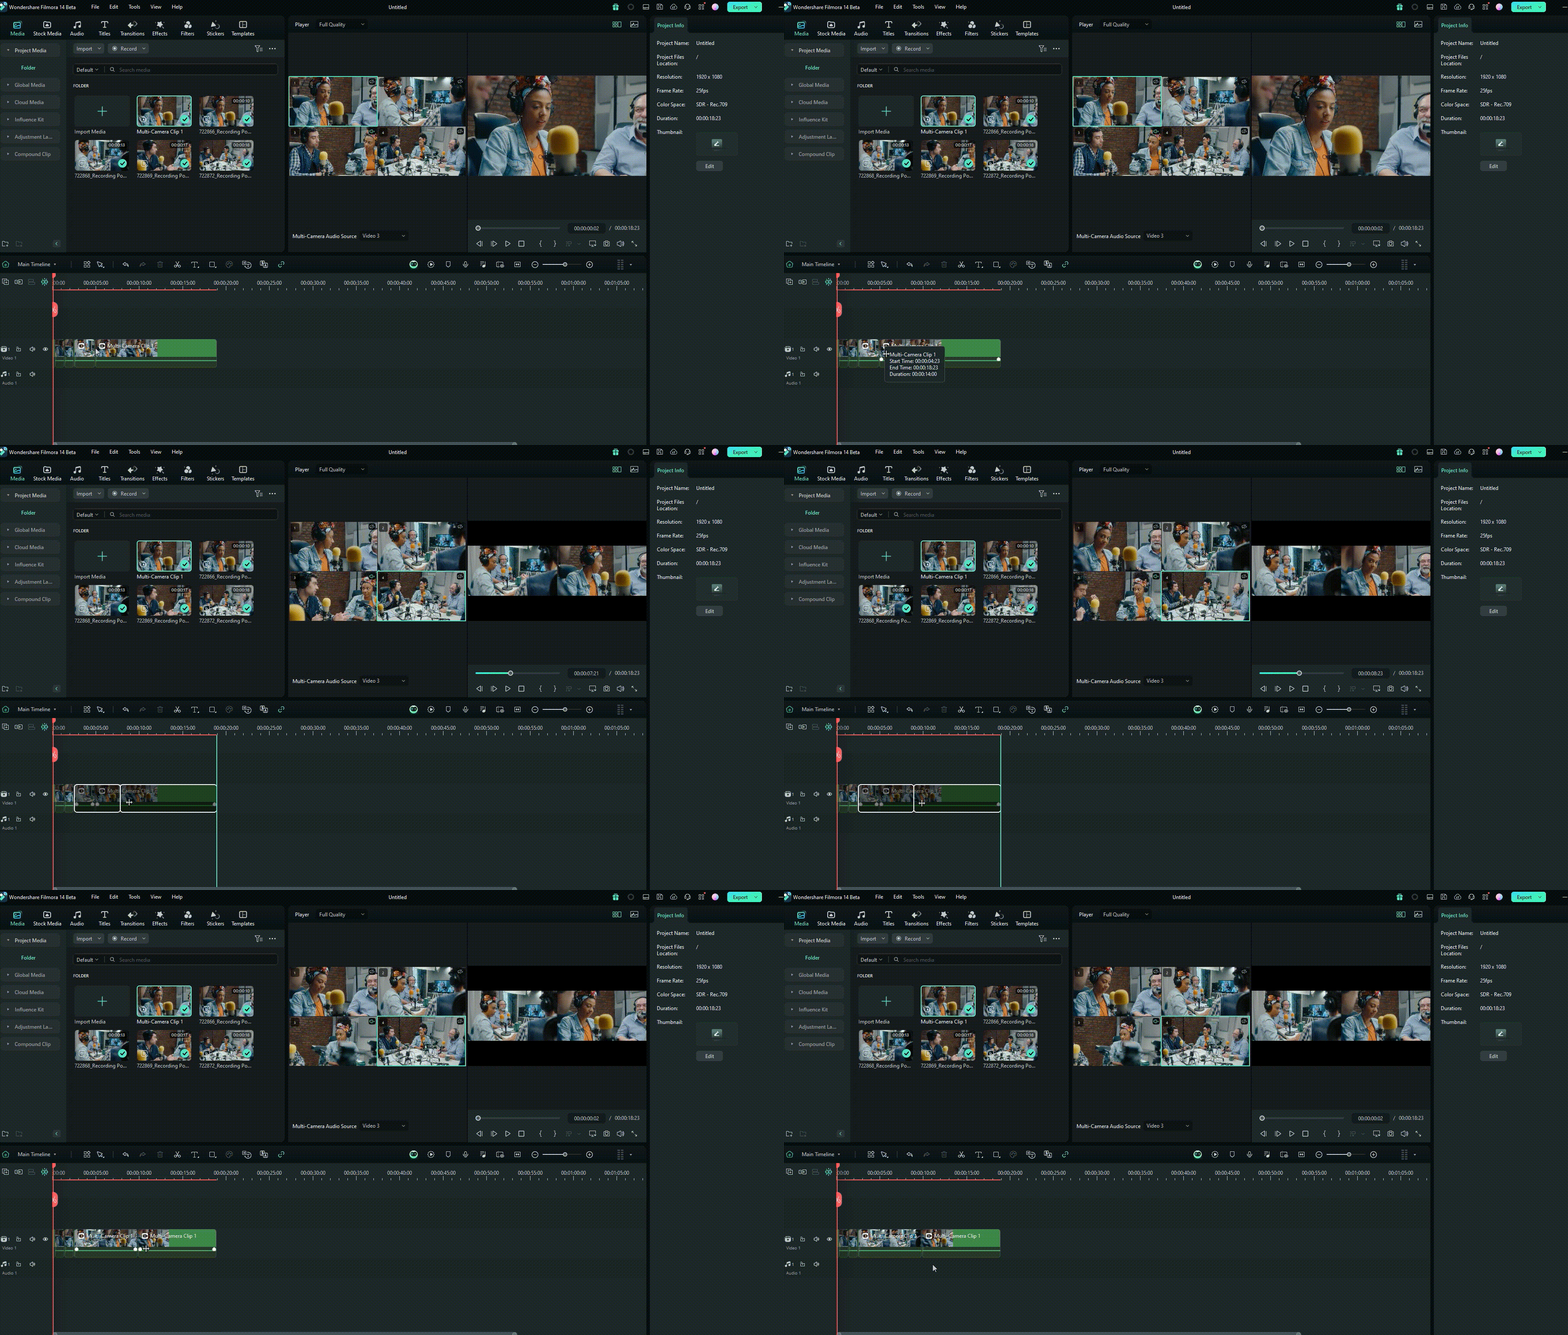
Select the trimmed multi-camera clip and click on the multi-camera view to switch the clip to the corresponding camera angle you clicked on.
- Bidirectional Editing:
When you find that the current cut point is not suitable, hover your mouse over the cut point to change it to a bidirectional arrow. At this point, you can drag the mouse to adjust the cut point.
Related Posts
Featured Articles
How to Add Emojis in Premiere Pro (2026 Guide for Beginners)
Learn how to add emojis in Premiere Pro with this step-by-step tutorial. Make your videos more engaging, creative, and audience-friendly.
Elevate Your Presence with LinkedIn Short-Form Videos
Check out how to leverage the best video editor to create engaging short-form videos for LinkedIn's new video feed. Enhance your professional presence with tailored content that resonates.
Top 5 Free Online Video Enhancers to Elevate Your Video Content
Sail ready into 2026 with professional-looking and eye-catching content! Discover the top 5 free online video enhancers and improve your video quality in the blink of an eye!
Recommended User Guide
Creating a PIP effect
Learn how to create a PIP effect in Filmora.
Drawing Tools for Windows | Filmora Guide
This guide tell you how to use Drawing Tools feature in Filmora for Mac.
Filmora Flicker Removal Guide | Windows
Learn how to use Filmora Flicker Remover on Windows to remove video flicker and fix lighting issues quickly and easily.


