For the Best Results, Use the Latest Version.
-
Preparations
-
Account
-
Get Started & Basic Settings
-
Compatibility & Tech Specs
-
Performance Settings
-
-
Creating Projects
-
Creating New Projects
-
-
Importing & Recording
-
Video Editing for Windows
-
Basic Video Editing
- Enable/Disable Clip in Windows
- Magnetic Timeline for Windows
- Dual Monitor Setup for Video Editing on Windows
- Select All Clips on Timeline for Windows
- Manage Timeline and Tracks on Windows
- Auto Ripple for Windows
- Split & trim video
- Crop & Pan & Zoom Video
- Compositing
- Change video playback speed
- Playing videos in reverse
- Mark In and Mark Out for Windows
- Markers for Windows
- Group editing
- Customizable Backgrounds for Videos and Images in Windows
- Video snapshot
- Using freeze frame
- Logo Reveal For Windows
- Apply auto enhance
- Applying drop shadow
- Adjustment layer for Windows
- Transforming
- Video Editing Ruler – Windows
-
Advanced Video Editing
- Drawing Tools for Windows | Filmora Guide
- Create Multi-Camera Clip
- Compound Clip for Windows
- Multi-Clip Editing for Windows
- Filmora Motion Blur | Windows
- Filmora Flicker Removal Guide | Windows
- Apply mask to video
- Creating a PIP effect
- Keyframe Graph Editor for Windows
- Add animation keyframing for Windows
- Keyframe Path Curve for Windows
-
AI-Powered Video Editing
- Smart Scene Cut for Windows
- Smart Short Clips for Windows
- AI Face Mosaic for Windows
- Filmora AI Eye Contact- Windows
- AI Video Enhancer for Windows
- AI Text-to-Video for Windows
- Planar Tracking for Windows
- AI Idea to Video for Windows
- Filmora Image to Video for Windows
- Filmora Image to Prompt for Windows
- Instant Cutter Tool for Windows
- AI Extend
- Filmora AI Relight - Windows
- Filmora AI Image Enhancer Guide - Windows
- AI Script to Video Guide for Windows
- AI Text-Based Editing for Windows
- AI Mate Editing for Windows
- Create with instant mode
- ChatGPT Plugin - AI Copywriting
- AI Smart Cutout
- Lens correction on Windows
- Auto reframe video
- AI Portrait Cutout
- Scene detection feature
- AI Smart Masking for Windows
- Make motion tracking
- Video Stabilization for Windows
- AI Video/Photo Object Remover for Windows
- AI Smart Search for Windows
- AI Skin Tone Protection for Windows
- AI Image for Windows
- Chroma key (green screen)
- Super Slow Motion with Optical Flow for Windows
- Video Denoise for Windows
-
-
Audio Editing for Windows
-
Basic Audio Editing
-
Advanced Audio Editing
-
AI-Powered Audio Editing
-
-
Text Editing for Windows
-
Basic Text Editing
-
Advanced Text Editing
-
AI-Powered Text Editing
-
-
Video Customizations
-
Video Effects
-
Audio Effects
-
Transitions
-
Stickers
-
Filters
-
Color Editing
-
Animations
-
Templates
-
Asset Center
-
-
Exporting & Share & Cloud Backup
Audio Fade In and Fade Out
Fading is commonly used in audio transitions. With Fade In, the sound begins with silence and increases to the full volume gradually. With Fade Out, the audio begins at full volume and decreases to silence gradually.
Index
Add Fade In and Fade Out in Audio Pane
1. After adding the audio to the timeline, click on it to open the Audio edit panel.
2. Set fade-in and fade-out effects by dragging the sliders or by entering how many seconds a fade effect should last.

Add Fade In and Fade Out in Audio Pane
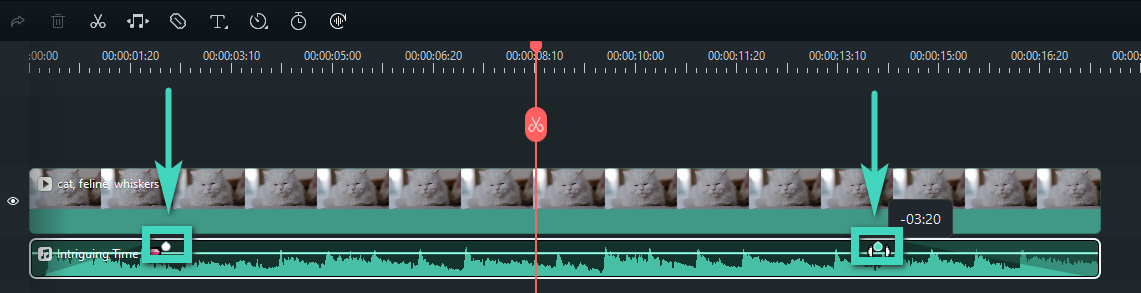
You can also use the fade icons at the left and right edges of the audio waveform areas to quickly fade in and out.
1. At the beginning of the audio clip, drag the fade-in maker to the right to apply a fade-in audio effect.
2. Go to the end of the audio clip and drag the fade-out maker to the left to add a fade-out audio effect.
Note:
The further you drag, the longer the fade effect will last.Related Posts
Featured Articles
CapCut vs Filmora: A Comprehensive & Detailed Comparison for 2026
CapCut vs Filmora - which is better for you? Explore our detailed 2026 comparison of features, pricing, and pros & cons to find the best video editor.
How to Create a Podcast Clip for Social Media | 2026
Instantly turn podcast episodes into viral clips with Filmora's AI tool! Perfect for creators - save hours editing & boost engagement with auto-generated shorts. Try it now!
How to Auto Translate YouTube Videos to English Without CC
Learn how to auto-translate YouTube videos to English without CC. Get instant translations with ease.
Recommended User Guide
Detach audio
This is a guide teaching you to detach audio in Filmora.
Mute Audio
This is a guide telling you to mute audio in Filmora.
Trim audio
Learn how to trim audio in Filmora.
