
For the Best Results, Use the Latest Version.
-
Preparations
-
Account
-
Get Started & Basic Settings
-
Compatibility & Tech Specs
-
Performance Settings
-
-
Creating Projects
-
Creating New Projects
-
-
Importing & Recording
-
Video Editing for Windows
-
Basic Video Editing
- Enable/Disable Clip in Windows
- Magnetic Timeline for Windows
- Dual Monitor Setup for Video Editing on Windows
- Select All Clips on Timeline for Windows
- Timeline and Track Management
- Auto Ripple for Windows
- Split & Trim Video
- Crop & Pan & Zoom Video in Filmora for Windows
- Compositing
- Change Video Speed on Windows
- Reverse Video for Windows
- Mark In and Mark Out for Windows
- Markers for Windows
- Group editing
- Customizable Backgrounds for Videos and Images in Windows
- Video Snapshot
- Using Freeze Frame in Filmora for Windows
- Logo Reveal For Windows
- Auto Enhance in Filmora for Windows
- Applying drop shadow
- Adjustment layer for Windows
- Apply Transforming for Windows
- Video Editing Ruler – Windows
-
Advanced Video Editing
- Keyframe Motion Blur for Windows
- Drawing Tools for Windows | Filmora Guide
- Camera Tracking for Windows
- Create Multi-Camera Clip in Filmora for Windows
- Compound Clip for Windows
- Multi-Clip Editing for Windows
- Filmora Motion Blur | Windows
- 360° Video Reframing for Windows
- Track Matte for Windows
- Video Chapters in Filmora on Windows
- Filmora Flicker Removal Guide | Windows
- Create Multi-Screen Videos in Filmora on Windows
- Masking in Filmora on Windows
- Creating a PIP Effect for Windows
- Keyframe Graph Editor for Windows
- Animation Keyframing for Windows
- Keyframe Path Curve
-
AI-Powered Video Editing
- Smart Scene Cut for Windows
- Smart Short Clips for Windows
- AI Face Mosaic for Windows
- Filmora AI Eye Contact- Windows
- AI Video Enhancer for Windows
- AI Text-to-Video for Windows
- Planar Tracking for Windows
- AI Idea to Video for Windows
- AI Media Analysis for Windows
- Filmora Image to Video for Windows
- Filmora Image to Prompt for Windows
- Instant Cutter Tool for Windows
- AI Extend
- Filmora AI Relight - Windows
- Filmora AI Image Enhancer Guide - Windows
- AI Script to Video Guide for Windows
- AI Text-Based Editing for Windows
- AI Mate Editing for Windows
- Instant Mode for Windows
- ChatGPT Plugin - AI Copywriting
- AI Smart Cutout for Windows
- Lens correction on Windows
- Auto Reframe Video for Windows
- AI Portrait Cutout
- Scene Detection for Windows
- AI Smart Masking for Windows
- Motion Tracking on Windows
- Video Stabilization for Windows
- AI Video/Photo Object Remover for Windows
- AI Smart Search for Windows
- AI Skin Tone Protection for Windows
- AI Image for Windows
- Chroma Key (Green Screen) for Windows
- Super Slow Motion with Optical Flow for Windows
- Video Denoise for Windows
-
-
Audio Editing for Windows
-
Basic Audio Editing
-
Advanced Audio Editing
-
AI-Powered Audio Editing
- Auto synchronization
- AI Sound Effects in Filmora for Windows
- Smart BGM Generation on Windows
- AI Voice Enhancer in Filmora
- AI Voice Cloning in Wondershare Filmora
- AI Music Generator for Windows
- Audio To Video
- AI Vocal Remover for Windows
- AI Auto Beat Sync for Windows
- AI Audio Stretch for Windows
- AI Audio Denoise for Windows
- Silence Detection on Windows
-
-
Text Editing for Windows
-
Basic Text Editing
-
Advanced Text Editing
-
AI-Powered Text Editing
-
-
Video Customizations
-
Video Effects
- Filmora VST3 Plugins for Windows
- Filmora OpenFX Plugins for Windows
- Retouch Guide for Windows
- Filmora Pen Tool Tutorial: Motion Paths & Animation Guide
- Animated Charts
- Mocha Filmora - For Windows
- Different Types of Video Effects
- NewBlue FX effects
- Boris FX effects | Filmora Windows Guide
- Body Effects for Windows
- Filmora -Filmstock Asset
-
Audio Effects
-
Transitions
-
Stickers
-
Filters
-
Color Editing
-
Animations
-
Templates
-
Asset Center
-
-
Exporting & Share & Cloud Backup
Scene Detection in Filmora (Windows)
Scene Detection is an advanced editing feature offered in Filmora, which can be used to automatically split a film into basic temporal segments by detecting the transitions between shots in a video. It will greatly facilitate your job if you don't want to edit your video frame by frame but would rather quickly edit short clips in a large piece of video.
The steps below will show you how to use automatic scene detection in Filmora.
How to Use Scene Detection in Filmora
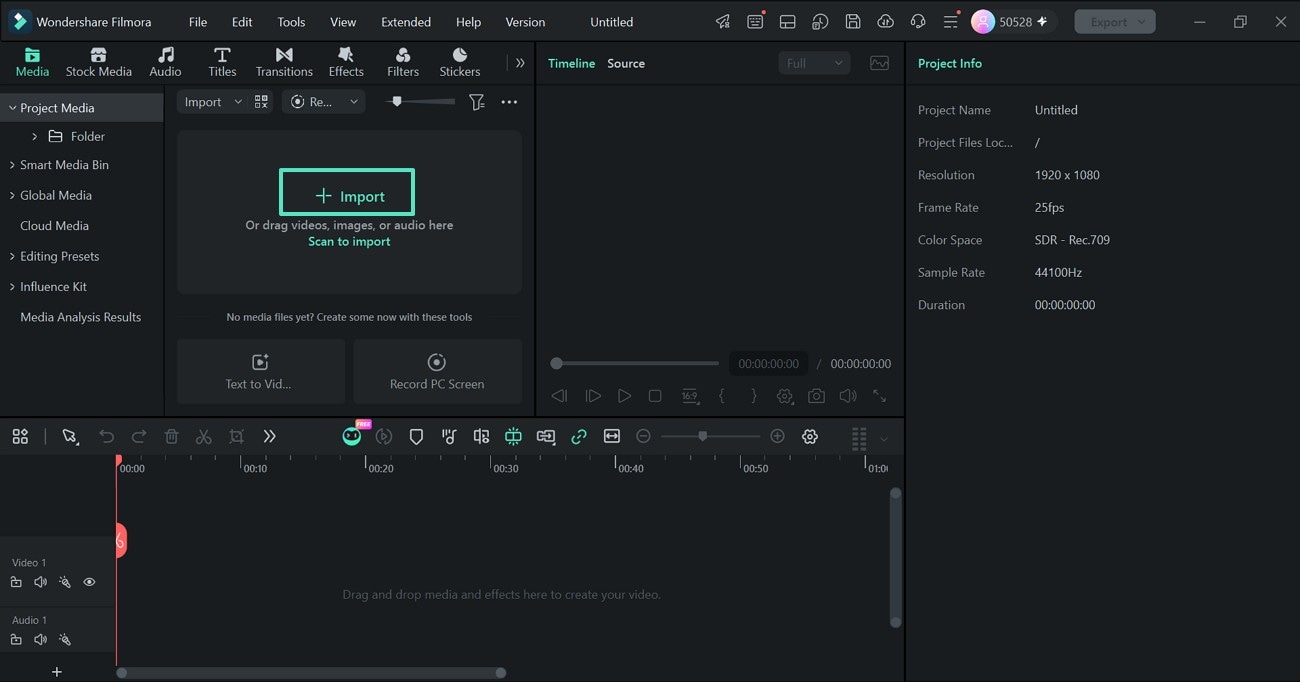
Step 1. Import Video to Project Media
Open Filmora, start a new project, and click the +Import button to add your video file to the Project Media library.
Step 2. Choose the Scene Detection Option
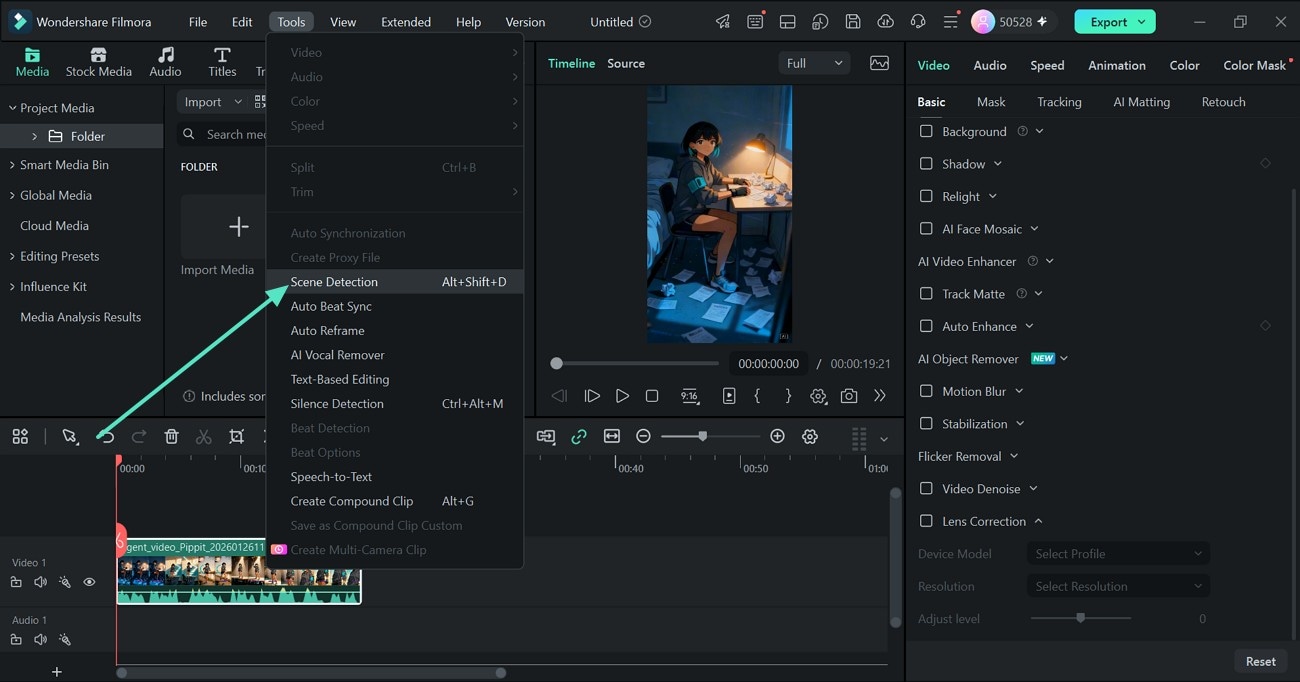
Drag the clip to the timeline and go to Tools > Scene Detection in the top menu.
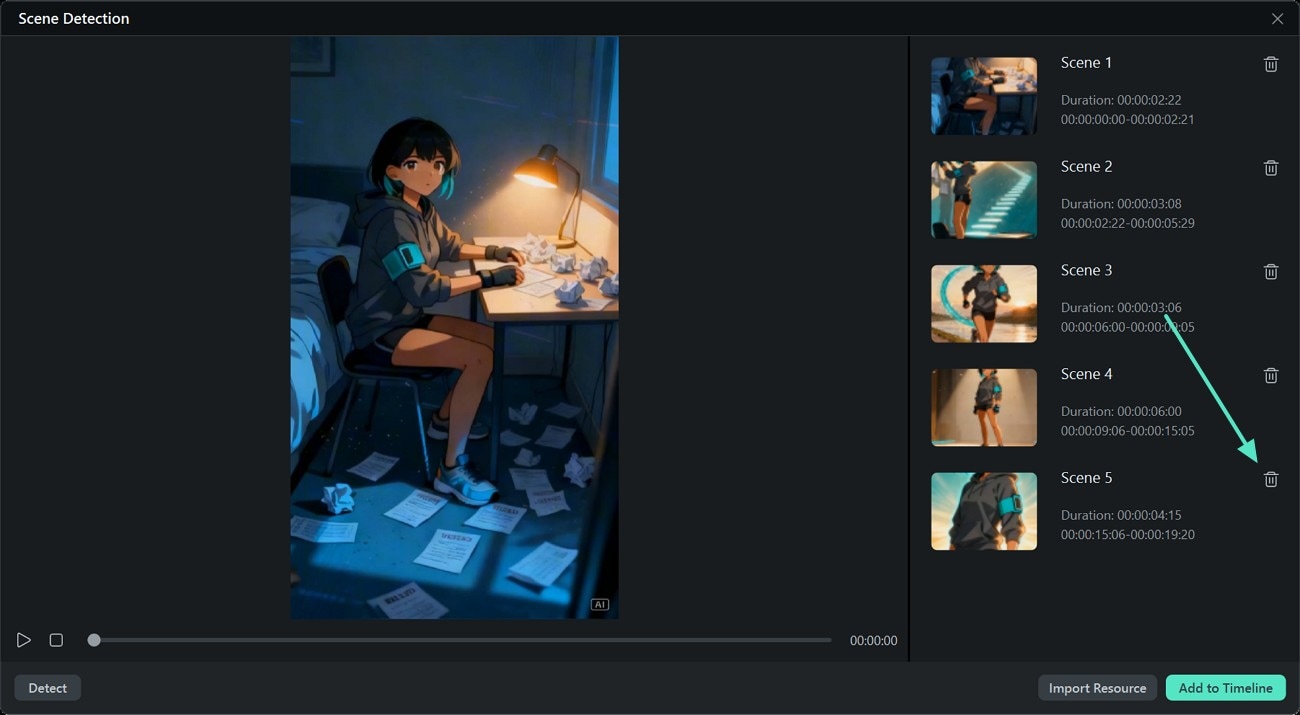
Step 3. Review the Detected Scenes
Once the analysis is complete, the Scene Detection window will show each detected scene as a separate segment. Double-click any scene to preview it, and use the Delete icon if you want to remove a segment you do not need.
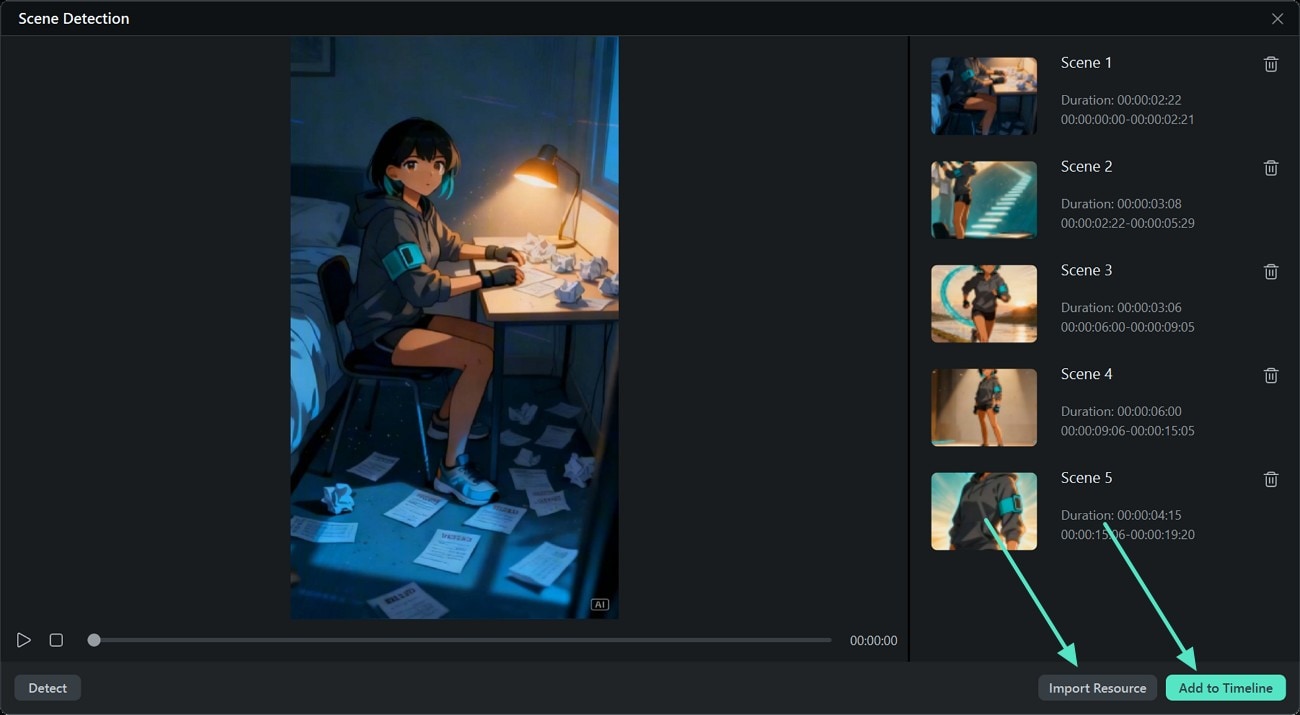
Step 4. Import or Add the Scenes
Click Import Resource if you want to bring the detected scenes into the Project Media area first. If you are ready to edit them, choose Add to Timeline to place all the separated clips directly onto the timeline.
Note:
If you're using Filmora 9 or 10, click here to learn how to do scene detection.Related Posts
Featured Articles
How to Apply Bunny Ear Filters to Photos?
Transform your selfies with charming bunny ear filters. A quick, step-by-step guide to fun, Instagram-worthy edits.
How to Create a Memorable Birthday Story on Instagram
Are you planning to create a birthday story on Instagram for your loved ones? You might want to check out this article for birthday Instagram story ideas that everyone will talk about.
The Essential Guide To TikTok Aspect Ratio
Follow this comprehensive guide to get the right TikTok Aspect Ratio to boost engagement and visual experience for your TikTok audience.
Recommended User Guide
Instant Cutter Tool for Windows
Want to quickly trim your videos? Filmora's Instant Cutter tool is the perfect solution for immediate video trimming.
AI Video/Photo Object Remover for Windows
Want to remove unwanted objects from videos or photos? Check Wondershare Filmora's AI object remover feature.
Filmora AI Image Enhancer Guide - Windows
Here is the guide on how to use the AI image enhancer feature in Filmora on Windows.
