For the Best Results, Use the Latest Version.
-
Preparations
-
Account
-
Get Started & Basic Settings
-
Compatibility & Tech Specs
-
Performance Settings
-
-
Creating Projects
-
Creating New Projects
-
-
Importing & Recording
-
Video Editing for Windows
-
Basic Video Editing
- Enable/Disable Clip in Windows
- Magnetic Timeline for Windows
- Dual Monitor Setup for Video Editing on Windows
- Select All Clips on Timeline for Windows
- Manage Timeline and Tracks on Windows
- Auto Ripple for Windows
- Split & trim video
- Crop & Pan & Zoom Video
- Compositing
- Change Video Speed on Windows
- Playing videos in reverse
- Mark In and Mark Out for Windows
- Markers for Windows
- Group editing
- Customizable Backgrounds for Videos and Images in Windows
- Video snapshot
- Using freeze frame
- Logo Reveal For Windows
- Apply auto enhance
- Applying drop shadow
- Adjustment layer for Windows
- Transforming
- Video Editing Ruler – Windows
-
Advanced Video Editing
- Drawing Tools for Windows | Filmora Guide
- Create Multi-Camera Clip
- Compound Clip for Windows
- Multi-Clip Editing for Windows
- Filmora Motion Blur | Windows
- Filmora Flicker Removal Guide | Windows
- Apply mask to video
- Creating a PIP effect
- Keyframe Graph Editor for Windows
- Add animation keyframing for Windows
- Keyframe Path Curve for Windows
-
AI-Powered Video Editing
- Smart Scene Cut for Windows
- Smart Short Clips for Windows
- AI Face Mosaic for Windows
- Filmora AI Eye Contact- Windows
- AI Video Enhancer for Windows
- AI Text-to-Video for Windows
- Planar Tracking for Windows
- AI Idea to Video for Windows
- Filmora Image to Video for Windows
- Filmora Image to Prompt for Windows
- Instant Cutter Tool for Windows
- AI Extend
- Filmora AI Relight - Windows
- Filmora AI Image Enhancer Guide - Windows
- AI Script to Video Guide for Windows
- AI Text-Based Editing for Windows
- AI Mate Editing for Windows
- Create with instant mode
- ChatGPT Plugin - AI Copywriting
- AI Smart Cutout
- Lens correction on Windows
- Auto reframe video
- AI Portrait Cutout
- Scene detection feature
- AI Smart Masking for Windows
- Make motion tracking
- Video Stabilization for Windows
- AI Video/Photo Object Remover for Windows
- AI Smart Search for Windows
- AI Skin Tone Protection for Windows
- AI Image for Windows
- Chroma key (green screen)
- Super Slow Motion with Optical Flow for Windows
- Video Denoise for Windows
-
-
Audio Editing for Windows
-
Basic Audio Editing
-
Advanced Audio Editing
-
AI-Powered Audio Editing
-
-
Text Editing for Windows
-
Basic Text Editing
-
Advanced Text Editing
-
AI-Powered Text Editing
-
-
Video Customizations
-
Video Effects
-
Audio Effects
-
Transitions
-
Stickers
-
Filters
-
Color Editing
-
Animations
-
Templates
-
Asset Center
-
-
Exporting & Share & Cloud Backup
Create New Project
Learn about project files, and how to create and manage projects in Filmora.
The project (. wfp format) you create in Filmora contains the settings you select for each sequence in the timeline, as well as editing decisions, effects, and music used in the project.
Filmora project files don't store the source videos, audio, or images. They only save a reference to these types of media files based on the file names and locations. If you move, rename, or delete a source file, Filmora won't be able to find it automatically the next time you open a project that uses that piece of media.
Note:
For your convenience, Filmora offers you the option of archiving your source files all together with the project.Create A New Project
There are two ways to create a new project.
- Method 1: Create New Project from Startup Window
Select the corresponding Aspect ratio at the top of the Startup Window according to the video scene requirements

- Method 2: Create New Project from Menu Bar
Launch Filmora and choose New Project to enter the editing interface. You can re-create a new project under File > Project Settings.
You can also set the resolution, aspect ratio, and frame rate for the project as you like under File > Project Settings.
Note:
The default aspect ratio is 16:9, but you can change it to 1:1 or 9:16 if you want to make videos for Instagram or other social media, or you can select Custom to customize your aspect ratio.
Save A Project
After you finish your editing in the timeline, you can click File > Save Project or Save Project As, or use the hotkey Ctrl+S to save the edited project to your computer, in case you need to modify it in the future.
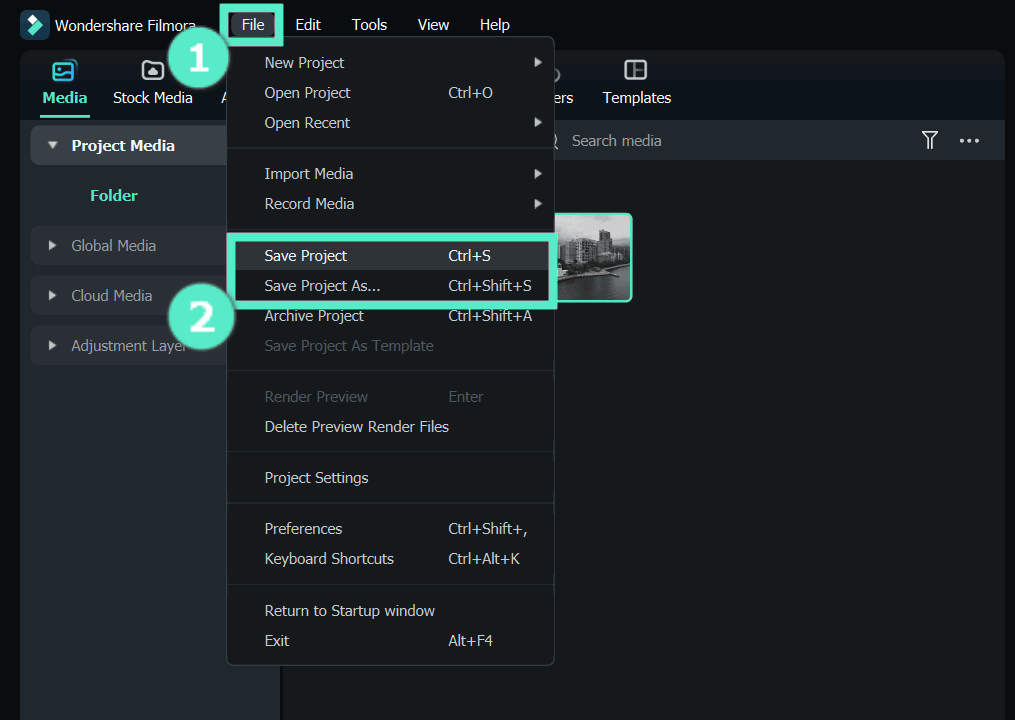
Note:
The project will be saved as a file with the extension. wfp. And it can only be recognized and opened by Filmora.Related Posts
Featured Articles
Create a Hype Video That Hits Hard with Free Music & AI Tools
Want to energize your audience, build excitement, and leave a strong impression? With Filmora’s AI tools and free music, creating a hype video has never been easier.
10 Funny President's Day Memes to Post on Your Feeds
Find the best President's Day memes and GIFs from our selection here, or create your own to celebrate the day with a touch of humor.
10+ FREE Online MP3 to Text Converters
With the help of an online mp3 to text converted you can convert any MP3 file into text document. Here is a list of the best 10 free mp3 to text converters you can use.
Recommended User Guide
Relocate projects
Learn how to relocate Filmora projects in case you change the location of the source files.
Short Video Project
The short video project mode enables users to effortlessly create videos using Auto Reframe and Smart Scene Cut. With a 9:16 aspect ratio, it supports mask displays for platforms like TikTok, YouTube Shorts, and Instagram Reels, allowing users to quickly adapt the layout for different platforms.
