For the Best Results, Use the Latest Version.
-
Preparations
-
Account
-
Get Started & Basic Settings
-
Compatibility & Tech Specs
-
Performance Settings
-
-
Creating Projects
-
Creating New Projects
-
-
Importing & Recording
-
Video Editing for Windows
-
Basic Video Editing
- Enable/Disable Clip in Windows
- Magnetic Timeline for Windows
- Dual Monitor Setup for Video Editing on Windows
- Select All Clips on Timeline for Windows
- Manage Timeline and Tracks on Windows
- Auto Ripple for Windows
- Split & trim video
- Crop & Pan & Zoom Video
- Compositing
- Change Video Speed on Windows
- Playing videos in reverse
- Mark In and Mark Out for Windows
- Markers for Windows
- Group editing
- Customizable Backgrounds for Videos and Images in Windows
- Video snapshot
- Using freeze frame
- Logo Reveal For Windows
- Apply auto enhance
- Applying drop shadow
- Adjustment layer for Windows
- Transforming
- Video Editing Ruler – Windows
-
Advanced Video Editing
- Drawing Tools for Windows | Filmora Guide
- Create Multi-Camera Clip
- Compound Clip for Windows
- Multi-Clip Editing for Windows
- Filmora Motion Blur | Windows
- Filmora Flicker Removal Guide | Windows
- Apply mask to video
- Creating a PIP effect
- Keyframe Graph Editor for Windows
- Add animation keyframing for Windows
- Keyframe Path Curve for Windows
-
AI-Powered Video Editing
- Smart Scene Cut for Windows
- Smart Short Clips for Windows
- AI Face Mosaic for Windows
- Filmora AI Eye Contact- Windows
- AI Video Enhancer for Windows
- AI Text-to-Video for Windows
- Planar Tracking for Windows
- AI Idea to Video for Windows
- Filmora Image to Video for Windows
- Filmora Image to Prompt for Windows
- Instant Cutter Tool for Windows
- AI Extend
- Filmora AI Relight - Windows
- Filmora AI Image Enhancer Guide - Windows
- AI Script to Video Guide for Windows
- AI Text-Based Editing for Windows
- AI Mate Editing for Windows
- Create with instant mode
- ChatGPT Plugin - AI Copywriting
- AI Smart Cutout
- Lens correction on Windows
- Auto reframe video
- AI Portrait Cutout
- Scene detection feature
- AI Smart Masking for Windows
- Make motion tracking
- Video Stabilization for Windows
- AI Video/Photo Object Remover for Windows
- AI Smart Search for Windows
- AI Skin Tone Protection for Windows
- AI Image for Windows
- Chroma key (green screen)
- Super Slow Motion with Optical Flow for Windows
- Video Denoise for Windows
-
-
Audio Editing for Windows
-
Basic Audio Editing
-
Advanced Audio Editing
-
AI-Powered Audio Editing
-
-
Text Editing for Windows
-
Basic Text Editing
-
Advanced Text Editing
-
AI-Powered Text Editing
-
-
Video Customizations
-
Video Effects
-
Audio Effects
-
Transitions
-
Stickers
-
Filters
-
Color Editing
-
Animations
-
Templates
-
Asset Center
-
-
Exporting & Share & Cloud Backup
Markers for Windows
Marker is an insightful aid in Filmora’s video creation and editing since they enable users to highlight or mark the errored points in the video. In simple words, users can pinpoint their mistakes and correct them later easily without having to watch a complete video again. Although the feature was already present in Filmora, it has been optimized, and here is a guide to utilize it.
Index
Distinctions Between the Two Types of Markers
❶ Media Markers
- To add a marker to the media, first choose the media and then click the Mark icon or press M.
- You won't be able to see these markers until the video clip is imported into the software's video editor and placed on the timeline.
- You can use them to mark a place you're not too happy with, or to highlight the part of the video clip that you intend on featuring in the final cut of the video you've created with Filmora.

❷ Timeline Makers
- The timeline markers, on the other hand, can only be added to a project during the post-production period.
- You can utilize them to highlight the parts of the video clip you want to remove from the final version of your video or to mark the spots on the timeline where you'd like to switch from one take to another.
- This type of marker is immensely useful if you want to organize the timeline in your project better and to know exactly where every clip you want to use in your video is located at all times.
- Besides being a highly efficient tool for organizing vast amounts of footage, timeline markers can also help you denote the beats in the audio file and then sync the video clip perfectly to the beat of the tune you're using as a soundtrack to your video.
Add a Marker Before Video Editing
Markers play an important role in video editing, saving time wasted while rewatching a video. This section includes a detailed guide to adding markers step-by-step before starting to edit a video:
Method 1: Adding Markers through the Timeline Toolbar
Step 1: Initiate Filmora and Start a New Project
Once you reach the main interface of Filmora after installing it on your PC, log in to your account by clicking the profile icon at the top bar. Navigate towards the left-side panel, choose the "Create Project" option, and go to the "New Project" tab.
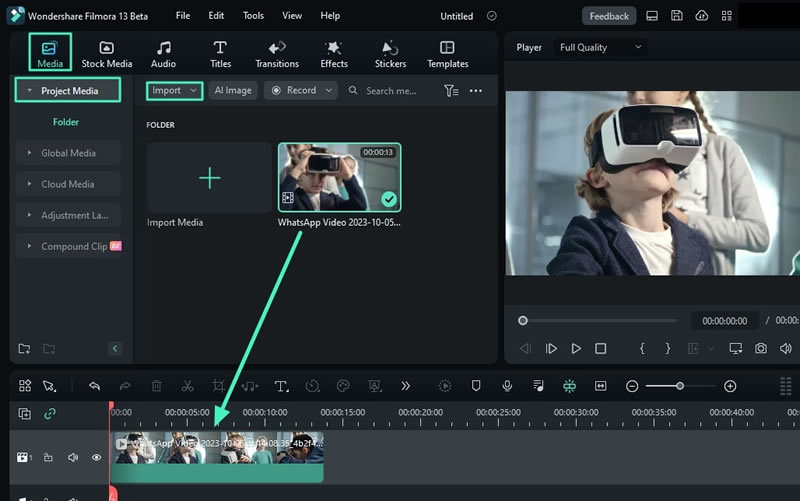
Step 2: Place the Imported Media to Timeline
Once the new project is created, hover the mouse towards the custom toolbar and select "Media". From the left panel, choose "Project Media" and select the "Import" option to add media at the project media bar. After this, click the media file with the help of a cursor and drag and drop it to the timeline panel.
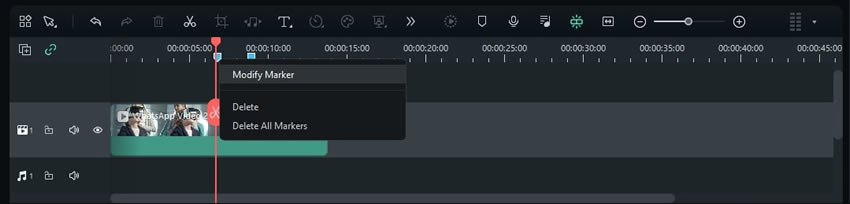
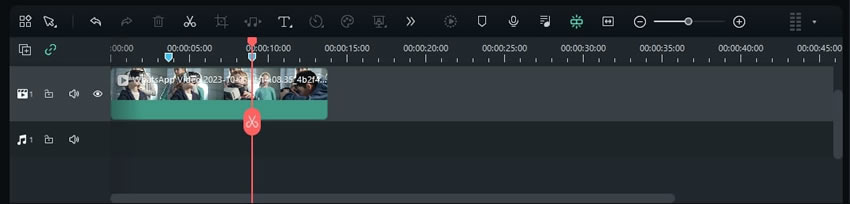
Step 3: Add Markers from the Timeline Toolbar
To add markers, watch your video, identify the mistake, pause the video, and place the playhead at that point. From the timeline toolbar, select the "Bookmark" icon saying "Add Marker", a marker will be added at that point. Repeat the same process for adding more markers.

Step 4: Access the Modification Option
With Filmora, you can customize your marker settings according to your video to avoid complications. For this, go to the marker you added and right-click on it. This will open a small control panel where you have to choose the "Modify Marker" option.
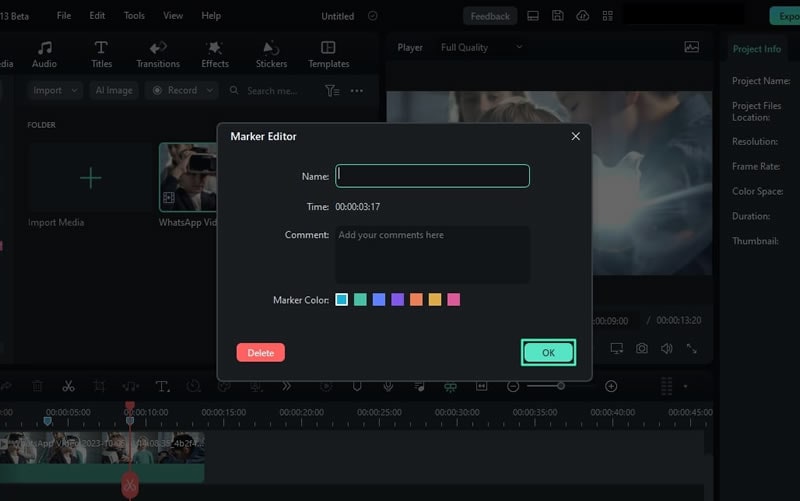
Step 5: Customize the Markers
From the new window, make relative changes in the Marker Editor window. You can name your marker, add a comment in the "Comment" box, and change the marker color.
Method 2: Adding Markers through the Keyboard
After importing the clip in timeline and identifying the points of error in your video, place the play on these points and press the "M" letter from your keyboard. This will add a marker in chosen timeframes.
Remove a Marker After Video Editing
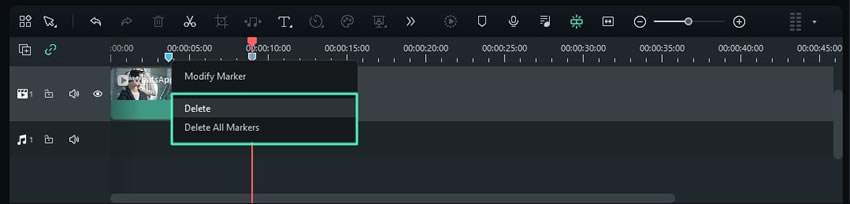
Once you are done editing your mistakes, you should remove those markers. To successfully remove a marker, click right on the marker and, from the options menu, select "Delete" to delete the particular marker or "Delete All Markers" to delete them collectively.
Related Posts
Featured Articles
15 Best Children's Halloween Videos: Top Picks for Kids of All Ages
Looking for spooky videos that won’t give the kids nightmares? Find the best children’s Halloween videos and how to pick the right one for your kid’s age.
Full Guide on How To Remove People From Video
Remove people from video offline on desktop, online, iOS, and Android. Follow the steps here and easily remove moving and static objects without losing quality.
Video Editing Tricks: Duplicate an Actor Using Green Screen
Learn how to duplicate actors in videos using Wondershare Filmora's green screen or split screen features. Create engaging content with ease!
Recommended User Guide
Playing videos in reverse
Learn how to play videos in reverse in Filmora 11
Apply auto enhance
Learn how to use Auto Enhance in Filmora 11
Compositing
To make an entire clip uniformly transparent or semi-transparent, use the Opacity effect in Compositing. You can set a selected clip’s opacity in video or image editing settings.
