
 100% Security Verified | No Subscription Required | No Malware


 ChatGPT
 Perplexity
 Gemini
 Claude
 Grok
Grok
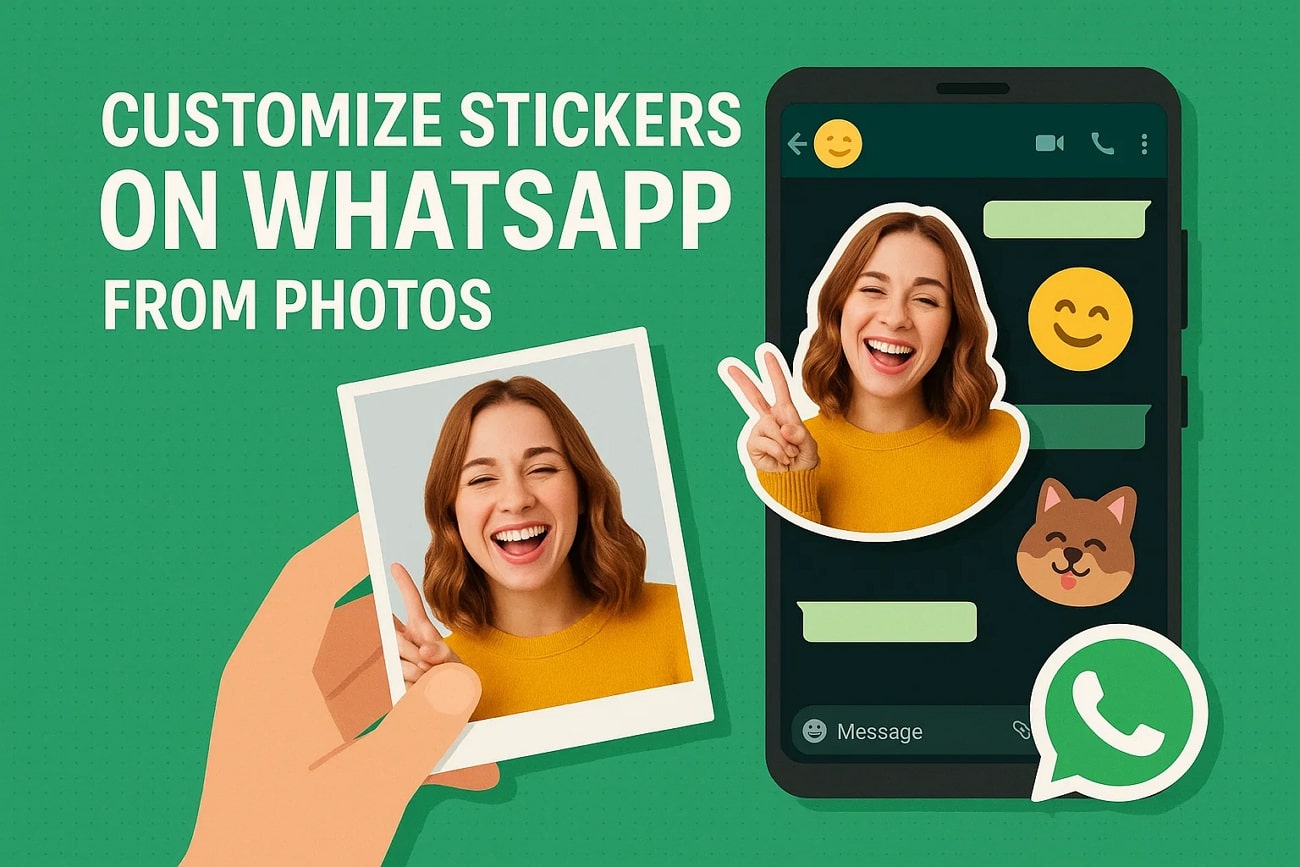
Imagine you have returned from a memorable trip and want to share highlights with your friends. Sharing memories in WhatsApp chat can feel restricted with limited standard stickers and emojis. Why settle for standard stickers when you can transform favorite photos into custom WhatsApp stickers? This article will help you learn how to make WhatsApp stickers from photos and express yourself on a deeper level.
In this article
Part 1. How to Make WhatsApp Stickers from Photos Using its Built-In features
In the digital landscape, it has become very easy to make your custom stickers using WhatsApp's built-in stickers feature. Nowadays, there is no requirement for any third-party tool to direct your photos into stickers on both smartphones and desktops. You can also customize stickers by describing them in the sticker box using AI. There is a comprehensive guide to converting a photo to sticker for WhatsApp discussed in the following:
Step 1. First, access WhatsApp and open any chat where you want to send your personalized sticker. Tap "Emoji Icon" ahead of the message box and select stickers tab. Now tap on the "Create" option to select your desired photo from the phone's gallery or snap a live photo.
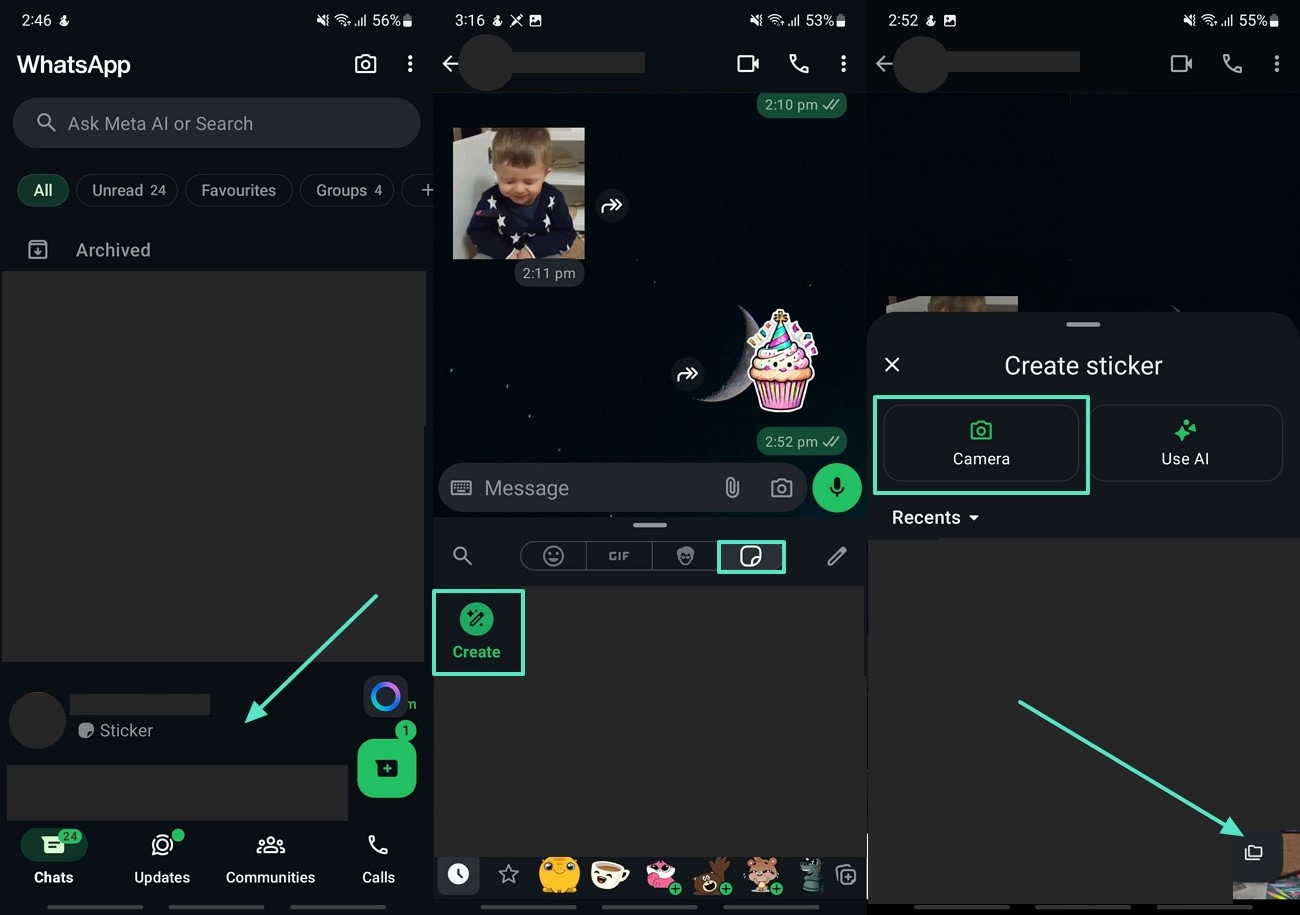
Step 2. Next, the built-in sticker feature in WhatsApp automatically removes the background. Afterward, add text or add emojis to adjust their size and position. Finally, once you are happy with the transformation, tap "Send" icon.
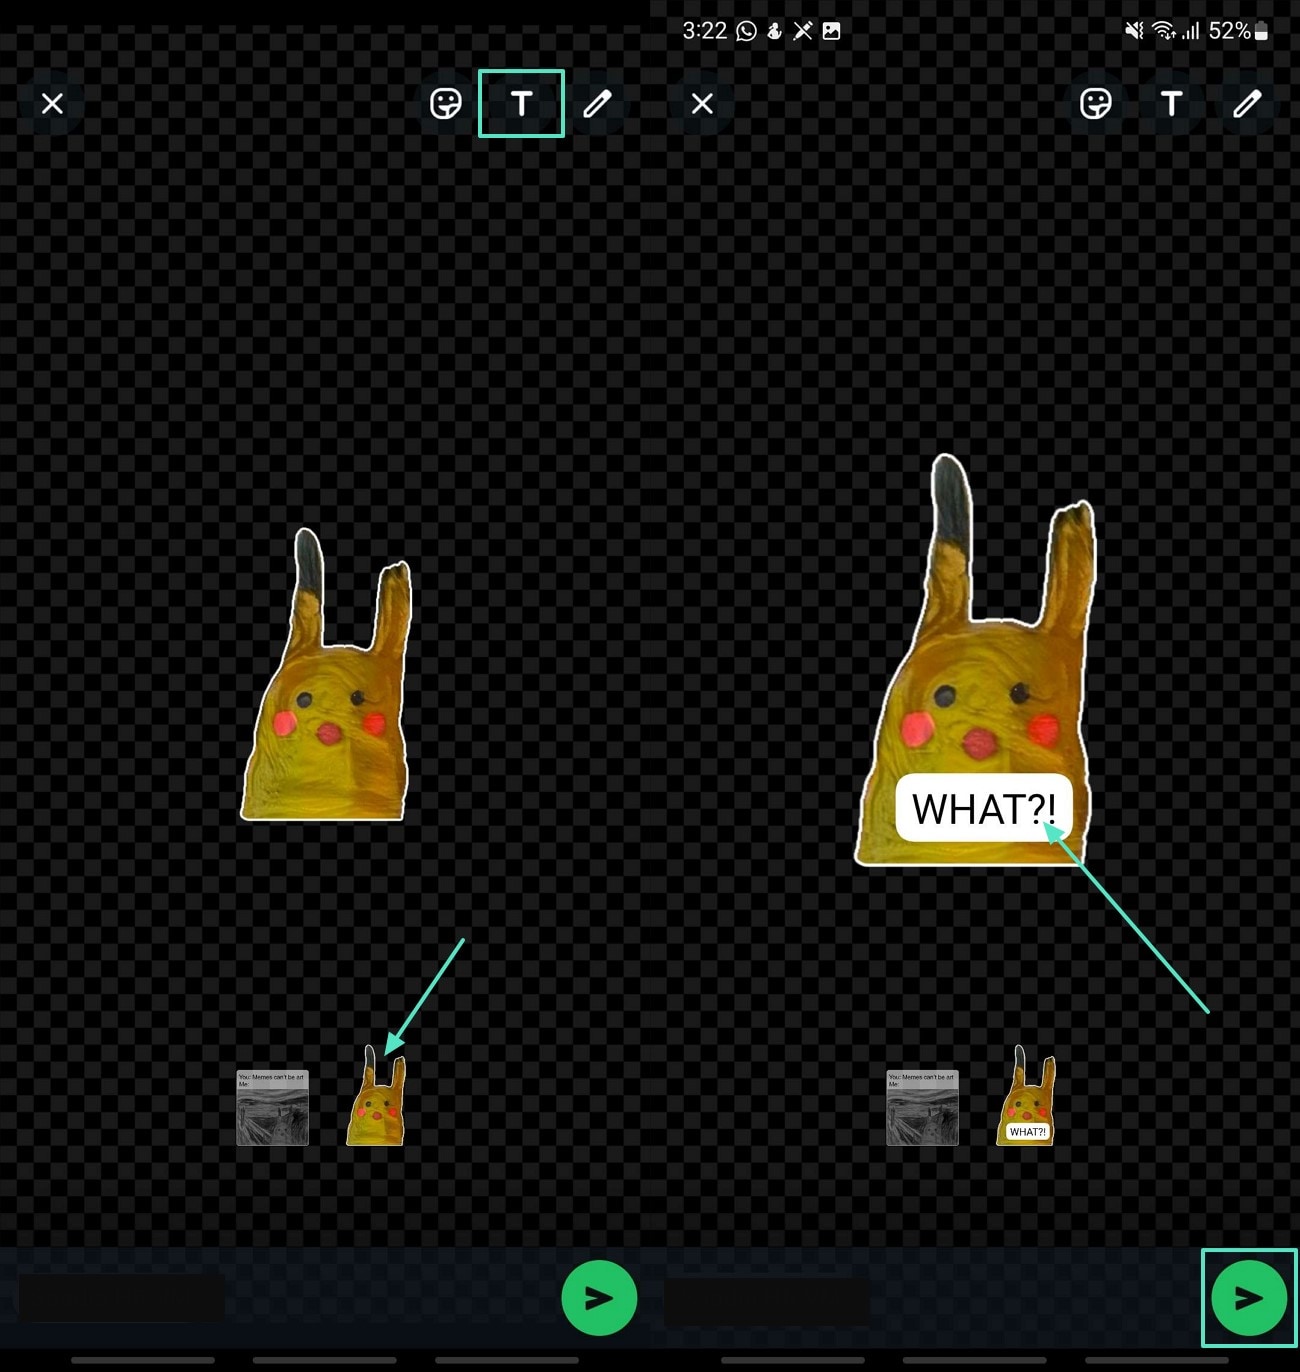
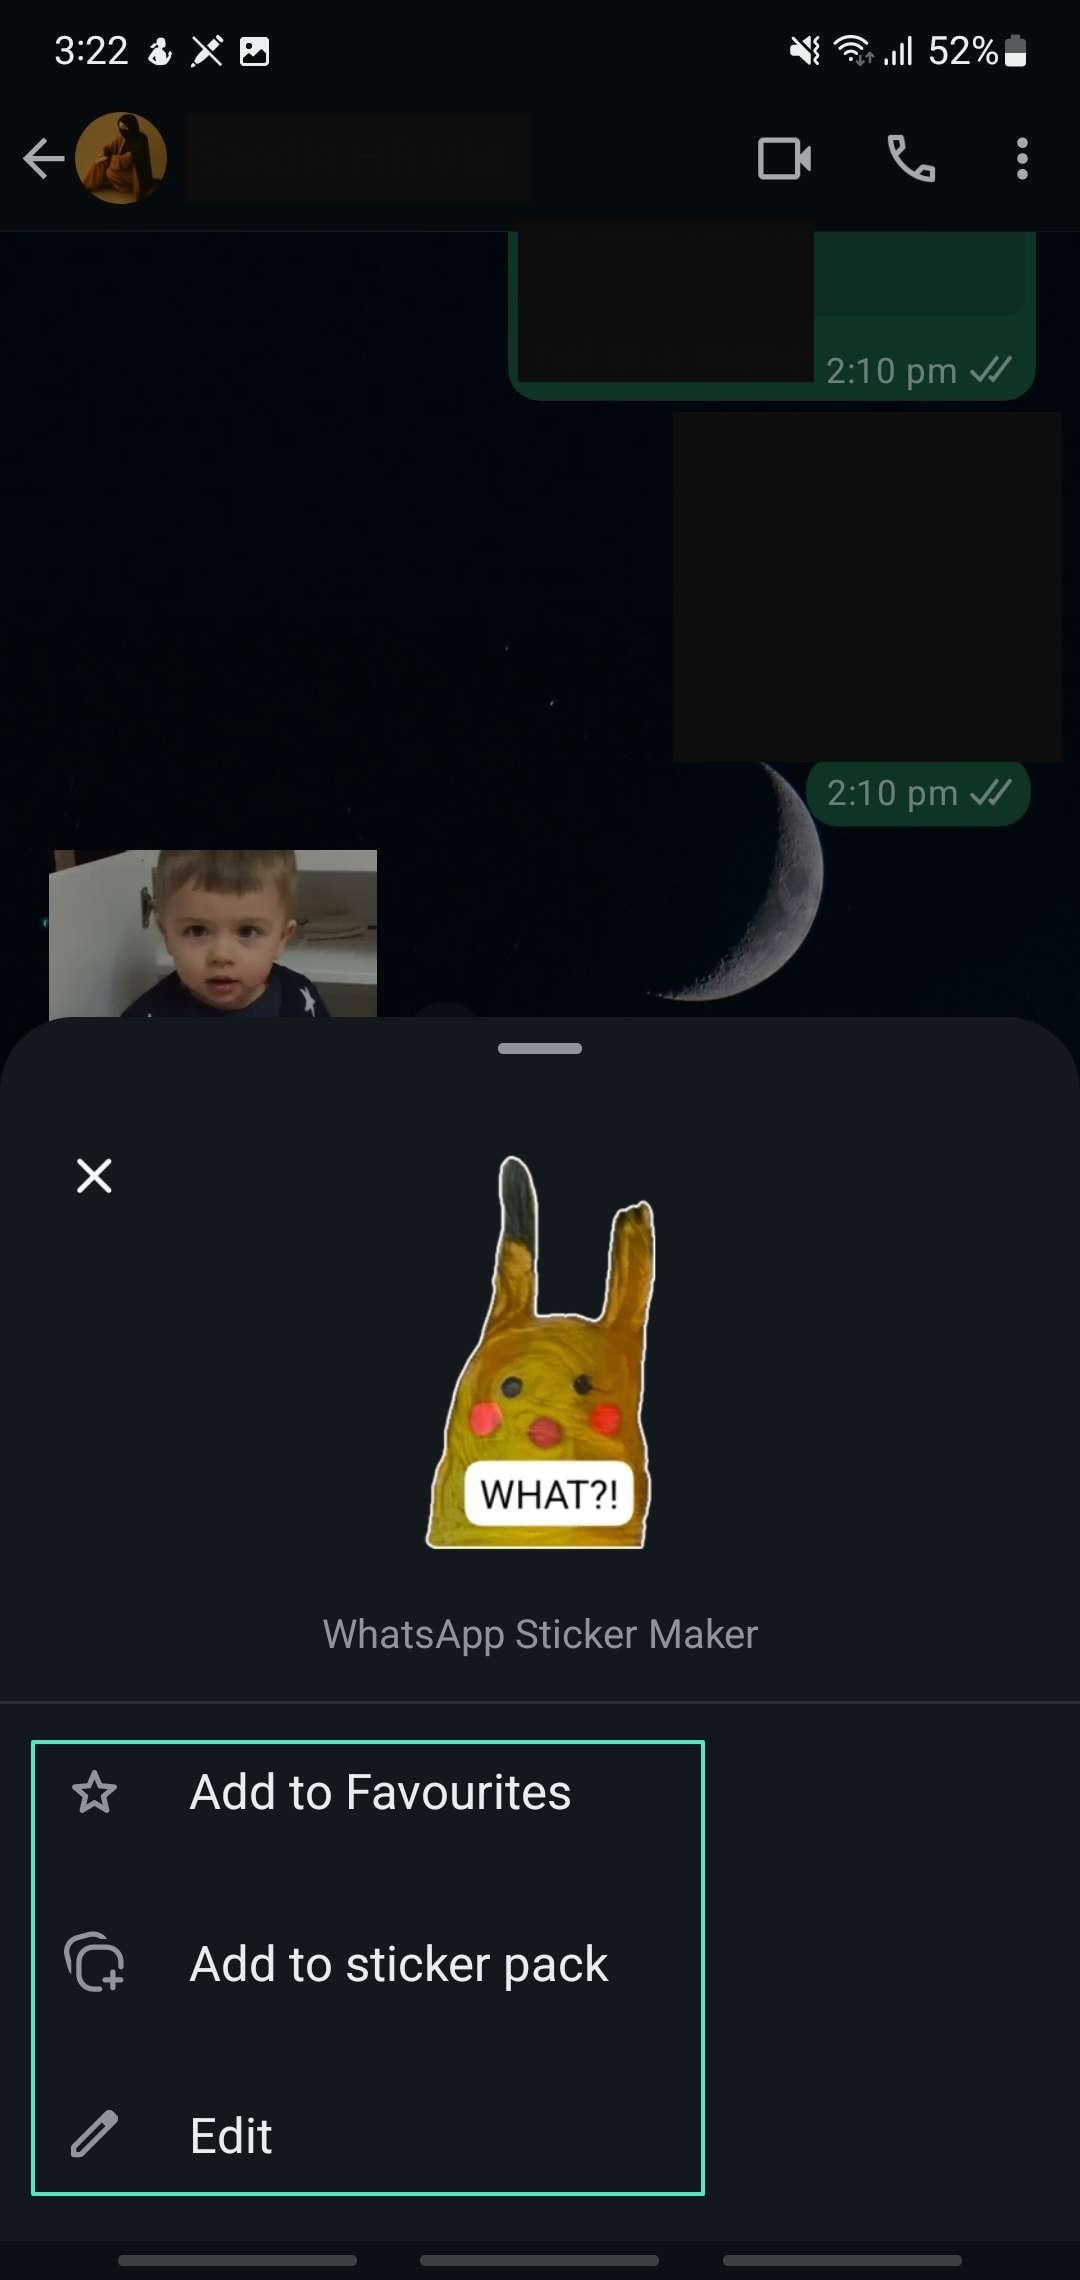
Step 3. Click on the sticker for a bit longer to "Add to Favorites" or further "Edit" the sticker you converted from an image.
Part 2. Customize Your Photos into Stickers Using a Mobile App
In the digital world, social media is full of expressions, emoticons, and unique stickers. In terms of customizing your photos into stickers, there are various mobile apps, but the most popular among all is Sticker Maker Studio. Here is a detailed navigation to convert an image to WhatsApp sticker, as mentioned below:
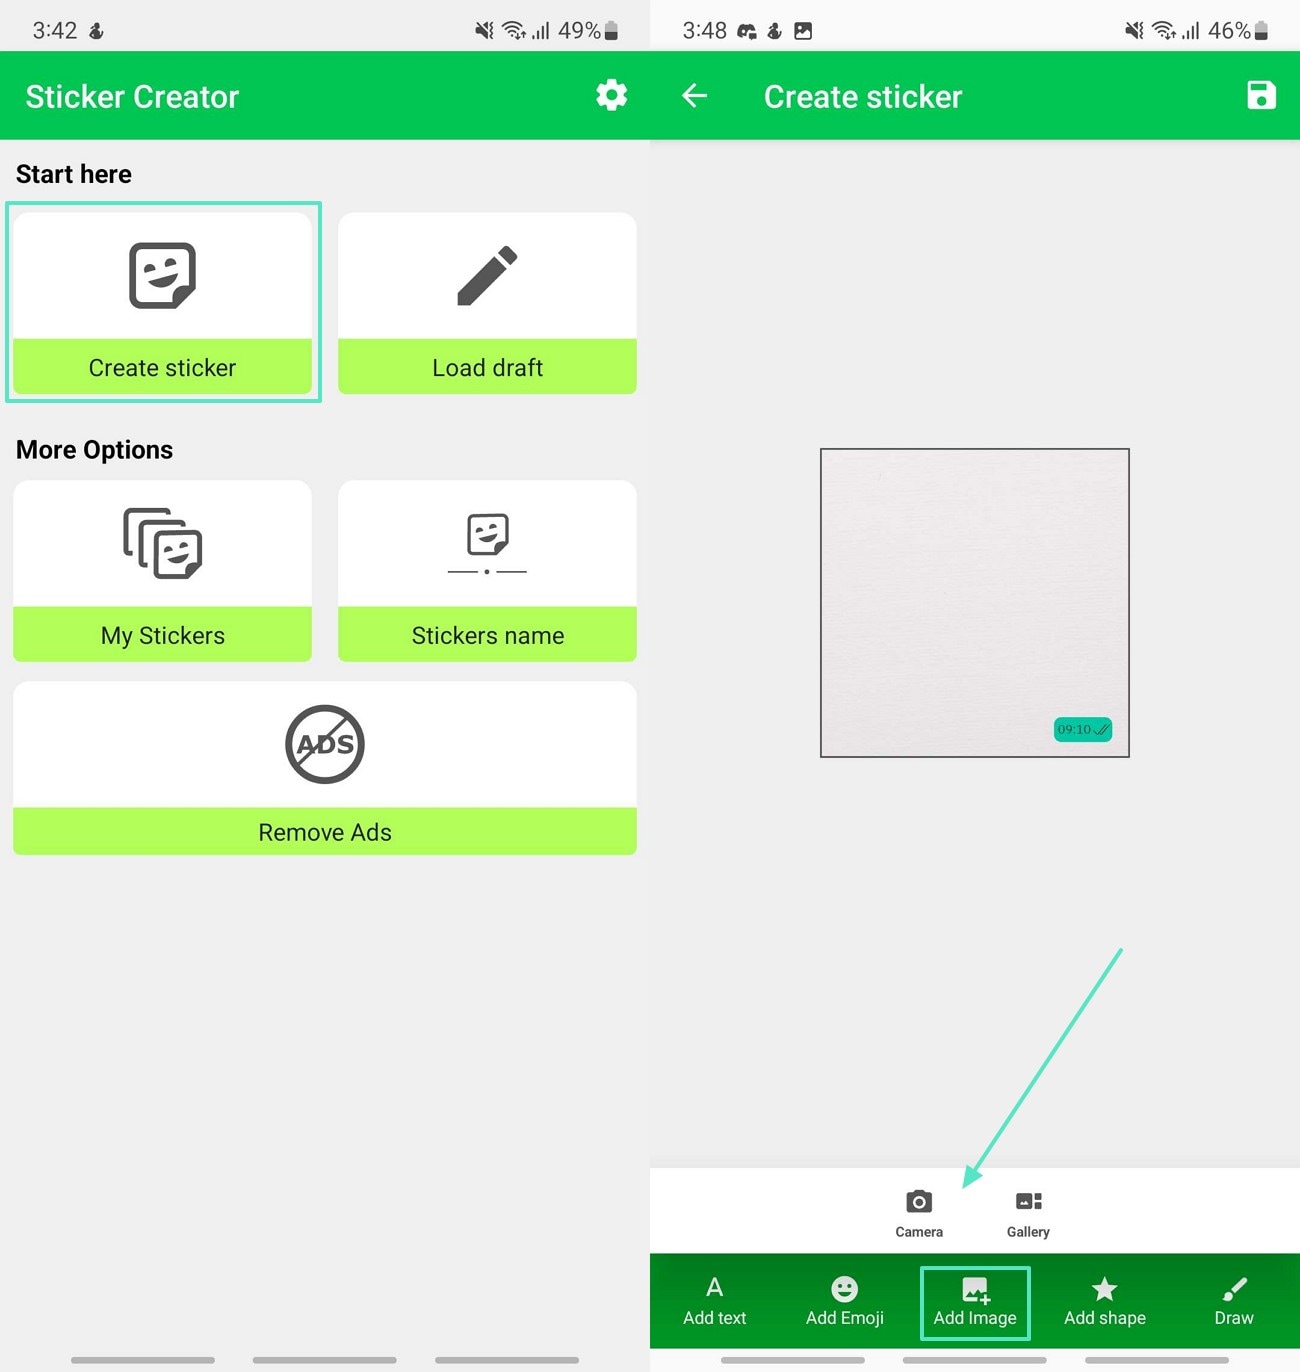
Step 1. Download the app on your mobile device and tap on the "Create Sticker" option. Hit the "Add Image" to import an image using the Camera or from the phone's Gallery.
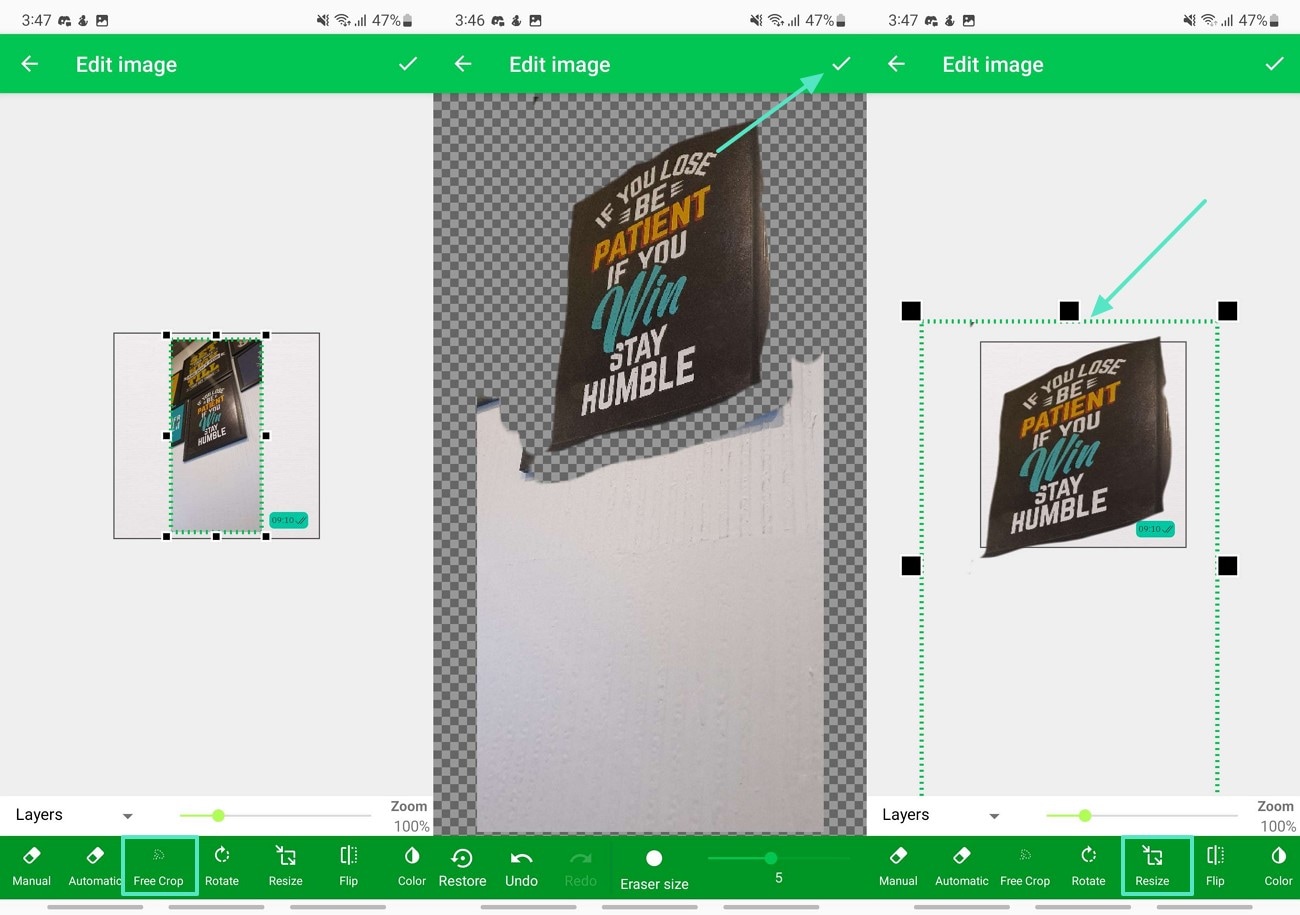
Step 2. You can enhance your image both manually and automatically. Press "Free Crop" to markup the area you want to remove and tap on the "Tick" icon. Then adjust the size by tapping the "Resize" button and hit the "Tick" icon.
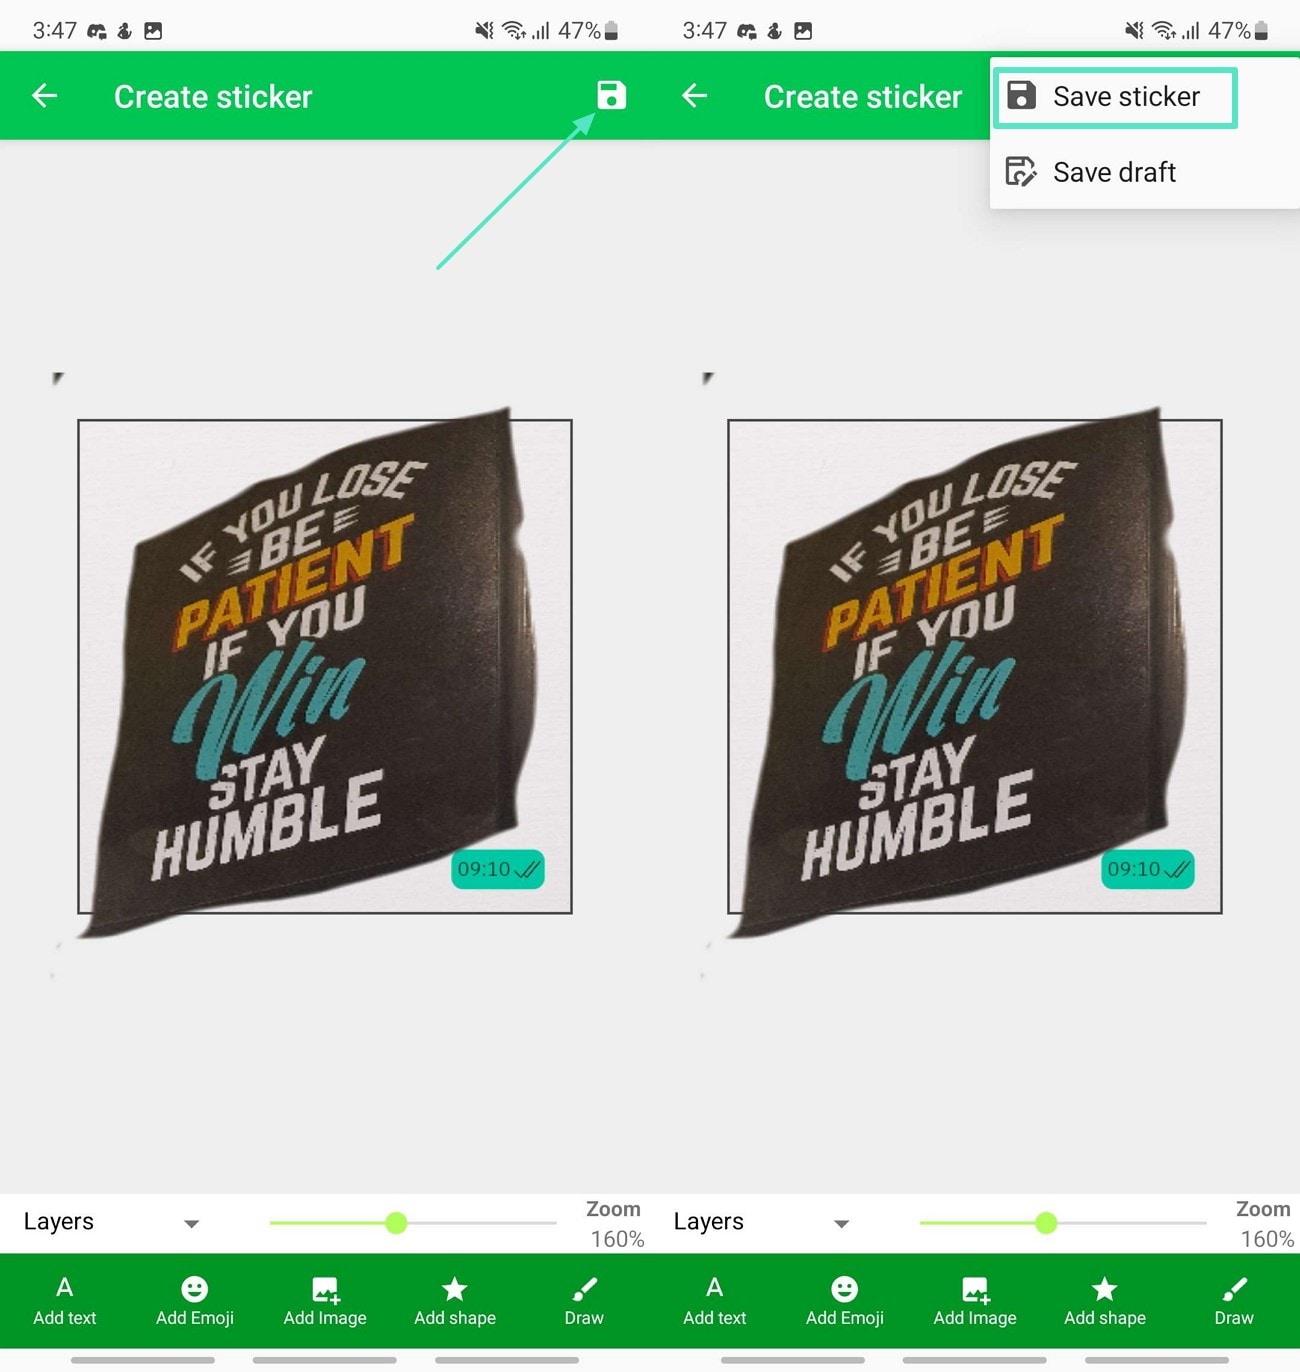
Step 3. Finally, press the "Save" icon in the top right corner and pick the "Save Sticker" option to download the sticker to your device.
Part 3. Convert Your Photos into Stickers Using Free Online Tools
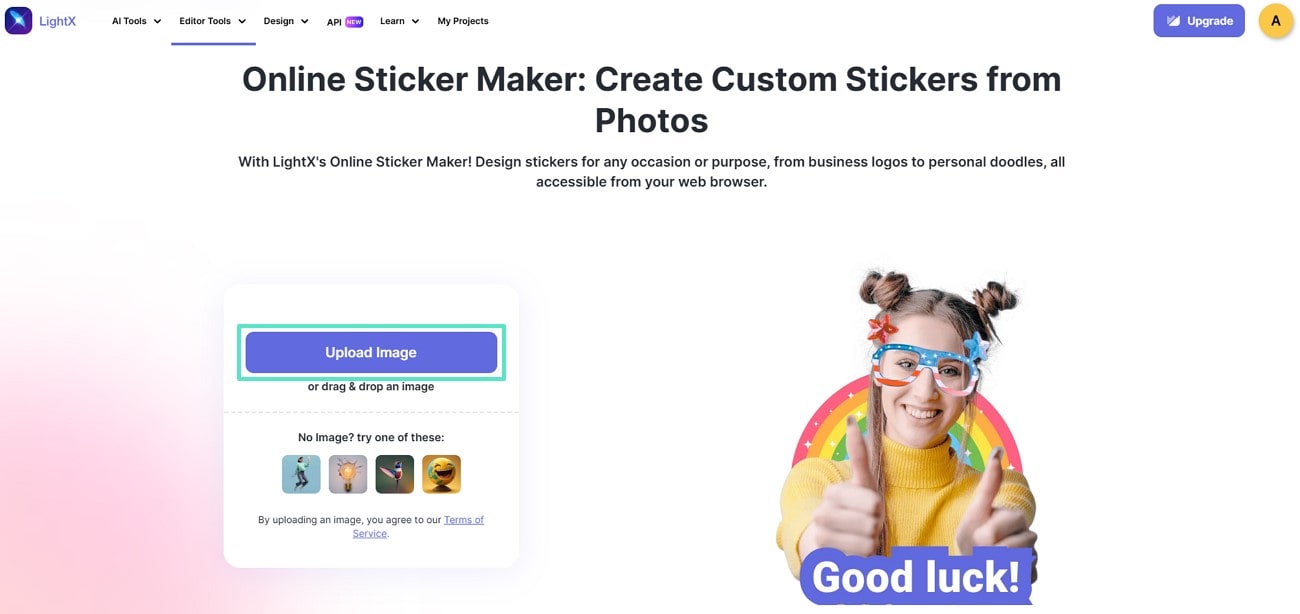
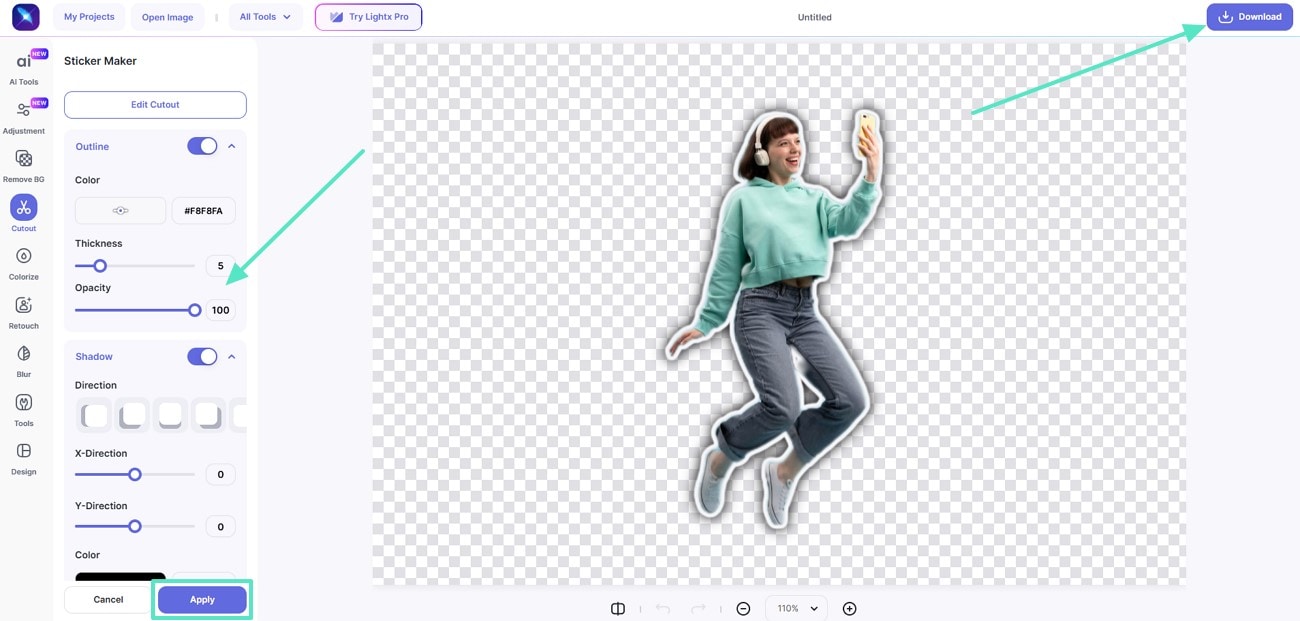
One of the best tools is LightX which transforms photos into professional-quality stickers. A step-by-step guide is discussed below, where you can convert an image to a WhatsApp sticker:
Step 1. Get access to the tool and click on the "Upload Image" button to convert the image to a sticker format of your choice.
Step 2. Once you choose the Auto option to automatically remove the background of the sticker. Then, make further adjustments to the properties from the left panel and hit "Apply." As you are satisfied with the results click on "Download" to save the sticker generated.
Part 4. Transform Your Photos into Stickers For Whatsapp Through Filmora
In case you are a photographer who documents everything in prints, you may need to turn your photos into stickers and share them with your friends. Transforming photos using Wondershare Filmora enables a regular photo to become a brilliant custom sticker. The tool has a user-friendly interface and provides professional tools, including AI background eraser, animated effects, and custom styles. Filmora can be used by complete beginners interested in converting WhatsApp stickers to images.
It comes in handy as an app that helps you to add outlines and shadows to your stickers to improve the visual interest. It offers compatibility with gadgets and can be accessed through desktops as well as smartphones. It is also possible to crop the photos manually and to adjust the aspect ratio.
Step-by-Step Guide To Make Stickers from Photos Through Filmora on Desktop
Creating stickers from personalized photos is a top trend these days. Here is a detailed guide that will let you make stickers from your photos as discussed in the following:
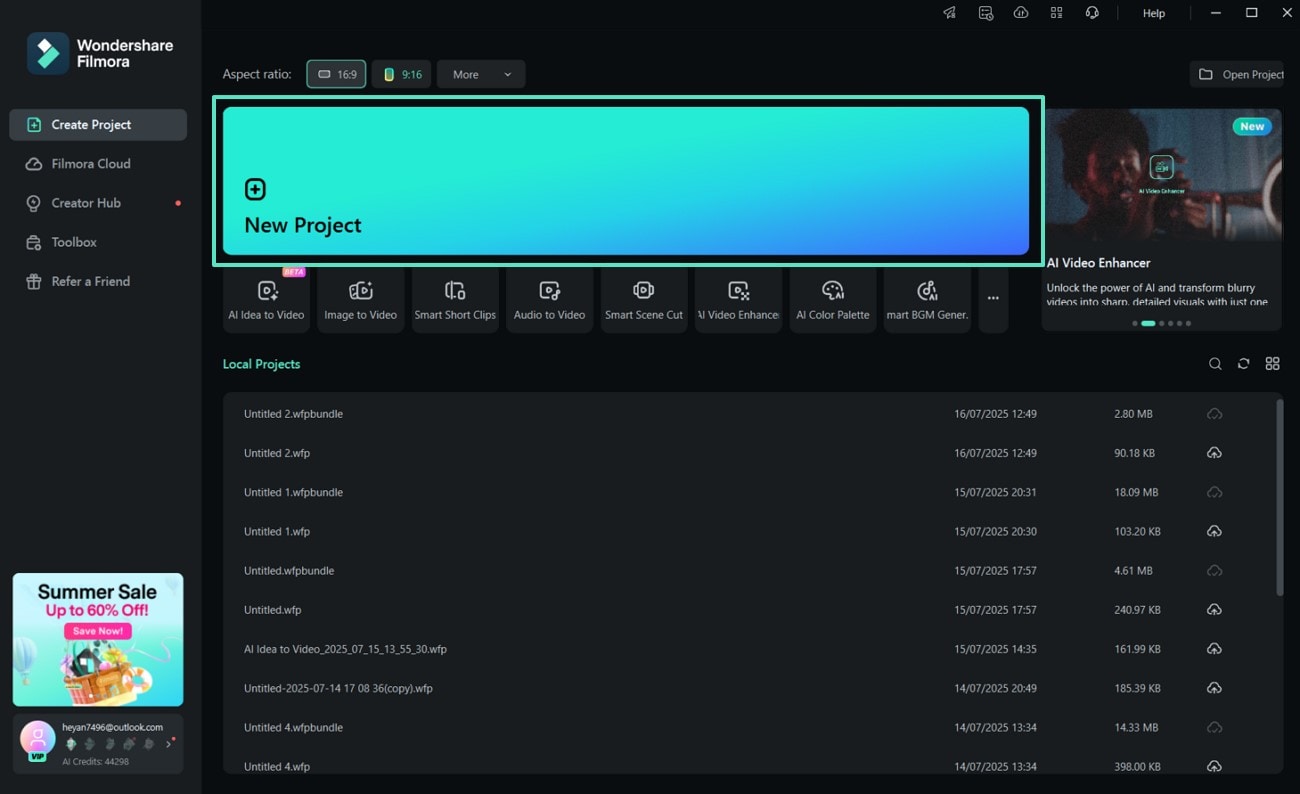
- Step 1. Access the Home Page of Filmora on Desktop. To start, access the Filmora home page and click "New Project" to import your photo. Then, drag your image to the editing timeline。
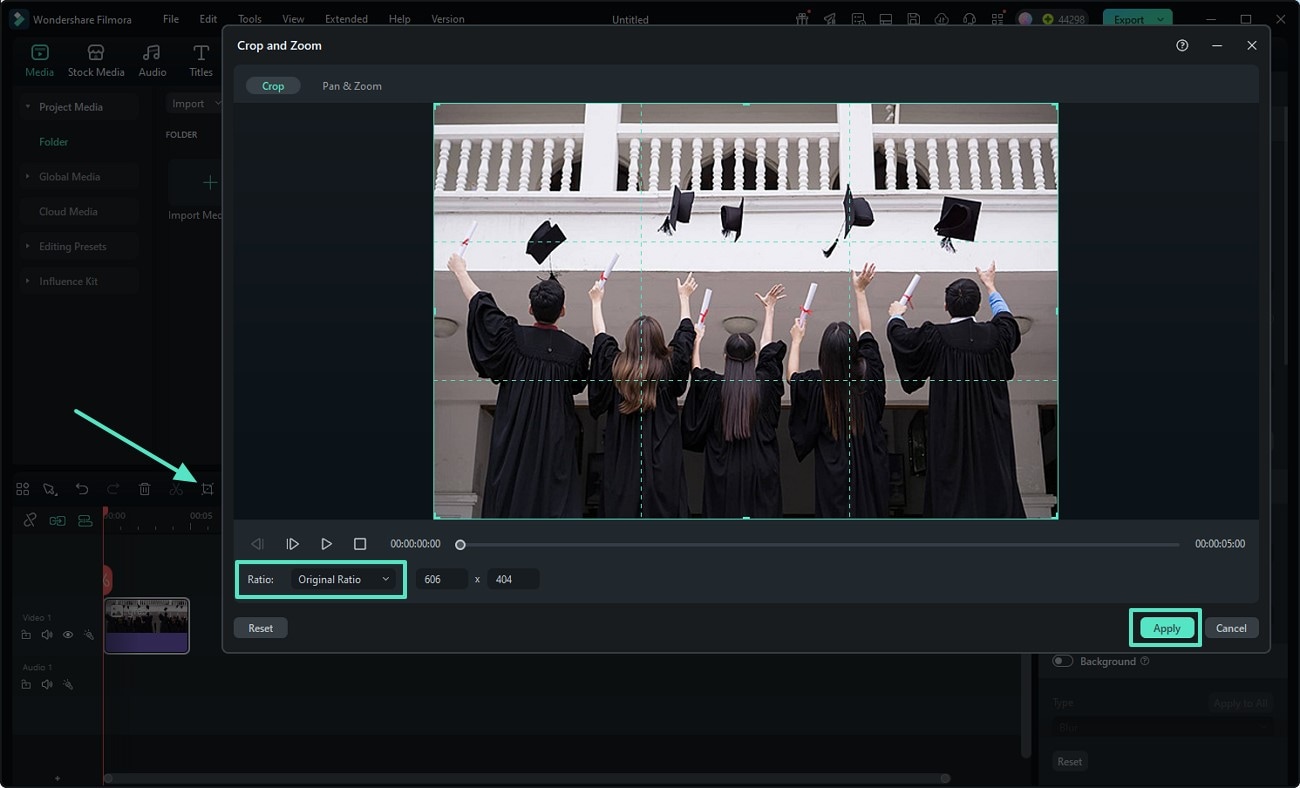
- Step 2. Hit the Crop Tool for Image Cropping. Next, tap on the "Crop" tool above the editing timeline and crop your image accordingly. You can also reset the aspect ratio by hitting "Ratio" and hit "Apply" to save the changes。
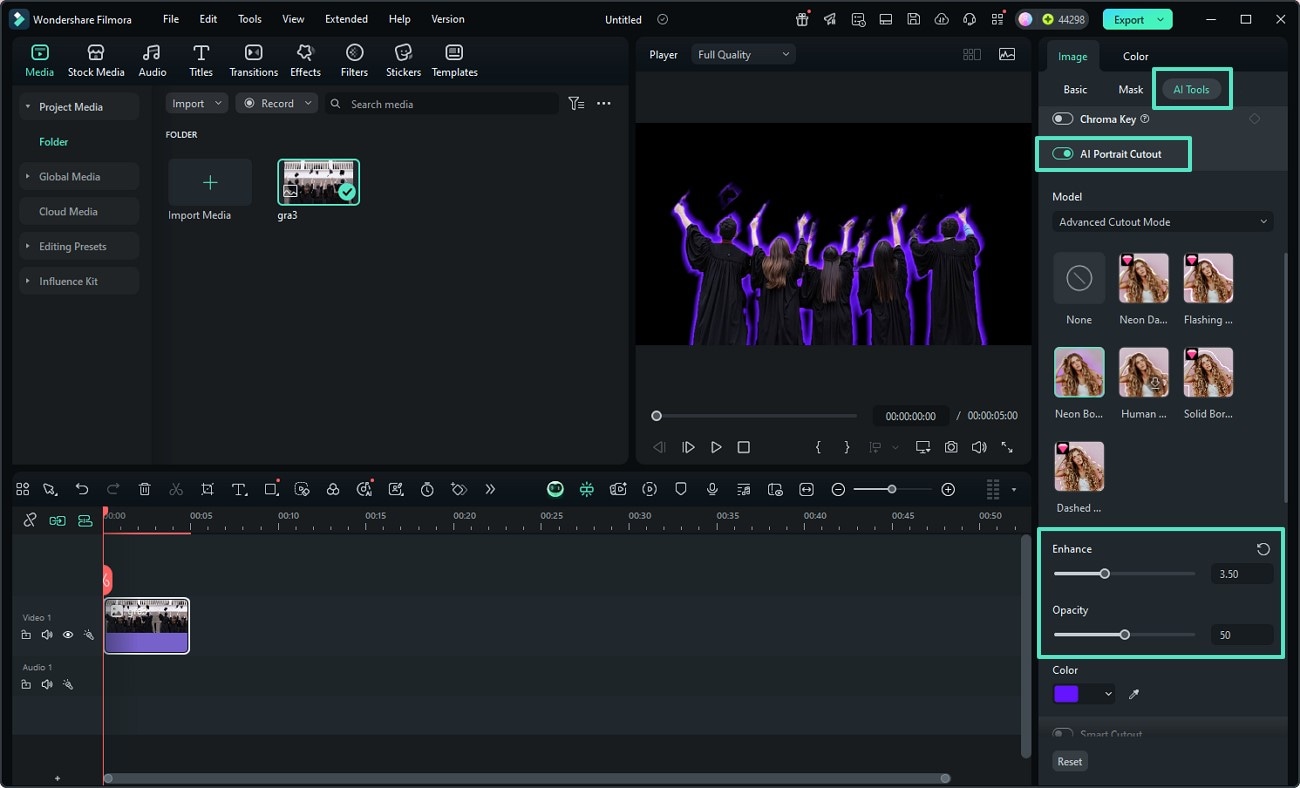
- Step 3. Remove Image Background From the Photo. Enable the "AI Portrait Cutout" tool from the "AI Tools" section to easily remove the background in a single click. You can also choose the outline for your photo and adjust its "Enhance" and "Opacity" by dragging。
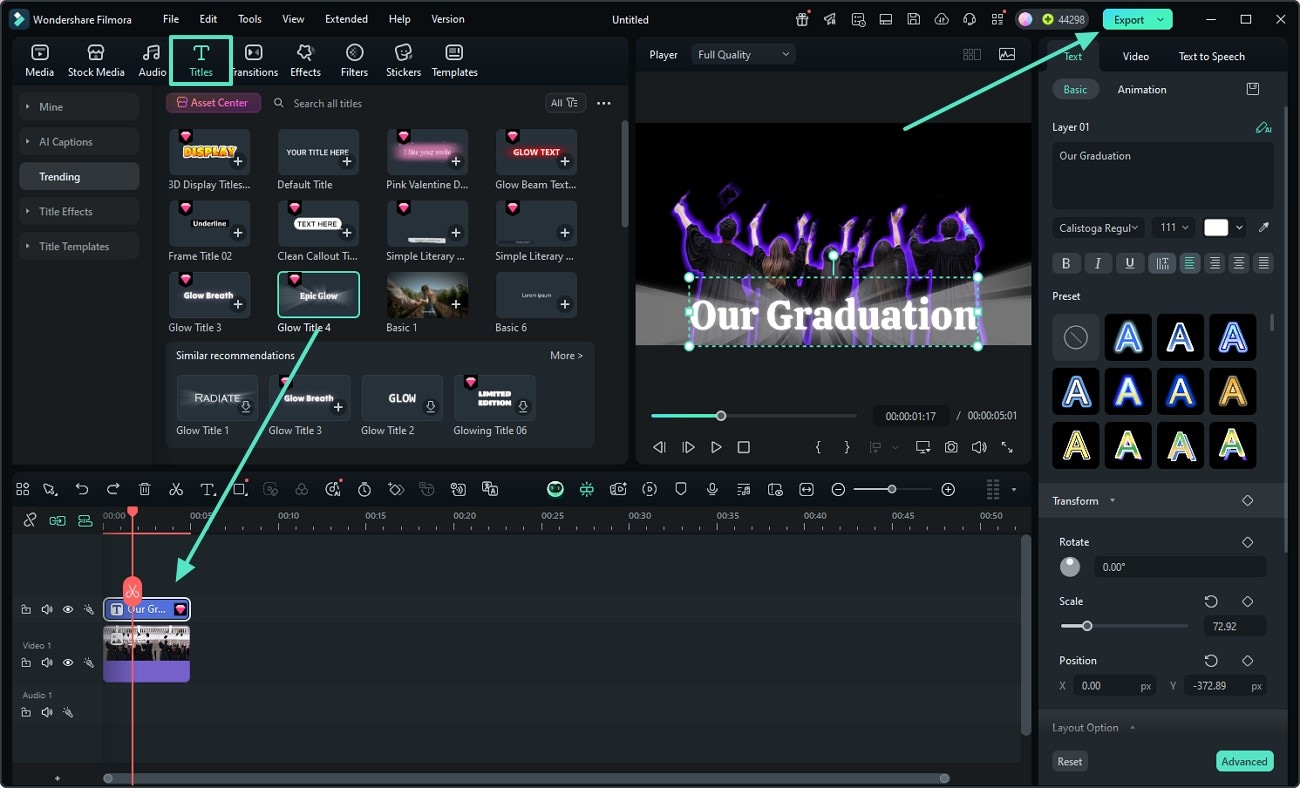
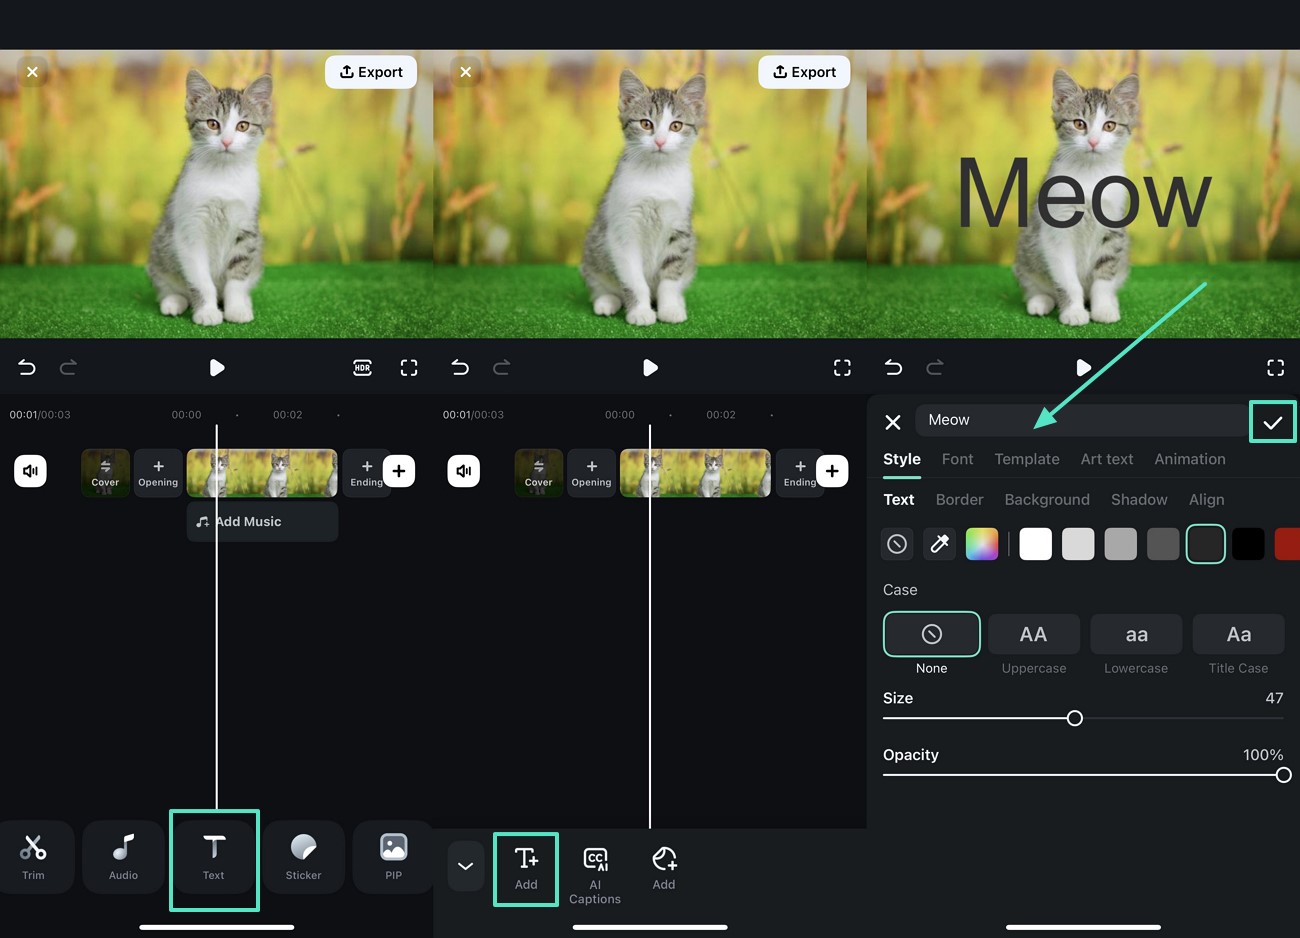
- Step 4. Add Text Descriptions to Your Sticker. Select "Titles" from the main menu and choose any template from the left side panel. Now, drag that template to the editing timeline and double-click on it. Afterward, add the desired text description in the text box and adjust its size, font, and preset, then click on "Export"。
- Step 5. Modify Sticker Settings and Export It to Your Desktop. Finally, modify the settings in the export window and choose PNG or JPG image sequence alongside resolution, before tapping on the "Export" button to save it to your desktop。

 secure download

A Detailed Guide to Transform Photos into Stickers Using the Filmora App
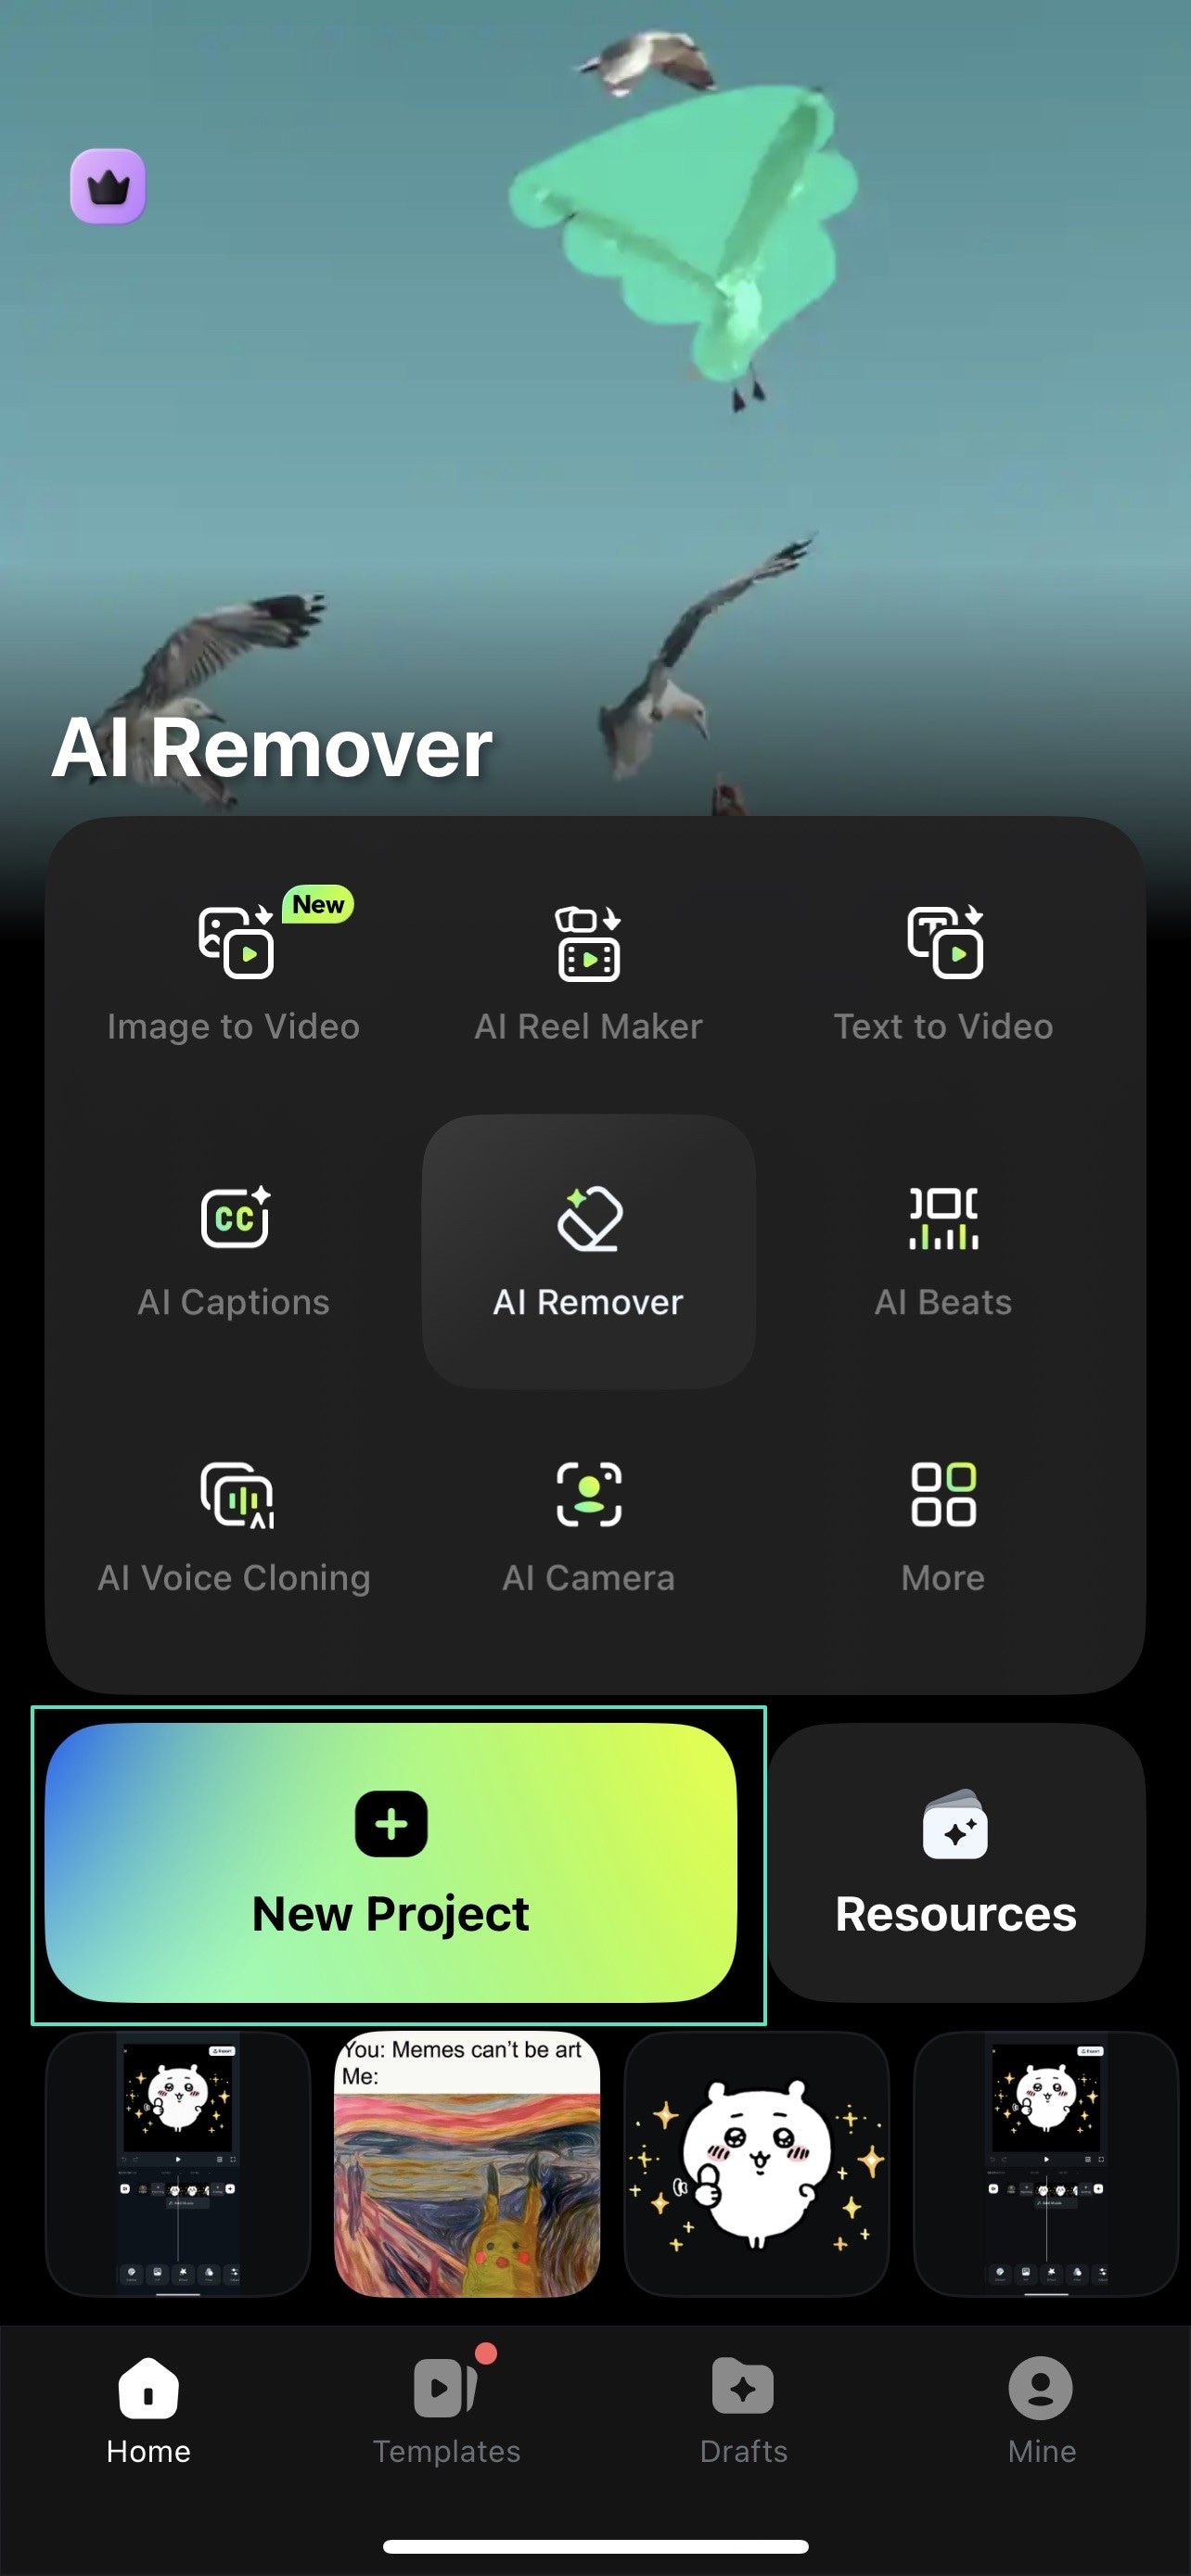
Using the Filmora App (iOS/Android), it is now a straightforward process to convert an image to a WhatsApp sticker. You can add emotions, personal touch, and creativity to stickers used in WhatsApp chats. Filmora in iOS provides the option of live photos, so here's a detailed guide for converting your images into stickers:
- Step 1. Open Filmora App and Insert Your Photo. Launch this app on your smartphone and press "New Project" to import the photo that you want to turn into a sticker for WhatsApp chat。
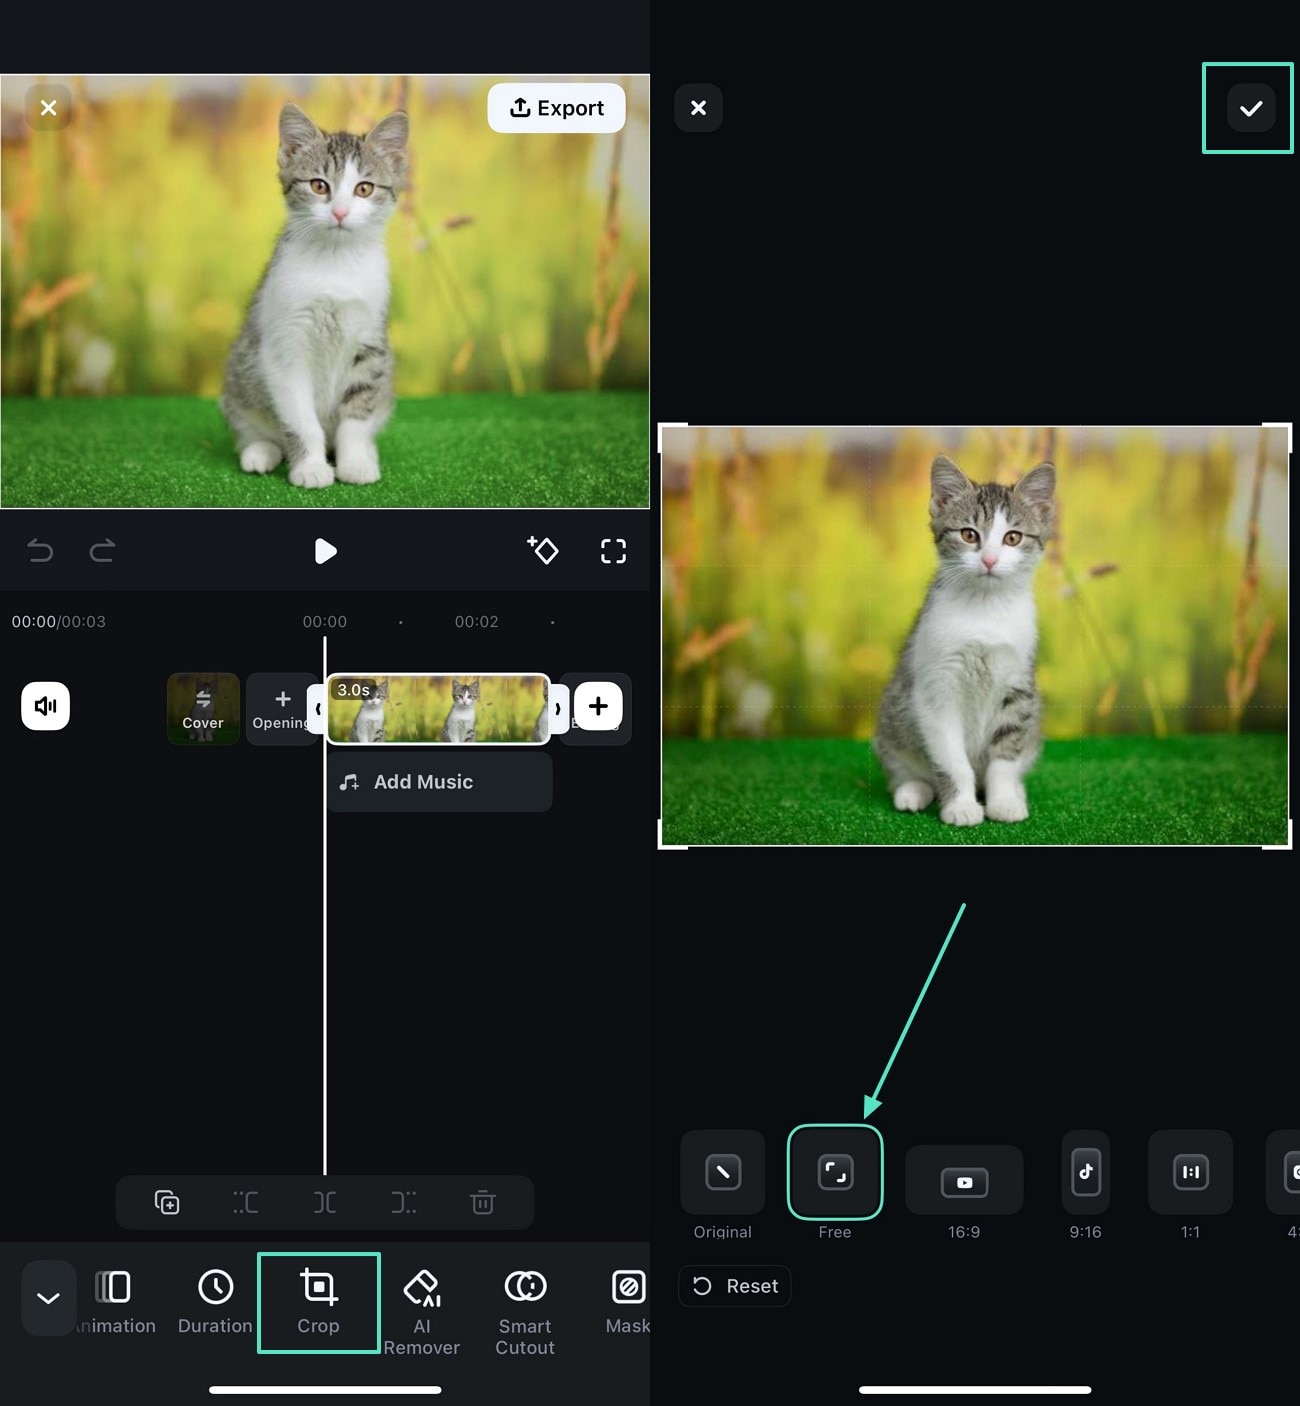
- Step 2. Adjust Image Cropping for WhatsApp Stickers. Now, click the editing timeline and hit the "Crop" option given below the screen to crop your image accordingly。
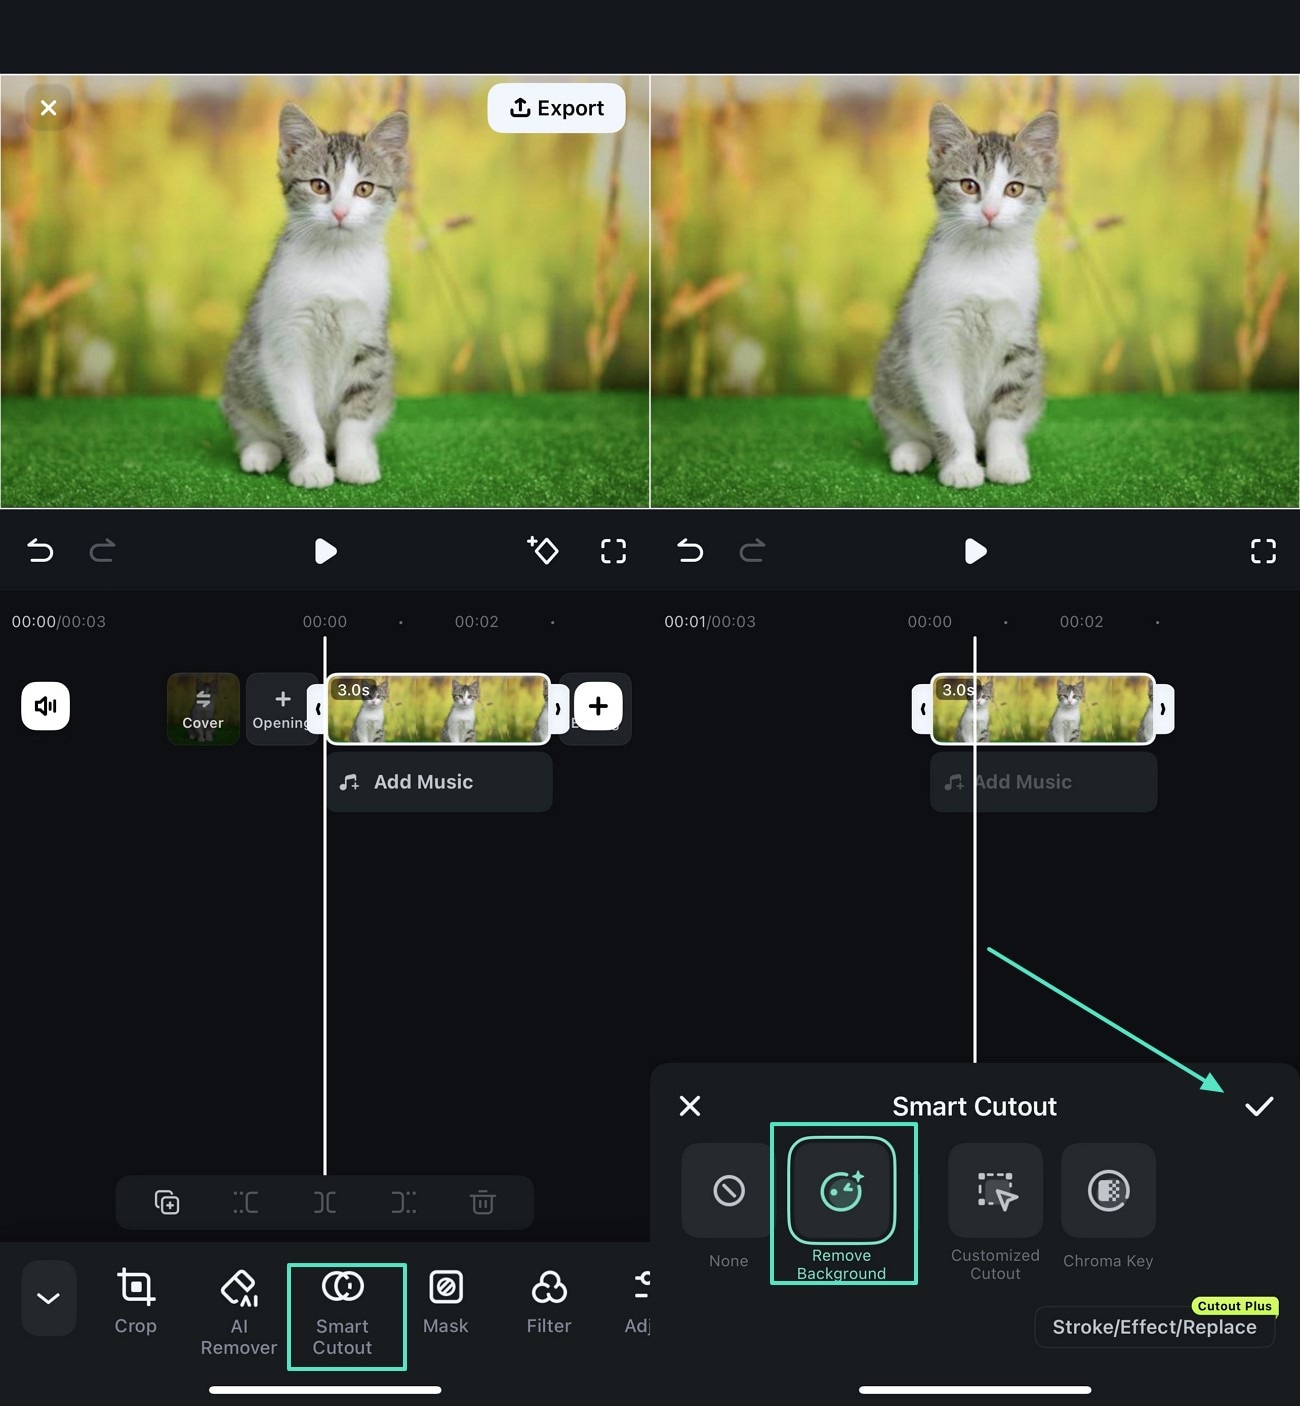
- Step 3. Select Smart Cutout to Remove Background. Next, remove the unwanted background of your photo by utilizing "Smart Cutout" and tap on the "Tick" option after apply the "Remove Background" feature。
- Step 4. Add Text Descriptions to Images. Moving on, you can add text descriptions relevant to your photograph's vibes by hitting "Text" from the menu bar at the bottom. Now, tap on "Add Text" button and further adjust the size, preset, and font of the text, then press the "Tick" option。
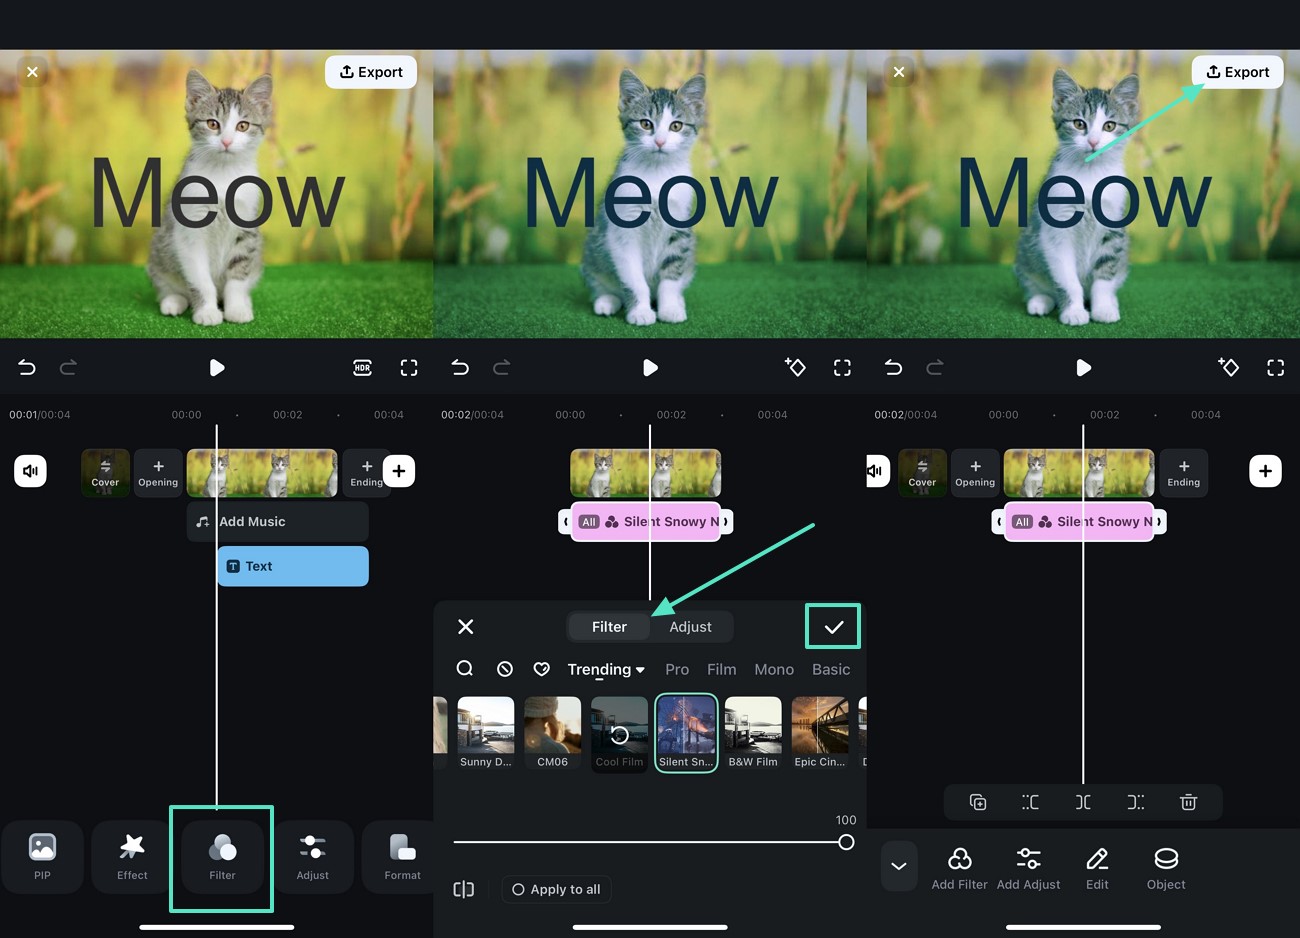
- Step 5. Add Filters to Your Photo. Then, select any desired filter from the library by clicking the "Filters" option in the toolbar below, and then tap on "Export"。
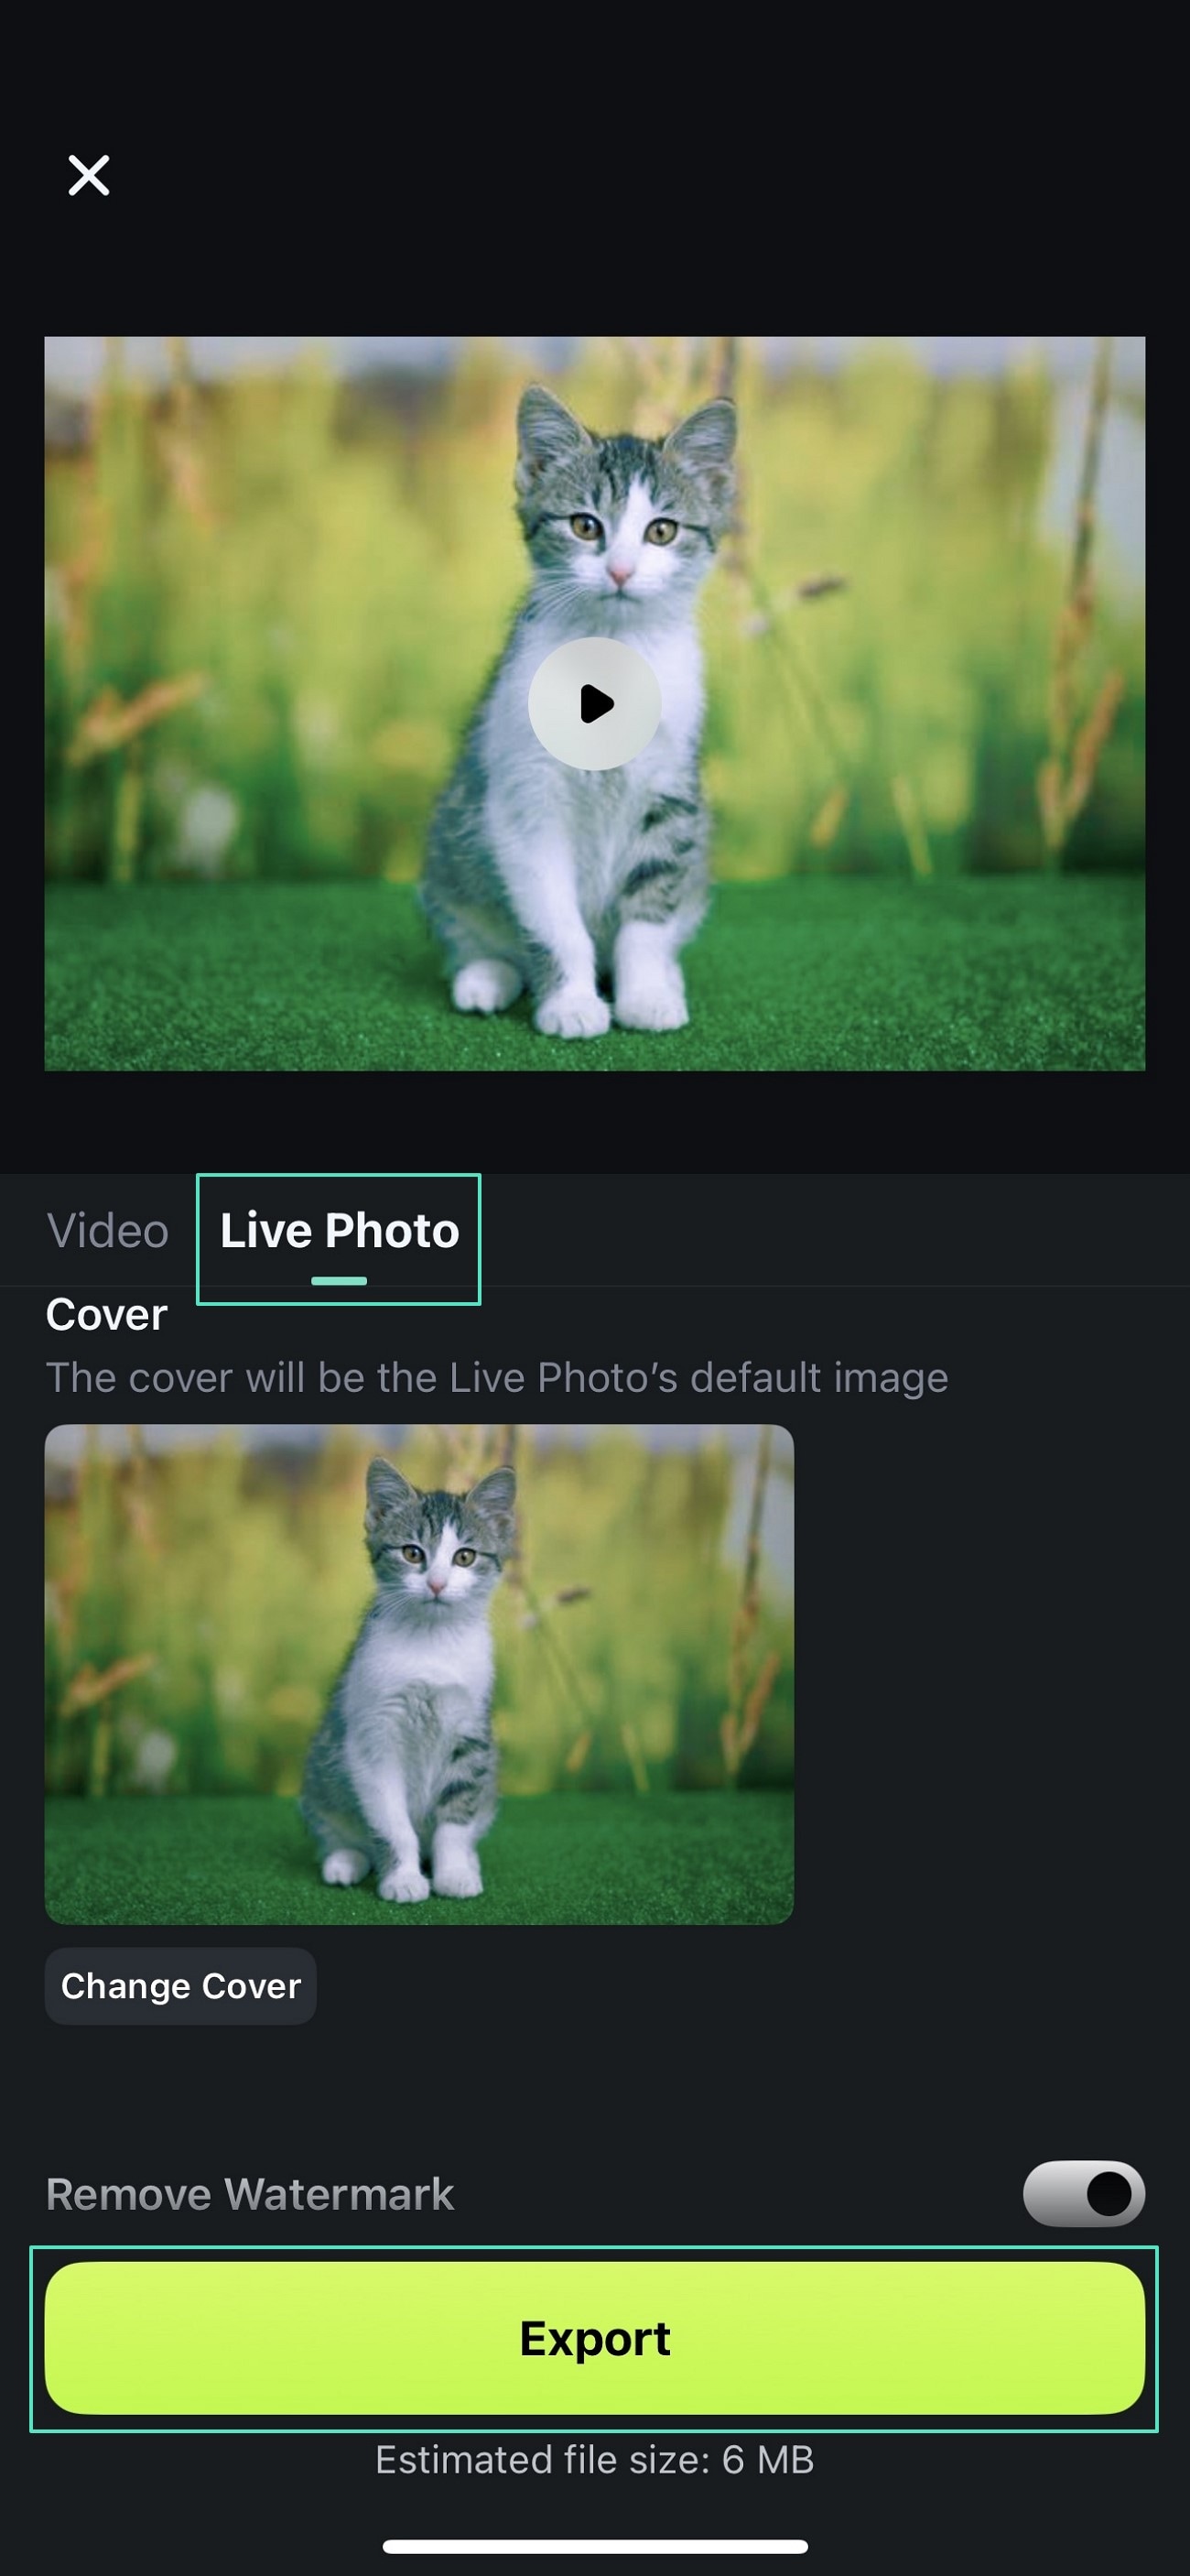
- Step 6. Adjust Settings and Export Your Image as Live Photo. Finally, change settings in the export window, select format and resolution under "Live Photo" section, and hit "Export" to save your sticker in your phone's gallery。
secure download
Conclusion
In conclusion, custom stickers have become a hyped digital form of communication that people use to bring about the aspect of satire and emotion in their WhatsApp conversations. Those stickers created from photos help bridge the gap between self-expression and text. Although there are several tools available on the market, Filmora is considered the premier choice on how to make whatsapp stickers from photos. By combining creativity and powerful customization, Filmora helps to ensure strikingly visual stickers.
