AI lip sync has revolutionized the way we translate speech into other languages, making dubbing more seamless and natural. Traditional dubbing often struggles with syncing translated speech to the speaker's mouth movements, which can be distracting for viewers.
However, with AI lip sync, technology now allows for accurate alignment of translated speech with the speaker’s mouth movements. This method not only eliminates the common issues of traditional dubbing but also ensures a more engaging and authentic experience.
To help you get started, we will introduce some of the best tools for AI lip sync and how to use them to help make your work efficient.
In this article
Part 1. How to Use Software Making AI Lip Sync Effect?
Some video editing software now feature the AI Lip Sync effect that automates the process of syncing a character's lip movements with audio tracks. This is great, as you can have powerful yet easy-to-use features in your hand to create realistic videos more efficient and accurate.
Among Lip Sync software that offers this functionality, we’ve hand-picked some of the best options, along with instructions on how to use the AI Lip Sync effect within each program.
Option 1: Wondershare Filmora
The top choice for lip sync software is Wondershare Filmora. Renowned and trusted for its ease of use in video editing, Filmora has been a favorite among creators. Starting with Version 14.0, Filmora introduces the AI Lip Sync feature, adding to its already impressive set of tools. This new AI functionality automates the synchronization of lip movements with audio tracks and the translated sound accurately.
Step-by-Step Guide on AI Lip Sync Effects in Filmora
Step1Install the latest version of Filmora
Make sure you have the latest version of Filmora installed. You can update or download it from the official website and follow the installation instructions.
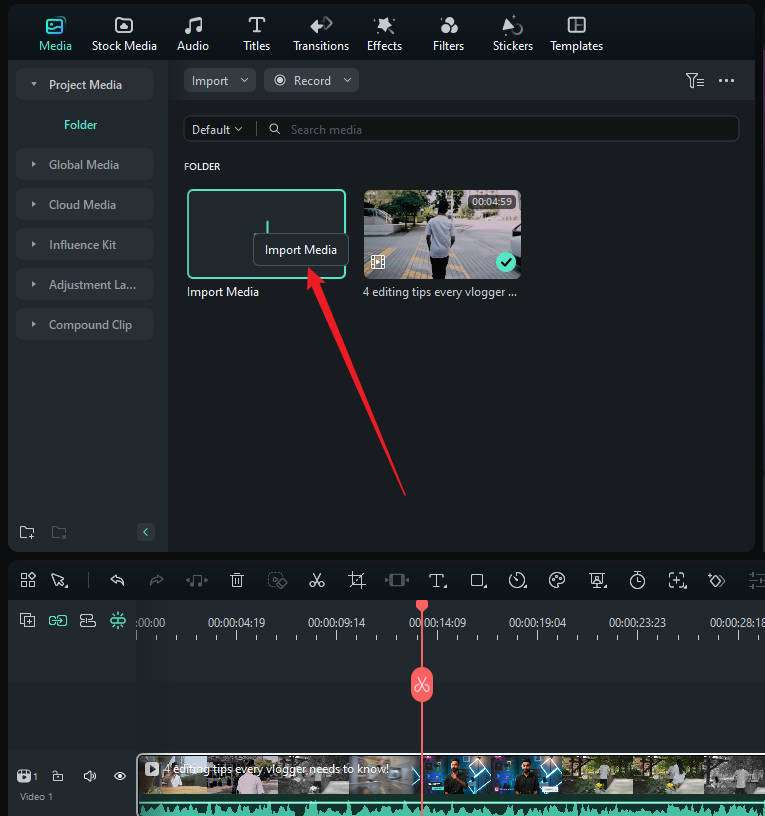
Step2Create a New Project and Import Your Video
In the Filmora startup window, click on "New Project." Then, add or import your video to the editing workspace.
Step3Enable AI Lip sync
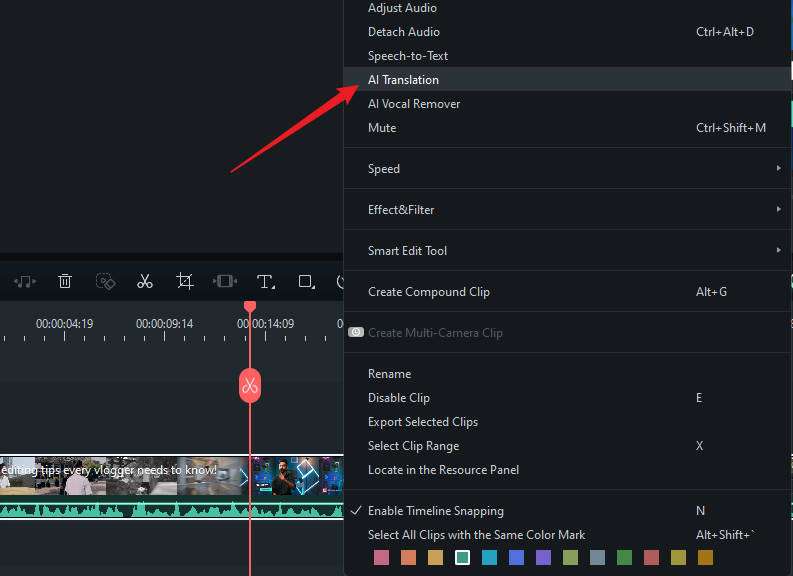
Next, right-click on the video and select "AI Translation."
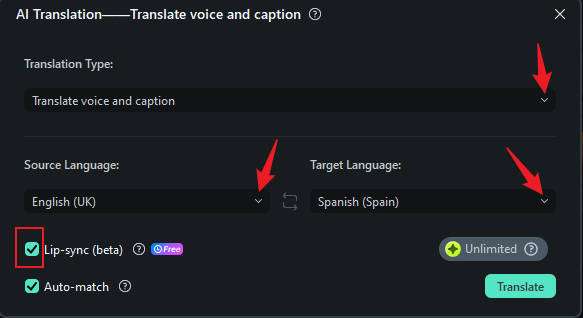
In the AI Translation window, choose the translation type as "Voice and Text." Select your source and target languages, and to enable lip sync, check the "AI Lip Sync" option.
Step4Edit and Customize the Subtitle
After a few minutes, you will see the results in the Project Media. There will be a separate video with lip synchronization in the new language and the corresponding subtitles.
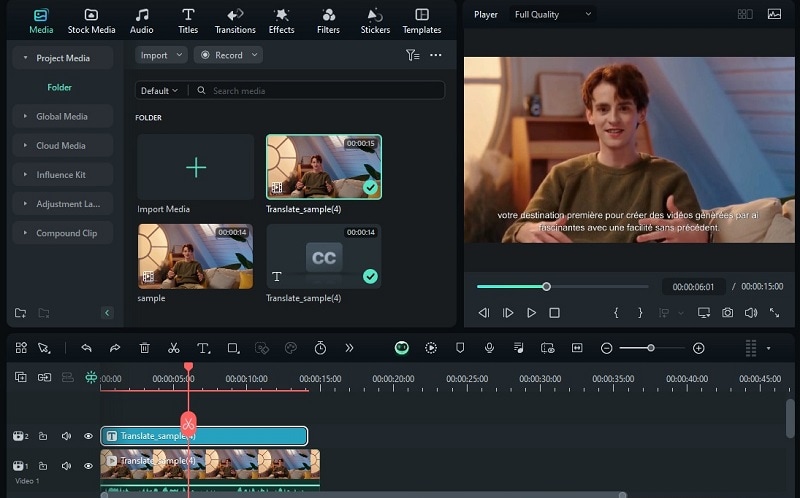
To edit the subtitle, you can double-click the subtitle track on the timeline and make adjustments as needed.
Other AI-driven tools you can find on Filmora include:
- AI Translation: Filmora supports over 20 languages, including German,Spanish, and Hindi, with an accuracy rate of over 95%. Filmora can detect the characters speaking in a video and match the tongue of the output language with carefully crafted lip animations. With this powerful technology, users can create lip-driven videos for any population around the world.
- Audio Ducking: Automatically adjust background audio levels
- AI Voice Changer: Modifies voice characteristics to create unique sound effects or alter voices for different characters
- Speech-to-text: Converts spoken words into text for captions, subtitles, or transcription
- AI Voice Cloning: Filmora video translator utilizes advanced and cutting-edge cloning technology that's essential in replicating your unique voice into another language and keeping the natural appeal and timbre of your voice.
- AI Vocal Beautification: Refines vocal quality to improve clarity and overall sound quality
Option 2: Virbo

Wondershare Virbo is another recommended software for AI lip sync. Through its AI Video Translator feature, Virbo can instantly translate your video into over 40 languages, with an option to synchronize lip movements with the translated audio. There is also an option to add subtitles in your selected language.
How to lip sync from audio using Virbo:
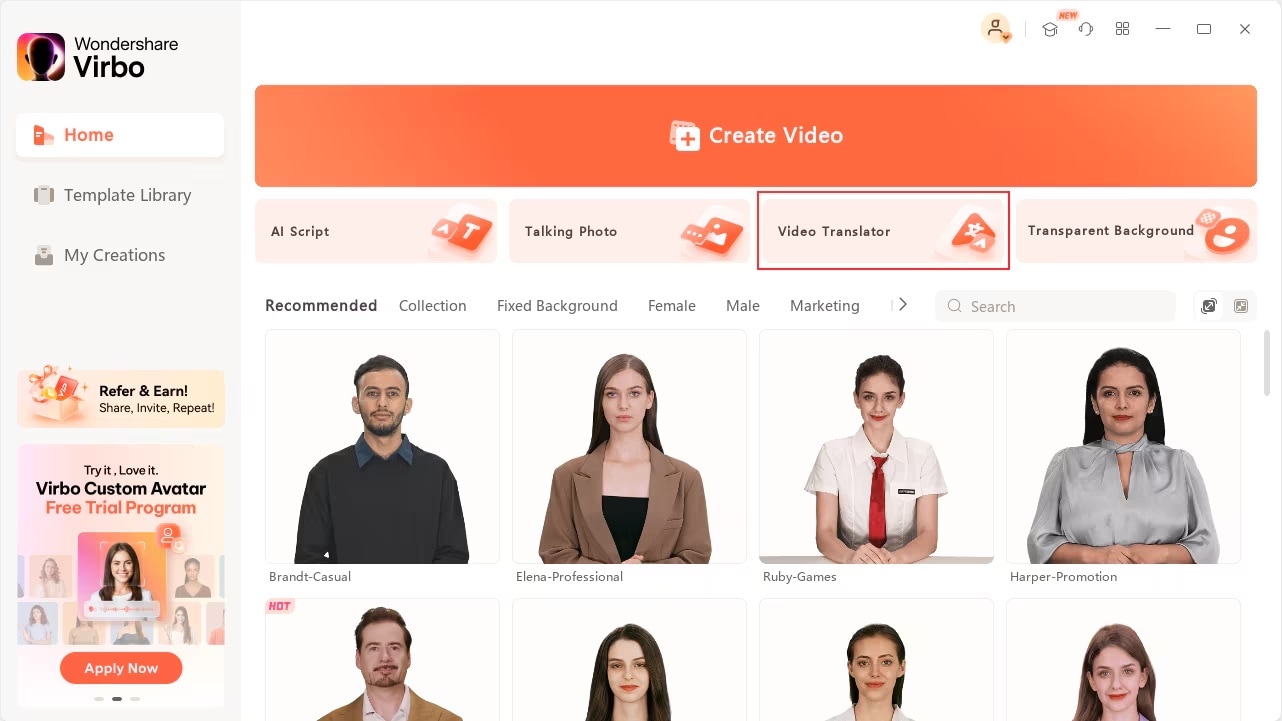
Step 1: Open Wondershare Virbo after installing. Then, select Video Translator.
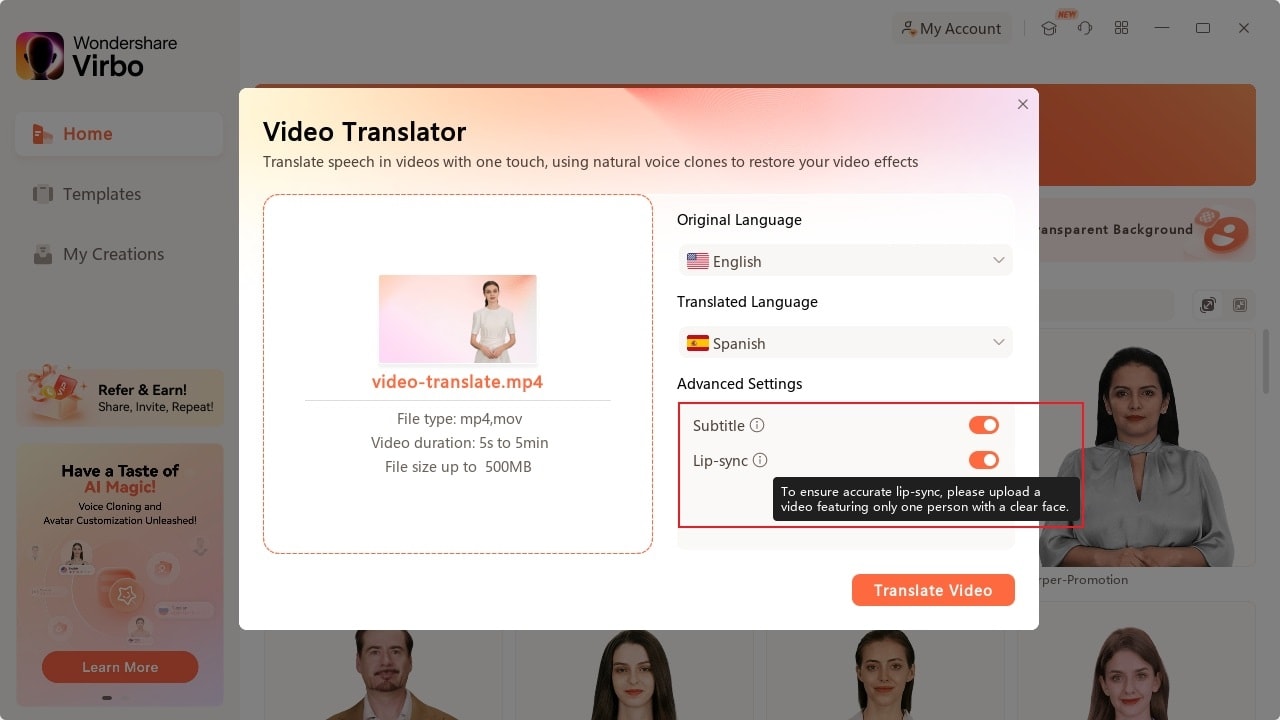
Step 2: Upload the video you want to sync, then choose the original and translated languages. Don’t forget to turn on the Lip Sync toggle and subtitle if you want to. Click Translate Video to proceed.
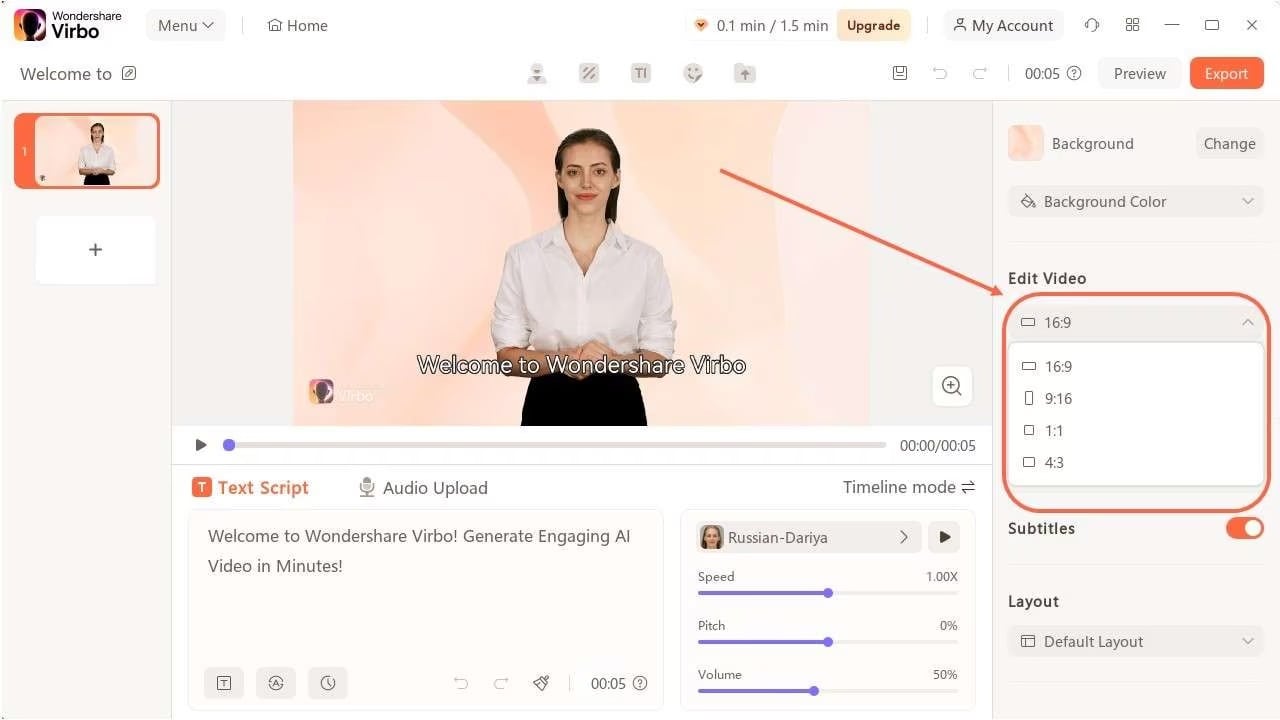
Step 3: Edit the video as necessary. Then, save your video to your computer by clicking Export.
Option 3: PixBim Lip Sync AI
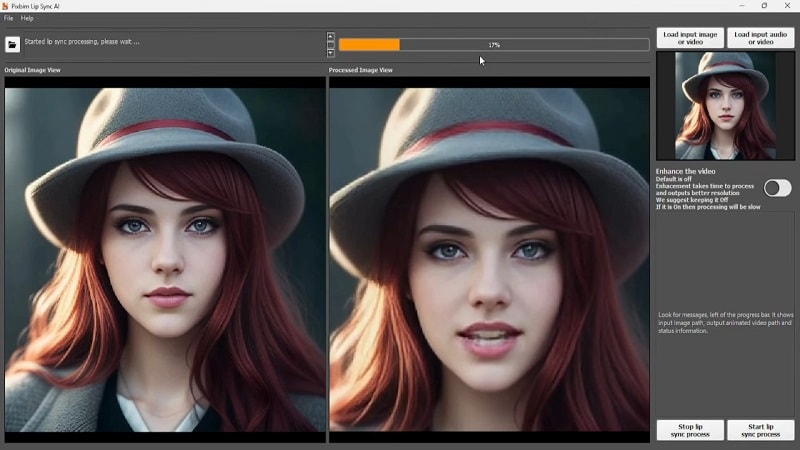
PixBim Lip Sync AI is a lip sync animation software that supports audio of any length. It can animate both real human faces and animated characters without limits. The software features a free trial for you to test results before purchasing.
How to use PixBim to create AI lipsync video
Step 1: Open PixBim
Launch PixBim on your computer. Click on “Load Input Image or Video” and select the image or video you want to use for lip-syncing.
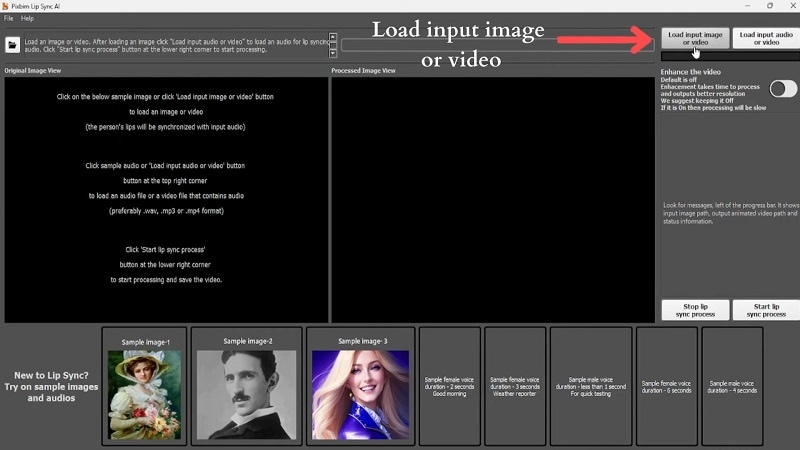
Step 2: Add Audio
Next, click “Input Audio or Video” to load your audio file. PixBim will extract the audio and generate a lip sync animation based on the input.
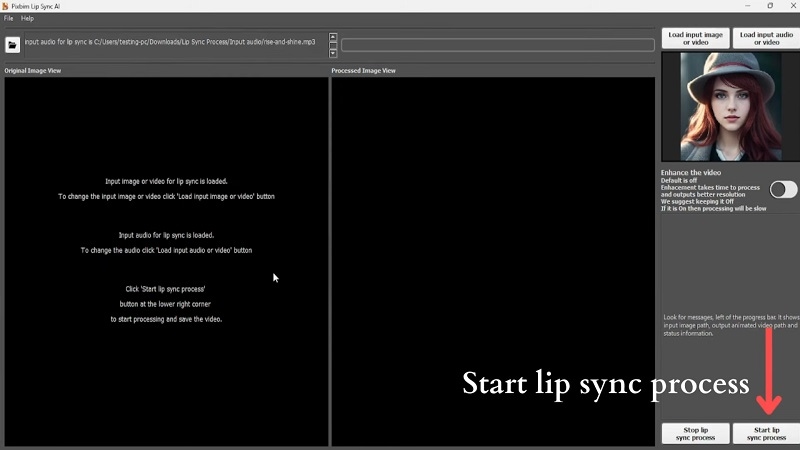
Step 3: Start the Lip Sync Animation
Click “Start Lip Sync Process” to initiate the animation. The software will process your file and synchronize the mouth and head movements with the audio. Once done, you can review the completed result.
Option 4: Adobe Animate
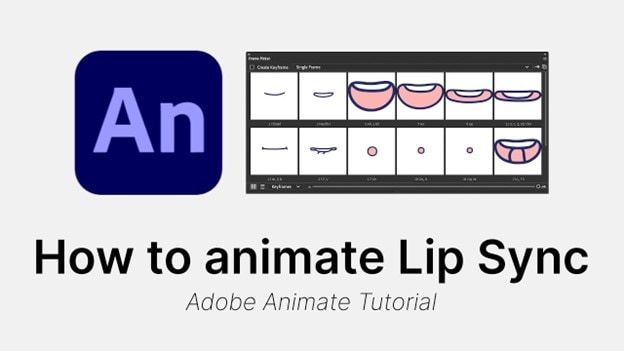
For animation videos, Adobe Animate now facilitates AI-powered lip-syncing thanks to Adobe Sensei AI technology. By using Adobe Sensei, Animate can automatically match visemes to phonemes and simplify the process of syncing prerecorded audio with character animations.
Besides this AI capability, Adobe Animate also supports traditional frame-by-frame lip-sync animation. You can work directly with an audio track and mouth chart, and then manually place mouth shapes to accurately match images with keyframes on the timeline.
How to use Adobe Animate AI Lip Sync:
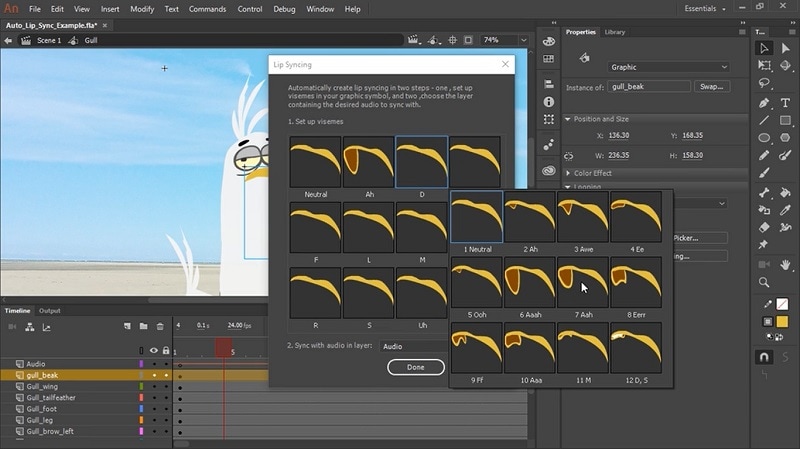
Step 1: Make sure you have imported the audio to the timeline and prepare the mouth symbol with different mouth shapes corresponding to various phonemes (A, E, O, etc.). You can create these as graphics.
Step 2: Double-click the mouth symbol layer and make the mouth setup. Then, label each mouth shape according to the phoneme it represents (e.g., "A", "E", "O", etc.) in a separate layer.
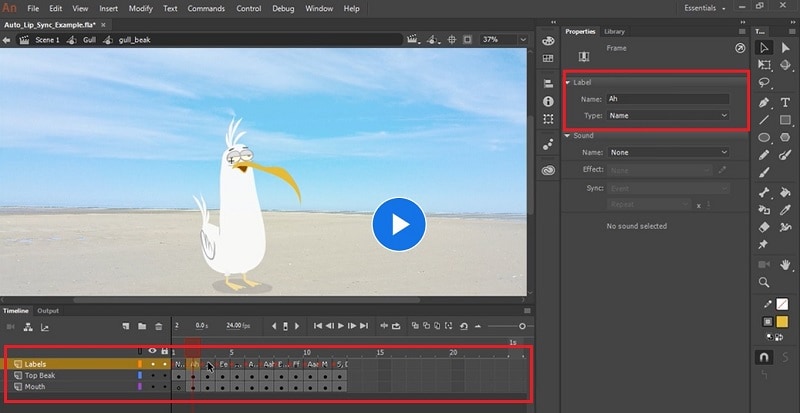
Step 3: Go back to the mouth layer and click the “Lip Syncing” option under the Properties Panel. It will open the Lipsycing Settings where you can designate each mouth shape to a specific phoneme.
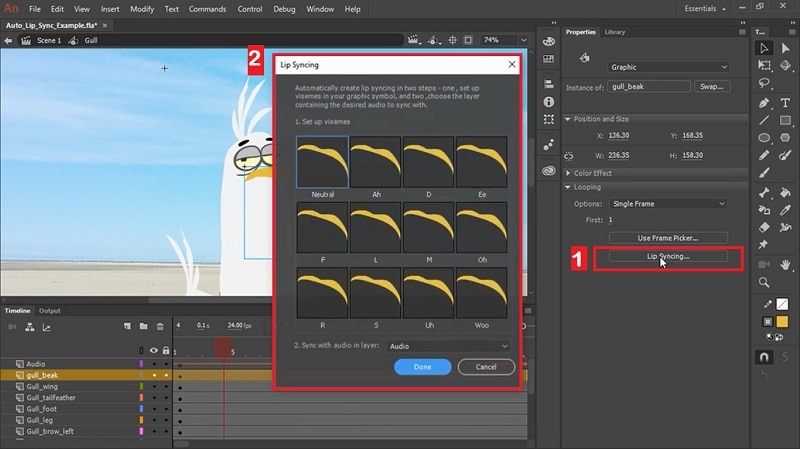
Step 4: Select and match the visemes to their corresponding mouth symbol by assigning them in the Lip Sync Settings. Once you’ve set them up, choose your audio layer for the “Sync with audio in layer” option. Click Done to proceed.
For a full tutorial, you can watch the video provided by Adobe Animate here.
Option 5: Reallusion
Similar to Adobe Animate, Reallusion is designed for animations. It’s a real-time 3D animation software that can help you easily produce professional animations for films, animation, videos, or games.
By using NVIDIA AI animation technology, Reallusion combines Character Creator, iClone, and Audio2Face into an integrated solution. One of its key features is an AI-powered workflow for multilingual facial lip-sync animation, which also extends Audio2Face compatibility with cross-platform 3D character models.
How to use Reallusion AI lip sync:
Step 1: Open Reallusion's software (such as iClone or Character Creator) and import your character model. Ensure that the character’s face is fully rigged and ready for lip-syncing.
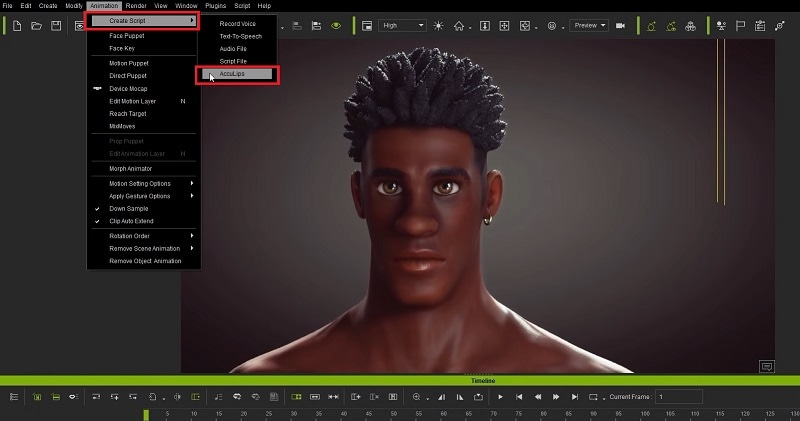
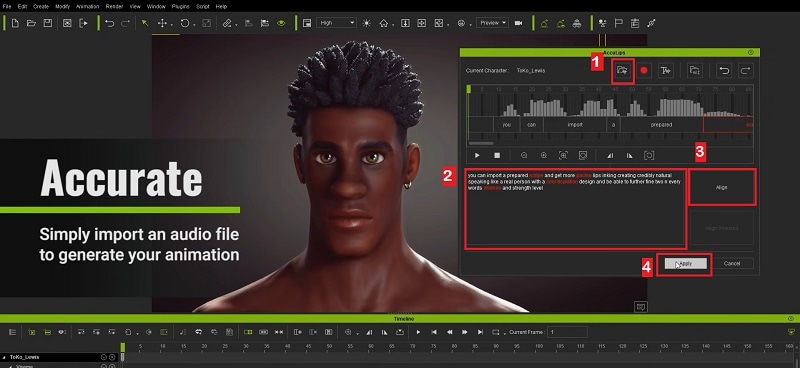
Step 2: Go to Animation > Create Script > AccuLip to import your audio for the lipsync.
Step 3: Once the AccuLips settings window appears, click the "Add File" button and select the audio file from your computer. Then, click "Generate Text" to upload the audio and automatically generate text from it. Make any necessary edits to the text, or upload a subtitle file to improve accuracy. Finally, click "Align" to synchronize the text with the audio and click “Apply” to apply the changes.
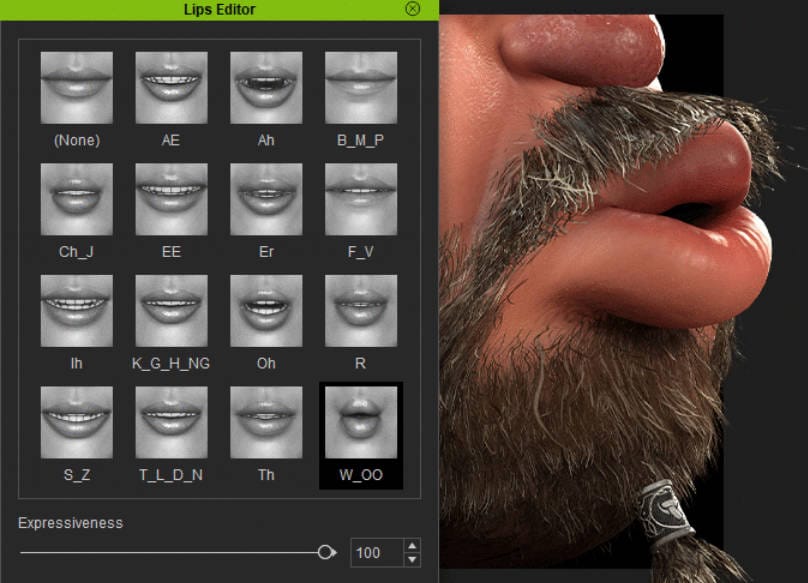
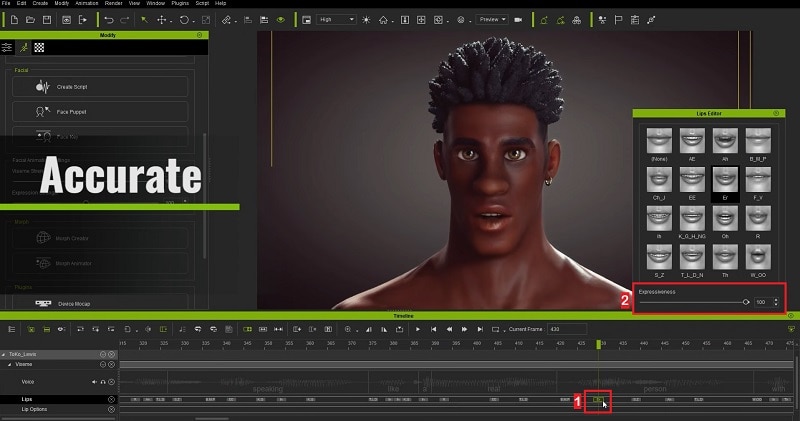
Step 4: The lip-sync results will now be visible on the timeline. To improve the realism of the lip movements, open the Lip Editor settings and adjust the expressiveness level. For a full tutorial, you can watch the full guide here or learn how to use the Audio2Face here.
Part 2 What Are the Tools That Allow You to Make AI Lip Sync Effect Online?
In addition to the software, you can also use online tools to generate AI lipsync videos. These tools are more easily accessible since there’s no need for installation, so you can set up and use them quickly. However, they may have limitations in terms of processing power, privacy concerns, and the quality of synchronization compared to the software we have mentioned above.
To find the most effective tools for this task, let’s explore some of the top lipsync AI online and see how to create AI lip sync effects using online platforms.
Option 1: Invideo AI
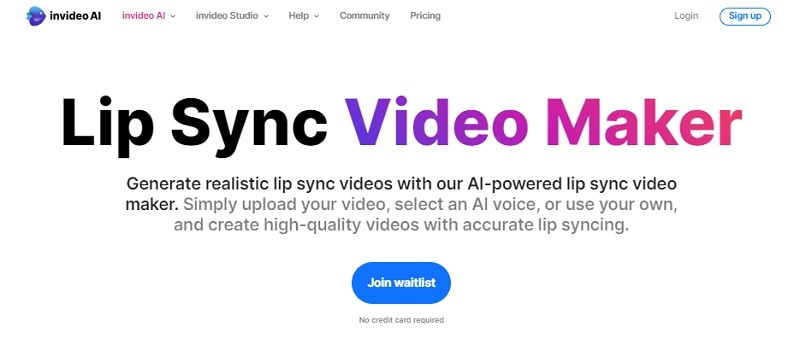
InVideo is a reputable online platform for video editing that is now opening a waitlist for its new AI lipsync video editor. It also offers custom avatars with AI-generated voices, allowing you to create professional voiceovers or clone your own voice to produce videos with an AI version of yourself. Additionally, Invideo AI can generate scripts for any video topic, which saves you hours of time and simplifies the video creation process.
Option 2: Gooey AI
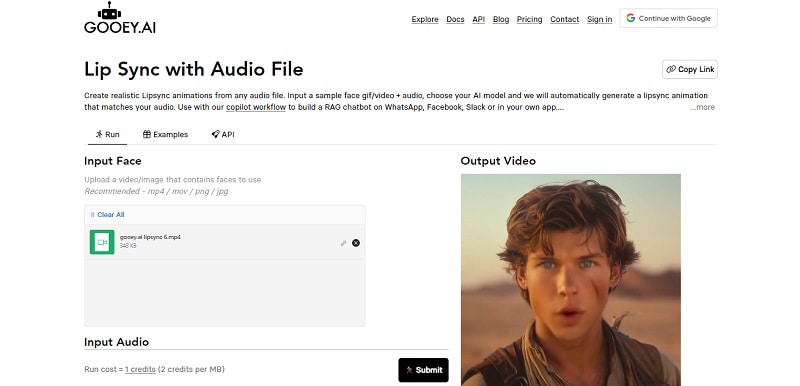
Gooey AI allows you to create AI lip-sync animation videos from any audio file. Simply upload a sample face GIF or video along with your audio, select your preferred AI model, and Gooey AI will automatically generate a lip-sync animation that accurately matches your audio.
Option 3: Vidnoz AI
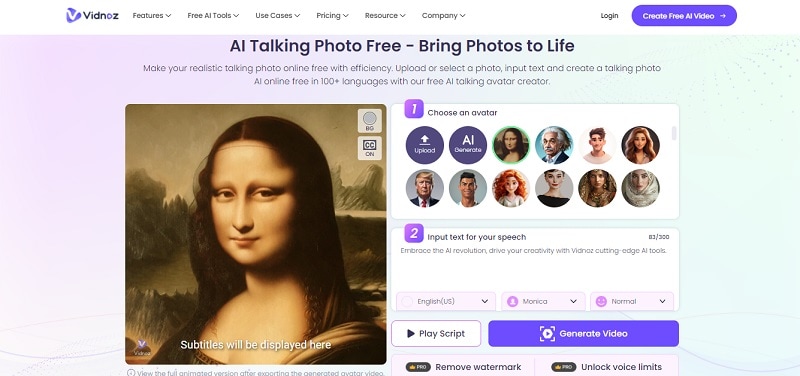
Vidnoz is an online video editing platform that features AI Talking Photo, which you can use to animate still images with realistic lipsync and facial movements. And since it’s powered by AI, it can create the natural articulation of lips and facial muscles and replicate genuine human expressions quickly. You can select from a variety of styles, including celebrities, movie characters, anime figures, and more, to make their images “speak” with customized text and voice options.
Option 4: Rask AI
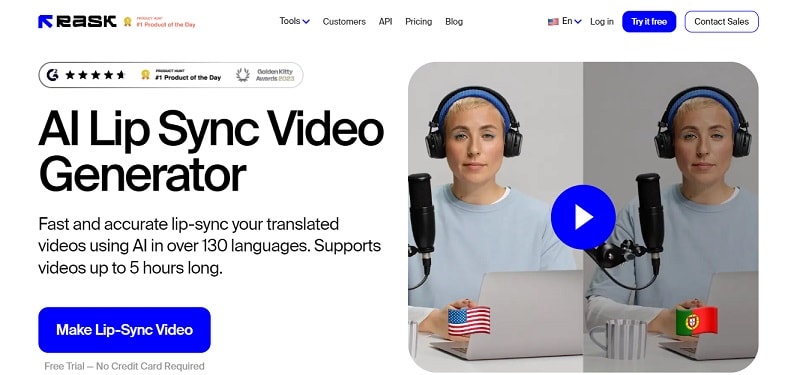
Rask AI offers an AI Lip Sync Generator that delivers fast and precise lip-sync for translated videos in over 130 languages. It supports videos up to 5 hours long and accommodates various file formats, including MP4, MOV, WEBM, MKV, MP3, and WAV. Simply upload your file, click the translate button, and enable the lip sync feature to achieve accurate synchronization.
How to use AI lipsync on online tools
The steps of using online tools to create AI lip-sync videos can vary depending on the tool you choose. For a quick demonstration here, we'll focus on using the Rask AI lip-sync feature, as it provides the most effective solution for generating accurate lip-sync animations.
Follow the steps below:
Step 1: Open Rask AI lipsync tool and sign in to your account. Then, click the add button to upload your video.
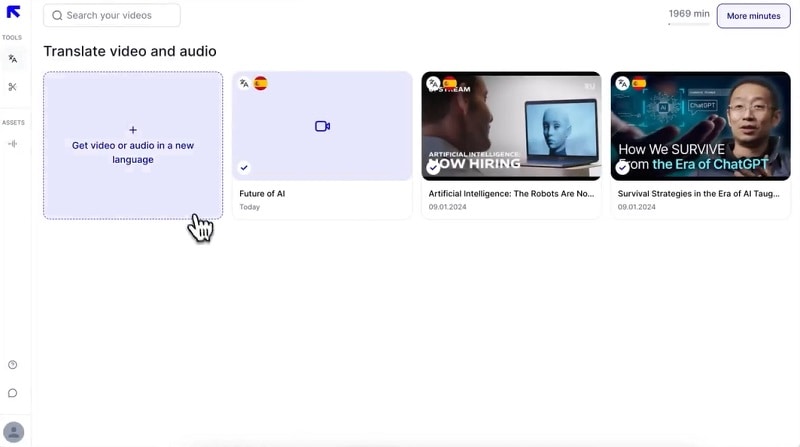
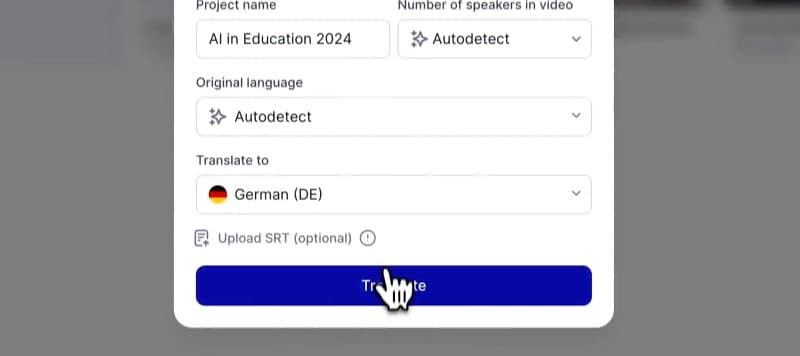
Step 2: You can import your own video or paste the URL link. Select the number of people and the original language of the video. You can use the auto-detection feature for this purpose if needed. After that, select the target language and click Translate to proceed.
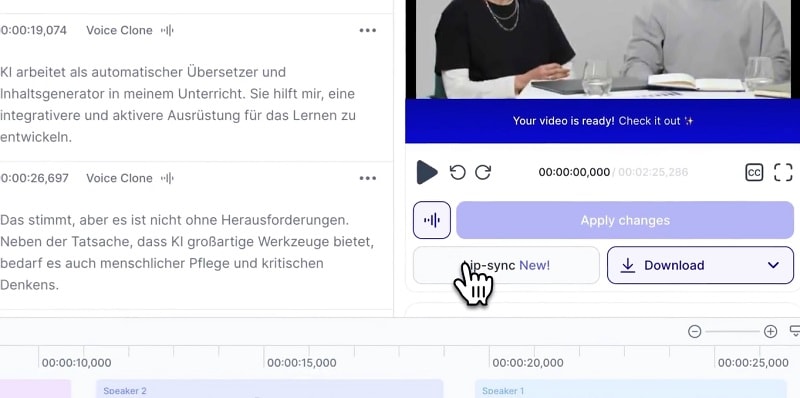
Step 3: Select your video to be directed to the editing interface. Click the "Lip-Sync" button and choose if you want to generate the full video (note that the free version only allows up to 1 minute).
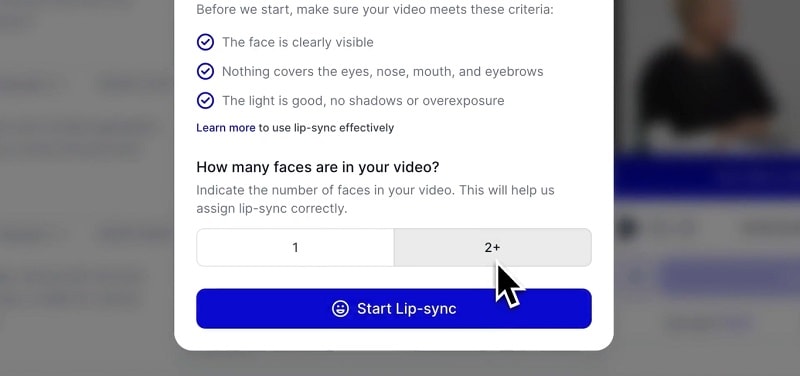
Specify the number of people in your video—whether it's just one or more than two—and click "Start Lip-Sync."
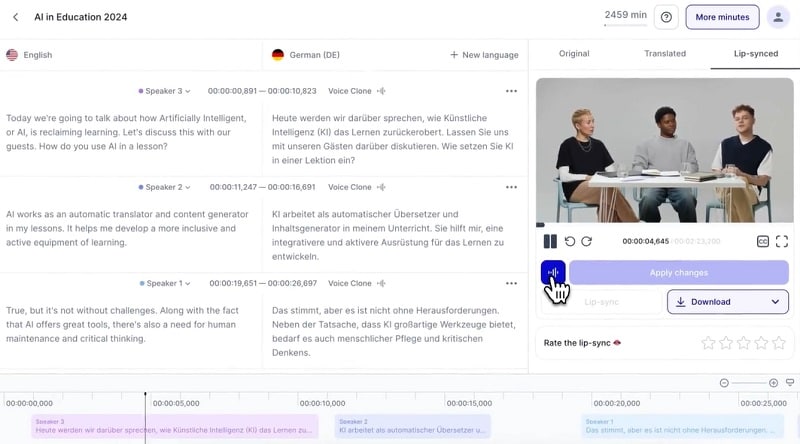
Step 4: Play and preview the result. You can make some adjustments, such as editing the translation, reducing silence, or adding subtitles if needed. Once you’re satisfied, click Apply Changes and Download to save the video.
Part 3 Manual vs. Automated Synchronization
When creating lipsync videos, you actually have two primary options for synchronization: manual and automated. Choosing the right method for you may depend on several factors, including the level of precision required, the complexity of the project, the time and resources you have, and your expertise with synchronization techniques.
- Manual Synchronization
Manual synchronization involves adjusting lip movements frame by frame to match the audio precisely. This method gives you greater control over the synchronization process, so it usually gives high precision and customization to ensure the lip movements align perfectly with the dialogue. However, manual synchronization can be highly time-consuming. It needs significant attention to detail and a considerable amount of effort. This approach may not be practical for projects with tight deadlines or large volumes of content.
- Automated Synchronization
On the other hand, Automated Synchronization uses software to align lip movements with the audio using algorithms and machine learning. This method is faster and requires less manual effort. Moreover, with the help of AI nowadays, automated synchronization has become increasingly accurate and efficient. Advanced algorithms can analyze audio tracks and predict lip movements with impressive precision.
Part 4 Why You Should Be Using AI Lip Sync Tools?
Based on the explanation before, you can see that AI lip sync is very useful as it cuts down on the manual work needed. If you’ve ever tried manually dubbing and matching audio with video, you know it requires careful strategizing to make the lip movements align perfectly with the spoken words. This process can be time-consuming and require trial and error.
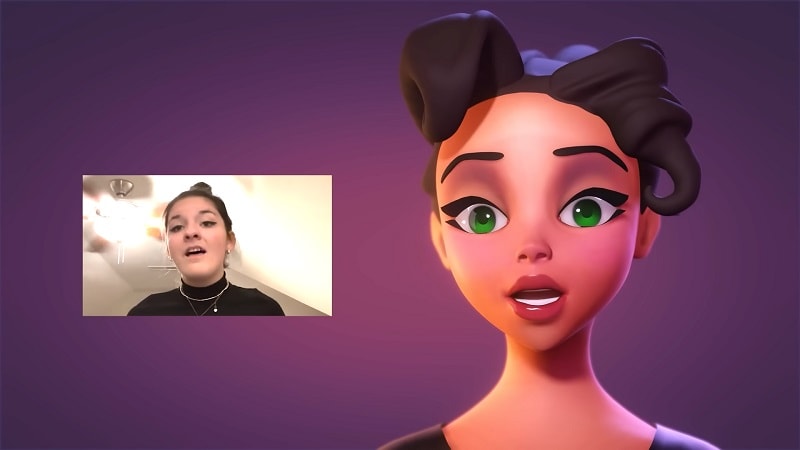
Meanwhile, AI lip sync can automate those tasks. It’s a lot faster and more efficient to achieve seamless mouth and sound synchronization. This technology works by matching the mouth movements of the person in the video to the audio for a more professional appearance.
So when do we get to use AI lip sync? Some of the most common applications of AI lip sync can be found in:
1. Film and Television Production
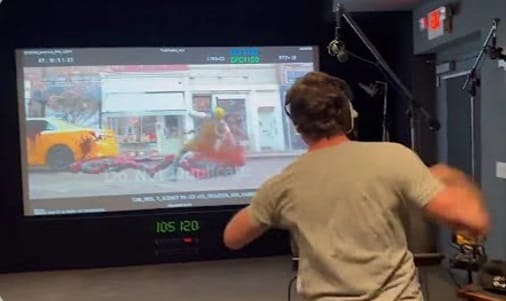
When working on movies or TV shows, lipsyncing videos and providing dubs in different languages is a common practice to reach a broader audience and make sure the sound is clear. However, film productions are often short on time and resources. In such cases, using AI lip sync can help accelerate the workflow while preserving the quality. These tools streamline the post-production process by automating the alignment of the audio with the actors’ mouth movements.
2. Animation and Gaming
For animators and game developers, lip sync is an unavoidable yet tedious task when creating characters. However, they need accurate lip-syncing to improve the believability of animated characters and in-game avatars. Lip sync AI can be a solution by making it easier to synchronize characters' lip movements with voiceovers.
3. Marketing and Advertising
For global marketing campaigns, AI lip sync allows you to produce localized versions of your promotional videos quickly. With minimal experience required, it ensures that audio and video are well-aligned for different markets, so you can focus on the marketing content.

Conclusion
Lipsync AI comes as an effective solution for anyone involved in video production, animation, or content creation. And thankfully, many renowned video editing software like Filmora now incorporate this AI lip sync feature. Combined with its already robust suite of editing tools, creators can achieve realistic lip synchronization with minimal effort. This innovation allows for faster turnaround times and higher-quality output.


