
How to Set White Balance for Record Videos

Oct 23, 2026• Proven solutions
 TL;DR:
You can fix unwanted color casts in recorded footage by navigating to Color > Basic > Color in Wondershare Filmora version 9 to establish a neutral baseline using the Auto tool, Eyedropper, or manual sliders.
● Adjust the Temperature slider to fix warm-to-cool imbalances and the Tint slider for green-to-magenta shifts before applying creative grading tools like LUTs or Color Wheels.
● Apply keyframes to the Color settings to change white balance values dynamically across a single clip if the lighting environment changed or the in-camera Auto White Balance shifted during recording.
● Set a custom white balance with a neutral reference card or a fixed Kelvin value in-camera before shooting, because global post-production tools cannot effectively correct single frames containing mixed lighting temperatures.
Ask AI for a summary
 ChatGPT
 Perplexity
 Gemini
 Claude
 Grok
Grok
White balance affects how every color in a video appears. When it is set correctly, neutral objects look neutral and skin tones appear more natural. When it is wrong, footage may look too warm, too cool, green, or magenta.
Ideally, white balance should be set before recording. However, changing light conditions, Auto White Balance shifts, mixed lighting, or an incorrect camera setting can still leave recorded footage with an unwanted color cast.
Related article: Color grading and color correction in post video creation
Fortunately, you can correct many white balance problems during post-production. In Wondershare Filmora, the current white balance controls are located under Color > Basic > Color, where you can use Auto, the Eyedropper, Temperature, and Tint to rebalance the footage.
How to Fix White Balance Issues in a Recorded Video


You do not need advanced color-grading skills to fix a basic white balance problem. The workflow below starts with Filmora's automatic tools and then moves into manual correction when more control is needed.
Tools you will need:
A video editor with white balance controls. If you already use professional color software, you can correct footage there. If you want to keep the correction inside your main editing workflow, Wondershare Filmora provides white balance, lighting, LUT, HSL, Curves, Color Wheels, and other color tools in the same project.
How to Fix White Balance in Filmora
Below is the current Filmora workflow for correcting white balance in recorded footage.
Step 1: Import the Video Clip
Launch Filmora, create a project, and import the video you want to correct. Drag the clip onto the timeline and select it to open its editing properties.
Step 2: Open the White Balance Controls
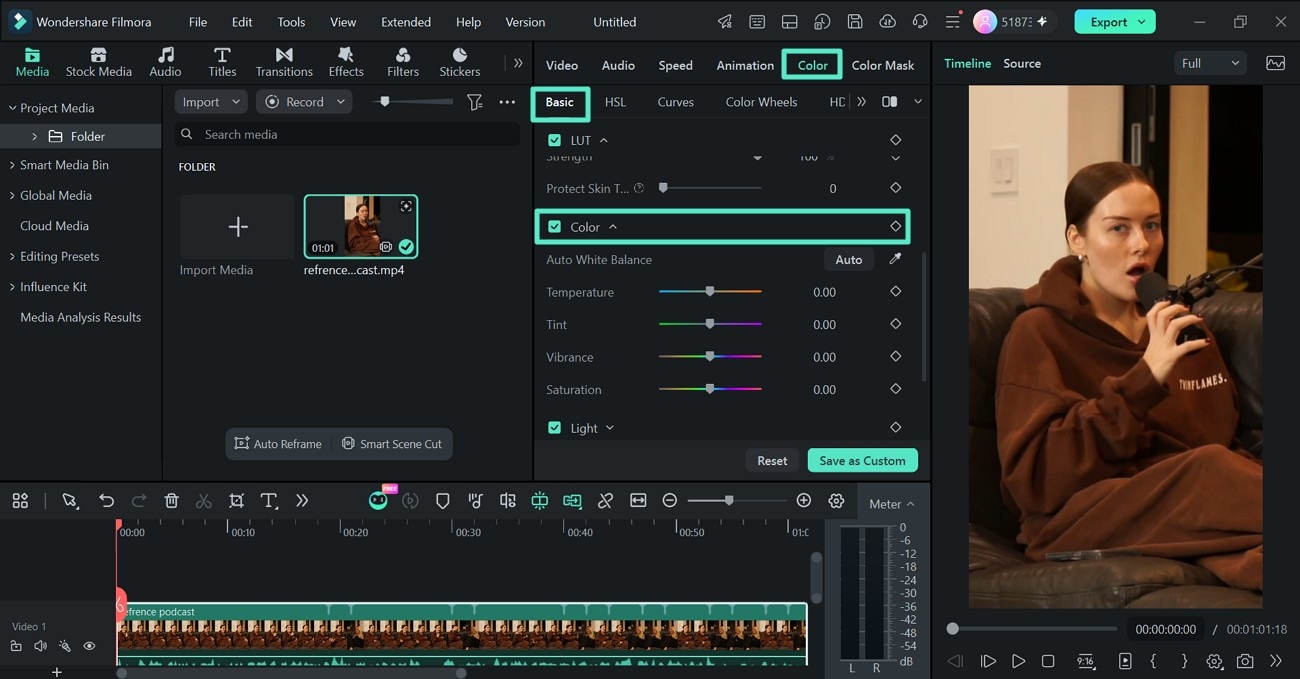
With the clip selected, open Color > Basic > Color. Enable the Color section to access the current white balance controls.
Step 3: Choose a White Balance Method
Filmora gives you several ways to correct the footage:
- Auto: Automatically analyzes the clip and applies a white balance correction.
- Eyedropper: Select a neutral white or gray area in the preview as the reference point.
- Temperature: Move the image toward warmer or cooler tones.
- Tint: Correct green or magenta shifts.
For a fast starting point, try Auto or the Eyedropper first. If the result still needs refinement, adjust Temperature and Tint manually.
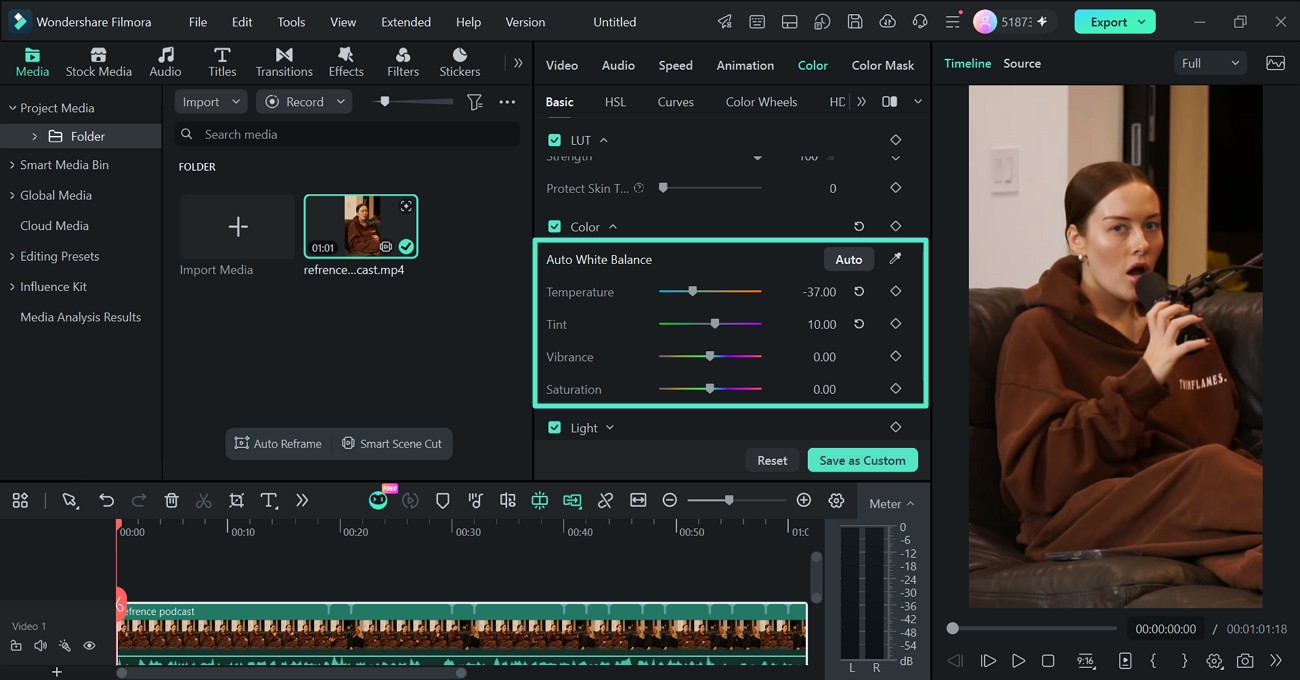
Temperature controls the warm-to-cool balance of the image, while Tint helps correct green-to-magenta shifts. Avoid using white balance as a creative grading tool at this stage—the main goal is to remove an unwanted color cast and establish a neutral starting point.
Step 4: Adjust Lighting If Necessary
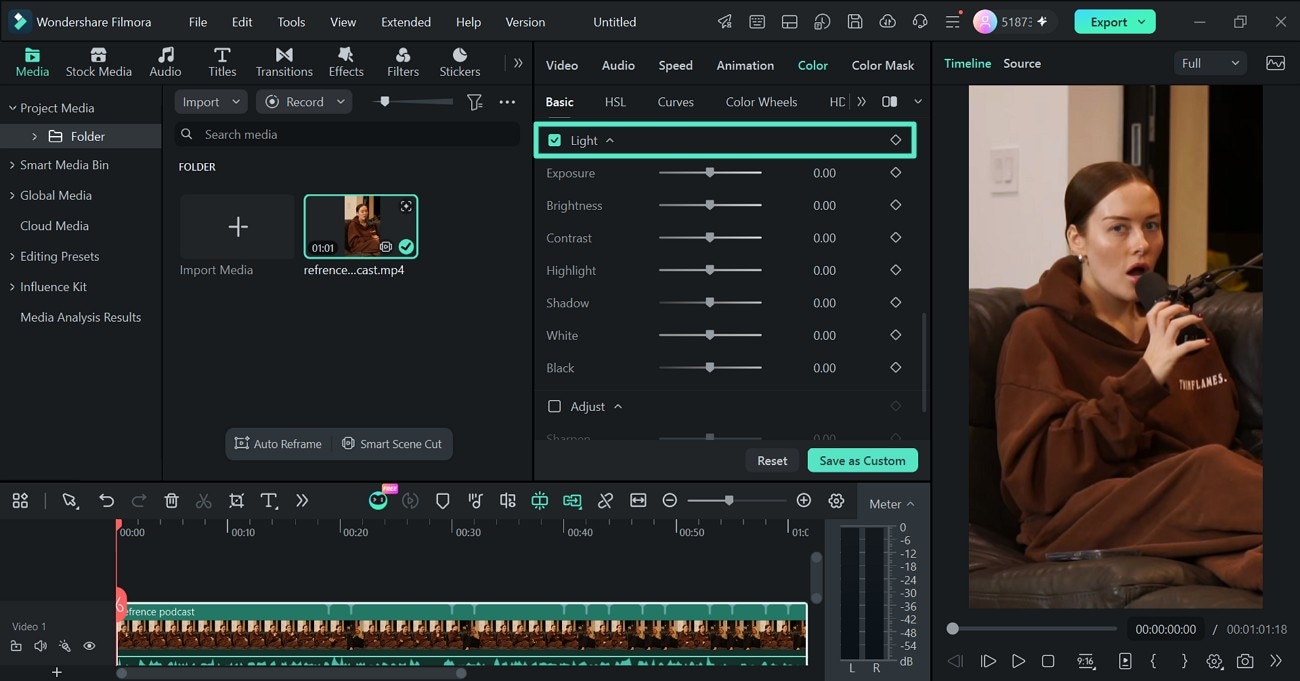
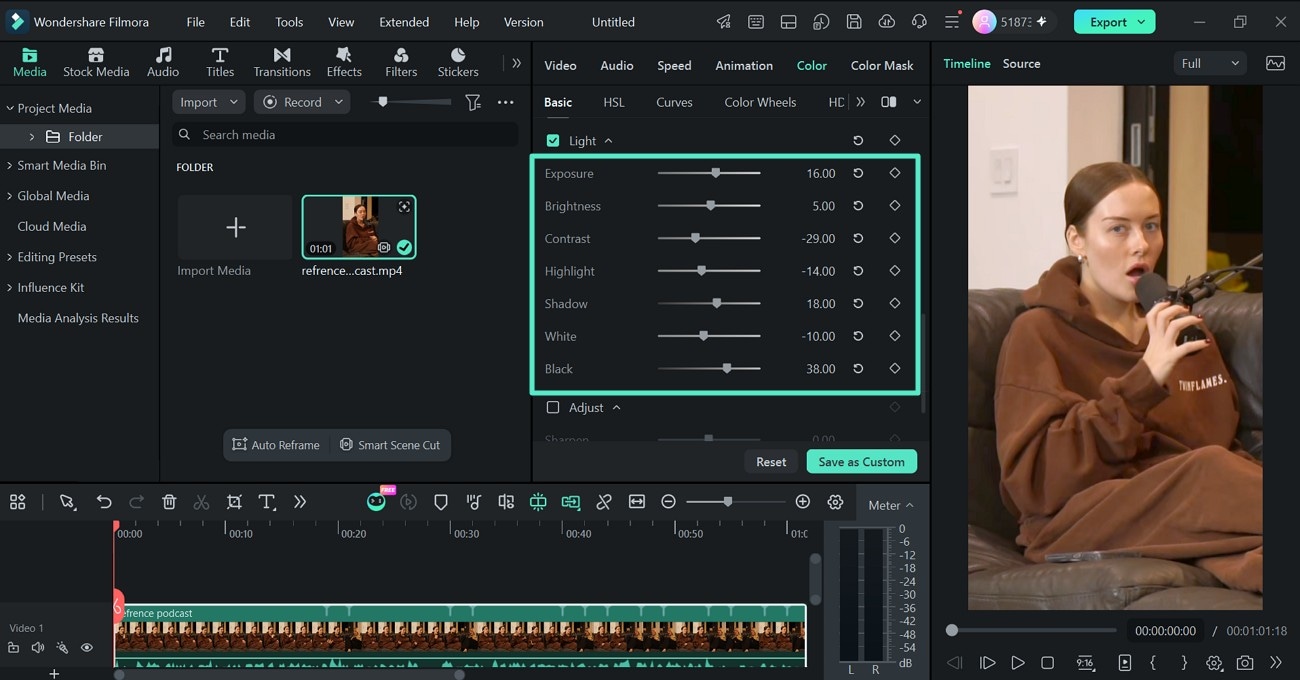
White balance and exposure are separate issues. If the color looks correct but the clip is still too bright, dark, flat, or contrasty, open Color > Basic > Light.
Filmora provides Exposure, Brightness, Contrast, Highlight, and Shadow controls for balancing the tonal appearance of the footage.
Step 5: Refine Other Colors Only If Needed
Once the white balance is correct, you can continue with more detailed color adjustments if the footage needs them.
- HSL: Adjust the Hue, Saturation, and Luminance of specific color ranges.
- Curves: Fine-tune brightness, contrast, and individual RGB channels.
- Color Wheels: Adjust Shadows, Midtones, and Highlights separately.
- LUT: Apply a predefined or imported look after the technical correction is complete.
For targeted color work, Filmora's current HSL tool can also sample a precise color from the preview with an Eyedropper before you refine its Hue, Saturation, and Luminance.
Step 6: Correct Changing White Balance With Keyframes
If the lighting changes during the same clip, one fixed correction may not work for the entire shot. Filmora supports keyframes for the Color settings, allowing different white balance values to be applied at different points in the video.
This is useful when moving between indoor and outdoor lighting, filming under changing sunlight, or correcting footage where Auto White Balance shifted during recording.
Step 7: Preview and Export
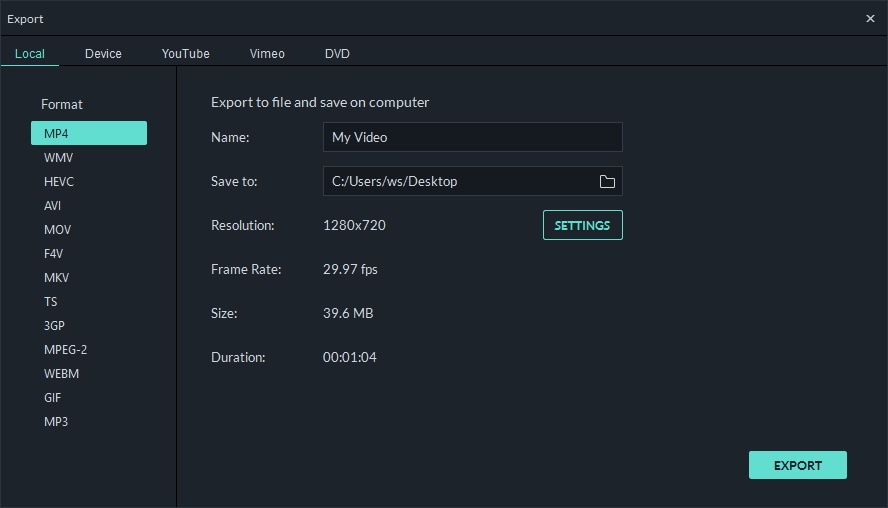
Play the corrected clip and check skin tones, neutral objects, and adjacent shots. When the result looks consistent, export the finished video using your preferred format and settings.
Pro Tip: You can also adjust white balance in the Filmora App on iPhone and Android when you need to correct color tones directly on a mobile device.
Set White Balance Before Shooting
Post-production correction is useful, but getting white balance close to correct while filming usually gives you a better starting point and reduces editing work later.
Most cameras provide several white balance methods:
- Auto White Balance: The camera automatically estimates the appropriate setting based on the scene.
- Preset White Balance: Modes such as Daylight, Cloudy, Shade, Tungsten, or Fluorescent are designed for common lighting environments.
- Custom White Balance: A white or neutral gray reference is used under the actual scene lighting.
- Kelvin: Some cameras allow you to set the color temperature manually.
For consistent shots, especially in interviews or multi-camera productions, avoid letting Auto White Balance change continuously during recording. A fixed preset, Kelvin value, or custom white balance usually makes it easier to maintain consistent color between shots.
Use a White or Gray Reference
For a custom white balance, place a neutral white or gray reference under the same light that will illuminate the subject. Set the camera's custom white balance using that reference before recording.
Repeat the process whenever the main lighting environment changes. For example, moving from daylight into tungsten lighting usually requires a new white balance.
Watch for Mixed Lighting
Mixed lighting can be more difficult because different parts of the frame may be illuminated by different color temperatures. A single global white balance setting may fix one region while making another look less accurate.
Whenever possible, reduce mixed lighting while shooting. If only part of the frame needs correction afterward, use a localized color adjustment rather than changing the global white balance.
Frequently Asked Questions About Video White Balance
Common Questions About Fixing White Balance
-
Can white balance be fixed after recording?
Yes. Video editing software can correct many white balance problems after recording by adjusting Temperature, Tint, or using an automatic white balance tool. However, capturing a consistent white balance in-camera usually provides a better starting point.
-
How do I fix white balance in Filmora?
Select the clip and go to Color > Basic > Color. You can use Auto, sample a neutral area with the Eyedropper, or manually adjust Temperature and Tint.
-
What is the difference between Temperature and Tint?
Temperature shifts the image between warmer and cooler tones, while Tint adjusts the green-to-magenta balance.
-
Can Filmora automatically correct white balance?
Yes. The Color section includes an Auto option for white balance. Filmora also provides an Eyedropper for selecting a neutral reference directly from the footage.
-
Can white balance change during a video?
Yes. Auto White Balance may shift when the composition or lighting changes. In Filmora, Color settings can be keyframed when different parts of the same clip need different corrections.
-
Should I correct white balance before color grading?
Usually, yes. Correcting the unwanted color cast first gives you a more neutral starting point before applying LUTs, HSL adjustments, Curves, Color Wheels, or other creative grading.
Conclusion
Incorrect white balance can make an otherwise good video look too warm, cool, green, or magenta. The best approach is to set a consistent white balance while shooting, but recorded footage can still be corrected in post-production.
In the current version of Filmora, white balance is handled under Color > Basic > Color. Start with Auto or the Eyedropper, refine Temperature and Tint manually, and use keyframes when the lighting changes during the clip.
With Filmora, you can be more creative. Just download the latest version 9 of Filmora video editor and have a try.
Check our tips about how to use a white balance card to get more accurate color in your shots.
A 3D LUT is designated to take the color cast and move it to a new level entirely. It is designed to provide the video with a great boost of colors.
by Liza Brown Oct 23, 2026 11:35 AM
guide user how to do the color tuning in Wondershare Filmora version 9
by Liza Brown Oct 23, 2026 11:29 AM
Liza Brown
chief Editor
