- Powerful AI for effortless content creation.
- Offer popular templates and royalty-free creative resources.
- Cross-platform functionality for editing everywhere.
How to Correct Color in Your Videos [Color Correction]

Sep 16, 2025• Proven solutions
 TL;DR:
Wondershare Filmora provides an accessible alternative to complex software like Premiere Pro CC, allowing beginners and semi-pros to perform professional-grade video color correction using HSL, RGBY curves, and AI Color Palettes on both desktop and mobile platforms.
● For desktop users on Windows 7 or later (64-bit) and macOS 10.14 or later, the color grading workflow requires navigating to the Basic Color panel to apply LUTs, followed by adjusting HSL sliders, manipulating RGBY curves, and refining highlights through Color Wheels.
● The Filmora App for iOS and Android offers a streamlined mobile alternative where users can instantly correct specific video colors by accessing the Adjust toolbar and modifying Hue, Saturation, and Lightness values per color.
● Editors seeking instant movie looks without manual tuning can apply cinematic lighting condition presets, such as the Chromatic Filter Set, available through the Filmora Effects Store Filmstock.
Ask AI for a summary
 ChatGPT
 Perplexity
 Gemini
 Claude
 Grok
Grok
When we talk about color grading or color correction, we may think about some professional color grading software such as Premiere Pro CC. It happens that you shot some home videos but find the color video image has mainly blue and purple colors and want to correct the color to make the video look like Hollywood manufacturing? We do know with these best video color grading software, you will always get the best result. But for beginners and semi-pros, we recommend you to try Wondershare Filmora (latest version X) based on its usability and features, and pricing as well. Equipped with the strong color fixing function, this easy-to-use video editor can help you break the monotony even if you have little color correction experience for videos.
Before we deep into the steps of how to color correct video with Filmora, just download the software and follow the video tutorial below to easily correct color in your videos.

 secure download

From the above color grading video tutorial we can see with the color correction tools in Filmora, you can:
- Make your footage look like Hollywood film with color tuning tool
- Take use of Temperature, Tint, Lights, LumaFusion Luts, Vigmette and more
- Various filter and overlay effects to touch up your video
You may also like:
How to set white balance for your recorded videos >>
Video Color Correction for YouTube Beauty>>
How to Use Color Balance to Perfect Photos>>
If you want to add some cinematic color to your video, you can also use some awesome video effects packs in Filmora Effects Store Filmstock such as the Chromatic Filter Set to simulate various lighting conditions and get movie looks.
secure download
Now, let's check the steps of how to color correct videos with Filmora?
Color grading: How to Correct Video Color in Filmora? [4 Steps]
If you are looking for an advanced solution to enhance the colors of your dull-looking videos, use Wondershare Filmora. The platform gives you the freedom of video color correction from your PC as well as from your smartphone.
Filmora Desktop for Video Color Correction
As discussed, users get the ability to adjust and enhance the colors in their videos and add a vibrant and more appealing look. Various AI and basic adjustments are offered by the platform to make your videos look professional grade. Learn how you can correct the colors in your videos using Filmora’s desktop version:
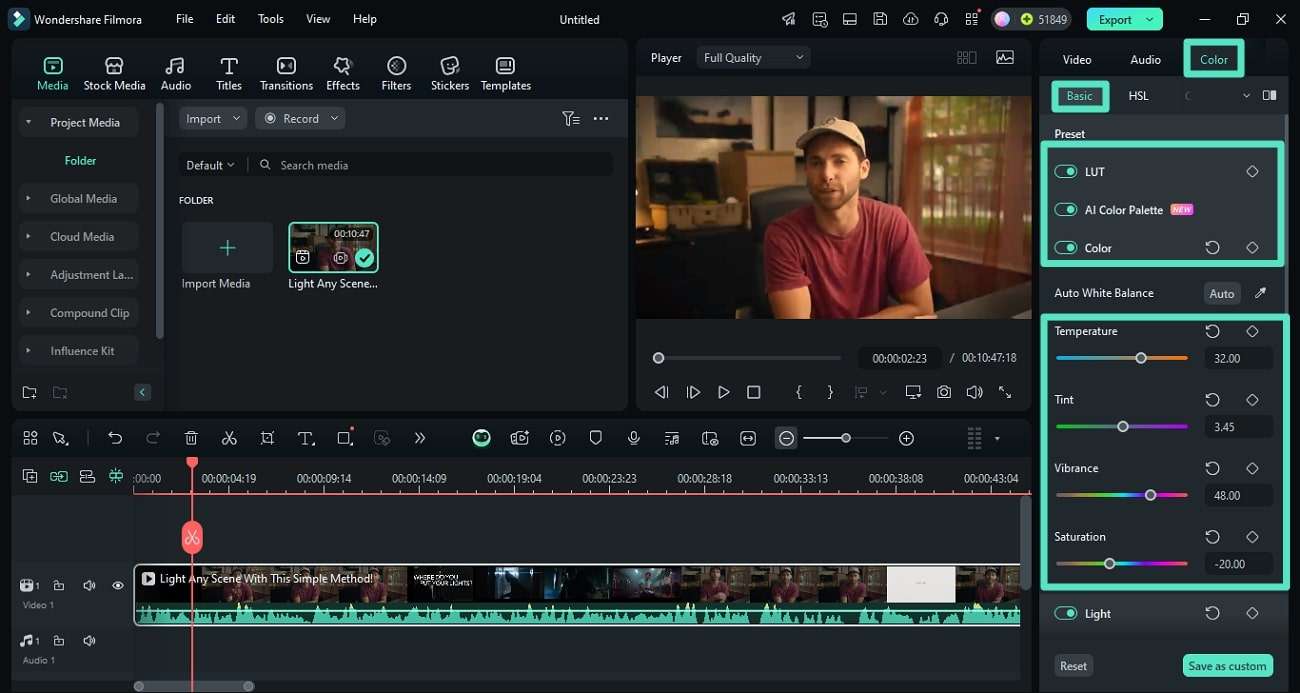
Step 1. Import the Video and Select the Color Correction Feature
Launch Filmora and import your video into its project timeline for color correction. Head to "Color" > "Basic" and enable enhancements like "LUT," "AI Color Palette," and "Color." Drag the sliders to make color enhancements according to your preferences.
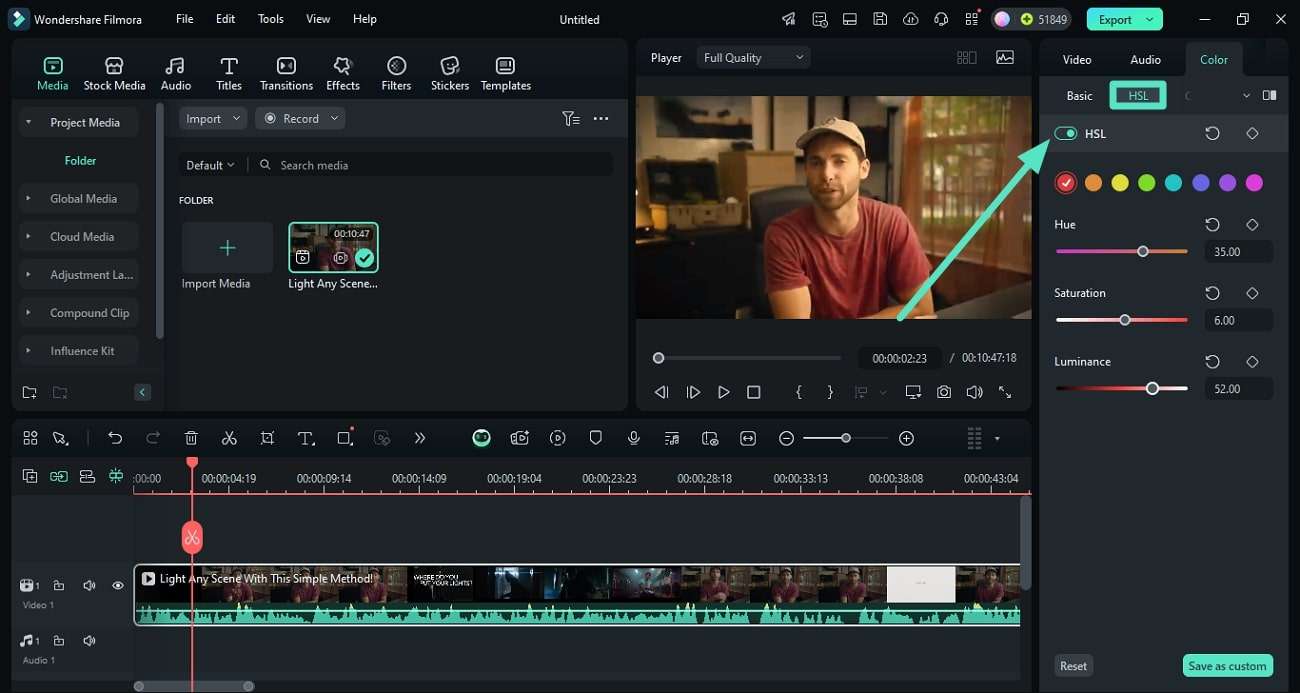
Step 2. Adjust The HSL of the Video
Acquire the "HSL" section and enable the "HSL" toggle. Adjust the “Hue,” “Saturation,” and “Luminance” by dragging the sliders and previewing the results.
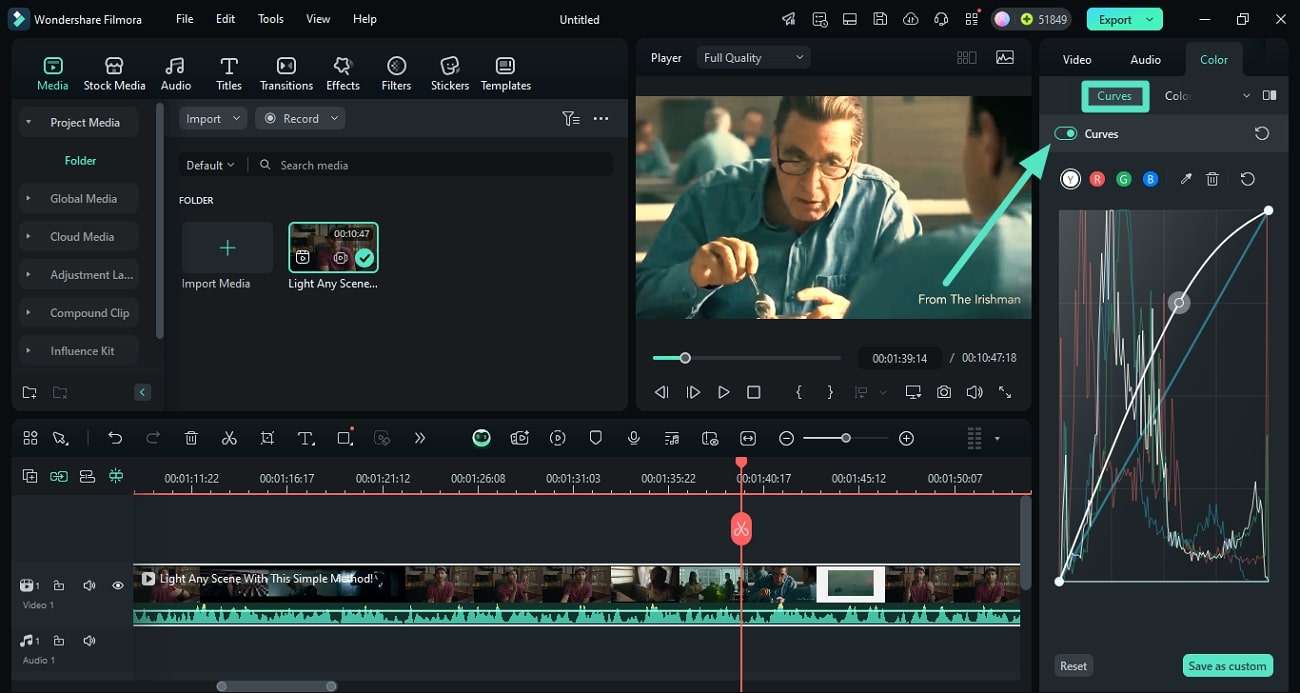
Step 3. Fine-Tune the RGBY Curve
Within the same panel of Filmora color correction, turn the toggle on located next to “Curves” and drag the graph according to your preferences.
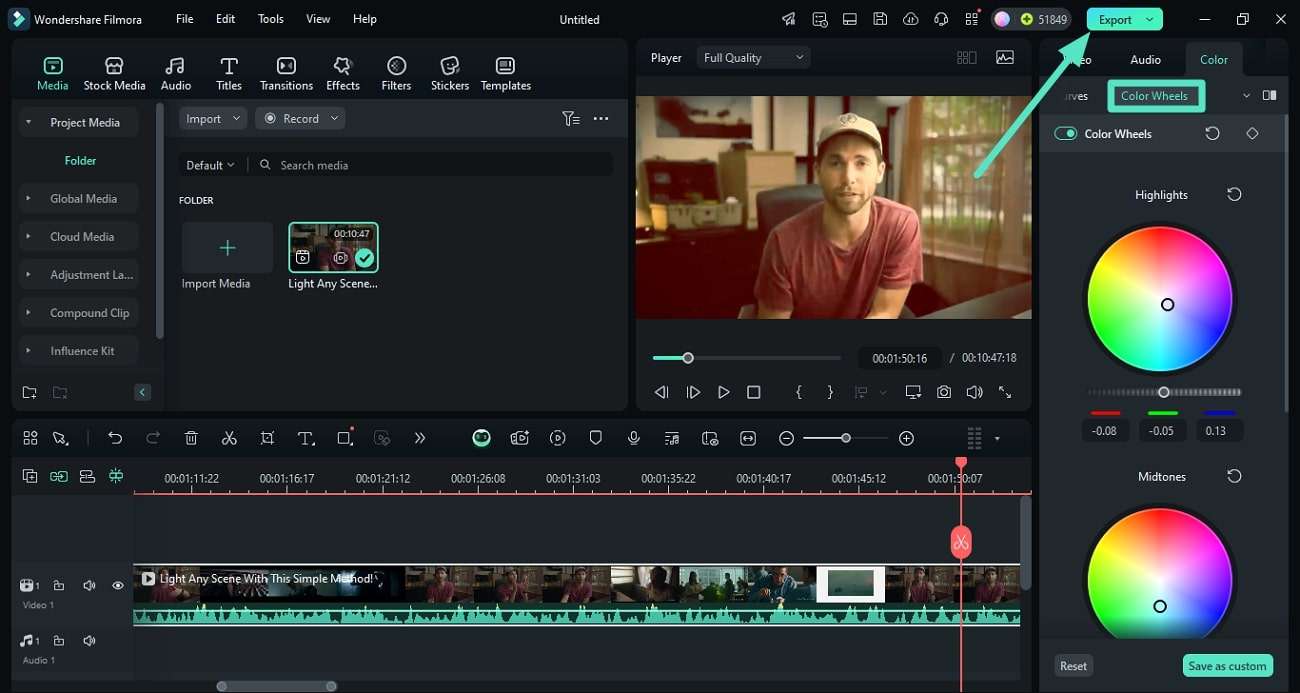
Step 4. Modify the Colors Using the Color Wheel
Expand the "Color Wheels" section and adjust "Highlights," "Mid-tones," and "Shadows" using the pointers. Once satisfied, click the "Export" button to save the video file.
Correct Color With Filmora App
If you are looking for an instant solution to adjust the coloring of the video from your smartphone, you can use the Filmora App [iOS/Android]. The application allows you to adjust the highlight, saturation, and luminance with respect to each color. Read the steps mentioned below to learn how to use this app for video color correction:
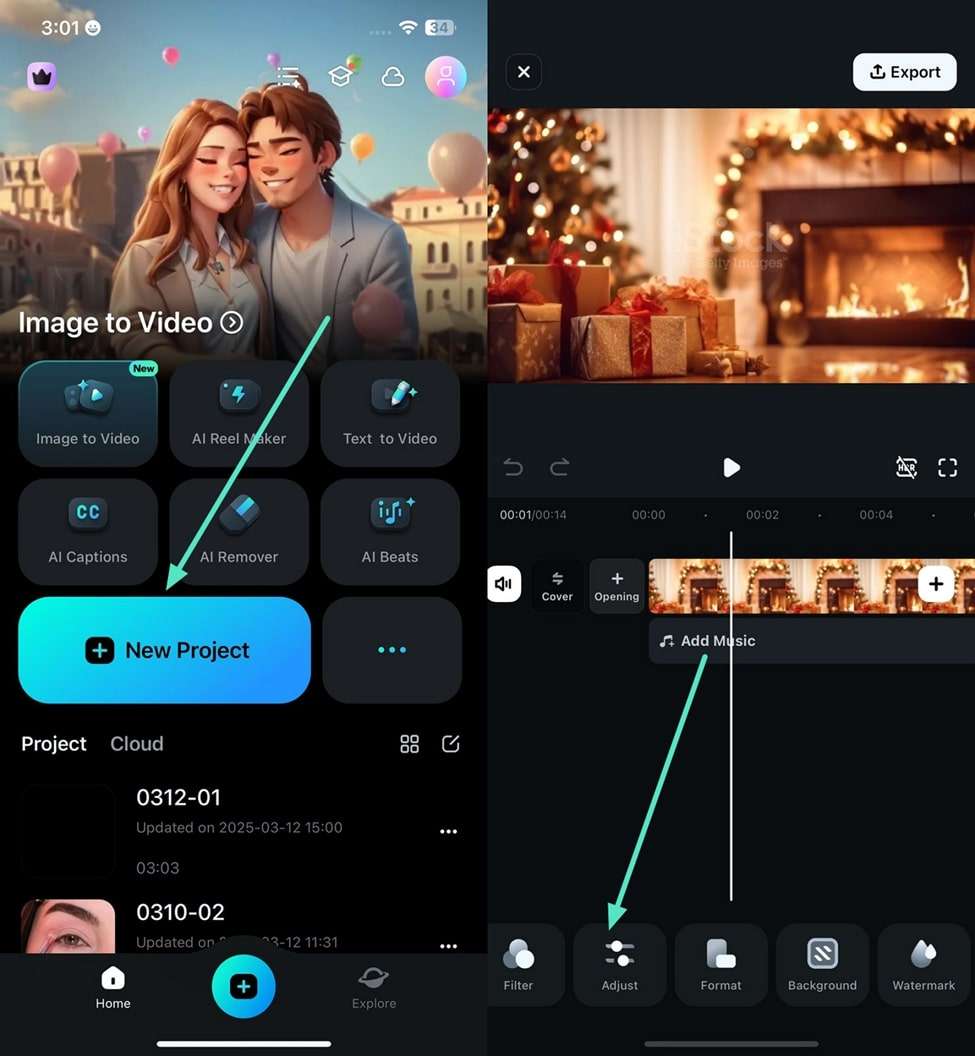
Step 1. Import the Video and Select Adjust
To begin, launch the application and select the “New Project” option. Next, import your video and access the toolbar at the bottom to tap on the “Adjust” option.
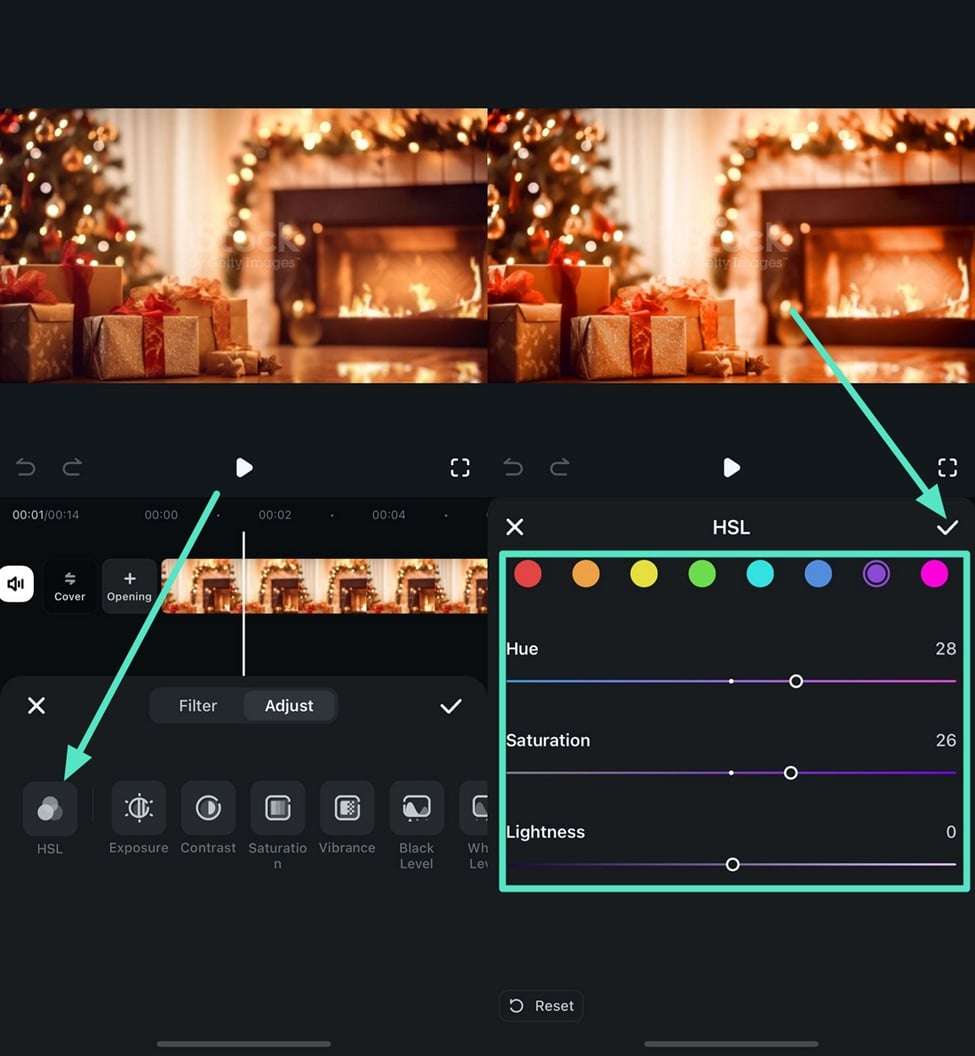
Step 2. Opt For HSL and Fine-Tune Colors
Tap on the “HSL” option located within the Adjust section to enable the visual adjustment options. Here, drag the sliders of “Hue,” “Saturation,” and “Lightness” according to each color.
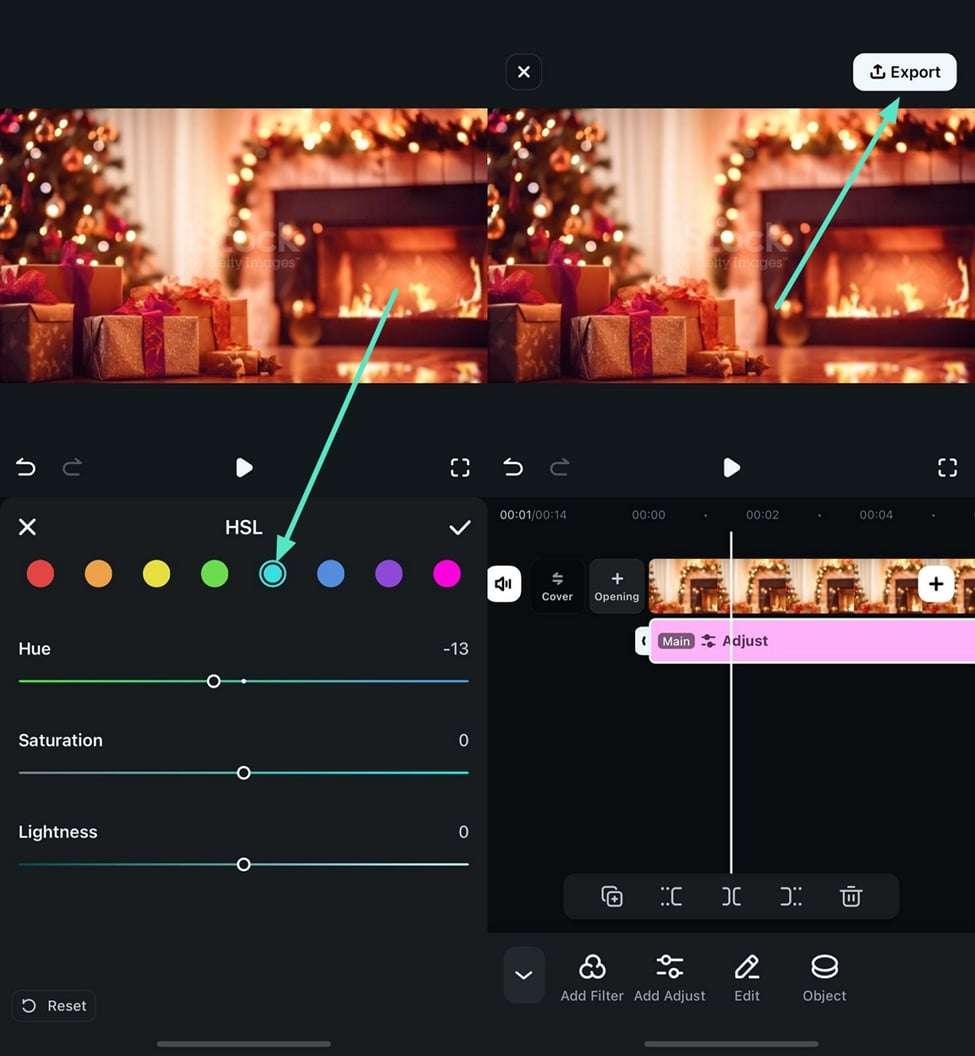
Step 3. Change the Color and Export
Tap on the other colors radio button and drag the sliders to modify the specific color in the video. Once the results are according to your desires, tap on “Export” to save the video to your phone.
Filmora for Mobile Filmora for Mobile Filmora for Mobile Filmora for Mobile Filmora for Mobile
Edit Videos on Your Mobile Phone with 1-Click!
- • Powerful Brand New AI Features.
- • User-friendly video editing for beginners.
- • Full-featured video editing for professional.


See, color correction and grading is easy in Filmora. Hope you find these color correction steps are useful in making stunning videos. While, besides the color tuning tools, you can achieve more effects with Filmora. Just our introduction video of how to use Filmora with a minute.
secure download
Benjamin Arango
staff Editor
