
 100% Security Verified | No Subscription Required | No Malware


 ChatGPT
 Perplexity
 Gemini
 Claude
 Grok
Grok
One of the best ways to make your video eye-catching for your audience is to make it bright and enhanced through different color modulations. This utility is not only essential for the content creators but also keeps the viewers glued to their screens for better visualization of their favorite content.
The need of the hour is to use the best tool to enhance your videos. Wondershare Filmora is here to save you from searching the web for such tools. Its color grading and correction feature helps in matching your style while giving you the option for easy customizations. Thus, give this article a read and learn to upgrade your video content with Filmora color grading.
In this article
Part 1. Color Correction vs. Color Grading: The Differences
Video editing and designing process usually use grading and color correction. Let us explore the main differences between video color grading and color correction in detail, as given below:
Color Correction
It is a process of fine-tuning the videos to make them more appealing and engaging by enhancing the colors. Some of the basic features of color correction are listed below:
- They provide fine lighting to the faded colors, fair balance, and fix bad color brightening.
- The video colors can be sharpened or reduced through this tool.
- Overexposed or underexposed videos can be corrected through color exposure.
- The color correction allows white balance for more transparent and neutral footage.
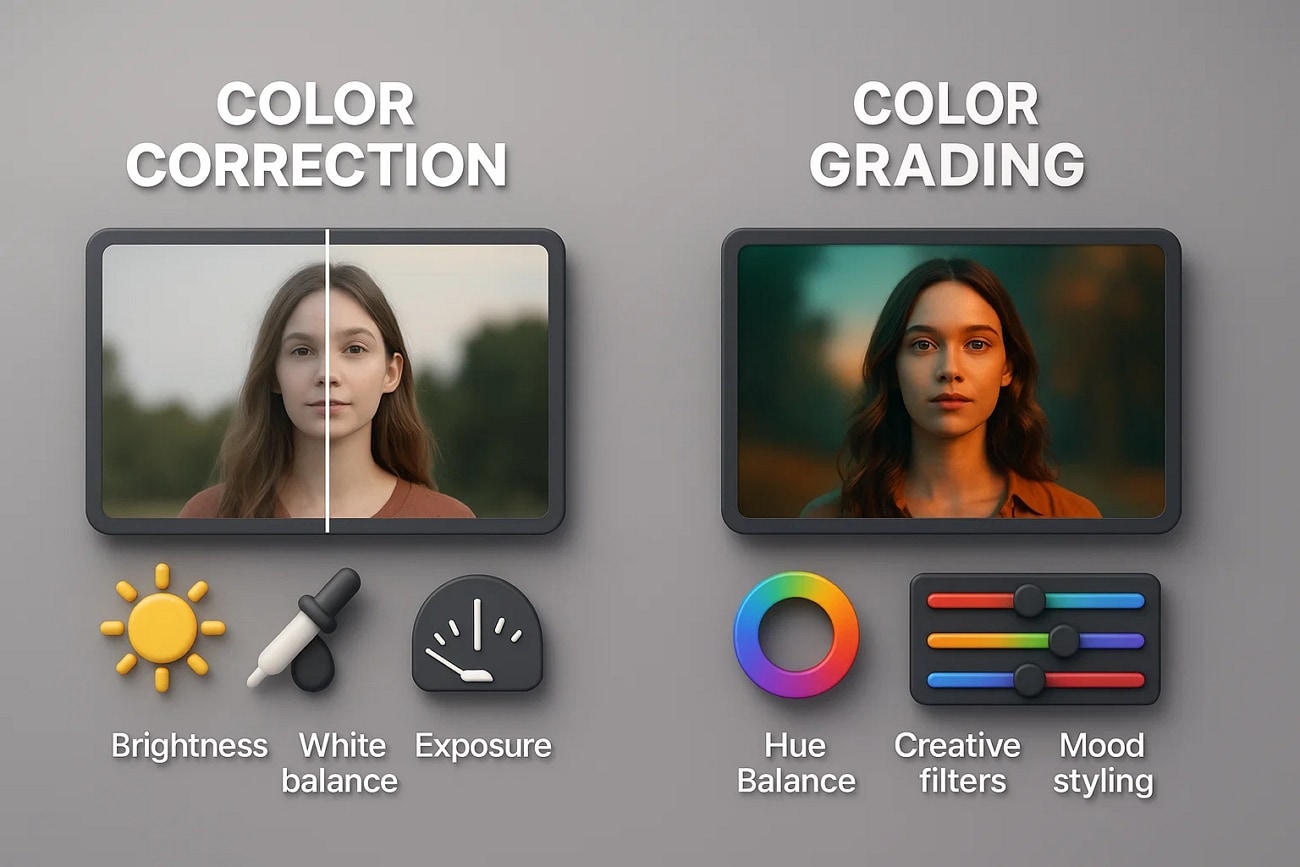
Color Grading
Color grading software allows the editor to control the image through its video editing feature. The main features used in color grading are listed below:
- Achieving a cinematic style involves adjusting various grading options like hue, saturation, and luminance.
- The editor can isolate and enhance certain color ranges to focus on a particular area of the video.
- With curves and color wheel options, you can adjust a specific range of colors in your clip.
Part 2. Color Like a Pro: Best Editor for Post-Production Grading and Correction
Are you a video editor who is tired of working with different online video editing applications? There is none that can meet the mood and tone you want to add to your content. Wondershare Filmora offers various color correction modules to make your content exceptional. Its 3D LUTs offer a preset color profile that can give your video a specific look.
By modifying the blacks, whites, and shadows in your clip, you can optimize the light. The HSL feature in the color grading tool lets you choose a color based on the hue, saturation, and luminance. It also gives an auto-white balance feature to change the color and atmosphere of your video. Below is the stepwise guide on how to color grade in Filmora using its color correction tool:
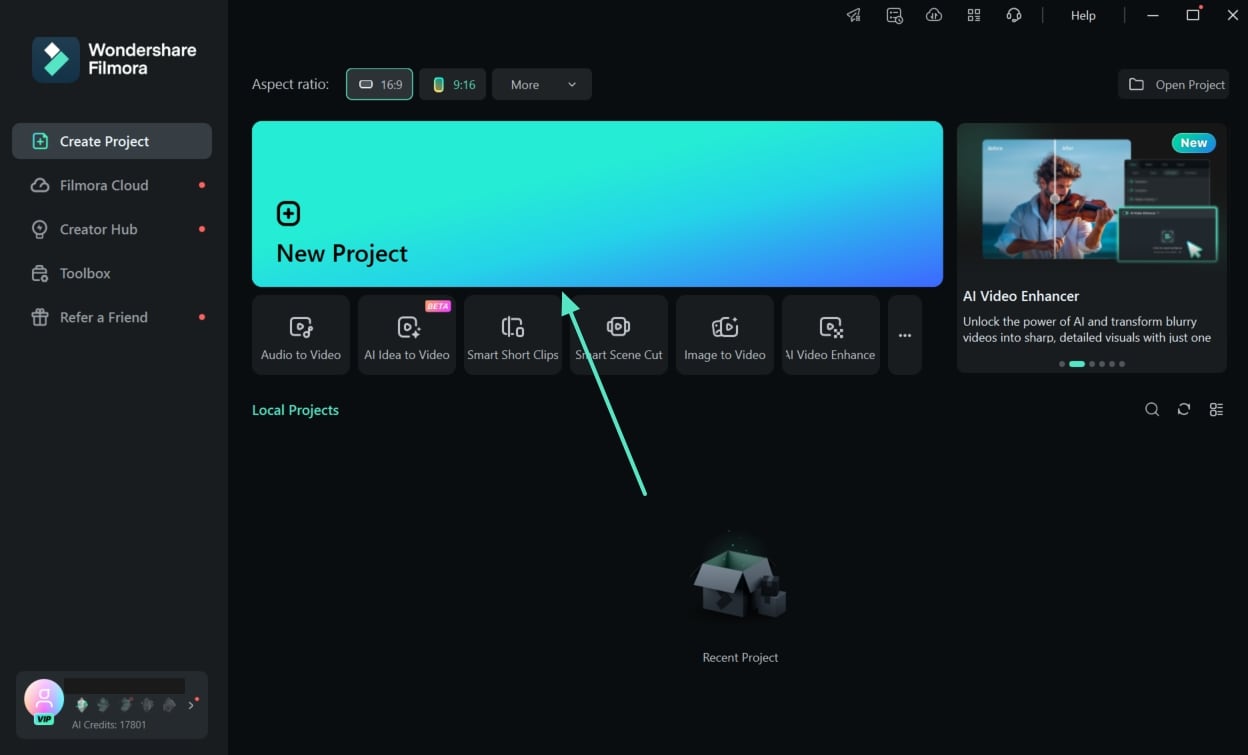
- Step 1. Open the Homepage and Import Your Video. Start the process by launching Filmora on your computer, accessing the Home page, and clicking the "New Project" tab. To enhance your video color grading, import your video and drag it to the editing timeline.
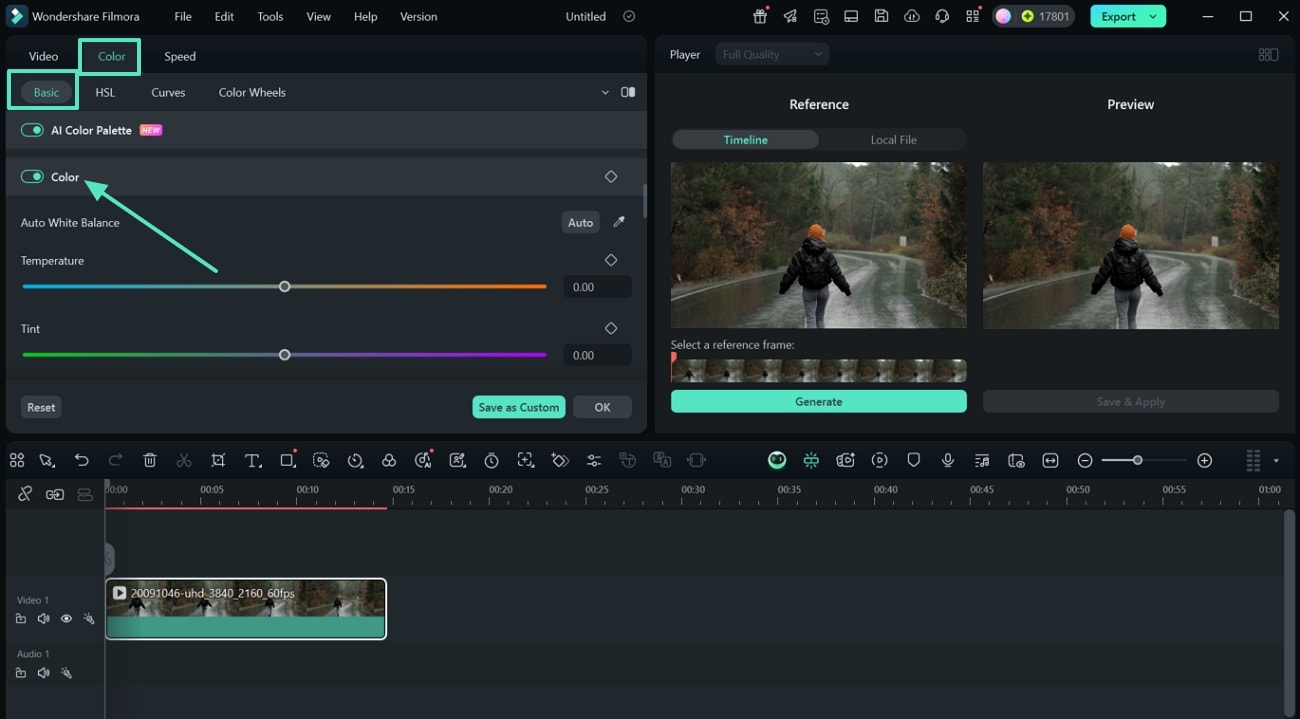
- Step 2. Click The Color Tab, Choose Temperature and Exposure Feature. Access the "AI Color Pallete" icon at the timeline toolbar and choose the "Color" tab from the next screen. After that, select the "Basic" feature, toggle on the "Color" button, and choose from temperature and saturation to recalibrate your video clips.
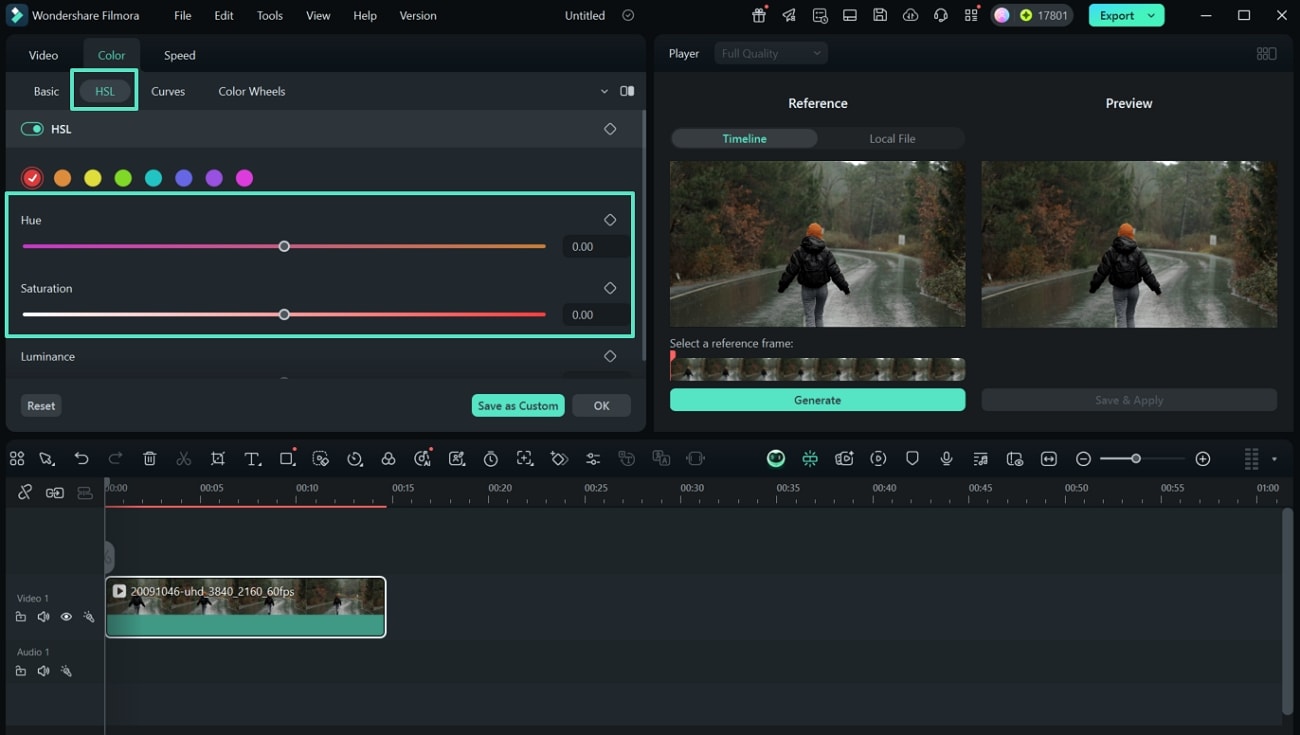
- Step 3. Adjust the Video Saturation With HSL. Swipe through the panel and enable "HSL" to adjust the Hue, Saturation, and Luminance mode of your clip by simply dragging the respective sliders. You can also preview your video editing in real time with its side-by-side and split-view features.
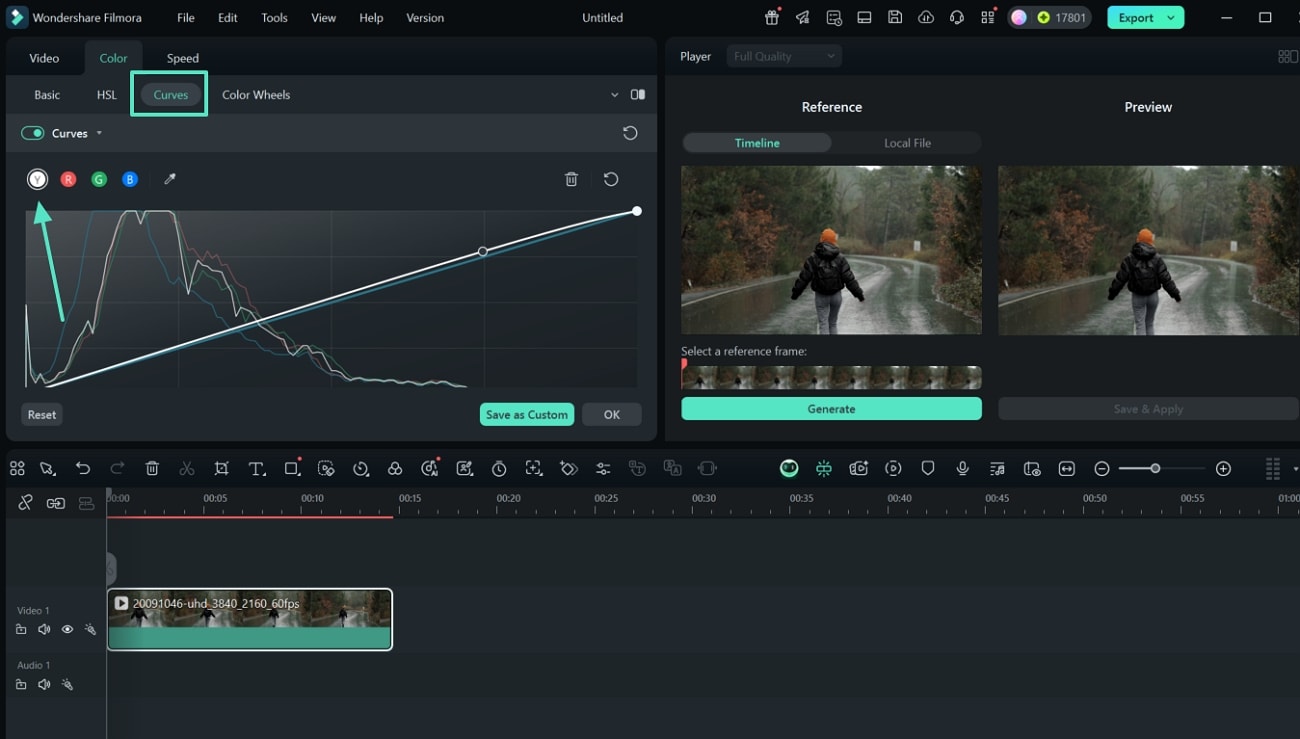
- Step 4. Select the Color Curves and Tune RGB Variations. From the color panel, swipe right and choose the "Curves" to adjust the RGB color correction. You can modify the overall brightness by selecting luma "Y" to balance the individual color panels of your video and pressing the "OK" button.
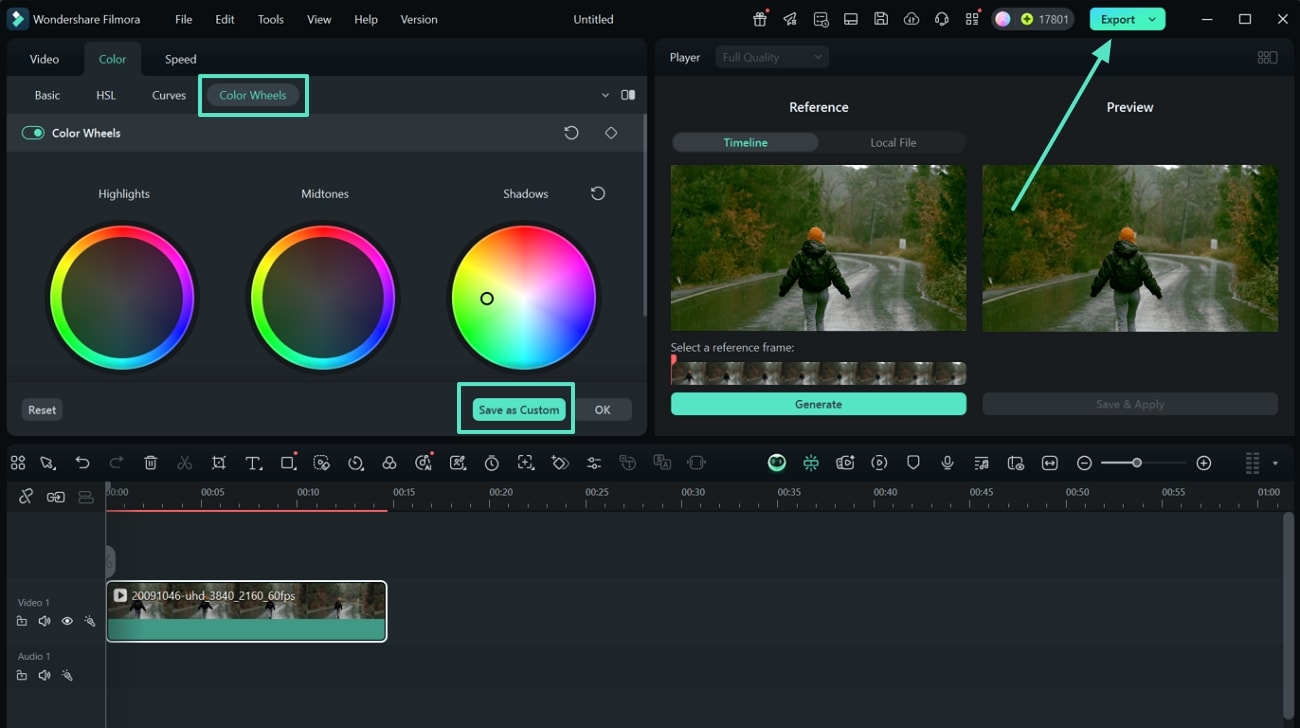
- Step 5. Save Color Adjustments as Custom and Export it. Moving forward, click the "Color Wheels" section, adjust the "Highlights" by dragging the cursor, and then press "Save as Custom." A dialogue box opens; name your custom Filmora color grading presets, and press "OK." Finally, export your edited video directly by using the "Export" button.
 secure download

Part 3. From Raw to Radiant: Enhance the Colors Instantly
As a videographer or editor, there is a need for a smartphone application that has a realistic view of video on your phone. To quickly edit your video into a cinematic clip, you need a tool that offers quick editing, which in this case is the Filmora App [iOS/Android].
It is considered a top-notch video editing app for color correction and grading, enabling you to add tone using HSL adjustments. Mentioned below is a detailed, step-by-step guide for Filmora's color grading and correction using this comprehensive application:
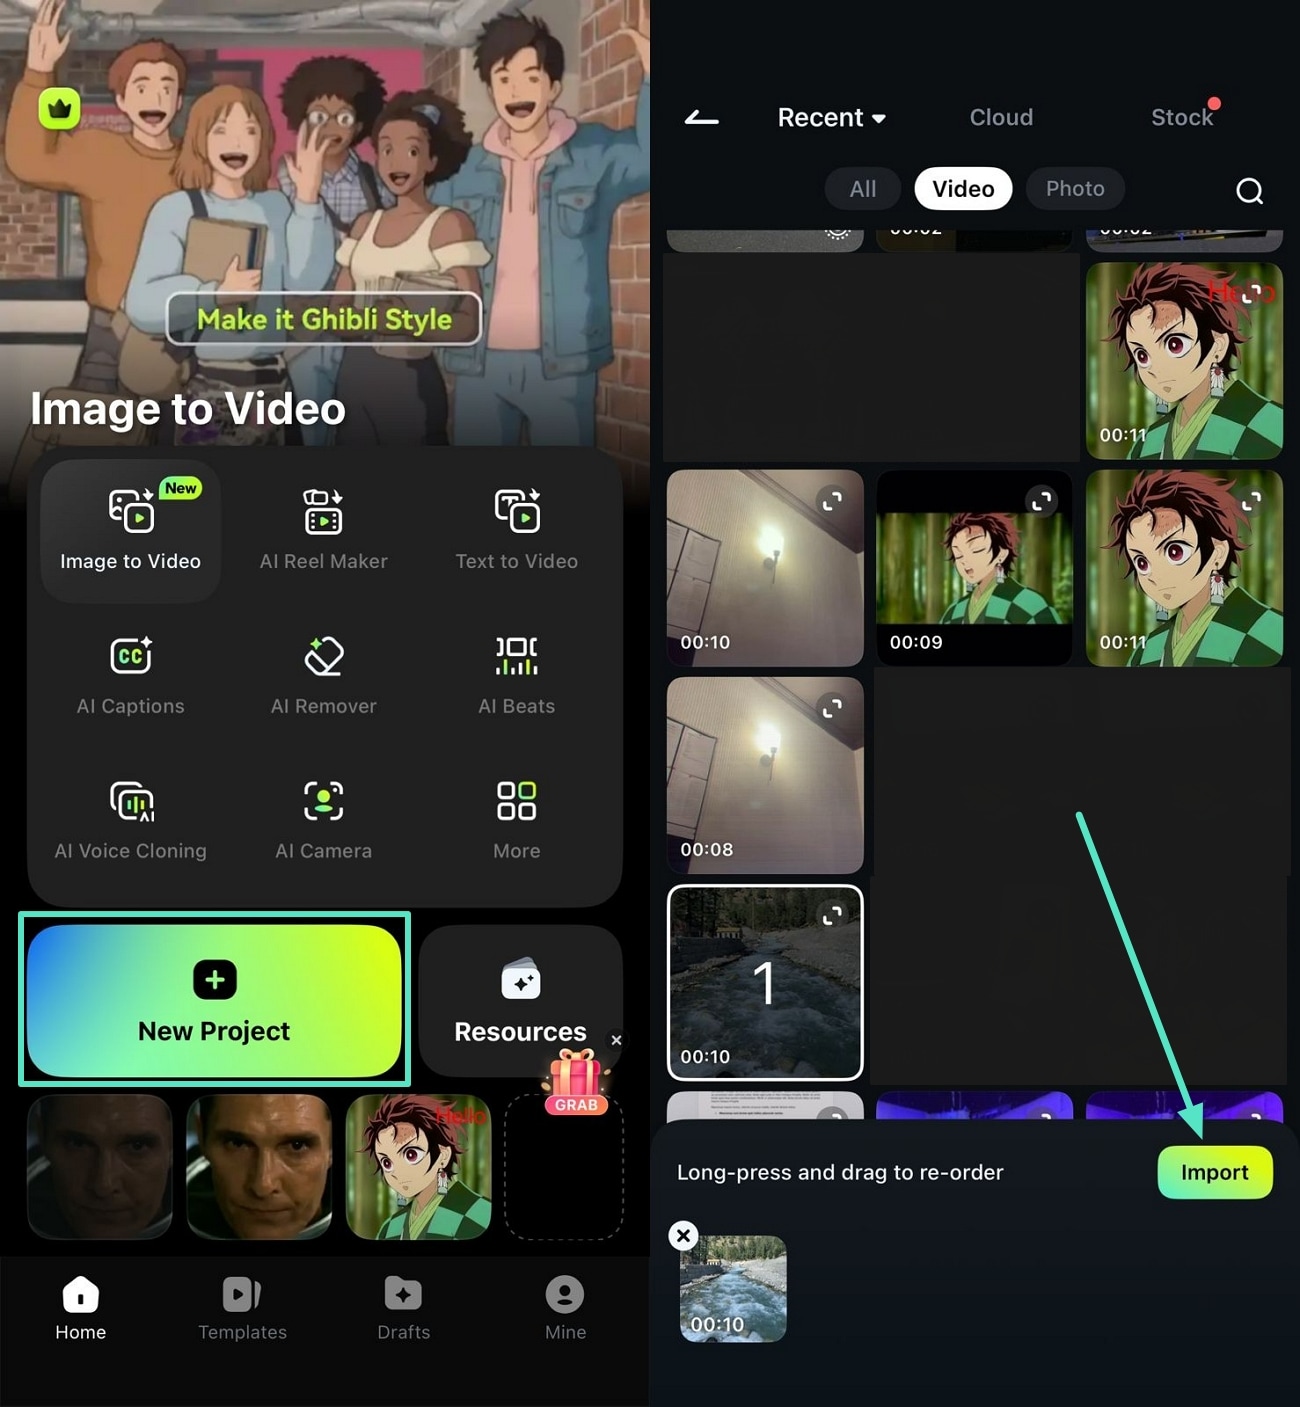
- Step 1. Import Video Clip and Press Color. Access the project timeline of the Filmora App to color grade and correct your video. Press "New Project" to open the gallery and select your desired video. Afterward, hit the "Import" button to insert the video for enhancement.
- Step 2. Choose Adjust and Opt For HSL. As the toolbar is shown below the screen, press the "Adjust" icon to access options for color enhancement. Choose "HSL" for further changes. You can see three different options, "Hue," "Saturation," and "Brightness," which can be manually configured. Choose any color by pressing the desired radio button, and save the changes by tapping on the small "Tick".
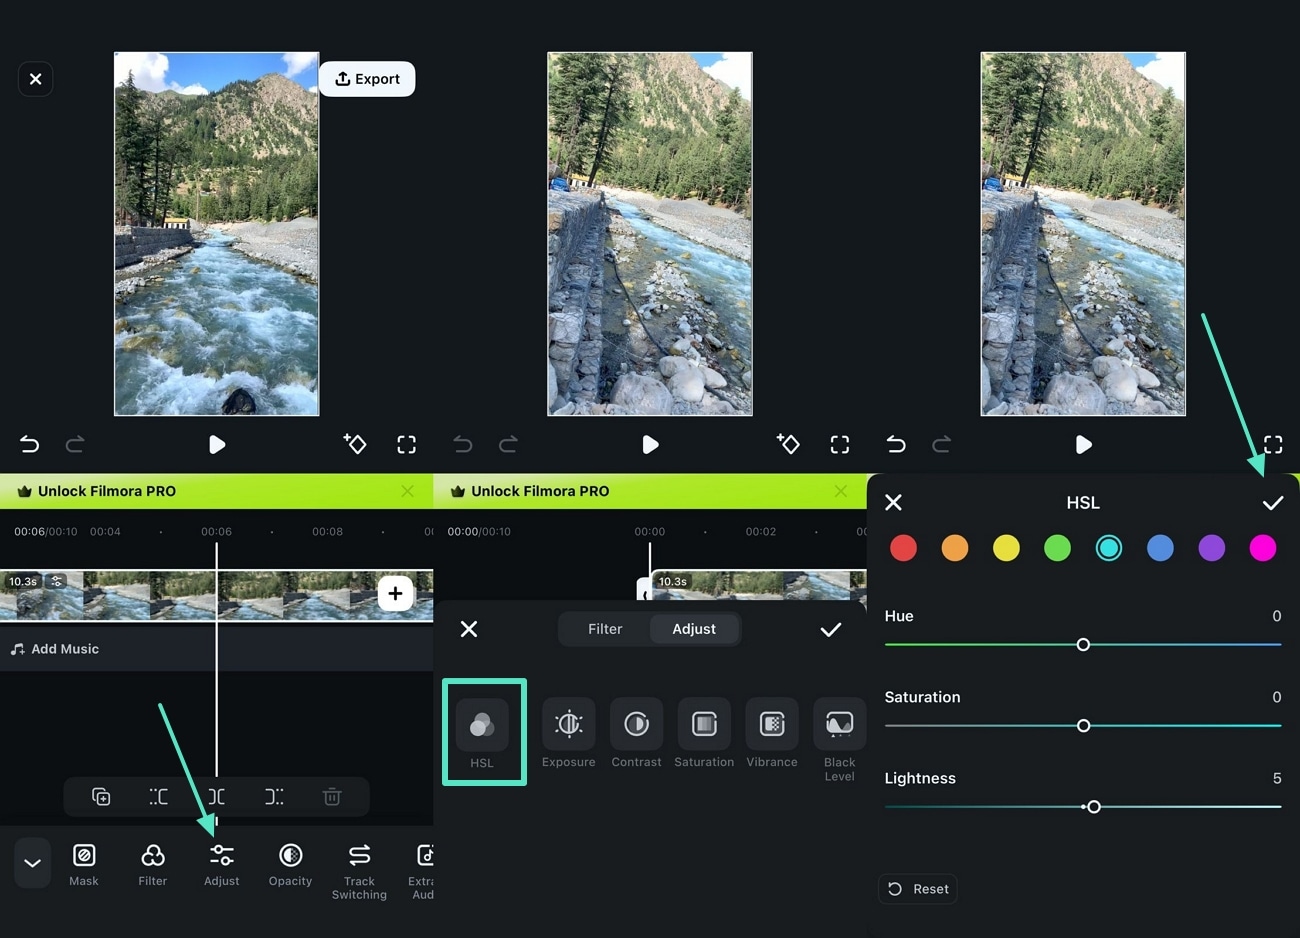
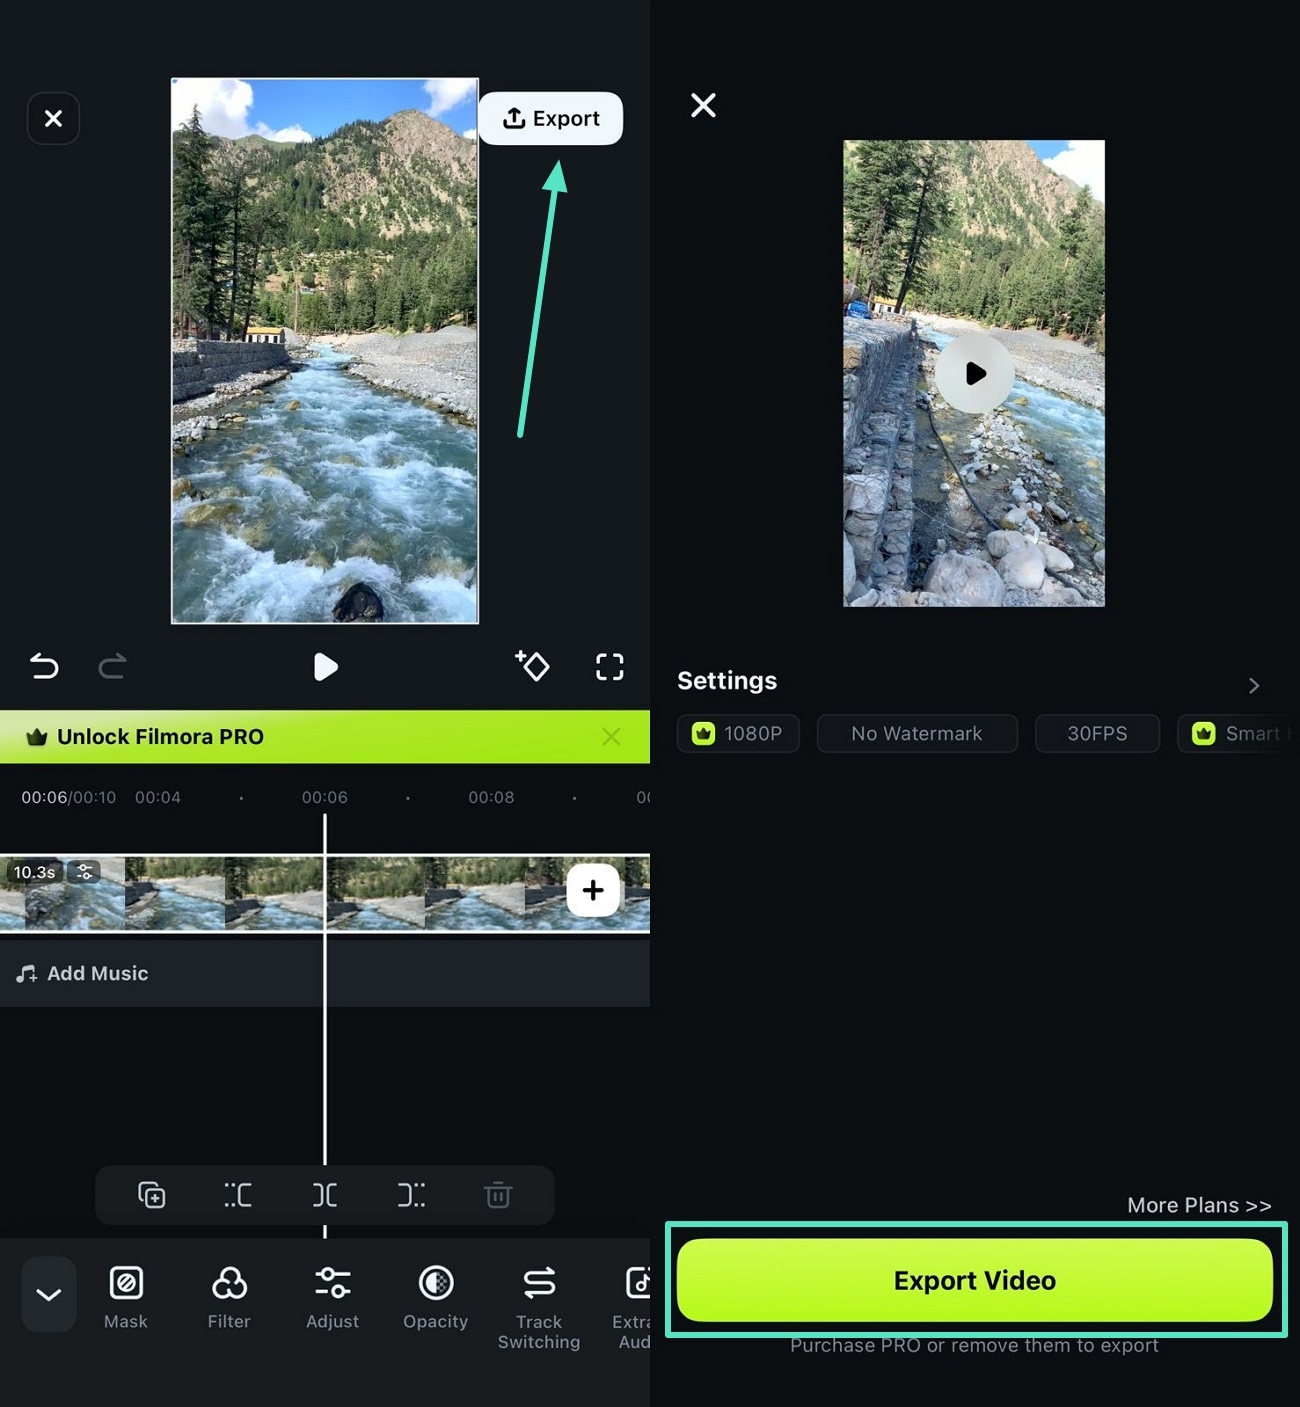
- Step 3. Preview Video and Export. Once the video is completely edited, you can preview it for your satisfaction. Finally, hit the "Export" button and configure the settings to set the resolution, frame, and watermark on the video. Then, press "Export Video" to save the video to your gallery.
secure download
Part 4. Benefits of Using Filmora for Color Correction and Grading
Some of the benefits of Filmora for video color grading and correction are described in the section given below:
- Natural UI is used for colorful visual effects and layouts to make your videos perfect, and it presents numerous layouts.
- Cinematic color treatments are applied by the Filmora App, which helps to maintain the skin tones of the videos.
- Customized formats are available for color grading to enhance the cinematic view, using color wheels that are applied to create a specific effect.
- It offers functional color adjustment tools and ready-made filters to achieve your desired look with tremendous customization.
- There are 40 color presets to instantly add calm and warm effects to videos, creating a filmic look.
- The industry-standard 3D LUT is used to project colors within the image's color range and can change the color scheme according to your preferences.
Conclusion
To wrap it up, video color gradingand correction are essential for video production that includes quality, visual allure, and storytelling. Anyone can now easily add these outputs to turn their videos into cinematic clips using the Filmora App on their devices. This tool is equipped with all the necessary features to manually edit your Filmora color grading conveniently.
secure download
