For the Best Results, Use the Latest Version.
-
Preparations
-
Account
-
Get Started & Basic Settings
-
Compatibility & Tech Specs
-
Performance Settings
-
-
Creating Projects
-
Creating New Projects
-
-
Importing & Recording
-
Video Editing for Windows
-
Basic Video Editing
- Enable/Disable Clip in Windows
- Magnetic Timeline for Windows
- Drawing Tools fo Windows
- Dual Monitor Setup for Video Editing on Windows
- Select All Clips on Timeline for Windows
- Dual Monitor Setup for Video Editing on Mac
- Manage Timeline and Tracks
- Auto Ripple for Windows
- Split & trim video
- Crop & Pan & Zoom Video
- Compositing
- Change video playback speed
- Playing videos in reverse
- Mark In and Mark Out for Windows
- Markers for Windows
- Group editing
- Customizable Backgrounds for Videos and Images in Windows
- Video snapshot
- Using freeze frame
- Logo Reveal For Windows
- Apply auto enhance
- Applying drop shadow
- Adjustment layer for Windows
- Transforming
- Video Editing Ruler – Windows
-
Advanced Video Editing
-
AI-Powered Video Editing
- Smart Scene Cut for Windows
- Smart Short Clips for Windows
- AI Face Mosaic for Windows
- AI Video Enhancer
- AI Text-to-Video for Windows
- Planar Tracking
- AI Idea to Video for Windows
- Image to Video for Windows
- Instant Cutter Tool for Windows
- AI Extend
- AI Script to Video Guide for Windows
- AI Text-Based Editing for Windows
- AI Mate Editing for Windows
- Create with instant mode
- ChatGPT Plugin - AI Copywriting
- AI Smart Cutout
- Lens correction
- Auto reframe video
- AI Portrait Cutout
- Scene detection feature
- AI Smart Masking for Windows
- Make motion tracking
- Stabilization
- AI Video/Photo Object Remover for Windows
- AI Smart Search for Windows
- AI Skin Tone Protection for Windows
- AI Image for Windows
- Chroma key (green screen)
- Super Slow Motion with Optical Flow for Windows
- Video Denoise for Windows
-
-
Audio Editing for Windows
-
Basic Audio Editing
-
Advanced Audio Editing
-
AI-Powered Audio Editing
-
-
Text Editing for Windows
-
Basic Text Editing
-
Advanced Text Editing
-
AI-Powered Text Editing
-
-
Video Customizations
-
Video Effects
-
Audio Effects
-
Transitions
-
Stickers
-
Filters
-
Color Editing
-
Animations
-
Templates
-
Asset Center
-
-
Exporting & Share & Cloud Backup
Ducking
Audio ducking
Audio Ducking means to decrease the volume level of specified audio when second specified audio is present. In video editing software, audio ducking is usually used to lower background music anytime a person speaks. When the person finishes speaking, the background music raises again. This technique can be used in any scenario where you want to be heard clearly.
Duck Audio in Filmora
Locate Ducking Function in Filmora
Note:
In Filmora audio ducking feature, you do not lower the volume of the clips that you choose. On the contrary, the volume of the other clips is decreased. Kindly choose the one that needs to be heard clearly.There are three methods that you can access Filmora ducking features.
1 Click the clip that you want the voice to be heard clearly.
2 Right-click on video or audio clip and select Adjust Audio.
3 Select the video or audio clip, then click Audio > Basic.
In the above three paths, the first one is the easiest way to duck your clips.

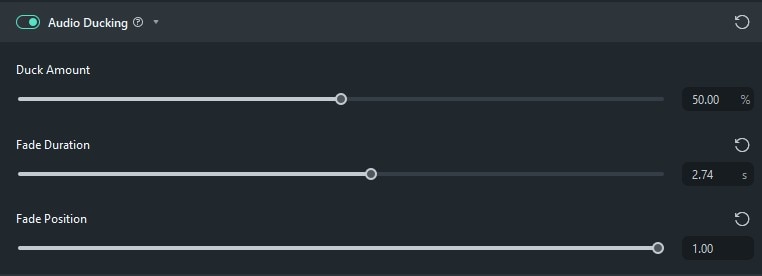
The default ducking value is 50%. You can also adjust the volume of the other clips by dragging the slider.
You can also adjust the Fade Position and Fade Duration. This lets you control where the ducking effect begins and how long the fades last, making your audio transitions sound more natural and pleasant.
Cancel the Ducking Option
There are two ways to turn off the audio ducking:
1 Click on the reset logo.
2 Click on the check box.
Related Posts
Featured Articles
[Top Tips] How To Make a YouTube Intro: A 2025 Guide
New to content creation and looking for ways to create captivating visual content? Read this article to learn how to make a YouTube intro video effortlessly.
How To Make a Video Podcast: A Beginner's Guide
Learn how to make a video podcast. Here’s a complete guide on everything there is to know about video podcasts, their types, uses, and editing.
Top 10 Sora Alternatives: Free & Paid AI Video Tools (2025)
Looking for a Sora alternative? Explore our top 10 list of AI text-to-video tools for 2025. Includes free and powerful options like Pika, Runway, & Filmora.
Recommended User Guide
Automatic normalization
Learn to set auto normalization in Filmora.
Audio equalizer
Learn how to use Audio Equalizer in Filmora 11.
Access Audio Meter in Windows
The Audio Meter is an independent functionality in Filmora, and users can enable it during or after editing.
