For the Best Results, Use the Latest Version.
-
Preparations
-
Account
-
Get Started & Basic Settings
-
Compatibility & Tech Specs
-
Performance Settings
-
-
Creating Projects
-
Creating New Projects
-
-
Importing & Recording
-
Video Editing for Windows
-
Basic Video Editing
- Enable/Disable Clip in Windows
- Magnetic Timeline for Windows
- Dual Monitor Setup for Video Editing on Windows
- Select All Clips on Timeline for Windows
- Manage Timeline and Tracks on Windows
- Auto Ripple for Windows
- Split & trim video
- Crop & Pan & Zoom Video
- Compositing
- Change Video Speed on Windows
- Playing videos in reverse
- Mark In and Mark Out for Windows
- Markers for Windows
- Group editing
- Customizable Backgrounds for Videos and Images in Windows
- Video snapshot
- Using freeze frame
- Logo Reveal For Windows
- Apply auto enhance
- Applying drop shadow
- Adjustment layer for Windows
- Transforming
- Video Editing Ruler – Windows
-
Advanced Video Editing
- Drawing Tools for Windows | Filmora Guide
- Create Multi-Camera Clip
- Compound Clip for Windows
- Multi-Clip Editing for Windows
- Filmora Motion Blur | Windows
- Filmora Flicker Removal Guide | Windows
- Apply mask to video
- Creating a PIP effect
- Keyframe Graph Editor for Windows
- Add animation keyframing for Windows
- Keyframe Path Curve for Windows
-
AI-Powered Video Editing
- Smart Scene Cut for Windows
- Smart Short Clips for Windows
- AI Face Mosaic for Windows
- Filmora AI Eye Contact- Windows
- AI Video Enhancer for Windows
- AI Text-to-Video for Windows
- Planar Tracking for Windows
- AI Idea to Video for Windows
- Filmora Image to Video for Windows
- Filmora Image to Prompt for Windows
- Instant Cutter Tool for Windows
- AI Extend
- Filmora AI Relight - Windows
- Filmora AI Image Enhancer Guide - Windows
- AI Script to Video Guide for Windows
- AI Text-Based Editing for Windows
- AI Mate Editing for Windows
- Create with instant mode
- ChatGPT Plugin - AI Copywriting
- AI Smart Cutout
- Lens correction on Windows
- Auto reframe video
- AI Portrait Cutout
- Scene detection feature
- AI Smart Masking for Windows
- Make motion tracking
- Video Stabilization for Windows
- AI Video/Photo Object Remover for Windows
- AI Smart Search for Windows
- AI Skin Tone Protection for Windows
- AI Image for Windows
- Chroma key (green screen)
- Super Slow Motion with Optical Flow for Windows
- Video Denoise for Windows
-
-
Audio Editing for Windows
-
Basic Audio Editing
-
Advanced Audio Editing
-
AI-Powered Audio Editing
-
-
Text Editing for Windows
-
Basic Text Editing
-
Advanced Text Editing
-
AI-Powered Text Editing
-
-
Video Customizations
-
Video Effects
-
Audio Effects
-
Transitions
-
Stickers
-
Filters
-
Color Editing
-
Animations
-
Templates
-
Asset Center
-
-
Exporting & Share & Cloud Backup
Enable/Disable Clip in Windows
When working on professional projects as a video editor, turning on and off clips helps with optimized editing. Hence, Wondershare Filmora offers this functionality as a professional editing software. The methods to access and enable these features are straightforward, and you'll learn about them in this guide:
Accessing the Enable/Disable Option
There are two ways for users to commence this action, and by reading further, you can familiarize yourself with them:
Method 1: Using the Timeline Dropdown Menu
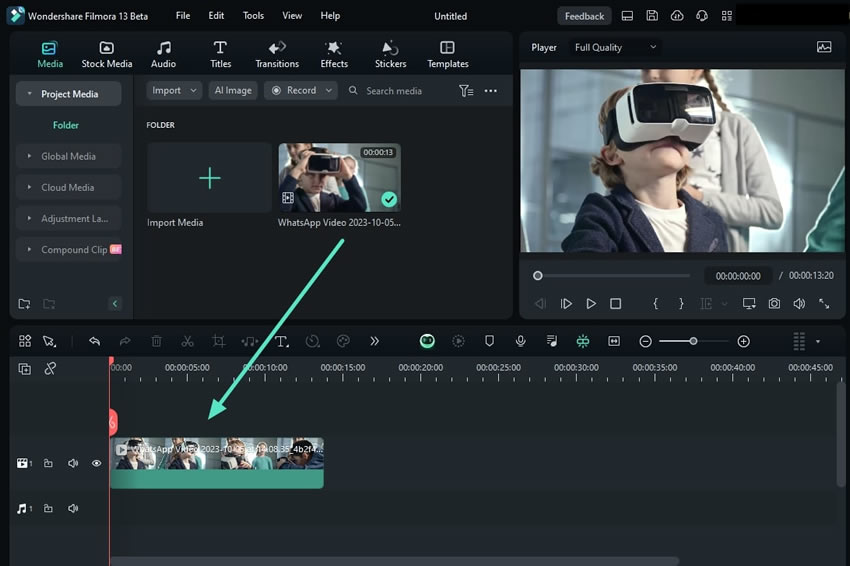
Step 1: Import Media to Timeline
Create a new project after launching Filmora, using the correct navigations. Once you reach the editing window, click the "Import" button in the Project Media section and import your files. Afterward, access this recently imported from "Media Library" and bring it to the timeline track.
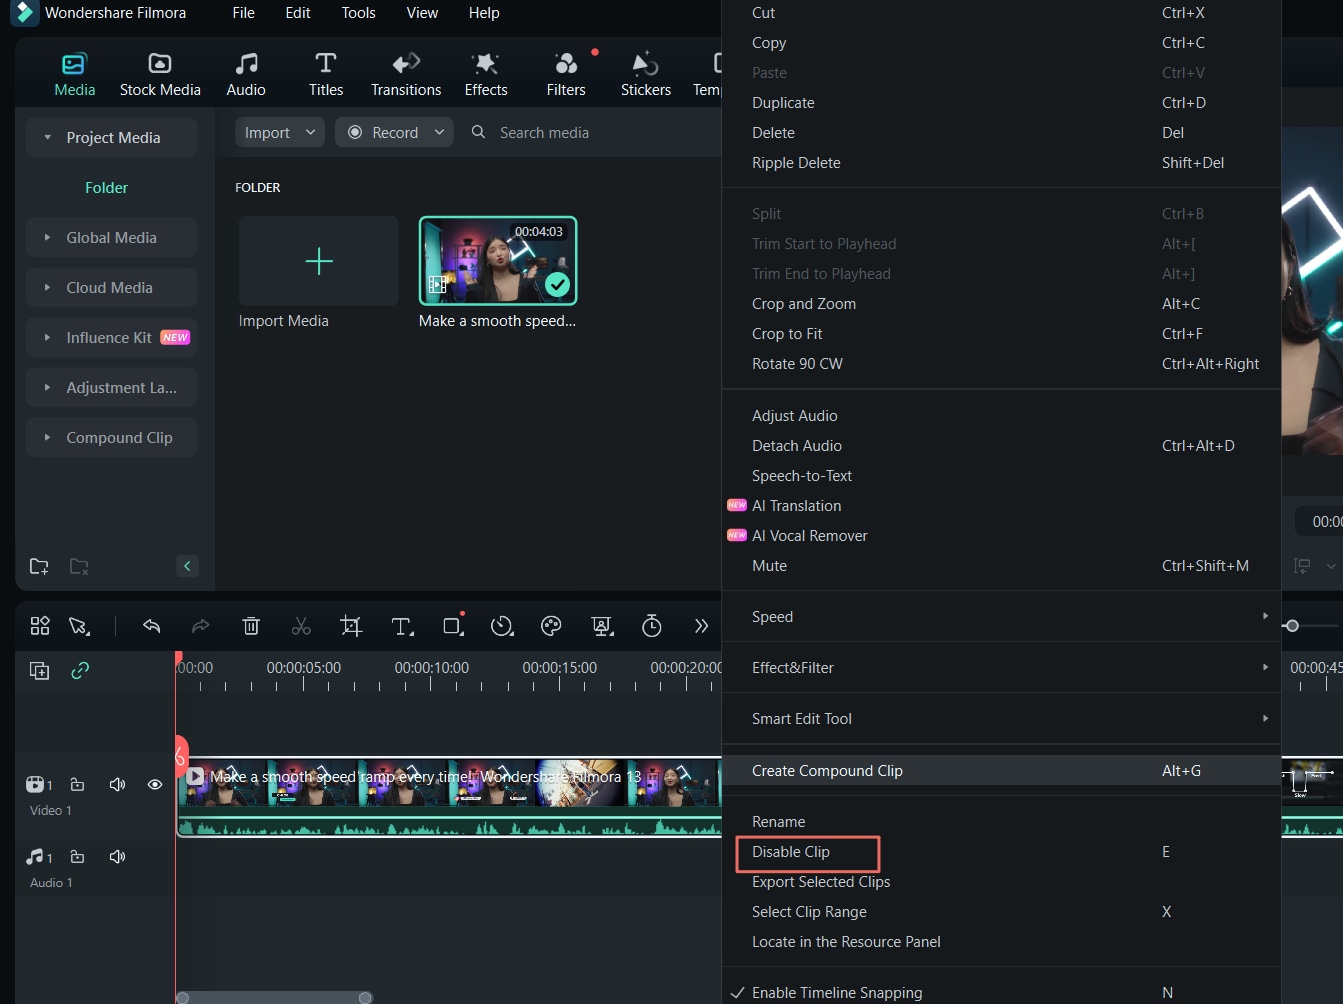
Step 2: Disable a Clip
Select this clip in the timeline panel and access the timeline dropdown menu by right-clicking on the following clip. From the dropdown menu options, locate and choose "Disable Clip". This action will hide the clip in the timeline while you focus on others to edit.
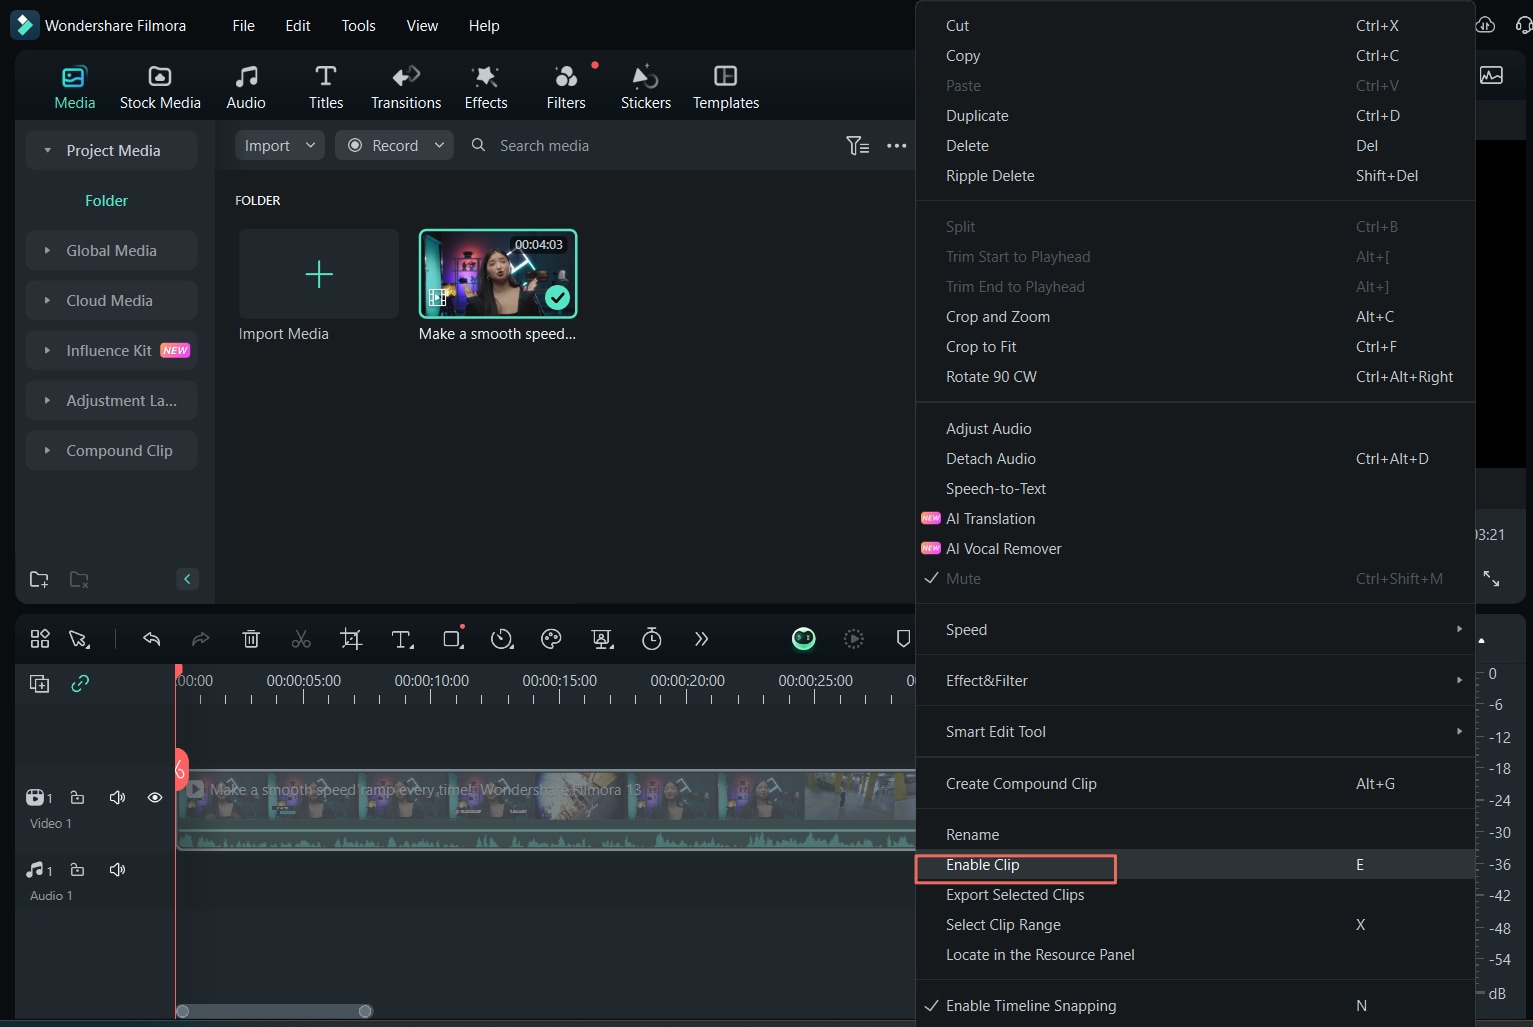
Step 3: Enable a Clip
Repeat the same action for enabling the clip, except this time, look for the "Enable Clip" option.
Method 2: Using the Timeline Panel on the Left
Once you have dropped media to the timeline, select it and navigate towards the panel at the left side of the pane. Click the "Eye" icon to turn off the clip from there. Once the editing is complete, click the same icon again to enable the clip.

Related Posts
Featured Articles
How to Add a Watermark in Lightroom?
Learn how to add a watermark in Lightroom using both desktop and mobile. This guide covers step-by-step instructions, customization tips, and a better option.
5 Cool Transitions for Premiere Pro and A Cool Tool Suggestion
Want to find out more about cool transitions in Premiere Pro? Check our article. You will also find a super alternative solution.
4 Easy and Quick Methods to Remove Thumbnails from Videos
If you’re struggling to remove the thumbnail, we got you! Learn how to remove thumbnails from videos on various platforms in easy steps.
Recommended User Guide
Playing videos in reverse
Learn how to play videos in reverse in Filmora 11
Compositing
To make an entire clip uniformly transparent or semi-transparent, use the Opacity effect in Compositing. You can set a selected clip’s opacity in video or image editing settings.
Magnetic Timeline for Windows
Discover Wondershare Filmora's Magnetic Timeline, a revolutionary tool that effortlessly aligns your clips for a seamless and organized video editing experience.
