For the Best Results, Use the Latest Version.
-
Preparations
-
Account
-
Get Started & Basic Settings
-
Compatibility & Tech Specs
-
Performance Settings
-
-
Creating Projects
-
Creating New Projects
-
-
Importing & Recording
-
Video Editing for Windows
-
Basic Video Editing
- Enable/Disable Clip in Windows
- Magnetic Timeline for Windows
- Dual Monitor Setup for Video Editing on Windows
- Select All Clips on Timeline for Windows
- Manage Timeline and Tracks on Windows
- Auto Ripple for Windows
- Split & trim video
- Crop & Pan & Zoom Video in Filmora for Windows
- Compositing
- Change Video Speed on Windows
- Playing videos in reverse
- Mark In and Mark Out for Windows
- Markers for Windows
- Group editing
- Customizable Backgrounds for Videos and Images in Windows
- Video snapshot
- Using Freeze Frame in Filmora for Windows
- Logo Reveal For Windows
- Auto Enhance in Filmora for Windows
- Applying drop shadow
- Adjustment layer for Windows
- Apply Transforming for Windows
- Video Editing Ruler – Windows
-
Advanced Video Editing
- Drawing Tools for Windows | Filmora Guide
- Create Multi-Camera Clip in Filmora for Windows
- Compound Clip for Windows
- Multi-Clip Editing for Windows
- Filmora Motion Blur | Windows
- Video Chapters in Filmora on Windows
- Filmora Flicker Removal Guide | Windows
- Apply mask to video
- Creating a PIP Effect for Windows
- Keyframe Graph Editor for Windows
- Add animation keyframing for Windows
- Keyframe Path Curve for Windows
-
AI-Powered Video Editing
- Smart Scene Cut for Windows
- Smart Short Clips for Windows
- AI Face Mosaic for Windows
- Filmora AI Eye Contact- Windows
- AI Video Enhancer for Windows
- AI Text-to-Video for Windows
- Planar Tracking for Windows
- AI Idea to Video for Windows
- Filmora Image to Video for Windows
- Filmora Image to Prompt for Windows
- Instant Cutter Tool for Windows
- AI Extend
- Filmora AI Relight - Windows
- Filmora AI Image Enhancer Guide - Windows
- AI Script to Video Guide for Windows
- AI Text-Based Editing for Windows
- AI Mate Editing for Windows
- Instant Mode in Filmora
- ChatGPT Plugin - AI Copywriting
- AI Smart Cutout for Windows
- Lens correction on Windows
- Auto Reframe Video for Windows
- AI Portrait Cutout
- Scene detection feature
- AI Smart Masking for Windows
- Motion Tracking on Windows
- Video Stabilization for Windows
- AI Video/Photo Object Remover for Windows
- AI Smart Search for Windows
- AI Skin Tone Protection for Windows
- AI Image for Windows
- Chroma key (green screen)
- Super Slow Motion with Optical Flow for Windows
- Video Denoise for Windows
-
-
Audio Editing for Windows
-
Basic Audio Editing
-
Advanced Audio Editing
-
AI-Powered Audio Editing
- Auto synchronization
- AI Sound Effects in Filmora for Windows
- Smart BGM Generation on Windows
- AI Voice Enhancer in Filmora
- AI Voice Cloning in Wondershare Filmora
- AI Music Generator for Windows
- Audio To Video
- AI Vocal Remover for Windows
- AI Auto Beat Sync for Windows
- AI Audio Stretch for Windows
- AI Audio Denoise for Windows
- Silence Detection on Windows
-
-
Text Editing for Windows
-
Basic Text Editing
-
Advanced Text Editing
-
AI-Powered Text Editing
-
-
Video Customizations
-
Video Effects
-
Audio Effects
-
Transitions
-
Stickers
-
Filters
-
Color Editing
-
Animations
-
Templates
-
Asset Center
-
-
Exporting & Share & Cloud Backup
Filmora Dynamic Captions
Filmora for Windows offers the utility of generating Dynamic Captions across the spoken words in your visual content. This feature uses AI to convert speech into animated, stylized text captions, enhancing viewer engagement and accessibility.
You can choose from various caption styles and customize fonts and sizes to match your video's theme. The captions are displayed on the screen, while emphasizing the word being spoken in the video with high accuracy. Filmora offers two main methods to generate these versatile captions using AI, which are presented as follows:
Method 1. Speech to Text
This method uses the speech to text functionality and efficiently converts your spoken words into accurate text. You can then add animation to the generated captions and emphasize the specific word by accessing the fonts settings. The generated captions can be saved as separate SRT files for users to repurpose the content.
Step 1. Start By Creating a Project and Importing a Video
After launching Filmora on your Windows device, click the "New Project" option located within the homepage. Next, import the video for which you want to generate the captions and drag it to the editing timeline.

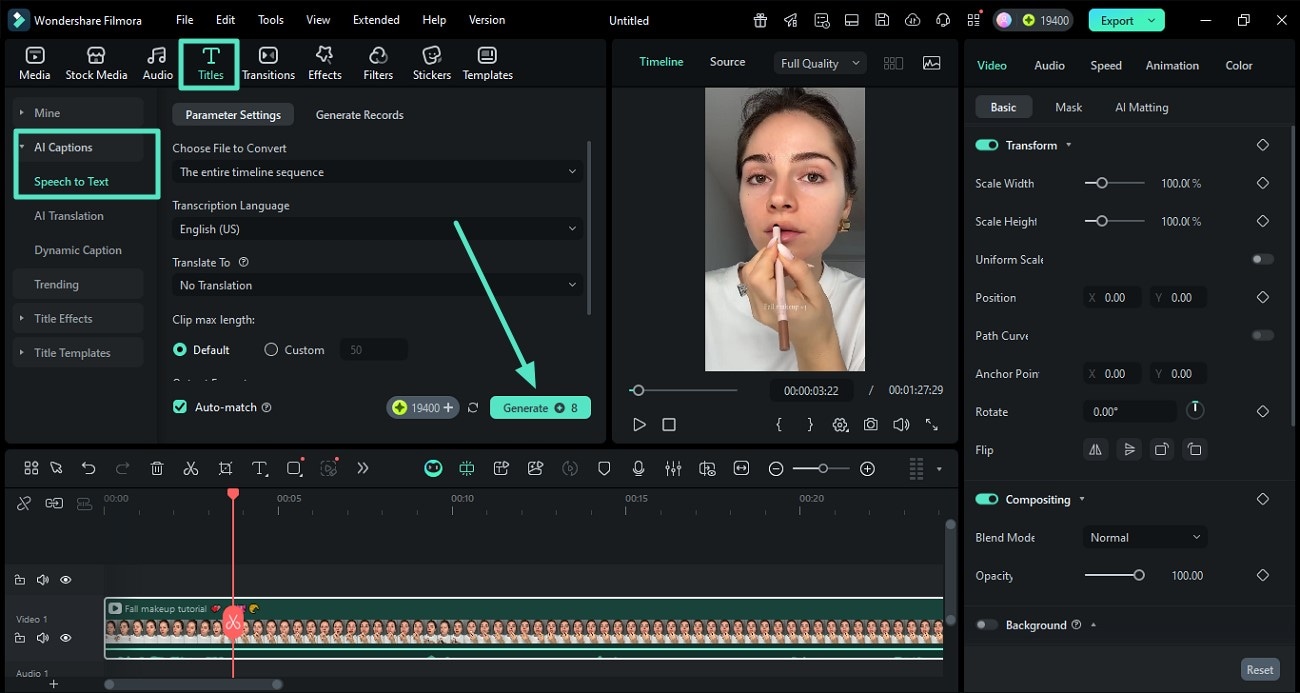
Step 2. Choose Speech to Text Feature
Next head to the "Title" option from the menu bar and access the "Speech to Text" option. From here, select the language parameters, output format and hit the "Generate" button to execute the process.
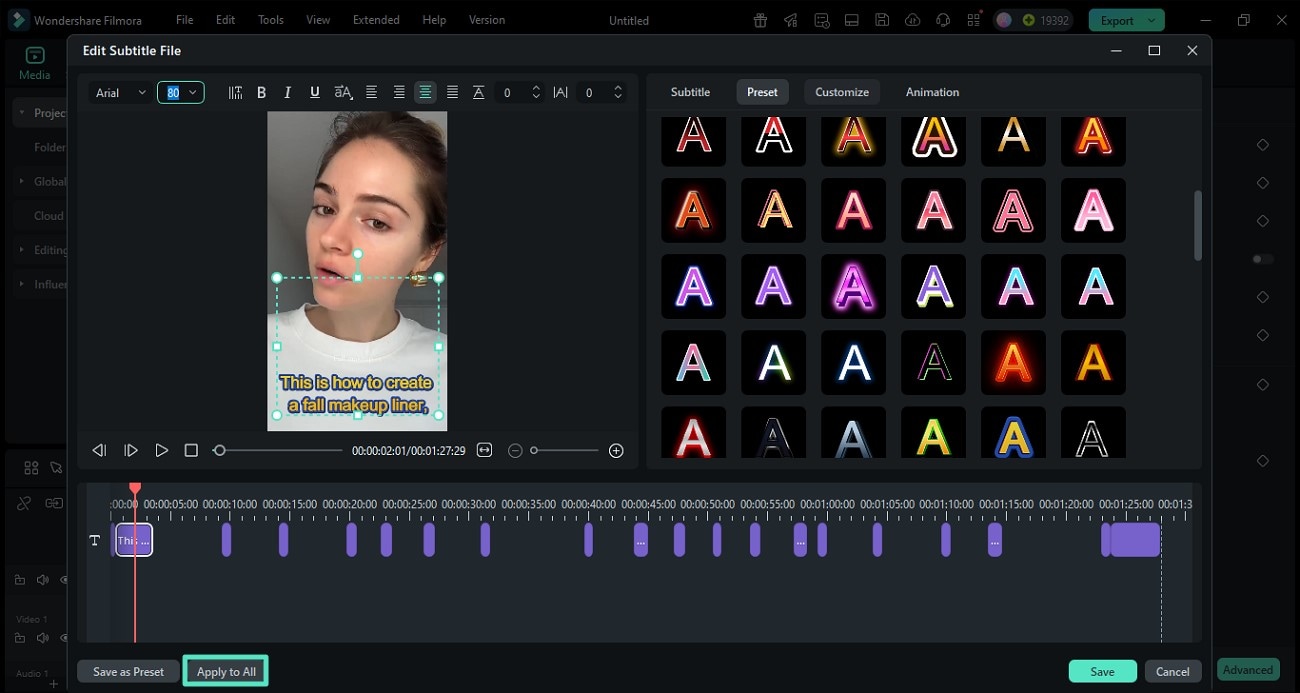
Step 3. Edit the Generated Captions
Once the captions are generated, double-click on the text track to enable the editing window. Here, customize the text according to your preferences as the tool provides the utility of text settings. Incorporate the changes made to the entire text by clicking the "Apply to All" button.
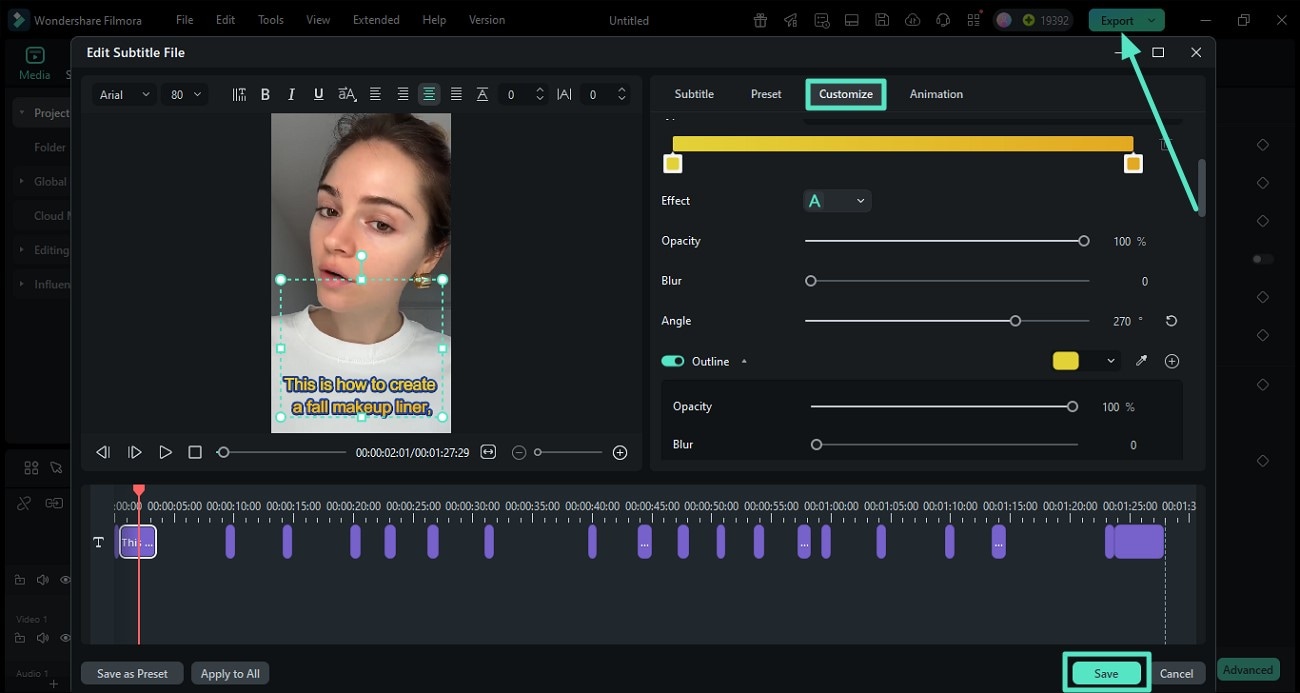
Step 4. Customize The Generated Captions
To make the subtitles dynamic, access the "Customize" section and make changes according to your preferences. When the stylizing of the text is completed, apply it to the entire text using the "Apply To All" button. Finally, head to the top-right corner of the interface and press "Export" to save results.
Method 2. Dynamic Captions
This feature of Filmora automatically detects the spoken words in the video and generates text across them. The word that is being spoken at the moment is highlighted automatically. You can also customize the appearance of the entire text or the emphasized text or phrase according to your preferences.
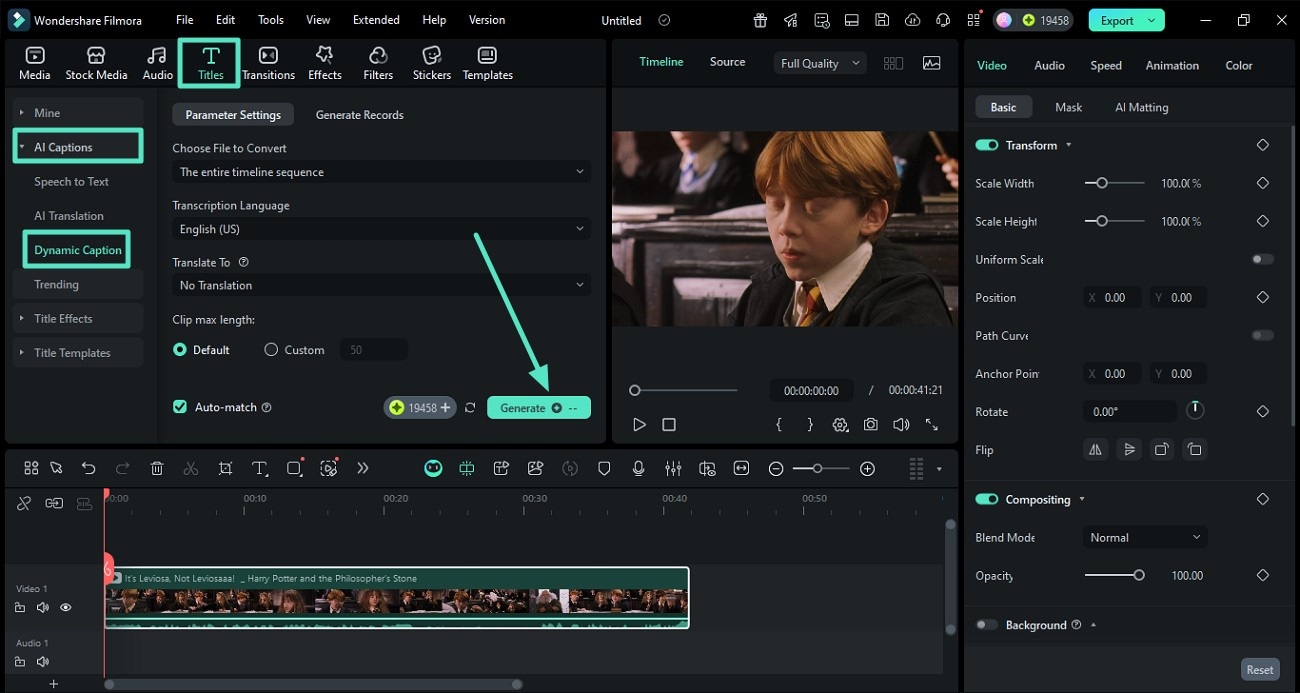
Step 1. Access the Dynamic Caption Feature
After launching Filmora and importing your video to the editing interface, click on the "AI Captions" section on the left from the "Titles" section on the menu bar. Next, access the "Dynamic Captions" option from the left and select the language of the subtitles. Choose whether you want to add the translation or not and hit the "Generate" button.
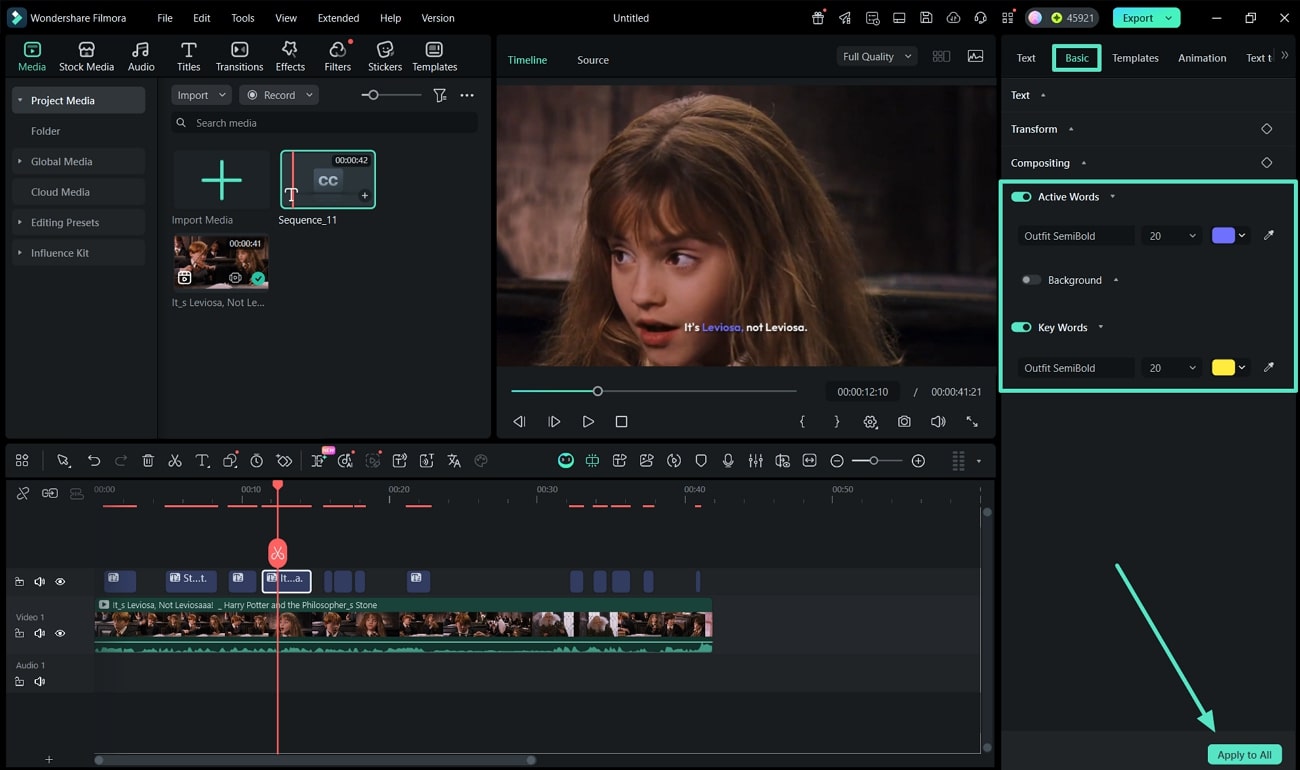
Step 2. Edit the Generated Dynamic Captions
Once the captions are generated, head to the right-side panel and click on the "Basic" section. Here, you can modify the appearance of the active word and the keyword according to your preferences. Moreover, apply other modifications like adding animations and hit the "Apply to All" button to make changes to the entire text.
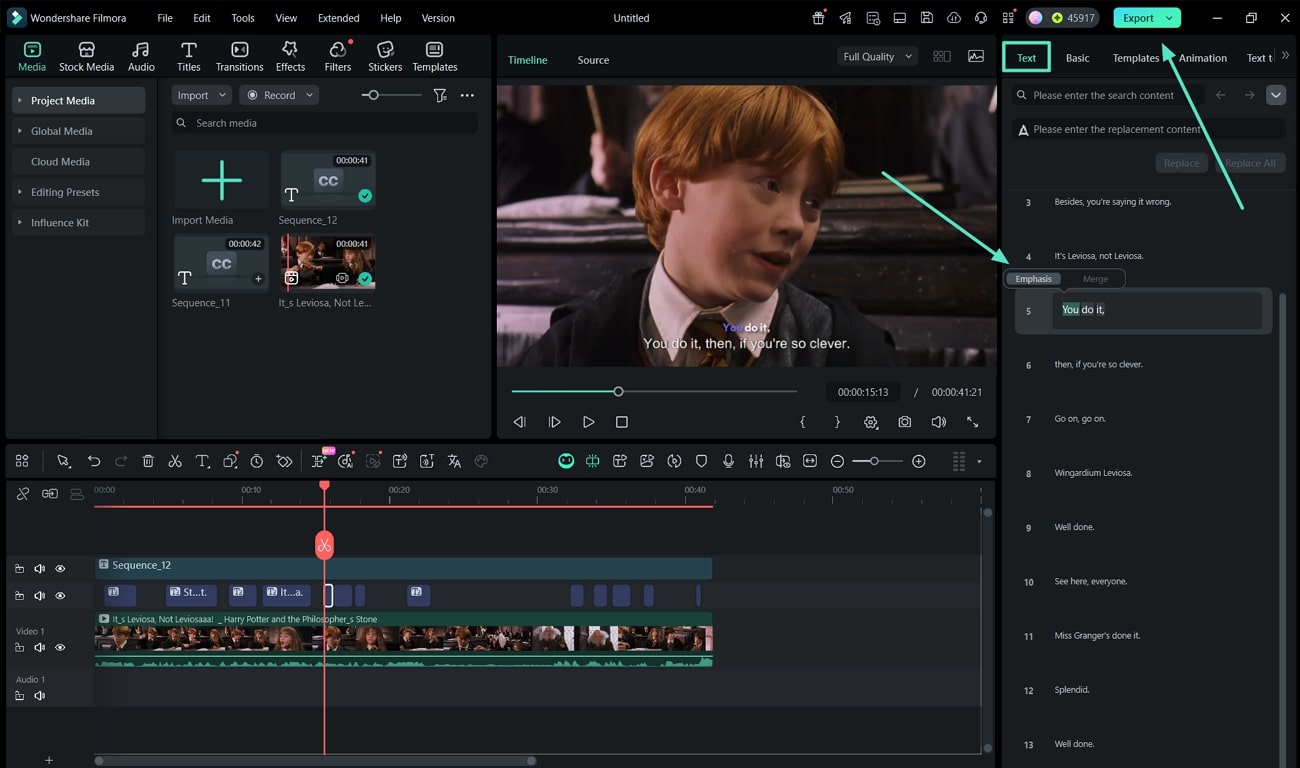
Step 3. Highlight the Emphasis on Spoken WordsNEW
Head to the "Text" panel on the right, select the text to be highlighted and press the "Emphasis" to highlight the emphasis on the spoken words. Once you are satisfied with the results, click the "Export" button located at the top-right corner.
Related Posts
Featured Articles
Premiere Pro Audio Equalizer Made Simple: Clearer Sound in Minutes
Using the parametric EQ in Premiere Pro, you can cut noise, boost clarity, and achieve a polished mix. Check out our guide to learn the basics in just a few minutes.
Make Fun: How to Make Yourself Look Old in Minutes
See your past and future self instantly using the three top old-face filter apps. Our AI age filter guide will show you how to watch yourself age from baby to adult in seconds.
How To Use Text Animations and Templates in Premiere Pro
While using Premiere Pro’s text animations may seem overwhelming, presets and templates are available to jumpstart your vlogs, presentations, and more.
Recommended User Guide
STT And TTS in Windows
These features enhance the dubbing and subtitle editing experience and improve editing efficiency.
AI Translation for Windows
Wondershare Filmora’s AI translation feature can effectively translate multiple sources of languages into your desired one. This is a guide about filmora's AI video translation
