For the Best Results, Use the Latest Version.
-
Preparations
-
Account
-
Get Started & Basic Settings
-
Compatibility & Tech Specs
-
Performance Settings
-
-
Creating Projects
-
Creating New Projects
-
-
Importing & Recording
-
Video Editing for Windows
-
Basic Video Editing
- Enable/Disable Clip in Windows
- Magnetic Timeline for Windows
- Drawing Tools fo Windows
- Dual Monitor Setup for Video Editing on Windows
- Select All Clips on Timeline for Windows
- Dual Monitor Setup for Video Editing on Mac
- Manage Timeline and Tracks
- Auto Ripple for Windows
- Split & trim video
- Crop & Pan & Zoom Video
- Compositing
- Change video playback speed
- Playing videos in reverse
- Mark In and Mark Out for Windows
- Markers for Windows
- Group editing
- Customizable Backgrounds for Videos and Images in Windows
- Video snapshot
- Using freeze frame
- Logo Reveal For Windows
- Apply auto enhance
- Applying drop shadow
- Adjustment layer for Windows
- Transforming
- Video Editing Ruler – Windows
-
Advanced Video Editing
-
AI-Powered Video Editing
- Smart Scene Cut for Windows
- Smart Short Clips for Windows
- AI Face Mosaic for Windows
- AI Video Enhancer
- AI Text-to-Video for Windows
- Planar Tracking
- AI Idea to Video for Windows
- Image to Video for Windows
- Instant Cutter Tool for Windows
- AI Extend
- AI Script to Video Guide for Windows
- AI Text-Based Editing for Windows
- AI Mate Editing for Windows
- Create with instant mode
- ChatGPT Plugin - AI Copywriting
- AI Smart Cutout
- Lens correction
- Auto reframe video
- AI Portrait Cutout
- Scene detection feature
- AI Smart Masking for Windows
- Make motion tracking
- Stabilization
- AI Video/Photo Object Remover for Windows
- AI Smart Search for Windows
- AI Skin Tone Protection for Windows
- AI Image for Windows
- Chroma key (green screen)
- Super Slow Motion with Optical Flow for Windows
- Video Denoise for Windows
-
-
Audio Editing for Windows
-
Basic Audio Editing
-
Advanced Audio Editing
-
AI-Powered Audio Editing
-
-
Text Editing for Windows
-
Basic Text Editing
-
Advanced Text Editing
-
AI-Powered Text Editing
-
-
Video Customizations
-
Video Effects
-
Audio Effects
-
Transitions
-
Stickers
-
Filters
-
Color Editing
-
Animations
-
Templates
-
Asset Center
-
-
Exporting & Share & Cloud Backup
Audio Meter in Windows
There is a certain level of sound that humans can bear and even lower that they can enjoy; hence, Filmora has a feature to take care of your content's audio level. The Audio Meter is an independent functionality in Filmora, and users can enable it during or after editing. Following this guide, users will find the step-by-step instructions to access the audio meter:
Accessing the Audio Meter
If you wish to display the audio meter while editing in Filmora, keep following the given directions to enable it:
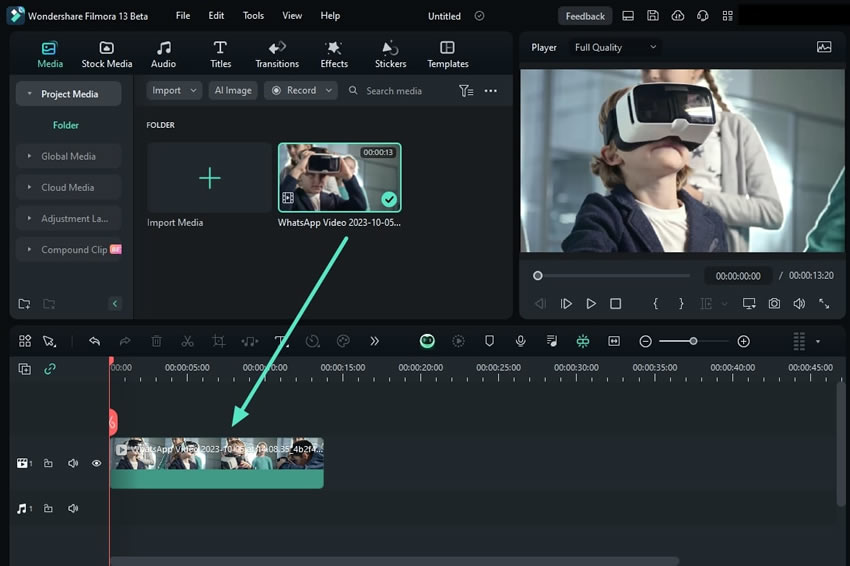
Step 1: Import Media and Bring it to the Timeline
Once Filmora is installed on your PC, initiate a new and import your media using the "Ctrl + I" shortcuts. Then, drop your media to the timeline panel while making sure that your media contains audio.

Step 2: Enable the Audio Meter
Choose the clip and activate this function by clicking the "Audio Meter" icon on the right side of the timeline toolbar.

Step 3: See the Audio Meter's Statistics
The audio meter will be shown on the right side of the timeline panel, providing the audio statistics for your media.

Related Posts
Featured Articles
AI Dinosaur Generator: Turn Texts into Dinosaurs
Find out about the best AI dinosaur art generator that can help you create stunning dinosaur photos, and then animate them to create something magical.
What is Transcoding? All You Need To Know
Learn how to transcode different video formats to ensure your video editing workflow is more efficient and seamless, overcoming challenges like hardware limitations or complex codecs.
Unveiling the Premier League Highlights on YouTube
Do you want to create action-packed Premier League Highlights for YouTube? Our guide will help you engage fans by making such videos using Filmora!
Recommended User Guide
Audio Mixer
Use the audio mixer in Filmora to create a creative video!
Automatic normalization
Learn to set auto normalization in Filmora.
