For the Best Results, Use the Latest Version.
-
Preparations
-
Account
-
Get Started & Basic Settings
-
Compatibility & Tech Specs
-
Performance Settings
-
-
Creating Projects
-
Creating New Projects
-
-
Importing & Recording
-
Video Editing for Windows
-
Basic Video Editing
- Enable/Disable Clip in Windows
- Magnetic Timeline for Windows
- Dual Monitor Setup for Video Editing on Windows
- Select All Clips on Timeline for Windows
- Manage Timeline and Tracks on Windows
- Auto Ripple for Windows
- Split & trim video
- Crop & Pan & Zoom Video
- Compositing
- Change video playback speed
- Playing videos in reverse
- Mark In and Mark Out for Windows
- Markers for Windows
- Group editing
- Customizable Backgrounds for Videos and Images in Windows
- Video snapshot
- Using freeze frame
- Logo Reveal For Windows
- Apply auto enhance
- Applying drop shadow
- Adjustment layer for Windows
- Transforming
- Video Editing Ruler – Windows
-
Advanced Video Editing
- Drawing Tools for Windows | Filmora Guide
- Create Multi-Camera Clip
- Compound Clip for Windows
- Multi-Clip Editing for Windows
- Filmora Motion Blur | Windows
- Filmora Flicker Removal Guide | Windows
- Apply mask to video
- Creating a PIP effect
- Keyframe Graph Editor for Windows
- Add animation keyframing for Windows
- Keyframe Path Curve for Windows
-
AI-Powered Video Editing
- Smart Scene Cut for Windows
- Smart Short Clips for Windows
- AI Face Mosaic for Windows
- Filmora AI Eye Contact- Windows
- AI Video Enhancer for Windows
- AI Text-to-Video for Windows
- Planar Tracking for Windows
- AI Idea to Video for Windows
- Filmora Image to Video for Windows
- Filmora Image to Prompt for Windows
- Instant Cutter Tool for Windows
- AI Extend
- Filmora AI Relight - Windows
- Filmora AI Image Enhancer Guide - Windows
- AI Script to Video Guide for Windows
- AI Text-Based Editing for Windows
- AI Mate Editing for Windows
- Create with instant mode
- ChatGPT Plugin - AI Copywriting
- AI Smart Cutout
- Lens correction on Windows
- Auto reframe video
- AI Portrait Cutout
- Scene detection feature
- AI Smart Masking for Windows
- Make motion tracking
- Video Stabilization for Windows
- AI Video/Photo Object Remover for Windows
- AI Smart Search for Windows
- AI Skin Tone Protection for Windows
- AI Image for Windows
- Chroma key (green screen)
- Super Slow Motion with Optical Flow for Windows
- Video Denoise for Windows
-
-
Audio Editing for Windows
-
Basic Audio Editing
-
Advanced Audio Editing
-
AI-Powered Audio Editing
-
-
Text Editing for Windows
-
Basic Text Editing
-
Advanced Text Editing
-
AI-Powered Text Editing
-
-
Video Customizations
-
Video Effects
-
Audio Effects
-
Transitions
-
Stickers
-
Filters
-
Color Editing
-
Animations
-
Templates
-
Asset Center
-
-
Exporting & Share & Cloud Backup
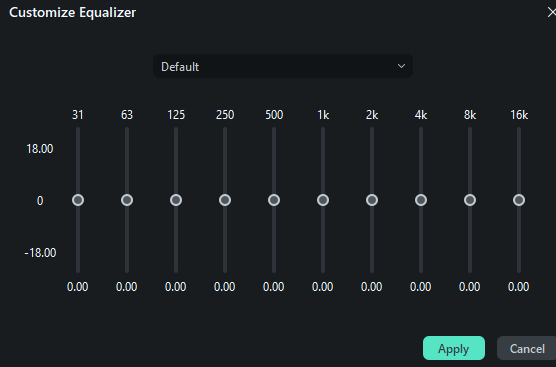
Audio Equalizer
The Audio Equalizer (EQ) enables you to raise and lower the loudness of an audio frequency (i.e. bass or treble). You can choose one equalizer preset and add it to the audio or customize it from scratch with sliders.
Index
Adjust Audio Equalizer
1. Double click the video or audio file in the timeline and then go to the Audio tab.
2. Go to Equalizer option and select one preset from the drop-down list, including Default, Classic, Low Bass, Sparkle, Pop, Rock' n' Roll, Soft, Techno, Hard Rock, Ska, Country, Acoustic, Folk, Blues, and Custom. You can choose a preset based on the type of audio or the genre of the music.

3. Click the Setting button and access the Custom Equalizer window to modify the gain by dragging the sliders up or down.
4. Click the play button in the Preview window to check the result. Click OK to apply the equalizer effect to the audio.
Note:
You can also click the Customize button before applying a preset to make the equalizer effect from scratch.Related Posts
Featured Articles
Chill Guy Creator: How to Generate Cool Chill Guy Memes with AI
You can create your own iconic Chill Guy meme easily with this expert guide. Learn how to create these memes using this top AI chill guy generator.
How to Add Lyrics to TikTok Videos Using AI Tools
Learn how to add lyrics on TikTok videos using AI tools. This guide will show you how to auto-generate synced captions with the music easily for faster editing.
How To Resize Video Online Free Without Watermark
Do you want to resize a video? Now, resizing a video is easy and hassle-free. Read this article to learn how to resize video online without watermark.
Recommended User Guide
Automatic normalization
Learn to set auto normalization in Filmora.
Audio ducking in Filmora
This is a guide about Filmora audio ducking.
Auto Normalization for Mac
Learn to set auto normalization in Filmora Mac
