For the Best Results, Use the Latest Version.
-
Preparations
-
Account
-
Get Started & Basic Settings
-
Compatibility & Tech Specs
-
Performance Settings
-
-
Creating Projects
-
Creating New Projects
-
-
Importing & Recording
-
Video Editing for Windows
-
Basic Video Editing
- Enable/Disable Clip in Windows
- Magnetic Timeline for Windows
- Dual Monitor Setup for Video Editing on Windows
- Select All Clips on Timeline for Windows
- Manage Timeline and Tracks on Windows
- Auto Ripple for Windows
- Split & trim video
- Crop & Pan & Zoom Video
- Compositing
- Change Video Speed on Windows
- Playing videos in reverse
- Mark In and Mark Out for Windows
- Markers for Windows
- Group editing
- Customizable Backgrounds for Videos and Images in Windows
- Video snapshot
- Using freeze frame
- Logo Reveal For Windows
- Apply auto enhance
- Applying drop shadow
- Adjustment layer for Windows
- Transforming
- Video Editing Ruler – Windows
-
Advanced Video Editing
- Drawing Tools for Windows | Filmora Guide
- Create Multi-Camera Clip
- Compound Clip for Windows
- Multi-Clip Editing for Windows
- Filmora Motion Blur | Windows
- Filmora Flicker Removal Guide | Windows
- Apply mask to video
- Creating a PIP effect
- Keyframe Graph Editor for Windows
- Add animation keyframing for Windows
- Keyframe Path Curve for Windows
-
AI-Powered Video Editing
- Smart Scene Cut for Windows
- Smart Short Clips for Windows
- AI Face Mosaic for Windows
- Filmora AI Eye Contact- Windows
- AI Video Enhancer for Windows
- AI Text-to-Video for Windows
- Planar Tracking for Windows
- AI Idea to Video for Windows
- Filmora Image to Video for Windows
- Filmora Image to Prompt for Windows
- Instant Cutter Tool for Windows
- AI Extend
- Filmora AI Relight - Windows
- Filmora AI Image Enhancer Guide - Windows
- AI Script to Video Guide for Windows
- AI Text-Based Editing for Windows
- AI Mate Editing for Windows
- Create with instant mode
- ChatGPT Plugin - AI Copywriting
- AI Smart Cutout
- Lens correction on Windows
- Auto reframe video
- AI Portrait Cutout
- Scene detection feature
- AI Smart Masking for Windows
- Make motion tracking
- Video Stabilization for Windows
- AI Video/Photo Object Remover for Windows
- AI Smart Search for Windows
- AI Skin Tone Protection for Windows
- AI Image for Windows
- Chroma key (green screen)
- Super Slow Motion with Optical Flow for Windows
- Video Denoise for Windows
-
-
Audio Editing for Windows
-
Basic Audio Editing
-
Advanced Audio Editing
-
AI-Powered Audio Editing
-
-
Text Editing for Windows
-
Basic Text Editing
-
Advanced Text Editing
-
AI-Powered Text Editing
-
-
Video Customizations
-
Video Effects
-
Audio Effects
-
Transitions
-
Stickers
-
Filters
-
Color Editing
-
Animations
-
Templates
-
Asset Center
-
-
Exporting & Share & Cloud Backup
Pro Video Scopes
Video Scopes is like a track of color elements during color correction and enhancement, and Filmora's new upgrades include pro video scopes for a professional editing experience. Users can use four video scopes: Parade, Waveform, Vectorscope, and Histogram. Filmora maintains the seamless flow of work with its Histogram feature. These histograms help keep track of color corrections to retain the graphical quality of the video. To utilize this functionality in Filmora, keep reading the details below:
With the help of this guide, users are going to learn how they can access the video scope functionality in Wondershare Filmora:
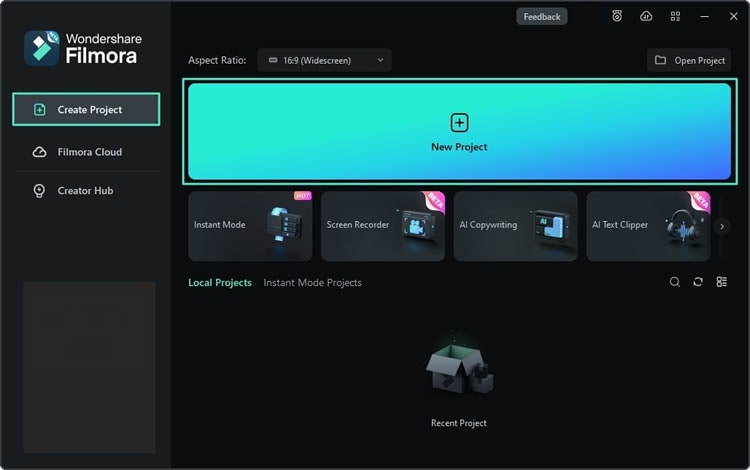
Step 1: Login to Start a New Project
After installing this software, navigate towards the "Profile" icon at the top and log in or sign up accordingly. To start editing, go to the left side panel of Filmora's main menu and select the "Create Project" option. Afterward, hover towards the center of this screen and click the "New Project" button.
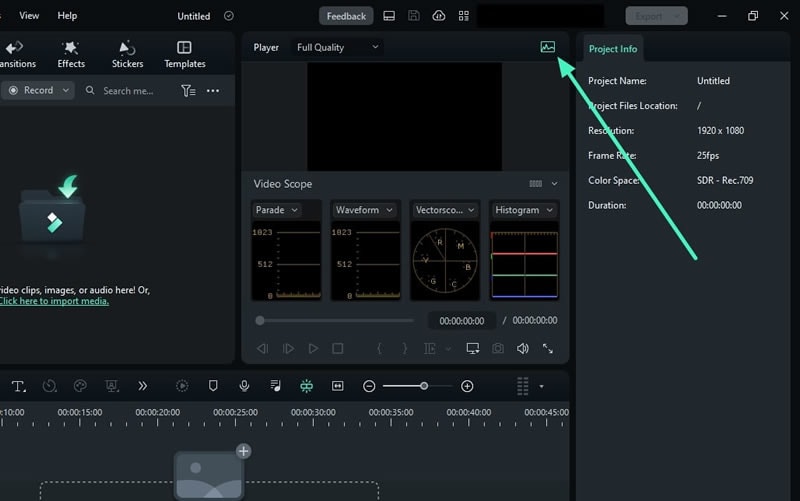
Step 2: Access Video Scopes
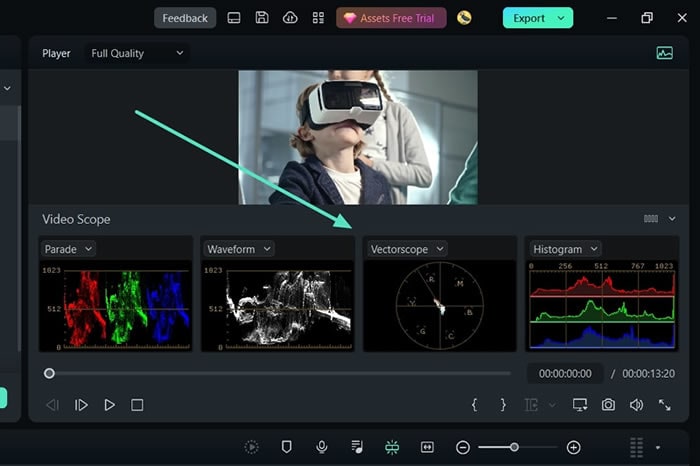
Once you are in the main interface of Filmora, navigate towards the top right corner of the preview screen and select the "Video Scope" icon. By selecting this button, the four video scopes mentioned above will appear.
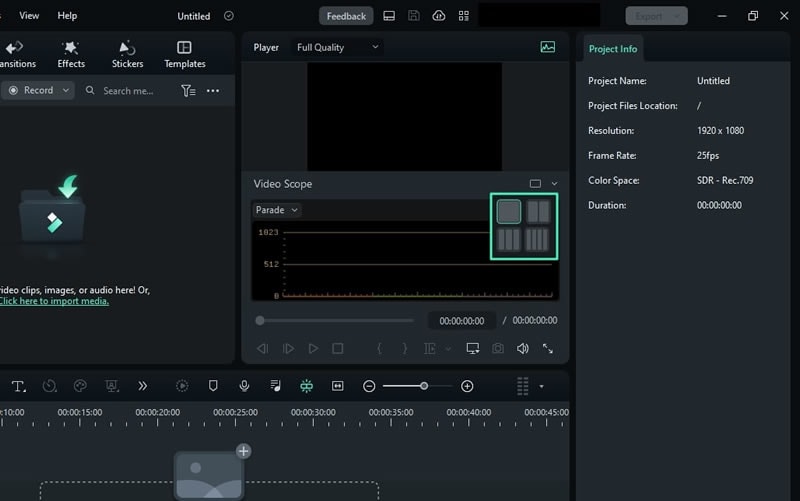
Step 3: Customize the Video Scopes
Users can also customize these video scopes as per their preferences. They can change the layout options from the available list to see selected video scopes at a time. Moreover, they can expand the button showing the name of the video scope and change display options for these video scopes.
Step 4: Manage Parade Video Scope
There are a variety of video scopes made available across Filmora. Starting from managing the colors of the video, the "Parade" video scope can be used to change the color channel from RGB to YRGB or YCbCr.
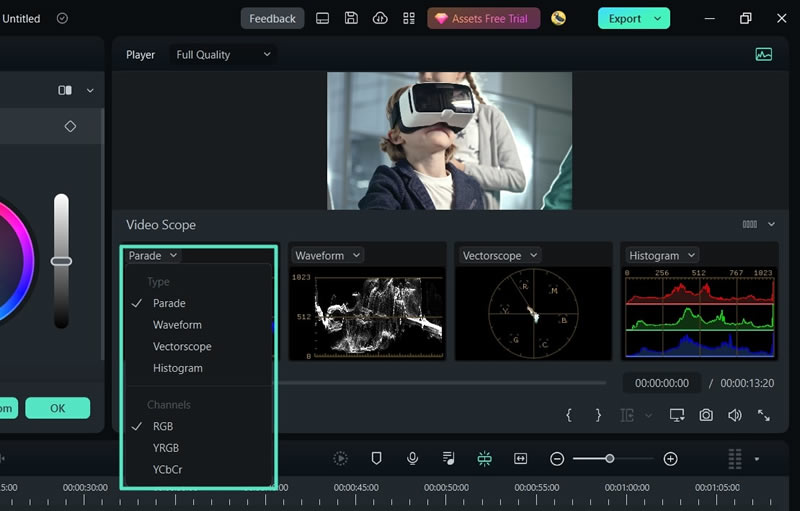
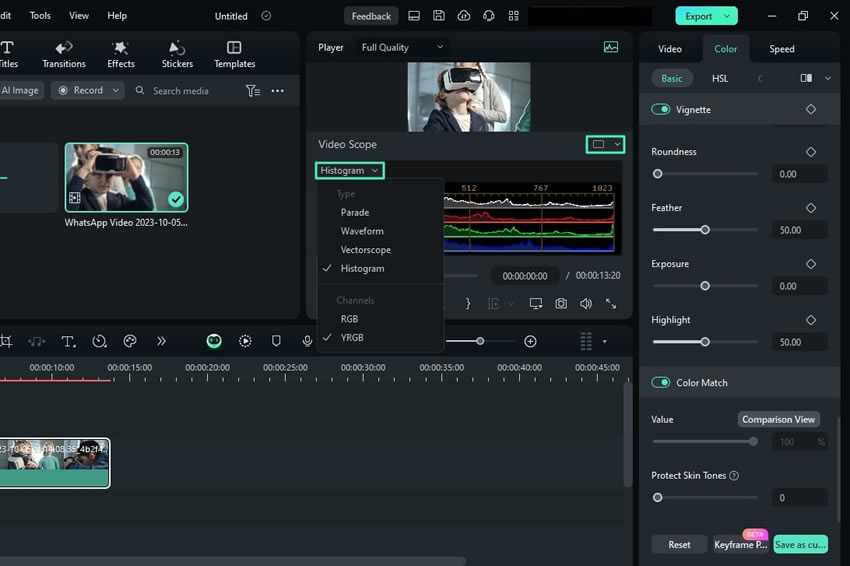
Step 5: Personalize the Histogram Options
The "Histogram" video scope displays the multiple color adjustments in a graphical way, with adjustments of color channels. Personalize the video scope layout to a single view from the top right corner and expand the "Type" button. From the expansion menu, opt for "Histogram" to begin editing. Additionally, you can switch between histogram channels like "RGB and "YRGB" options. Users can also switch the video scopes from the given options.
Step 6: Change Other Video Scopes
Conversely, the "Waveform" video scope can be used to adjust the color channels in a different way. The "Vectorscope" scope helps in identifying the skin tone.
Related Posts
Featured Articles
The Complete Audio Post-Production Workflow Explained [2026 Guide]
Get a clear look into the complete post-production audio workflow used by professionals and creators alike. From raw recordings to polished mixes, this guide breaks down every step in plain language.
[Guide] How To Make YouTube Shorts ( iPad & iPhone )
Want to increase your channel's viewership? Read this guide to learn how to make YouTube Shorts on mobile to engage your audience with creative content.
How To Remove Beat From Songs Easily? 3 Tried and Tested Methods
Learn how to easily extract beats from any song with our simple, step-by-step guide. You don’t need to have any music expertise. Our tested methods deliver professional quality and amazing results.
Recommended User Guide
Preset Color Adjustment
Learn how to adjust color, light, LUT in Filmora
Color Comparison View
While maintaining your content's integrity, Filmora offers dedicated color comparison functionality for clip editing.
Color Wheels for Windows
Users can enhance the task using color wheels when performing video editing or graphic designing in Filmora.
