Curving text in Microsoft Word can give your projects a unique and professional look. Whether you're working on a presentation, a flyer, or a creative endeavor, learning how to curve text will help.
This article will show you how to curve text in Microsoft Word and advise you on improving your designs. Curved text, for instance, gives a dynamic aspect that can capture attention. We'll look at how to use Filmora to generate curved text and beyond.
By the end of this guide, you'll have a good idea of how to take your designs to the next level. Let's explore the fundamentals of Microsoft Word's text effects.
In this article
Part 1. Text Effects in Microsoft Word
Many text effects available in Microsoft Word can turn plain text into captivating content. Shadows, reflections, and—above all—text alterations like curvature are among these effects. You can alter any of these effects to make it exactly what you want.
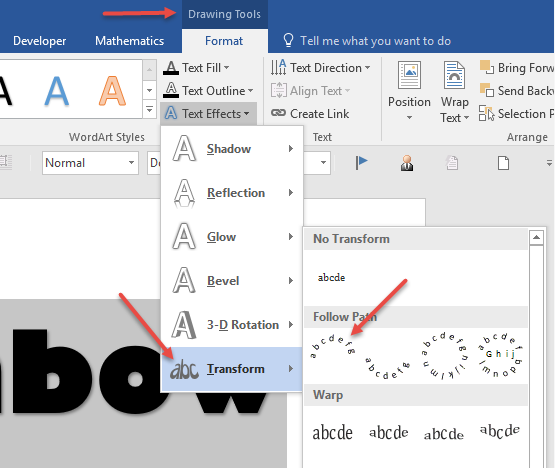
Curved text is helpful when designing headlines, logos, or any other text that needs to stand out. It can make your material more visually appealing and engaging, and it's easy to glam up your design without going overboard.
After introducing the idea of text effects, let's concentrate on why using curved text in your documents might benefit.
Overview of Text Effects Available in Word
Microsoft Word has various built-in text effects that allow you to change the look of your text. These effects might be as basic as shadows or as intricate as 3D transformations. Selecting the ideal impact for your project might be easier if you know these alternatives.
Why Use Curved Text?
Curved text can make your work more straightforward and visually engaging. It frequently adds a polished touch to presentations, marketing materials, and creative initiatives. Curved text helps direct the reader to particular details or graphic components.
Part 2. Curve Text in Microsoft Word
Microsoft Word is a word-processing application that produces and edits documents. It provides a variety of text effects, such as curved letters, that can give your projects a unique flair. Word's intuitive interface makes it simple for both novice and expert users.
Microsoft Word allows you to experiment with other styles and designs besides standard text formatting. Curved text is an excellent technique for making your titles and headings stand out. This ability can also help you create visually appealing documents for presentations.
Now, let's dive into the step-by-step guide on how to curve text in Microsoft Word.
Step-by-Step Guide to Curving Text in Word
Step 1: Open Your Document
Start by opening Microsoft Word and the document where you want to add curved text.
Step 2: Select the Text
Highlight the text you want to curve or create a new text box.
Step 3: Apply WordArt
Go to the "Insert" tab and select "WordArt" from the Text group. Choose a style that fits your design.
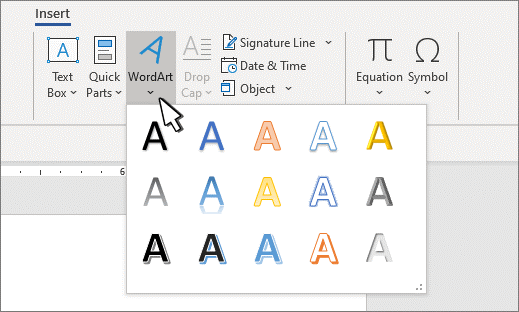
Step 4: Curving Text with WordArt
With the WordArt text selected, go to the "Format" tab. Click on "Text Effects" and choose "Transform." From here, select a curved option.
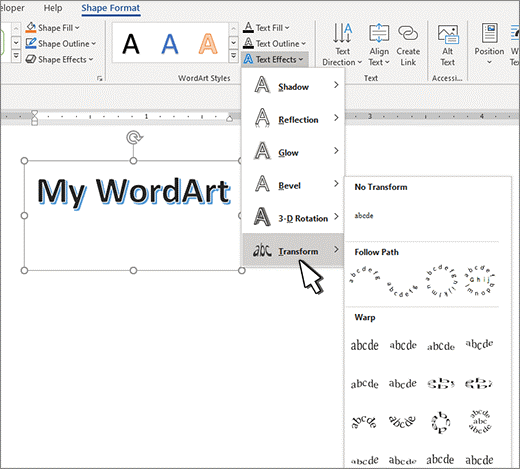
Step 5: Adjust the Curve
You can customize the curve by adjusting the handles on the text box. You can increase or decrease the curve as needed.
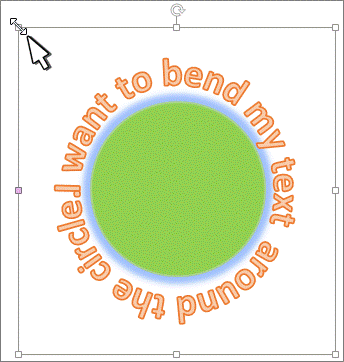
Step 6: Finalize and Save
Once you're satisfied with the curve, save your document.
Advanced Tips for Circular Text in Microsoft Word
You can also explore other advanced text effects when curving text in Microsoft Word. Layer styles like shadows and glows can add depth to your curved text. Combining shapes with curved text can create unique designs that stand out.
- Layer Styles and Effects: Use shadows, glows, and reflections to enhance the visibility of your curved text.
- Combine with Other Shapes: Integrate curved text with circles or other shapes for creative designs.
- Experiment with Path Shapes: Try different curvature paths, like arches or waves, to see what works best for your project.
Part 3. Enhance Curved Text with Filmora
Wondershare Filmora is a versatile video editor that improves text effects, including curved text. Filmora can be a great tool to add to your toolset, whether you're working on a film project or simply want to add more life to the text in your document.
the eye-catching curved texts are created by Filmora
With Filmora, adding animations, effects, and other improvements to your curved text is simple. Its intuitive design creates beautiful visuals without needing a professional editor.
Let’s explore how Filmora can help you enhance your text effects.
Why Use Filmora for Text Effects?
Filmora is easy to use, making it an excellent choice for beginners. It provides an extensive selection of text effects that can improve any project. With Filmora, you can easily incorporate animations, transitions, and visual effects into your text.
The program is flexible and appropriate for primary and sophisticated text editing. Filmora's user-friendly interface makes customization and fine-tuning simple. It also supports keyframe animation, allowing you to customize the text effects precisely.
Key Features of Filmora for Curve Text Creation
- Easy Text Curving: Filmora allows you to bend or curve text effortlessly, transforming standard horizontal text into visually appealing curved formats. This feature is accessible with just a few clicks.
- Multiple Presets: You can choose from four different preset shapes to create curved text, providing flexibility in design. These presets allow for various curvature effects, making it easy to achieve the desired look.
- Adjustable Curvature: The strength slider enables you to adjust the curvature of the text from 0° to 360°, allowing for precise control over how much the text bends or arcs.
- Font and Size Customization: The Curved Text tool supports various font styles and sizes, allowing you to experiment and find the perfect combination that fits their project’s aesthetic.
- Animation Capabilities: You can animate curved text using keyframes for scale, rotation, and position, adding dynamic movement to the text. This feature enhances engagement and visual interest in videos.
- Enhanced Visual Appeal: Curved text can significantly elevate the visual appeal of videos, making them more eye-catching and effective for logos, social media posts, wedding videos, travel vlogs, and more.
A step-by-step guide to making Curved Text in Filmora
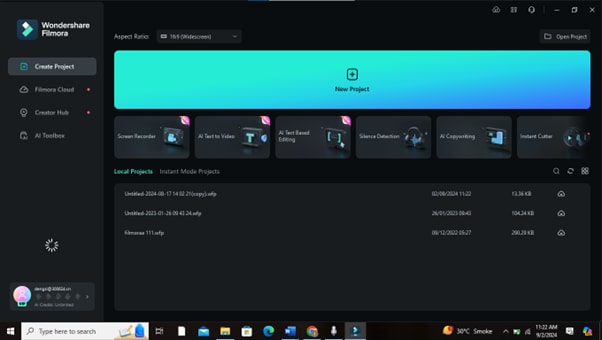
Step 1: Open Filmora
Launch Filmora and create a new project. This will be your workspace for adding and editing text.
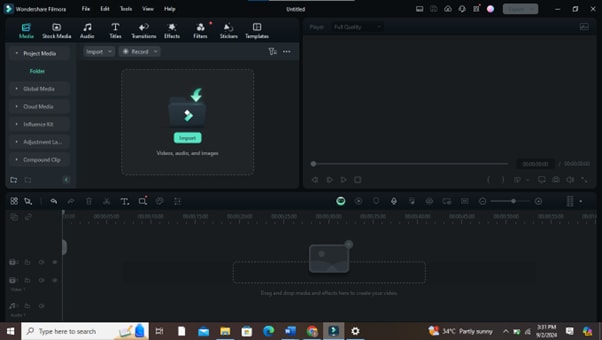
Step 2: Add Your Text
Go to the "Titles" menu to find a text preset. Drag it to the timeline to begin editing.
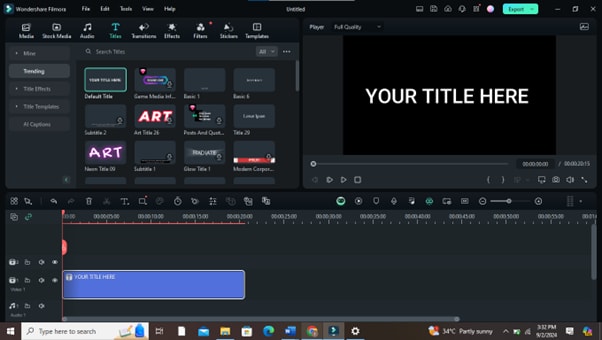
Step 3: Access the Advanced Text Editor
Double-click the text on the timeline. This opens the advanced text editor with more customization options.
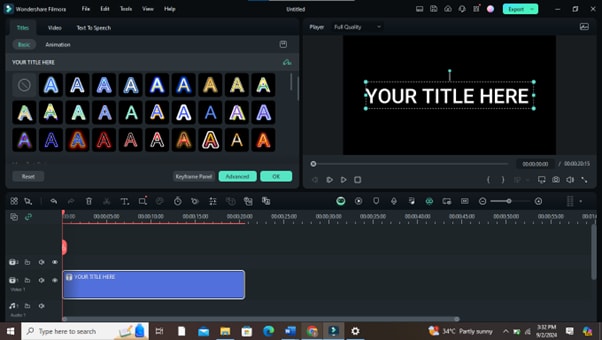
Step 4: Choose the Curved Text Option
In the text editor, find the "Transform" settings. Select "Curve Text" and adjust the curve with the slider.
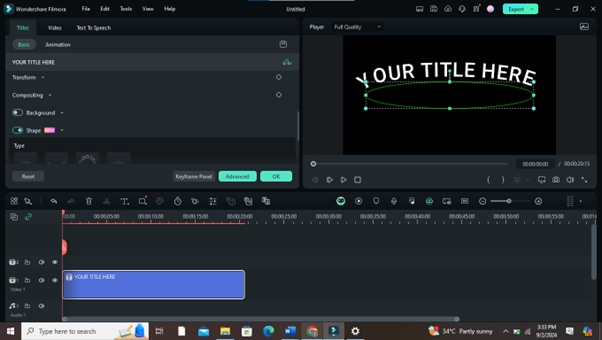
Step 5: Customize Your Text
You can modify the font, size, and color to match your design and add effects like shadows or outlines.
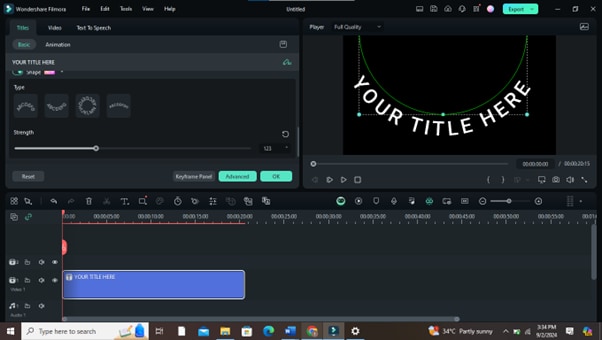
Step 6: Apply Animations
Add animations if you want to bring your curved text to life. Use the animation tab for various options.
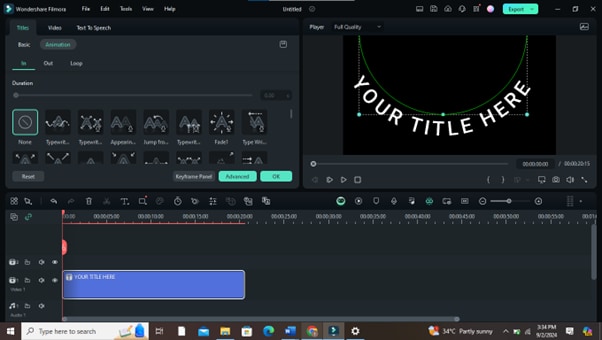
Step 7: Preview and Adjust
Preview your project to see how the text looks. Make any tweaks necessary for perfection.

Step 8: Export Your Video
When you're happy with the result, export your video. Your curved text is now part of your final project.
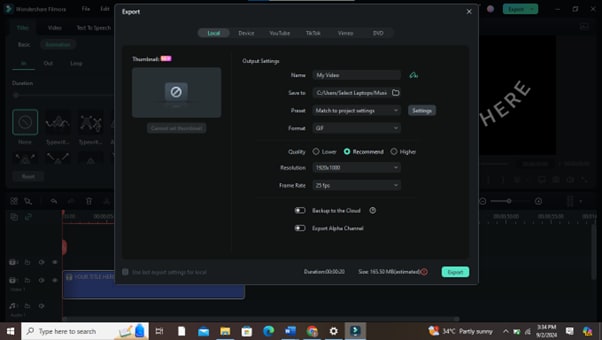
With these steps, you can seamlessly integrate and enhance curved text in your videos using Filmora, adding a professional touch to your content.
Conclusion
Curving text in Microsoft Word is a simple yet effective way to enhance your documents. Curved text can make your work stand out, whether you’re creating a presentation, a flyer, or a logo.
Combining Word with Filmora can enhance your text effects. Experiment with these tools to create professional-grade designs that leave a lasting impression.
Now that you know how to curve text in Word and enhance it with Filmora, it's time to get creative! Start experimenting with different effects and see how they can improve your projects.


