- • How-to tips for basic video editing
- 1.1 How to join video files
- 1.2 How to edit video frame
- 1.3 How to rotate video
- 1.4 How to crop video
- 1.5 How to trim video
- 1.6 How to reduce video size
- 1.7 How to compress video
- 1.8 How to improve video resolution
- 1.9 How to change aspect ratio
- 1.10 How to reverse your video
- A wide support for different formats.
- Enables you to compress, trim, cut, split and combine in a few clicks.
- Convert videos to other formats with smaller size.

 100% Security Verified | No Subscription Required | No Malware
How to Compress a Video with Filmora Video Editor?

Jul 17, 2026• Proven solutions
 TL;DR:
Wondershare Filmora reduces video file sizes across desktop and mobile platforms through timeline trimming, aspect ratio cropping, format conversion, and manual export parameter adjustments.
● Desktop users on Windows 7 (64-bit) or macOS 10.14 and newer can process files up to 50GB and utilize an Advanced Compression toggle to scale export quality between 10% and 90%.
● Switching the desktop export configuration to highly compressed formats like HEVC significantly lowers the final file size without degrading the original visual content.
● The Android and iOS applications compress media by applying predefined social media crop ratios, removing unwanted timeline segments, or decreasing the output resolution and frames per second.
Ask AI for a summary
 ChatGPT
 Perplexity
 Gemini
 Claude
 Grok
Grok
As filmmakers and social creators are constantly creating videos, they have to deal with large video files. These files take up a major chunk of your storage space, making it difficult to manage and organize. That's why the need for a seamless and reliable video compression tool is essential. With such a tool, users can ensure to preserve the visual content of the video, even after it's compressed.
Before discussing the topic, there are several things you need to have in your pockets.
What you need:
- Download Wondershare Filmora
- A video file. Wondershare Filmora provides a large collection of no less than 28 input formats. Therefore, it's highly likely that your video would work flawlessly with the software.
- A Windows /Mac PC or an iPhone /Android
 secure download

This article will provide you with the most advanced and AI-powered tool, Wondershare Filmora compress video. With this tool, you can reduce the video size without compromising the quality. Now, read this article till the end and find out how you can compress videos on your mobile and desktop.
secure download
Part 1. Compress Videos With Filmora Mobile Version
The Filmora video compressor app (Android & iOS) can reduce large video sizes to a suitable size without losing its quality. Users can easily utilize its smart video trimming and other compression features to reduce the video file. The following are a couple of methods that can help you compress large files, so upload any format, MP4, MOV, GIF, and get started on the app:
Method 1. Video Size Cropping
There are various trimming and cropping options on the Filmora App that you can use on your video. Creators can use various defined aspect ratios of social media platforms to crop their large video clips. So, go through the following steps and learn how to use the Filmora compression quality app:
- Step 1. Install the App and Access the Trim Tool. Once the app is installed on your phone, open it and tap the "+ New Project" button to upload any large video. Next, press the "Trim" option from the toolbar below to access its other options.
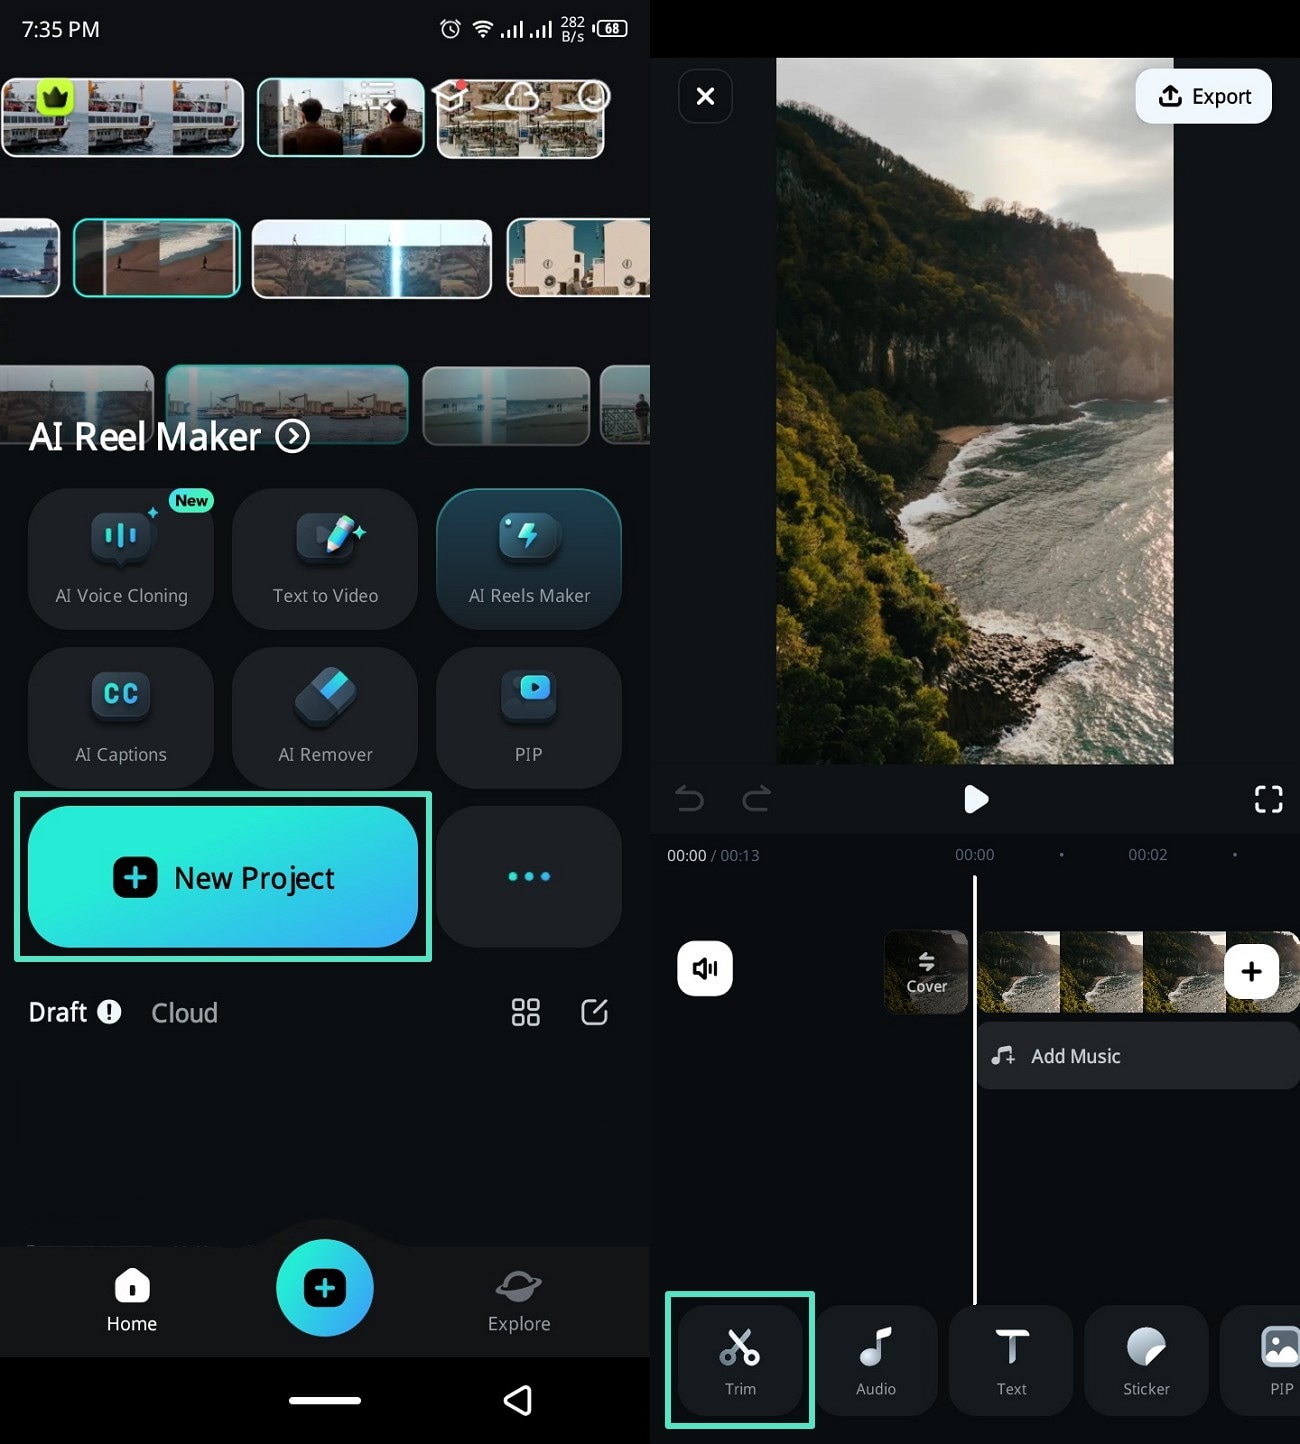
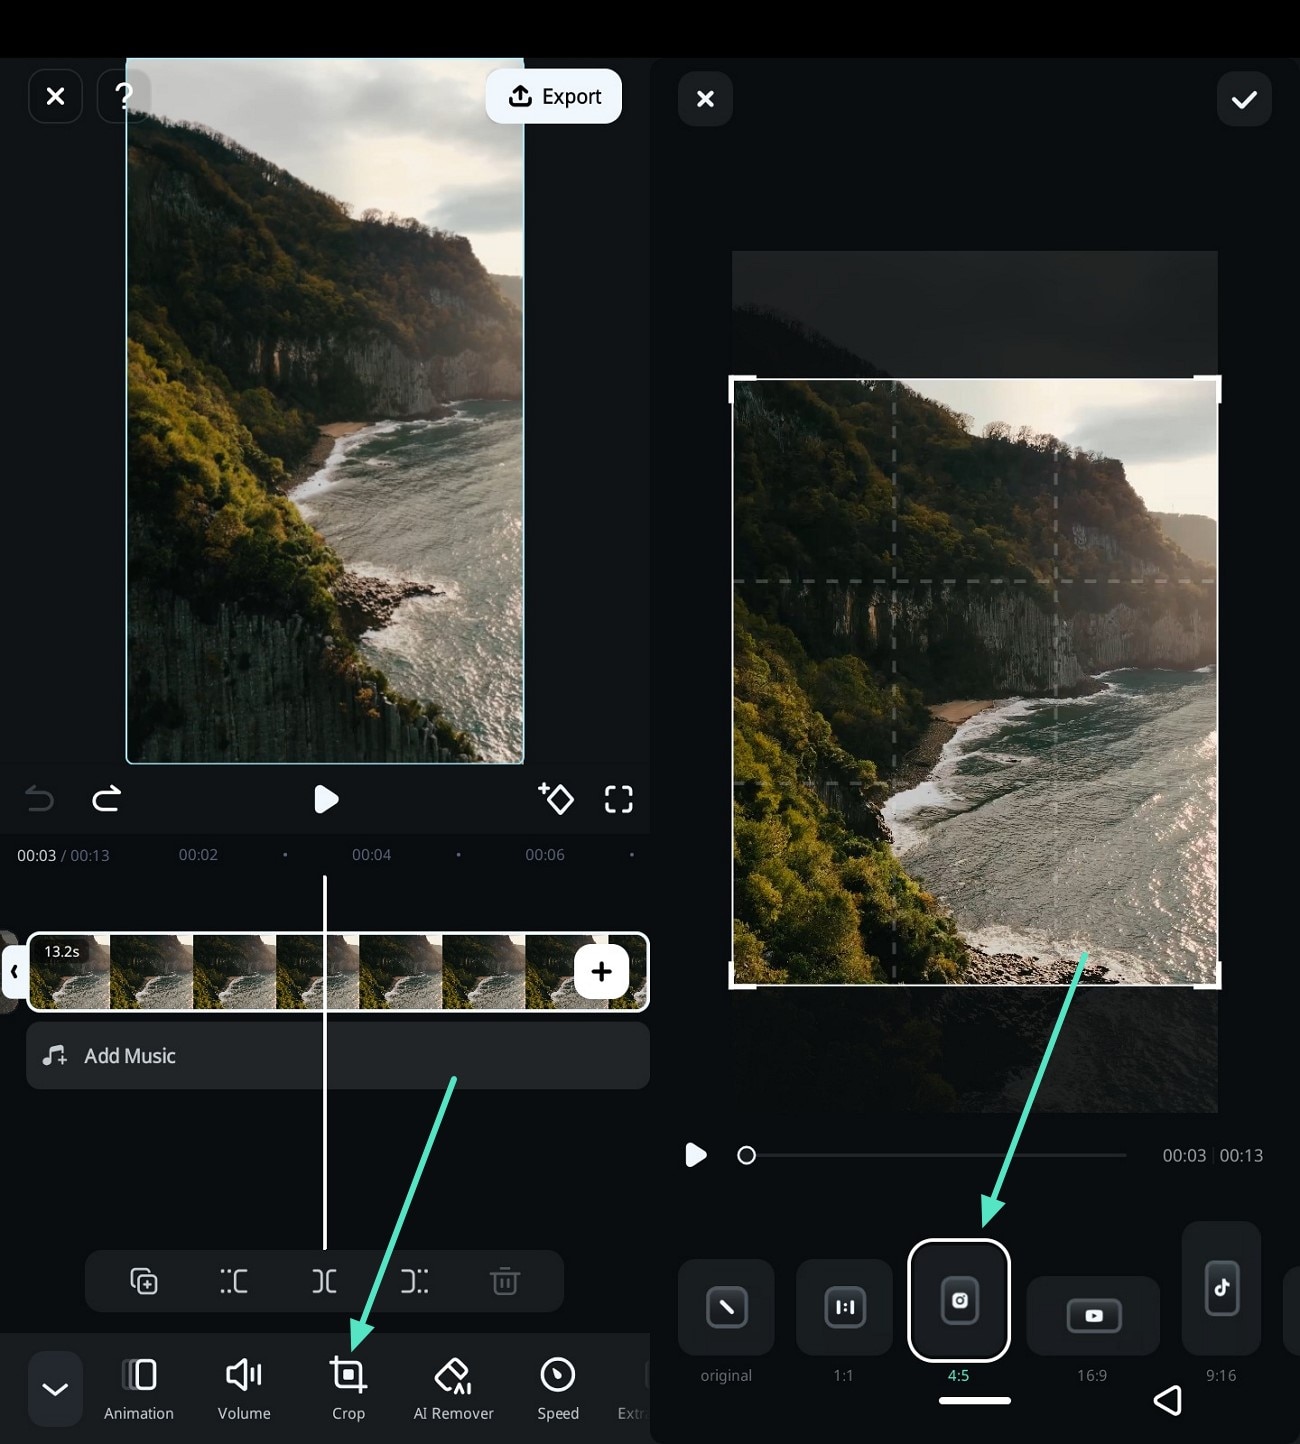
- Step 2. Crop Video in Different Aspect Ratios. After that, choose the "Crop" icon from the optional bar below, and pick any one of the aspect ratios to compress the video.
secure download
Method 2. Video Timeline Length Editing
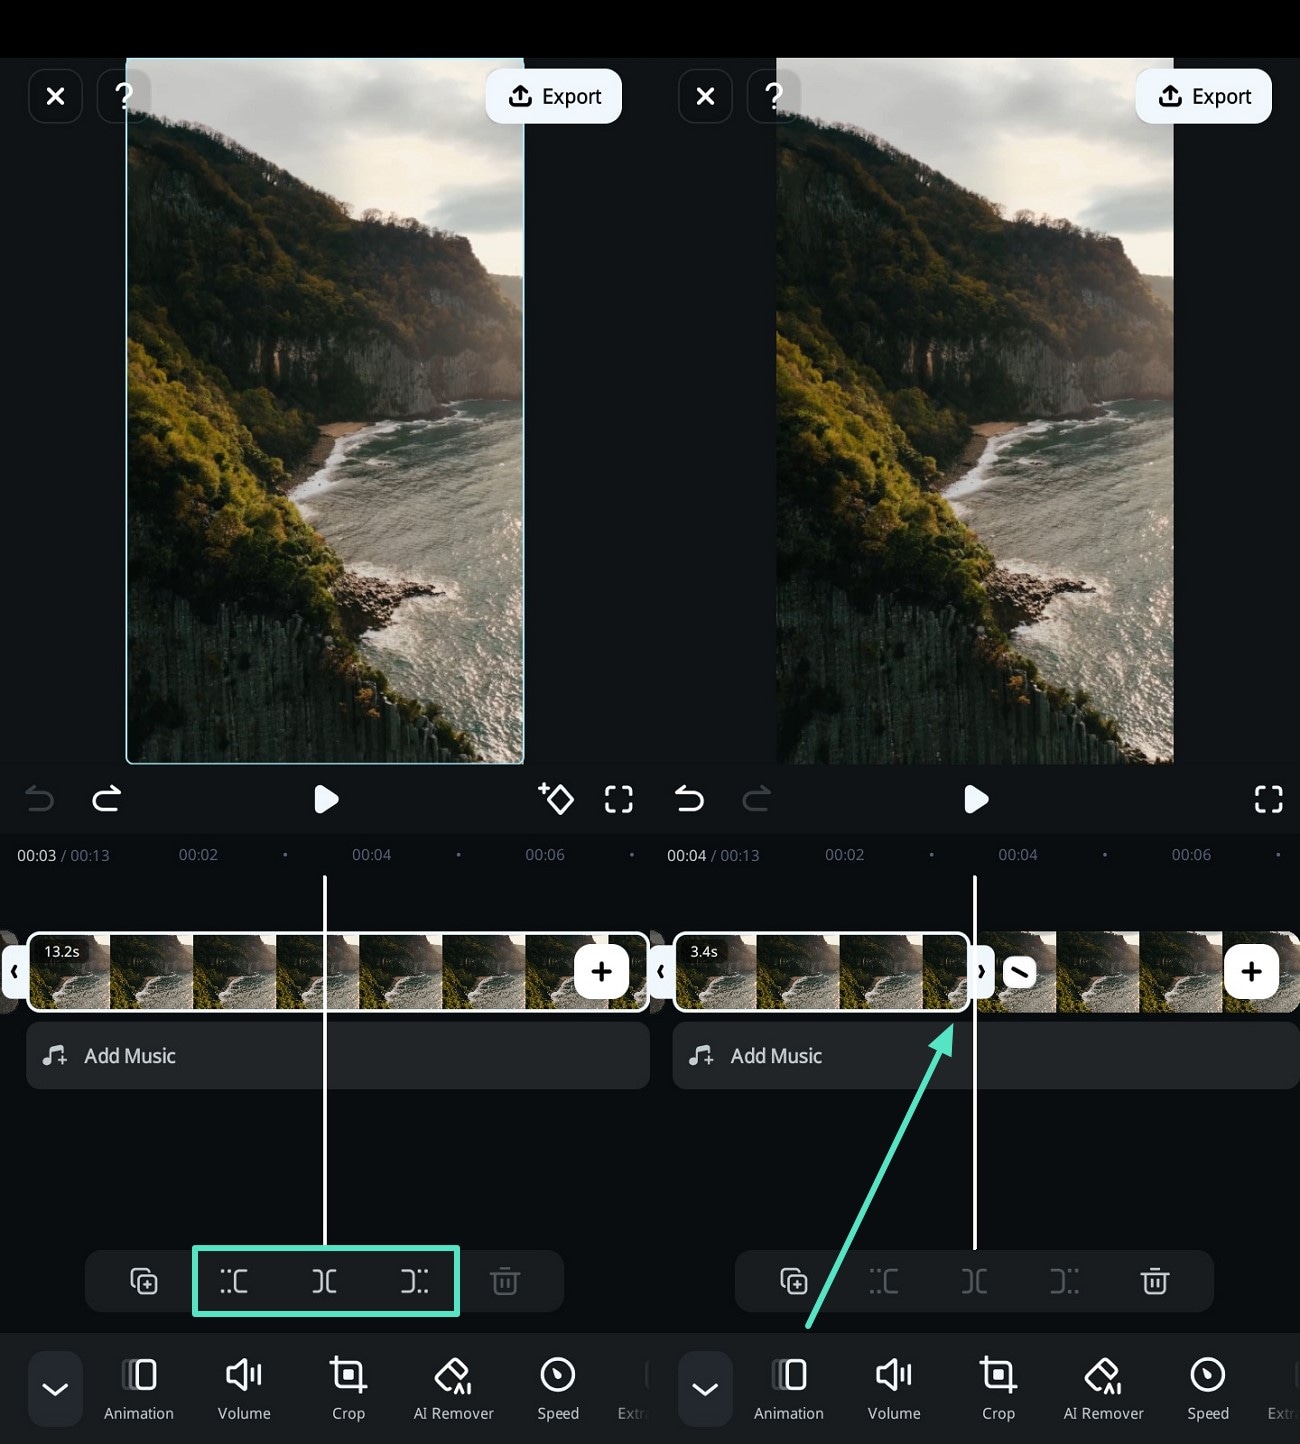
One of the simplest methods to compress video is to use timeline editing in the Filmora video compressor app. By simply choosing the timeline section, you can trim or make smaller sections and make it easier to export. With the following instructions guide, you can easily compress videos with ease:
- From the "Trim" option on the Filmora app, drag the timeline to a specific area, and choose any one of the "Length" options to cut the timeline.
secure download
Method 3. Export File Size
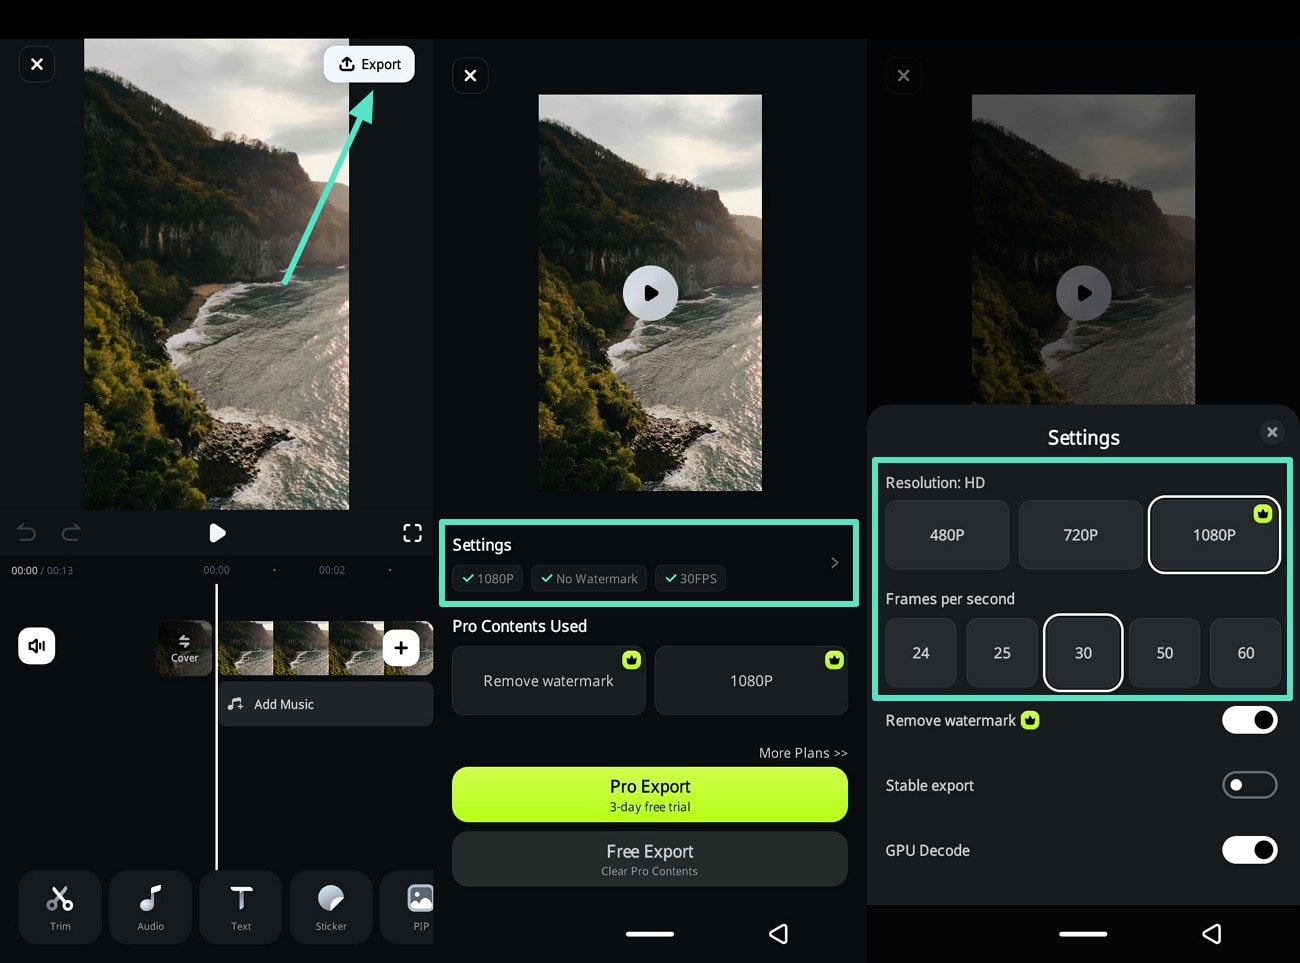
With the Filmora App, creators can change the export settings to compress their videos as well. These settings include various resolutions, FPS settings, and more. Now, read the following instructions and learn how to reduce video file size with the export option:
- Once the video is uploaded, tap the "Export" button at the top right corner and access the "Settings" on the next screen. From here, choose the desired "Resolution HD" and "Frames per Seconds" sections. When the changes are made, press the "Free Export" button to download the final compressed video.
Part 2. Filmora Desktop Version - Seamless Video Compression
When it comes to editing on the desktop version of this tool, Wondershare compresses videos with advanced editing possibilities. Users can decrease their video size by up to 90% with a remarkable 47x faster speed. Furthermore, it effectively minimizes blurriness across the content that can occur with compression and preserves the video's visuals.
Method 1. Video Size Cropping
Whether you're compressing videos for social media or making clips for content, it's important to ensure their quality. That's why the video cropping feature provides various aspect ratios and custom cropping to users. You can easily resize the video length using the given comprehensive step-by-step guide:
- Step 1. Import Large Video and Open Crop Feature. Launch the Filmora software on the desktop and click the "+ New Project" button to access the main editing interface. From here, press the "+ Import Media" option in the "Media" panel to import the large video file. After that, drag the video over to the timeline section and right-click the video to choose the "Crop and Zoom" option.
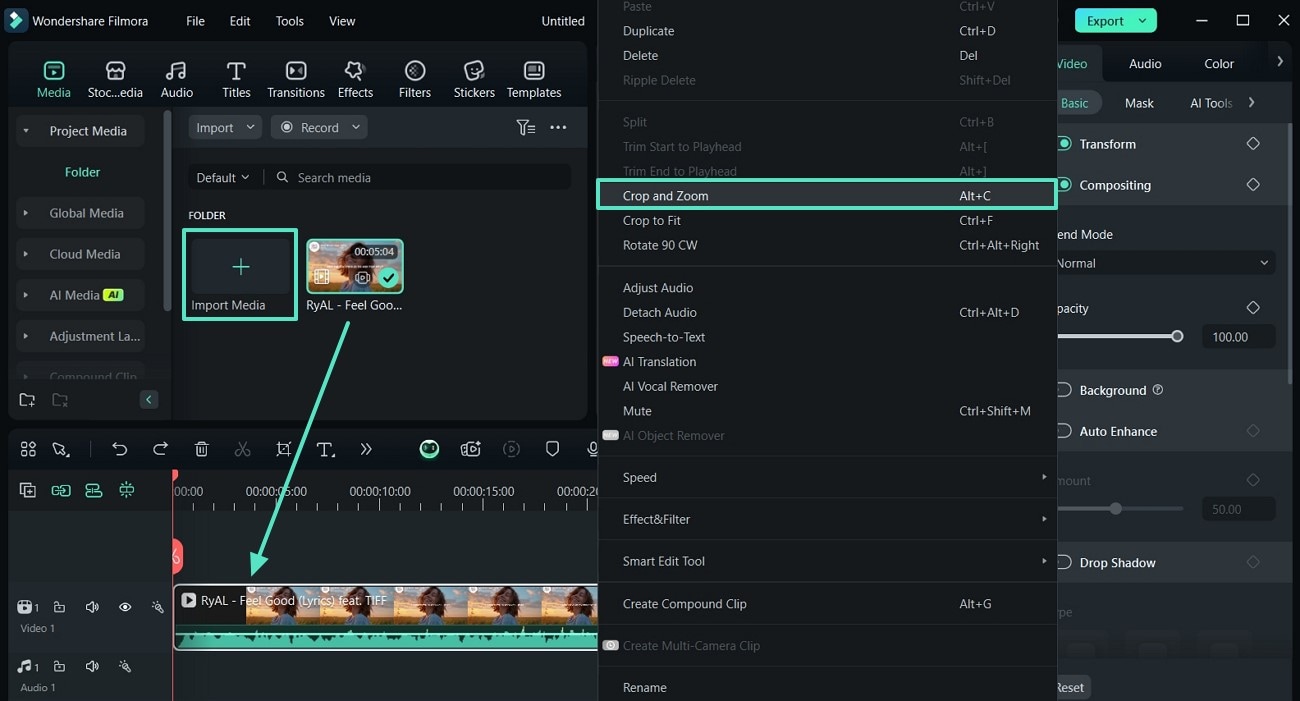
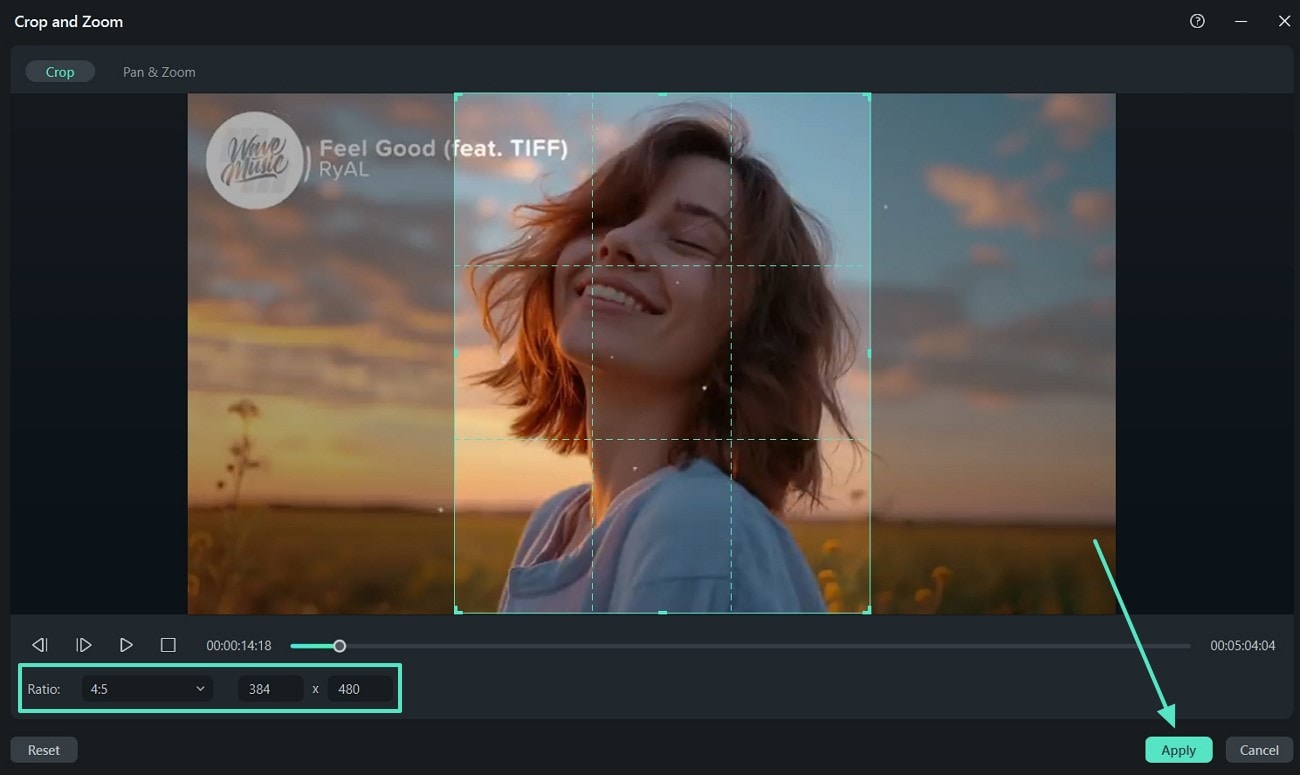
- Step 2. Make Suitable Cropping Adjustments. On the new window, pick a desired ratio aspect from the "Ratios" option or drag the edges of the crop box on your video. When done, click the "Apply" button to crop the video.
Method 2. Video Timeline Length Editing
Besides the cropping method, this video editor allows you to trim or edit the video length on the timeline section. It's also capable of compressing up to 50GB of video files in various formats, like MP4, MOV, AVI, and more. So, let's look at the steps on how to shorten the video length from the timeline section in the following:
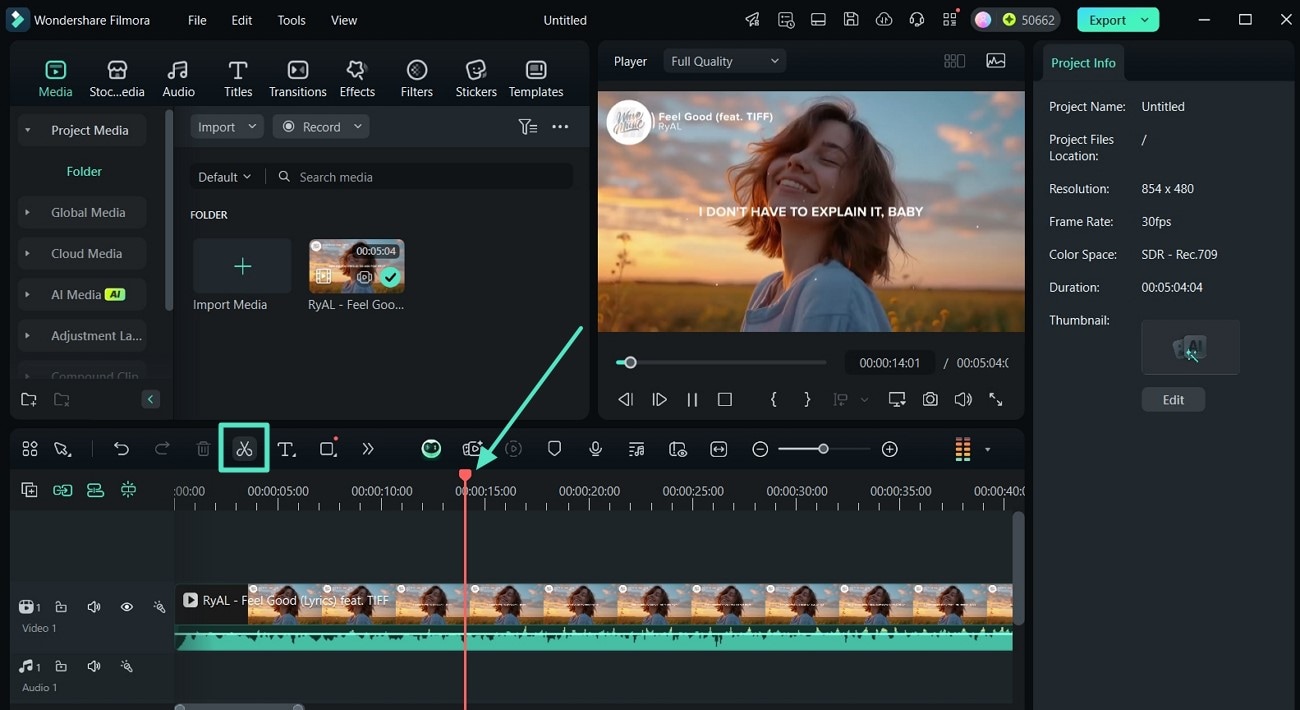
- Step 1. Use Trim for Timeline Video Cutting. When the video is imported, drag the "Playhead" line on the timeline over to a specific video length and press the "Split" scissors icon.
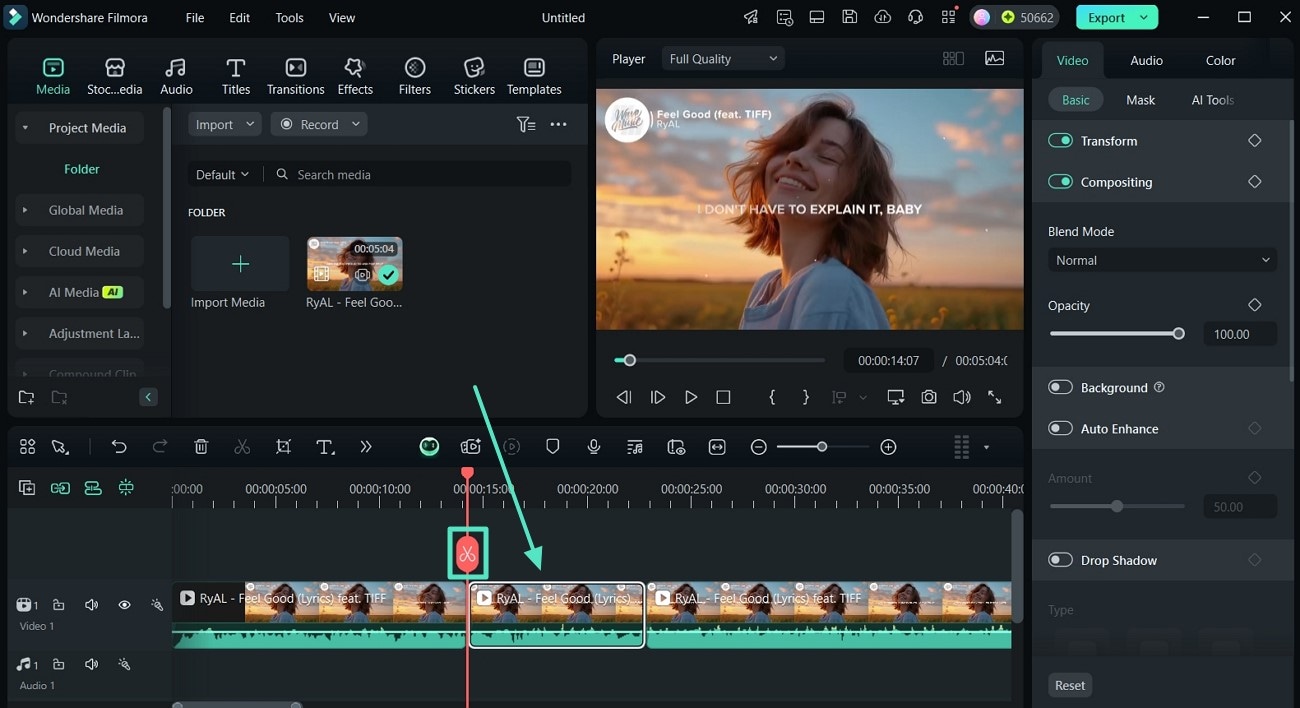
- Step 2. Reduce Video Size by Cutting. Simply click the "Split" icon on the Playhead line by dragging it on different parts of the video and remove the unwanted sections.
Method 3. Export in Appropriate File Size
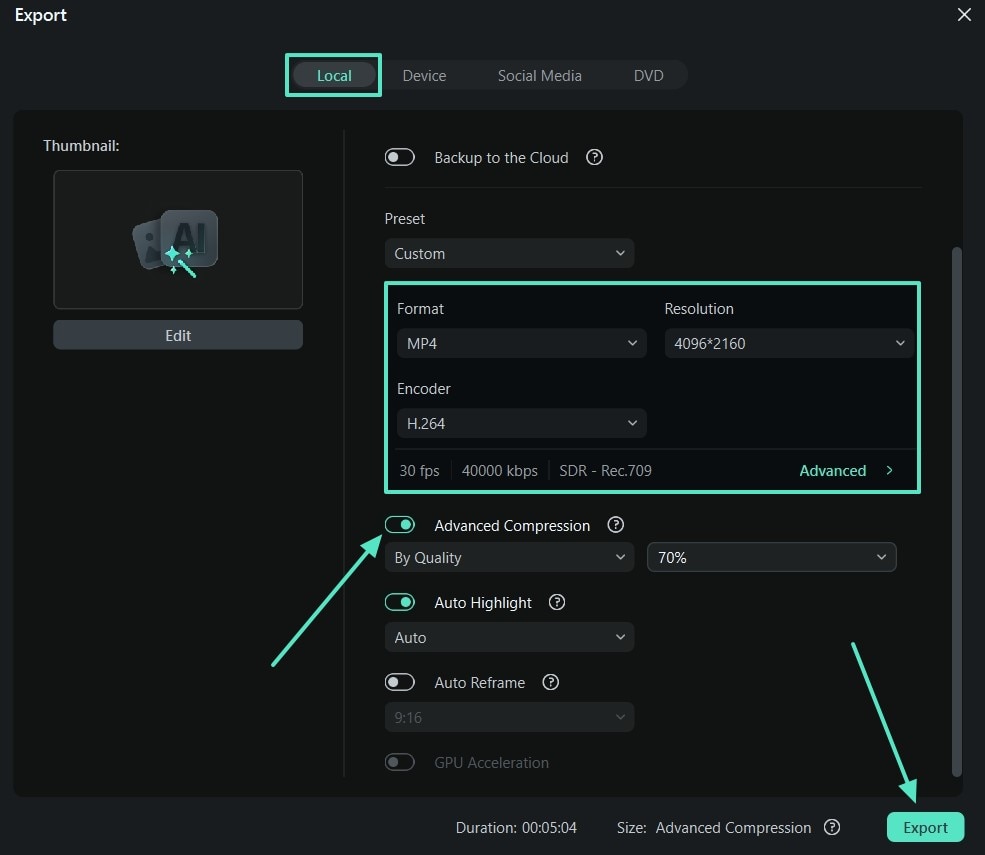
Among the simplest methods of reducing video file size, utilizing the advanced Wondershare Video Compressor is more efficient. It gives you full control over file size, and you can reduce it on various compression levels, from 10% to 90%. Other than that, users can fine-tune the video quality by adjusting the parameters like resolution, bitrate, frame rate, and more.
- When the video is imported into the software, click the "Export" button in the top right corner to access a dialogue box. From the "Local" tab, choose suitable "Format," "Resolution," and "Encoder" options. Next, toggle on the "Advanced Compression" option by changing the "Quality" from 10% to 90% and hit "Export."
Method 4. Changing Export Format
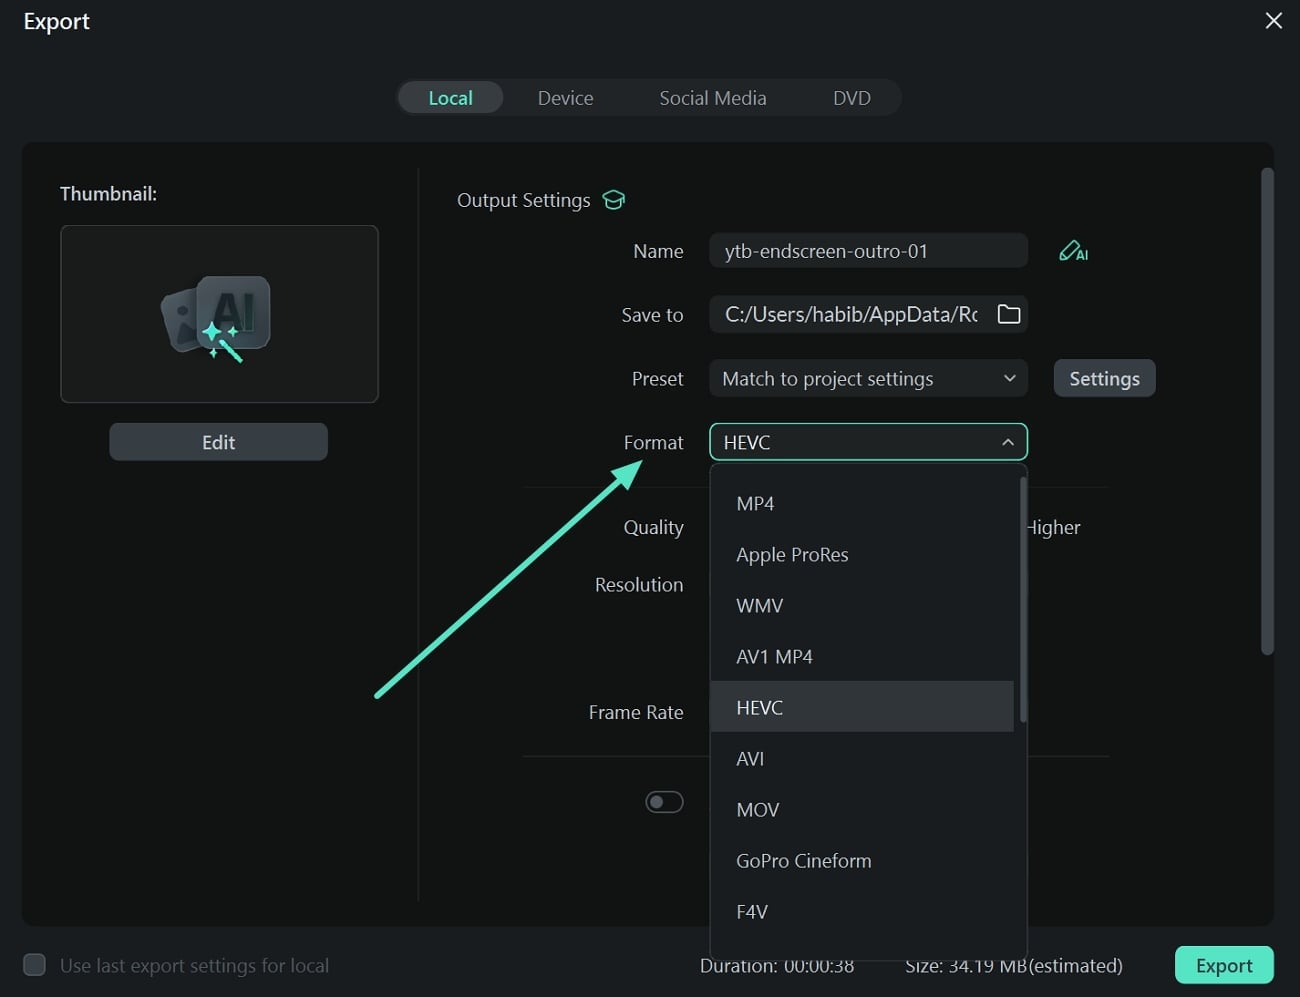
Another efficient method offered by Filmora, which allows you to compress your video files, is by changing the format of the video in the export section. When you change the format of the video into formats like HEVC, you can significantly reduce the file size without compromising the quality. Provided below are the instructions that let you utilize Filmora video compressor while exporting the file:
- After you are done with editing the video within Filmora's interface, head to the top right corner and press "Export." In the following window of export, locate the "Format" drop-down menu and expand it. Next, select the appropriate format and hit the "Export" button to execute automated compression while saving the file to the device.
You May Also Like
What is Video Bitrate? A Beginner's Guide
How to Compress a Video on Android Without Losing Quality
How to Compress a Video on iPhone and Reduce File Size Quickly
Conclusion
It is clear from this article that one of the best ways you can compress a video is by using Wondershare Filmora and its app. You have looked at the most effective methods that can be used on the desktop and mobile phones. Moreover, the Wondershare Filmora compress video without losing any of its quality within seconds. Whether you're compressing videos for social media, personal storage, or sharing large files, Wondershare Filmora offers an efficient solution for various scenarios.
So, try these methods for yourself and enjoy 100% excellent compressed video results with this editor.
secure download
Liza Brown
chief Editor
