
 100% Security Verified | No Subscription Required | No Malware


 ChatGPT
 Perplexity
 Gemini
 Claude
 Grok
Grok
Have you ever tried recording a few videos on your iPhone only to get hit with the "Storage Almost Full" message? Since deleting them can feel like a waste, you might look for ways on how to compress a video on an iPhone.
iPhones are known for their top-notch cameras, but those stunning high-resolution videos can eat up your storage space faster than you might expect. They can also be a pain to share via AirDrop, email, or social media, and uploading them to the cloud can take forever (not to mention drain your data).
In this guide, we'll show you simple and effective ways to compress video on an iPhone. Whether you're looking to free up space, send a video faster, or keep your phone running smoothly, we've got you covered.
In this article
- Advanced compression algorithms for quality retention.
- Compress 1000+ video file effortlessly, no size limit.
- Easy-to-use interface for quick adjustments.
- Export directly to social media platforms easily.


Part 1. Why iPhone Video Files Are Big and Take Up Storage
Since you understand why compressing videos is smart, let's find out why your iPhone videos take up so much space. This will help you manage storage better and make compressing videos on your iPhone easier.

iPhones are known for capturing high-quality videos, but that also means the file sizes can get pretty large. Here are the most common reasons why your video files might be way bigger than expected:
- Recording settings: Filming in 4K or using a high frame rate like 60fps looks great, but these settings produce much larger files compared to standard 1080p at 30fps. Unless you need ultra-HD quality, these high-end settings might be more than you need.
- Longer duration: It's pretty straightforward: the longer your video, the bigger the file. A 10-minute clip will be much smaller than a 20-minute one, even if both use the same recording settings.
- High bitrate: Bitrate is how much data is processed per second in your video. The higher the bitrate, the better the detail and quality, but also the larger the file. iPhones often use high bitrates to preserve video clarity, especially in ProRes or cinematic recordings.
- Using effects or slow-motion mode: Features like slow-motion, cinematic mode, or special filters can make your video look impressive, but they also require extra data. That means larger file sizes, even for short clips.
Understanding what makes videos so large is the first step. Now, let's move on to the real solution of how to compress a video on an iPhone using several methods.
Part 2. How to Compress a Video on an iPhone: 4 Methods
Once you understand why iPhone videos are so large, let's look at some simple solutions. If you're wondering how to compress a video on iPhone without needing a computer or complicated software, you're in the right place.
There are a few fast and easy ways to do it, right on your phone. Whether you want to shorten a long video, lower the quality, reduce video size on iPhone, or use a special app, these methods will help you shrink video size and save storage in just a few taps.
Method 1: Trim Videos Using iPhone's Built-In Video Editor
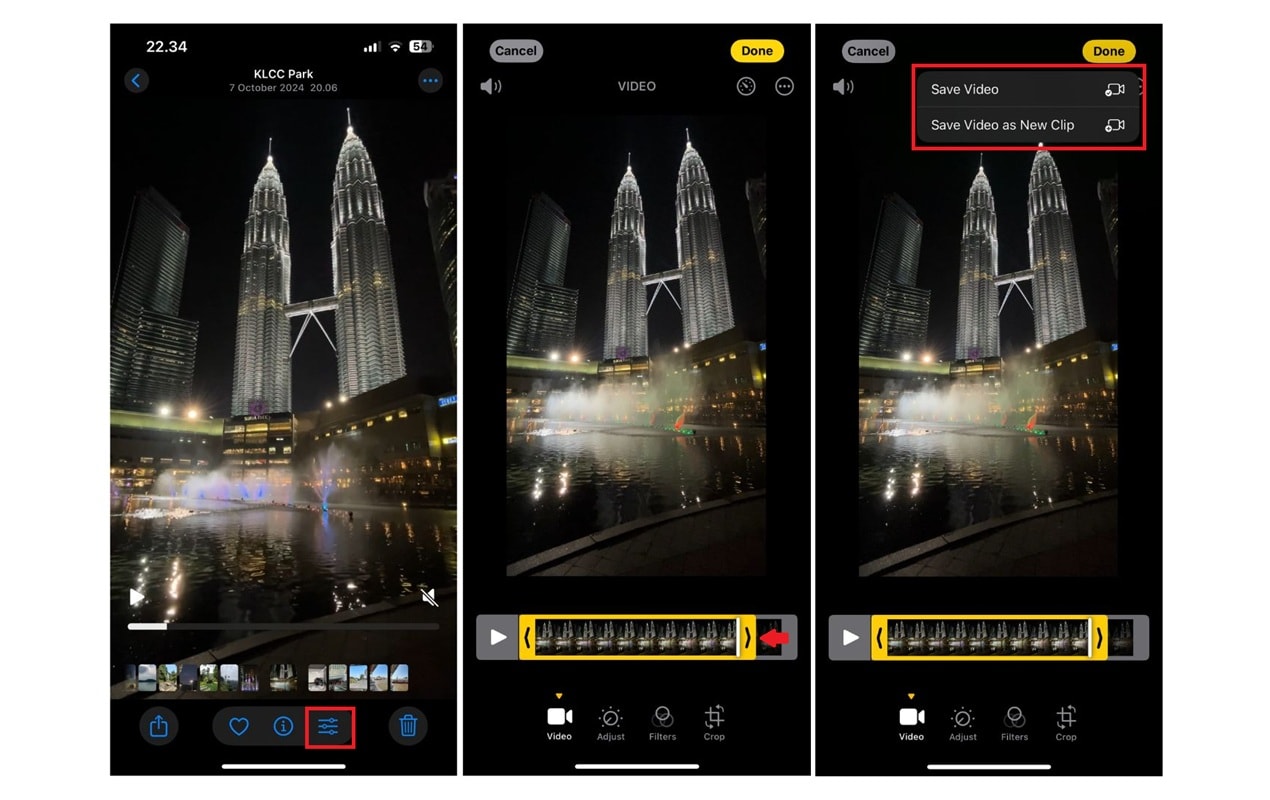
One of the easiest ways to reduce file size is by trimming the video directly in the Photos app. If your clip is long, cutting out the extra seconds you don't need can reduce the size significantly.
Here's a simple step-by-step:
- Open the Photos app, then select the video you want to compress.
- Tap Edit at the bottom next to Details.
- Drag the yellow handles on the timeline to trim the start or end.
- Tap Done, then choose Save Video as New Clip to keep the original video.
Method 2: Edit and Export in Lower Quality on iMovie
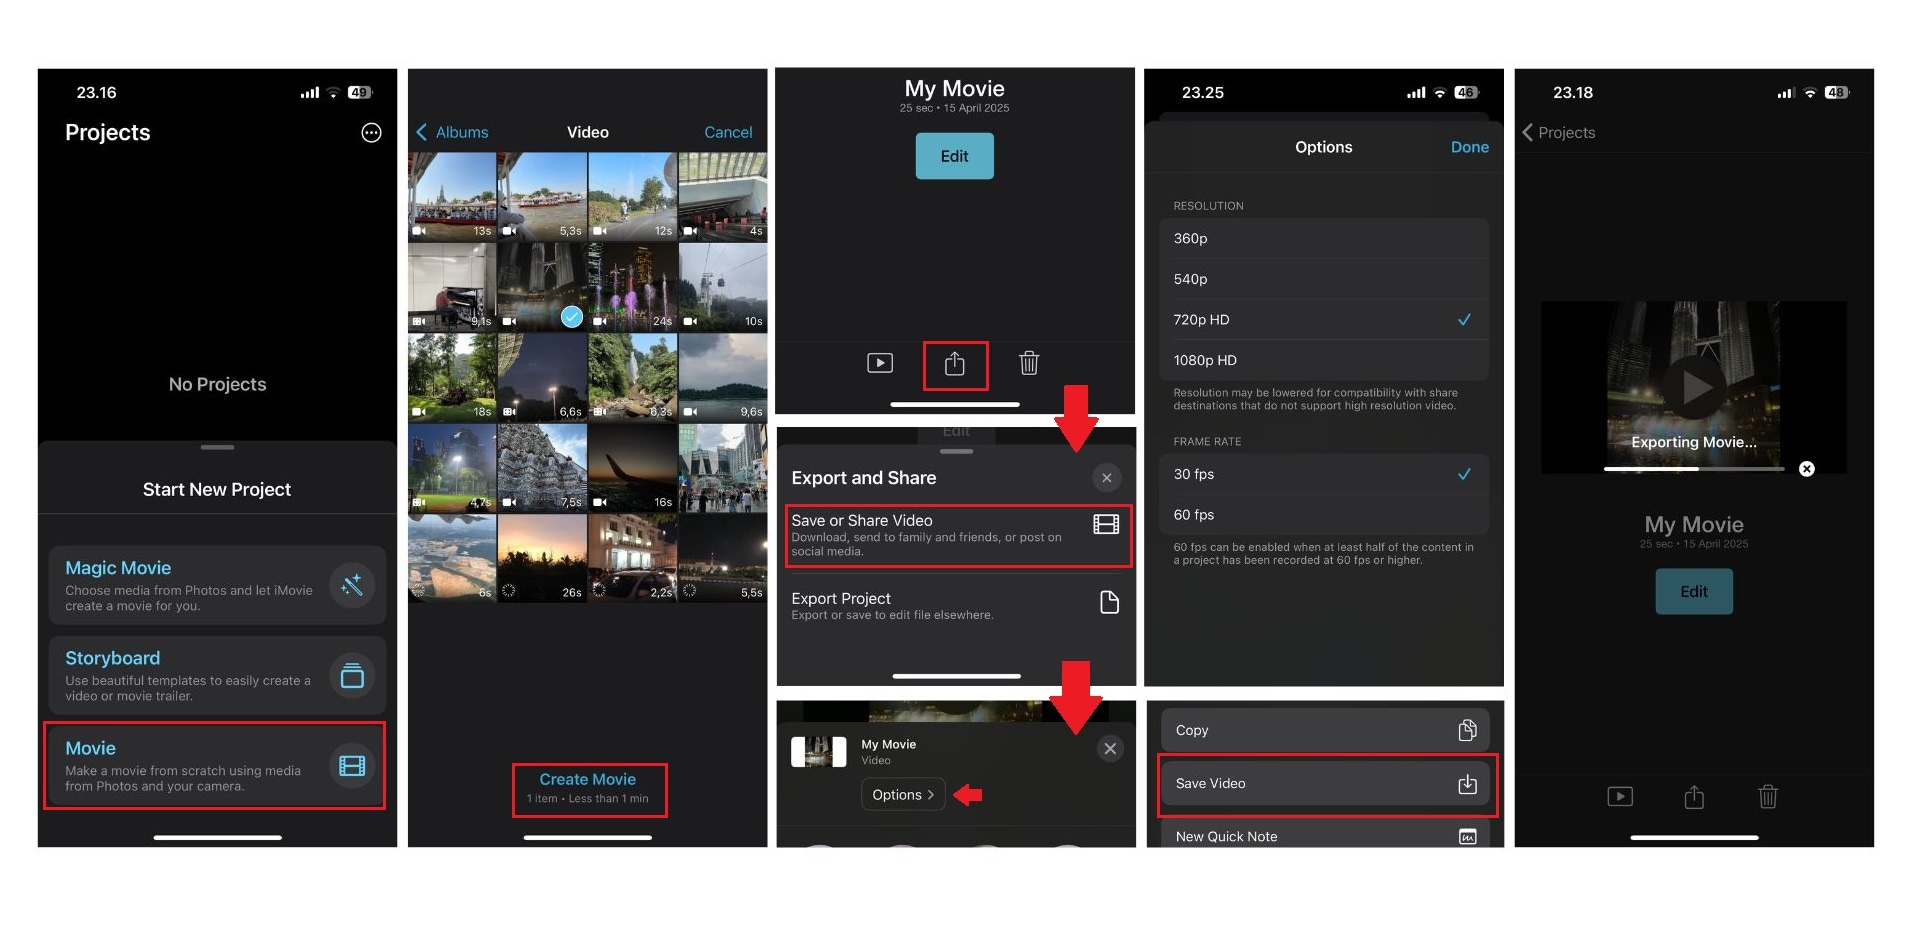
If you need more editing control, Apple's free iMovie app lets you export videos at a lower resolution, like 720p, which significantly reduces file size.
How to do it:
- Open the iMovie app, and tap Movie to create a new project.
- Import your video and make any edits you need.
- Tap Done, then the Share button.
- Choose Save or Share Video, and hit Options to open resolution settings. Then, select a lower resolution (like 720p). When the settings are complete, click Done.
- Tap Save Video, and iMovie will export your updated video.
Method 3: Compress Videos with a Video Compressor App for iPhone
There are many third-party apps designed to compress videos on iPhone without much complexity. Apps like Video Compress - Shrink Vids offer a user-friendly interface and quick results.

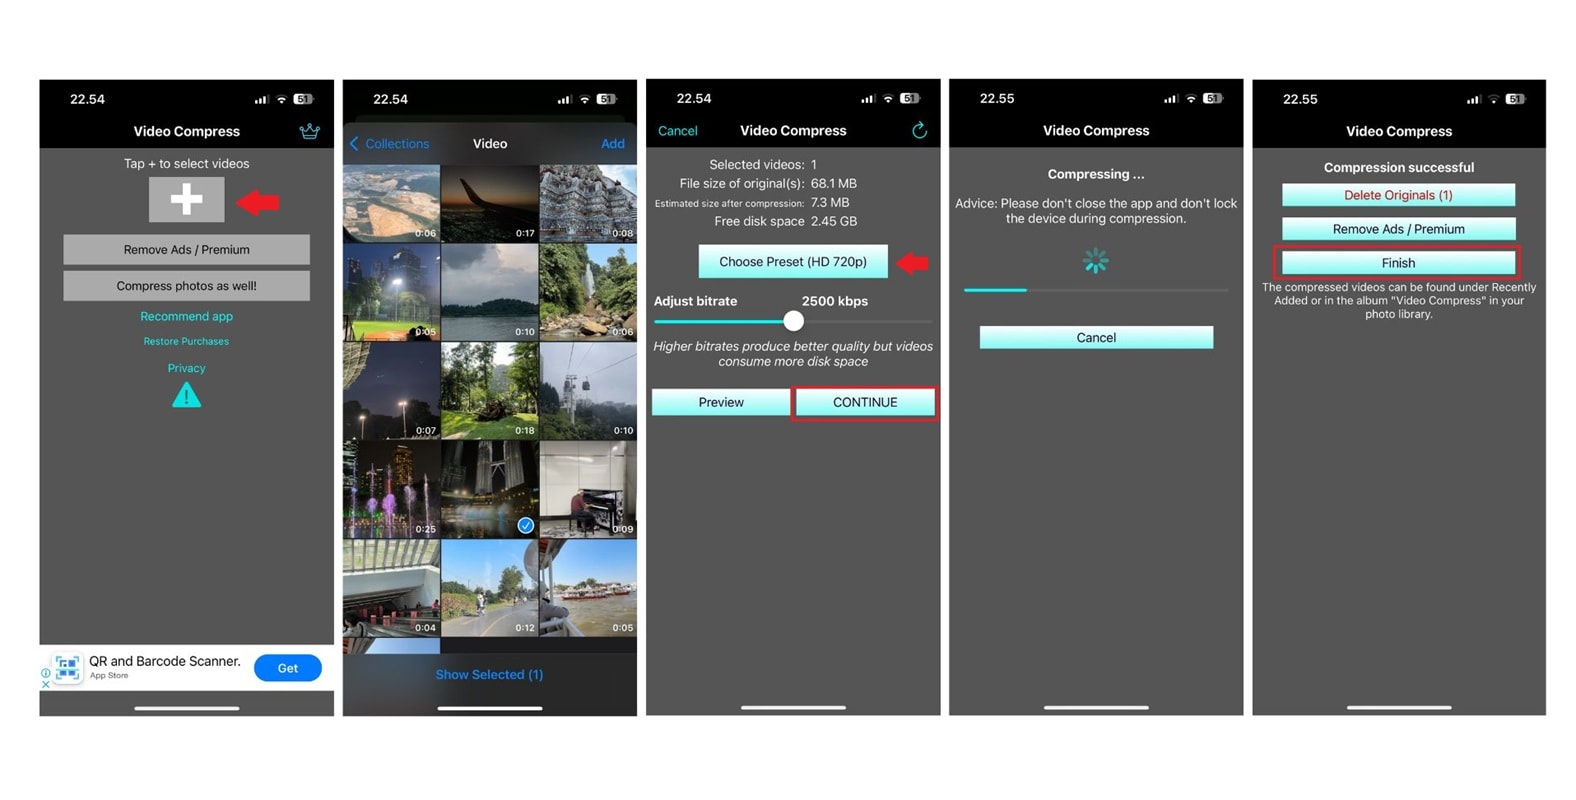
Here's a step-by-step using Video Compress - Shrink Vids:
- Download a trusted video compressor app such as Video Compress - Shrink Vids from the App Store.
- Open the app and import your video.
- Choose the resolution and compression level you want. Tap Continue, then the app compresses your video in seconds.
- Once your video compression is successful, click Finish to save the new video to your gallery.
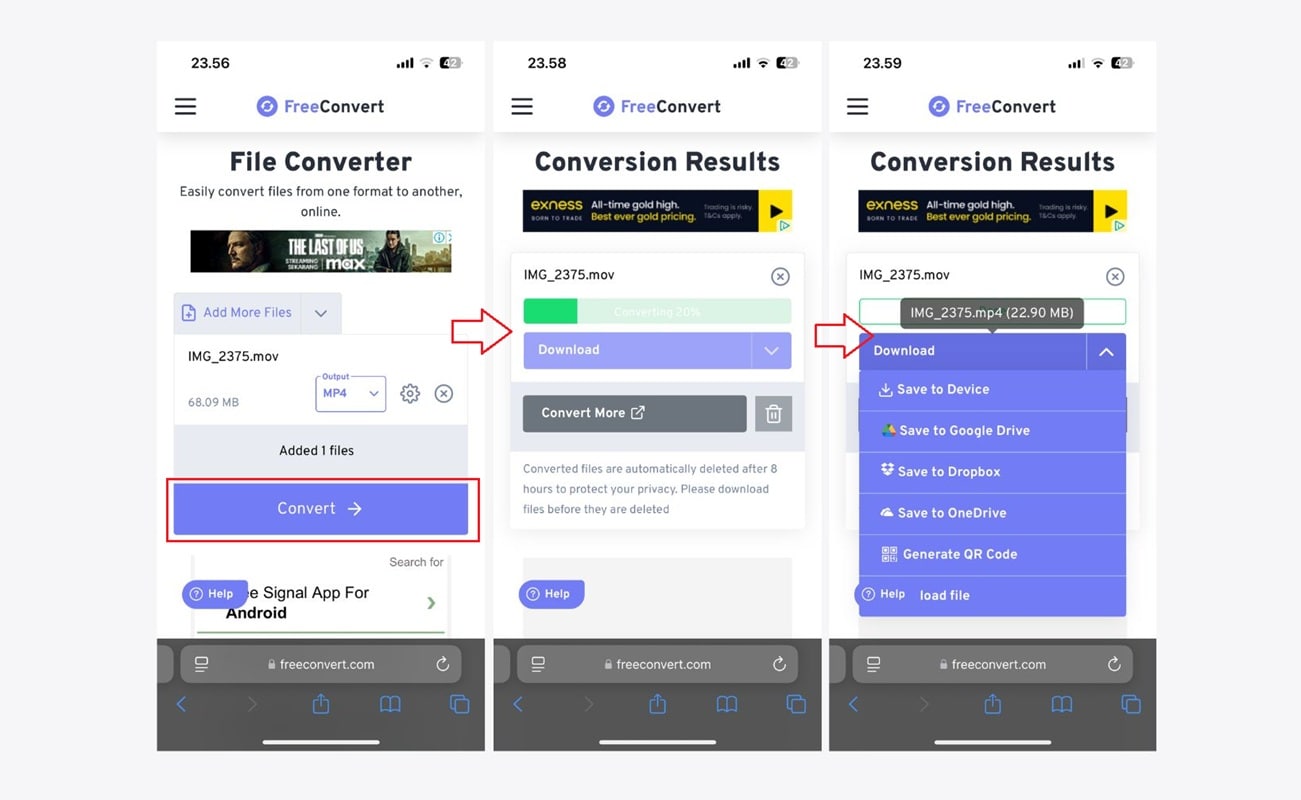
Method 4: Use Online Compression Tools on the iPhone
If you don't want to install an app, you can compress video online on iPhone using tools like Clideo or FreeConvert through Safari. These websites let you upload a video and download a smaller version in minutes.
Here's a step-by-step using online compression:
- Open Safari and go to a video compression website.
- Upload your video file; choose from several platforms, such as device, Dropbox, Google Drive, OneDrive, and URL.
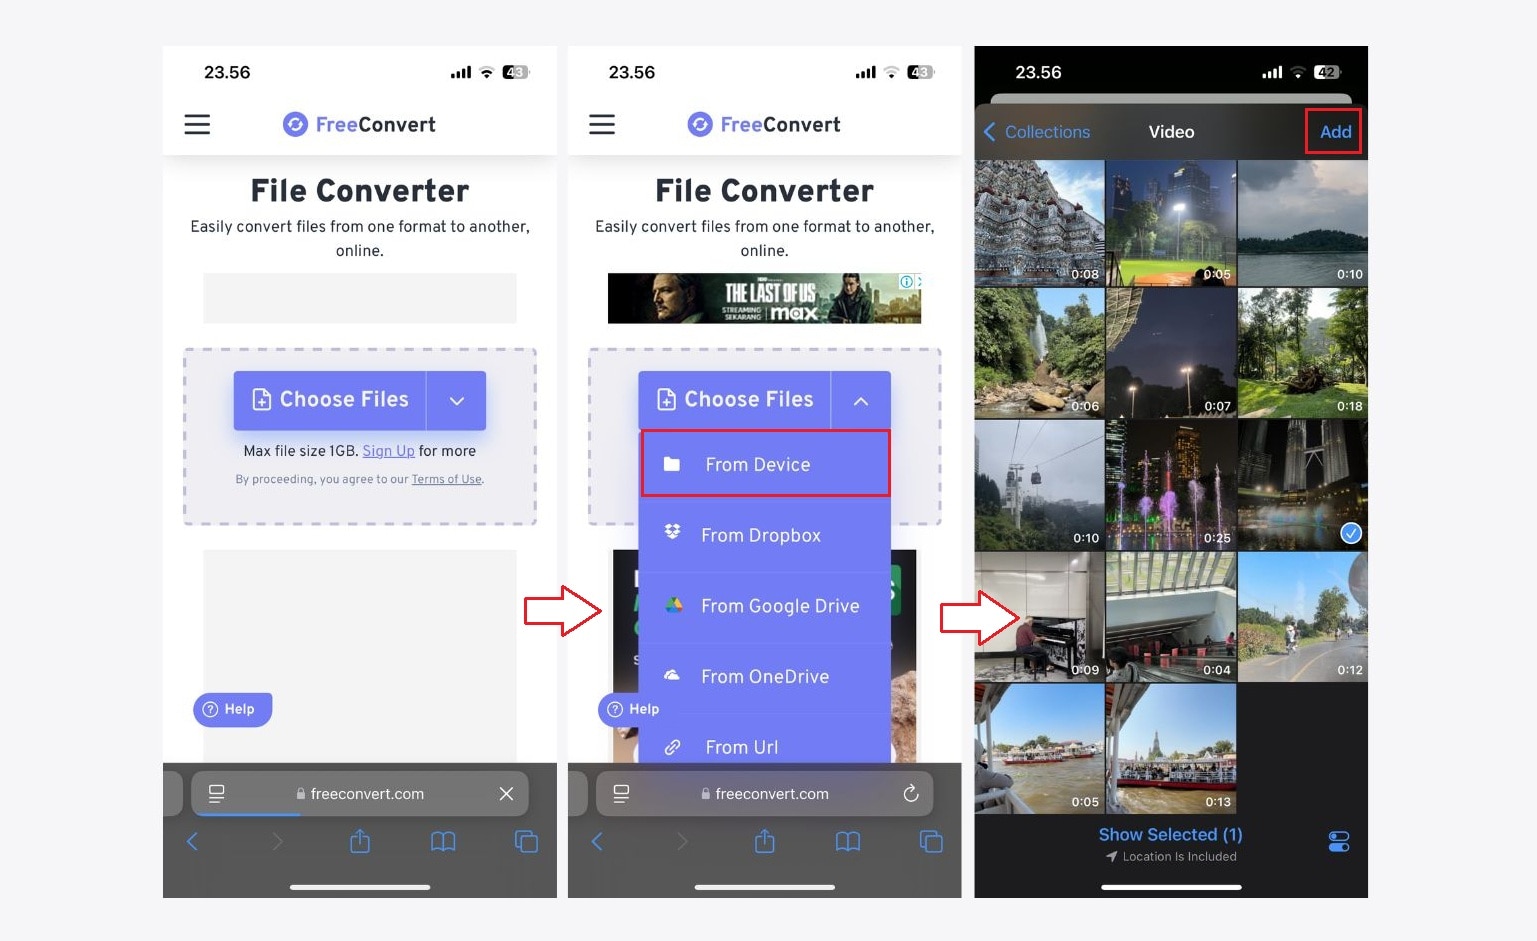
- Adjust compression settings (resolution, file size, etc.).
- Wait for it to process, then download the compressed video to your iPhone.
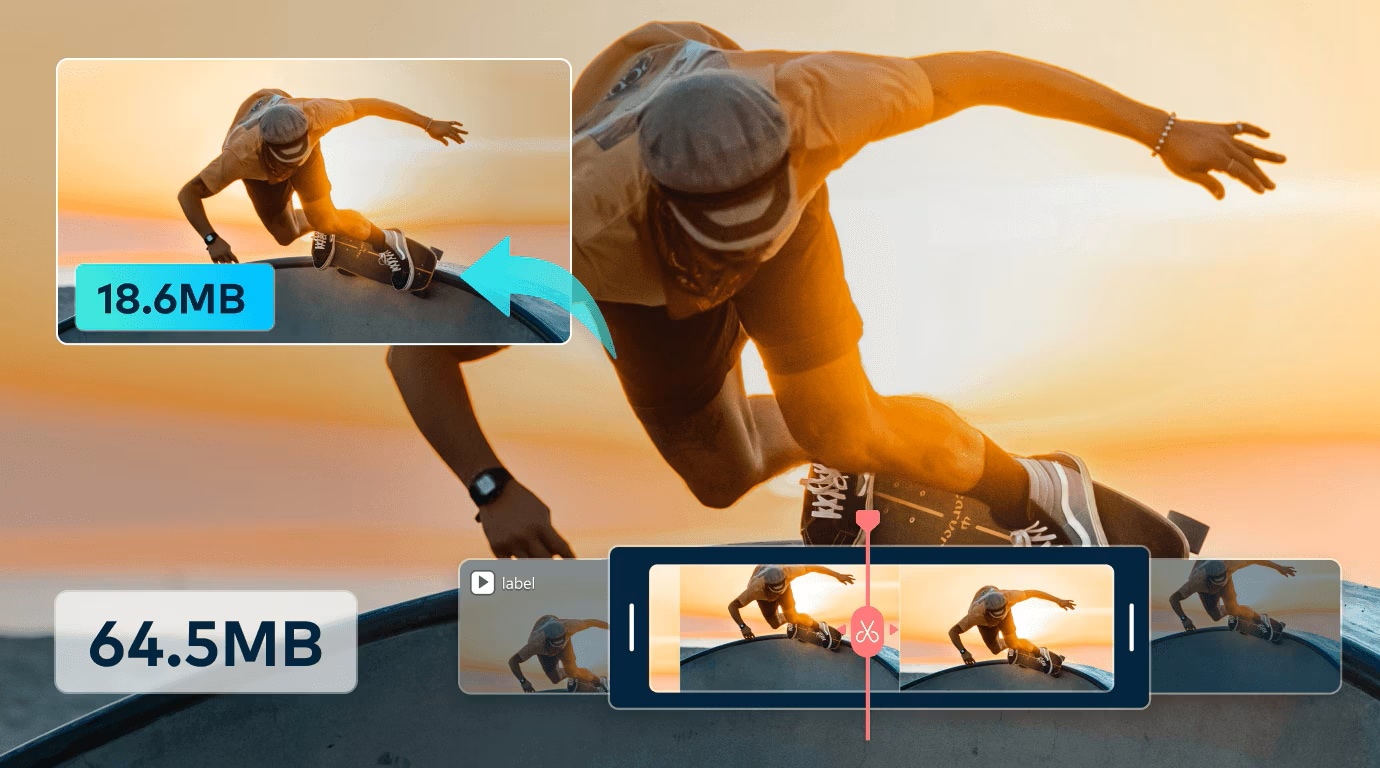
Part 3. Worried About Quality Loss? Try a Desktop Video Compressor Instead
While mobile apps and online tools are convenient, they sometimes compress video iPhone files at the cost of quality. If you're compressing videos for professional use, uploading to YouTube, or just want to preserve details like sharp visuals and smooth playback, using a desktop video compressor is a smarter choice.
One of the best tools out there is the Wondershare Filmora Video Compressor. It offers powerful compression features without making your videos pixelated or washed out.
Benefits of using Filmora's Video Compressor:
- High-quality compression with minimal loss.
- Support various formats, including iPhone video files (MOV, MP4, etc.).
- Customizable settings - control resolution, bitrate, and file size.
- Beginner-friendly interface - no tech skills required.
- Works on both Windows and Mac.
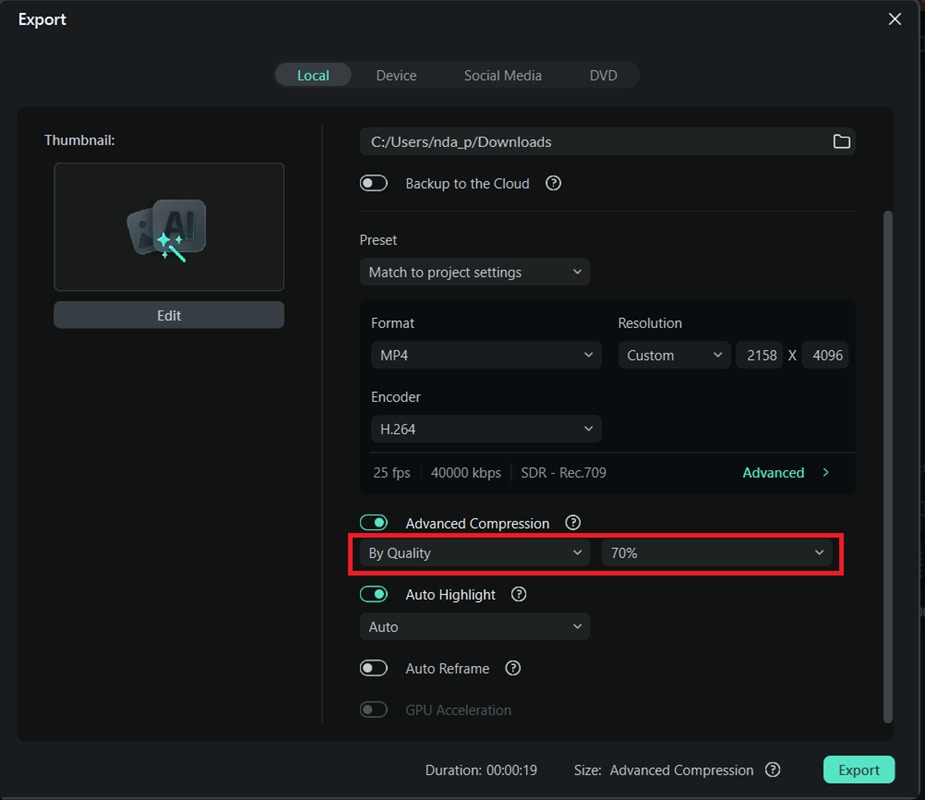
How to reduce the size of an iPhone video with Filmora compressor
Got a video on your iPhone? Simply transfer it to your computer (via AirDrop, iCloud, or cable), then follow these simple steps:
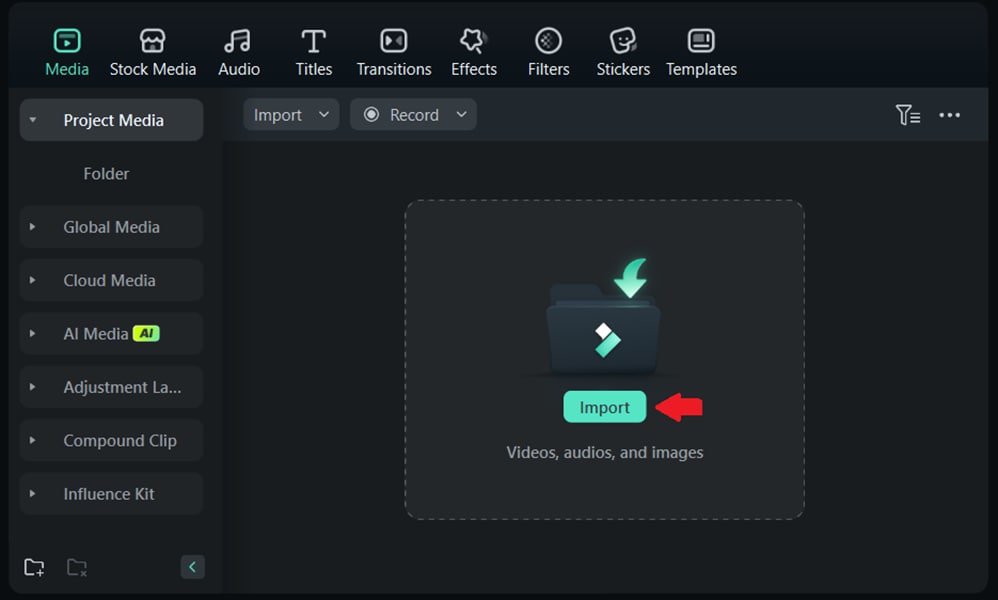
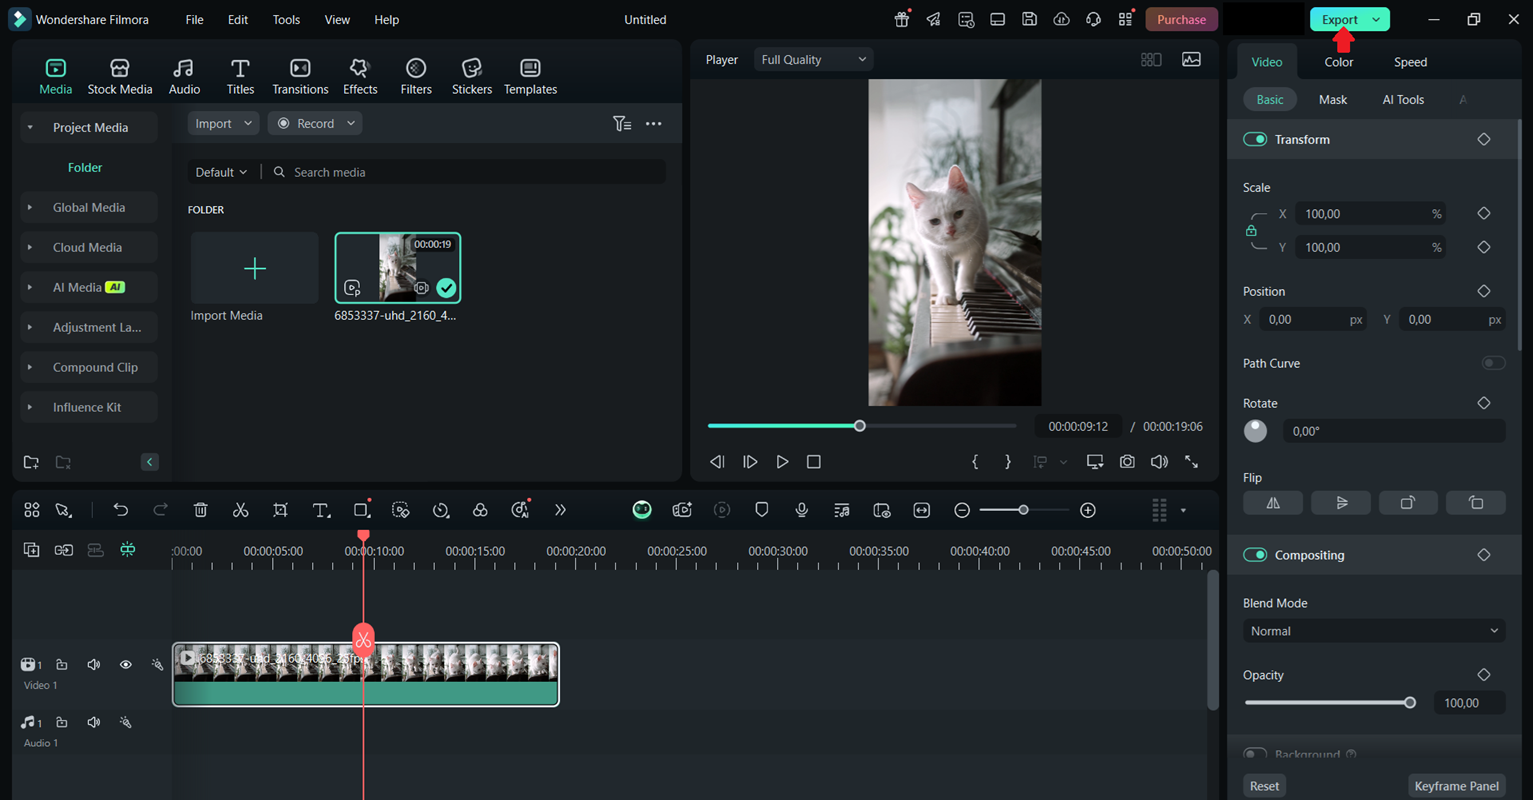
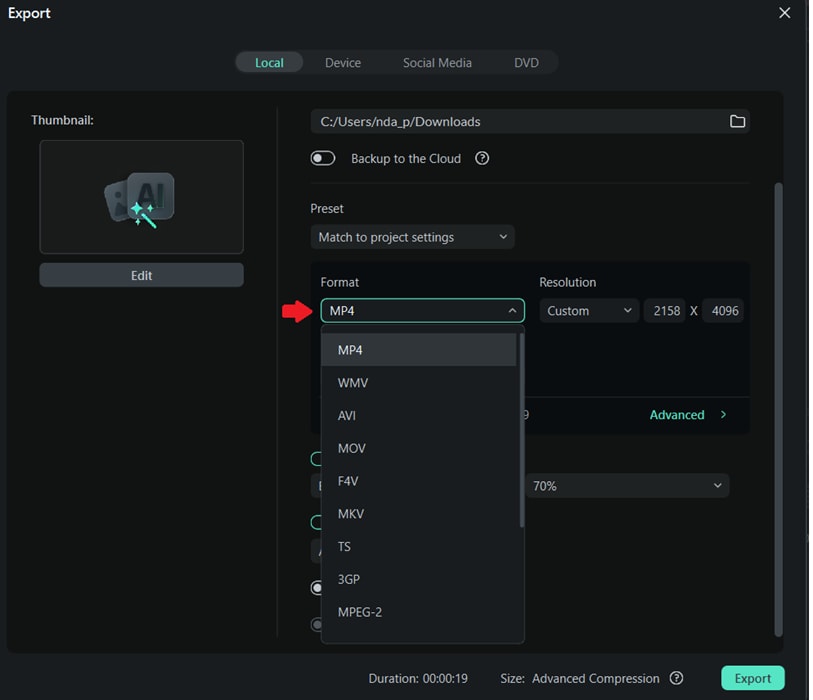
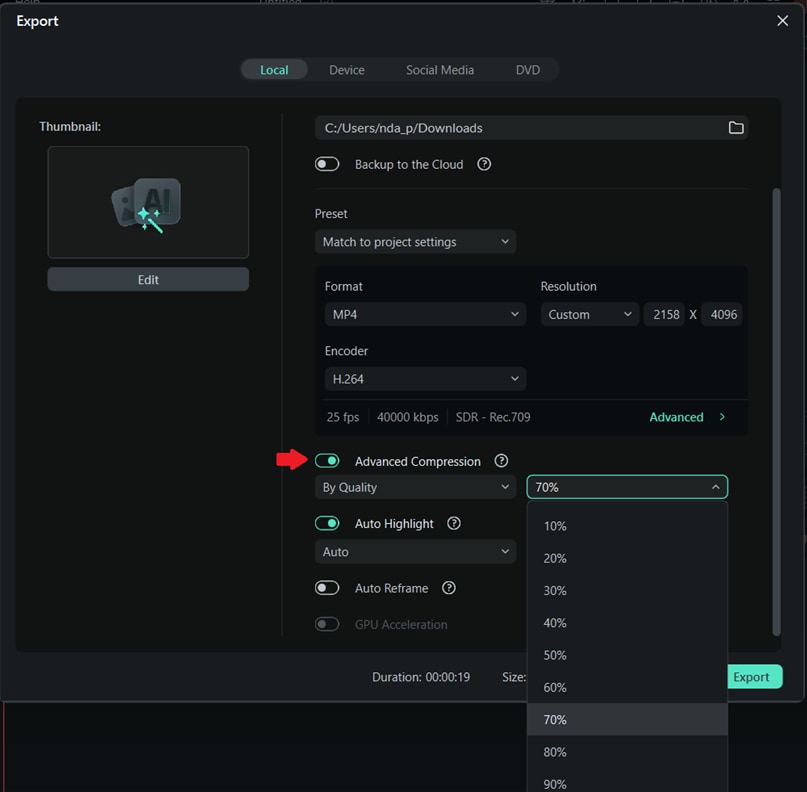
Filmora offers two ways to compress videos without losing quality:
- By Quality
Choose the 'By Quality' option from the dropdown menu, then set the compression percentage.
- YouTube Upload
Choose 'YouTube Upload' from the dropdown menu to automatically compress your video using the platform's recommended bitrate settings.

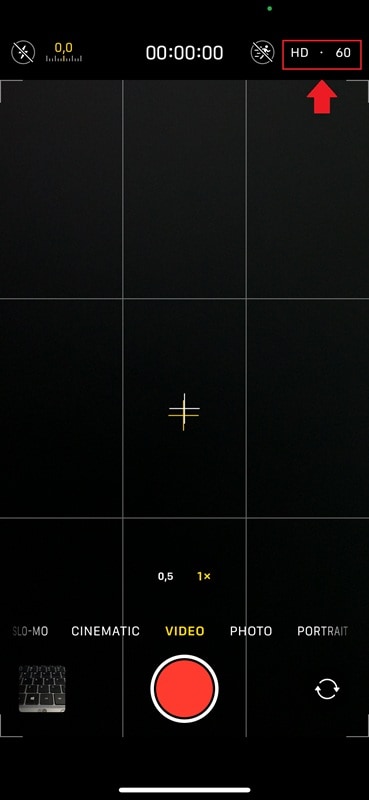
Part 4. How to Adjust iPhone Camera Settings to Keep Video Files Smaller
One of the easiest ways to save storage on your iPhone is by changing your camera settings before you start recording. By default, iPhones often shoot in high resolution, like 4K at 60 frames per second, which looks great but takes up a lot of space fast.
Unless you're filming a movie, lowering these settings can make a big difference. You'll still get good video quality but with much smaller file sizes. It's a wise first step if you're looking for an easy iPhone compression video solution.
Best Camera Settings to Reduce Video File Size
For most everyday videos, like recording family moments, social media clips, or short tutorials, 1080p at 30fps is a good balance between quality and file size.
Recommended settings:
- Resolution: 1080p HD
- Frame rate: 30 fps
How to Adjust Camera Settings on Your iPhone
- Open the Settings app on your iPhone.
- Scroll down and tap Camera.
- Tap Record Video.
- Choose 1080p HD at 30 fps (or 720p if you're trying to save space).

Additionally, you can modify it directly in the Camera App.
If you record in Slo-Mo or Cinematic Mode, your clips will automatically be larger. Use these modes only when necessary.
Taking a few seconds to adjust your settings can help you avoid large video files and save you the trouble of compressing an iPhone video later.
Conclusion
If your iPhone storage fills up fast, large video files are most likely the cause. Fortunately, learning how to compress a video on an iPhone is easier than you think. From trimming clips, lowering export quality, using a compression app, or switching camera settings, you have many options to reduce file size.
For better results with minimal quality loss, a desktop tool like Filmora's video compressor is a flexible choice. With the right tools and tips, you can save space, keep your videos shareable, and never have to worry about storage again, no matter how much you love to film.
