In this article
The secret to making your videos look polished like the ones you usually see online or in movies often comes down to one thing:adding special effects. They have the power to turn a plain clip into something cinematic, emotional, or even something otherworldly.
Special effects are creative enhancements added to your footage to improve the visual quality, bring in creative touches, or set a specific mood and atmosphere. If you want to learn how to add special effects to a video, you first need to know which effects to use and when to use them. Let's get into it.

Part 1: Understanding Video Effects
Special effects or video effects fall into two categories: visible and invisible. Visible effects are the ones you can instantly notice on screen, like bold color filters, smooth transitions, or any animated overlays. They're used to catch the viewer's eye and add personality or style to your footage.

Invisible effects, on the other hand, quietly work in the background. For example, stabilization tools help smooth out shaky shots, while a video enhancer removes grainy visuals of your clip. You might not notice these effects right away, but they significantly improve the overall quality and professionalism of your video.

What You Need to Add Video Effects to a Video
To add special effects to a video, you need the right editor that makes the process simple and gives you plenty of creative options. An editor like Wondershare Filmora is a great platform to start because it's designed for beginners but still powerful enough for more advanced projects.
Filmora's library includes over 3000+ built-in effects, including 3D elements, blur effects, green screen, and many others, so you'll never feel limited when editing. The program is also downloadable on both Windows and Mac computers. You can use it to enhance your video on whatever device you are using.
Related Templates For You to Try


Part 2: How to Add Special Effects to a Video
If we were to list all the available special effects out there, the list would never end. Instead, let's focus on some of the most popular and practical ones you can start using right away. These are the effects every editor uses most often, along with a quick tutorial on how to apply them to your video.
1. Transitions
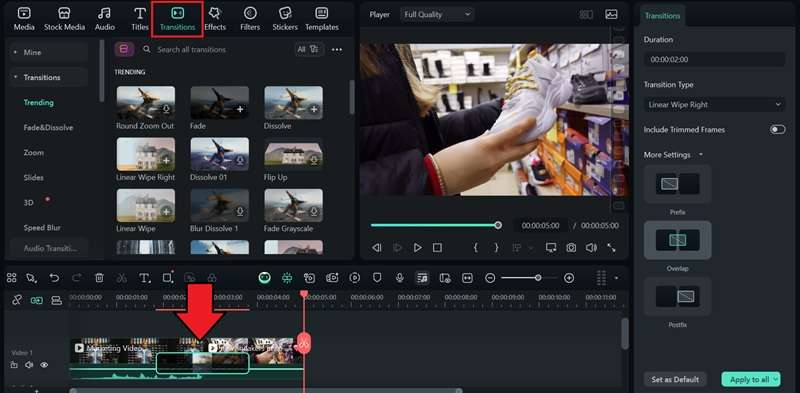
Videos are often made up of many clips, and without a smooth link between them, the whole thing can feel a little jumpy. Transitions help connect those clips so the story flows better, from one scene to the next.

There are many types of transitions. Subtle ones include fades and dissolves that gently move between scenes, while bold effects like wipes and zooms create a more dramatic shift.
How to add video effects like transitions to your video:
- Go to the Transitions tab.
- Browse and choose a transition style.
- Drag and drop it between two clips.
- Adjust the duration if needed.
2. Slow or Fast Motion
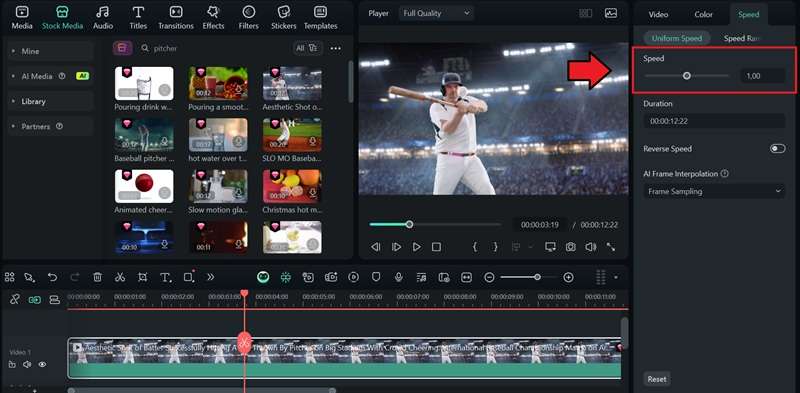
Changing the speed of your video is a simple trick that can completely change how people experience it. Slowing footage down adds drama and lets viewers catch details they might otherwise miss. This video effect is common in sports highlights, wedding films, or cinematic shots.

Speeding footage up has the opposite effect. It creates energy, urgency, or even humor. You'll often see this in travel vlogs to show a quick journey, in tutorials to skip over long steps, or in comedy edits where fast motion makes ordinary actions look funny.
How to add video effects by slowing down or speeding up a video:
- Select the clip on the timeline
- Navigate to the Speed tab on the property panel
- Adjust the speed with the slider or type in a specific number
3. Filters / Color Grading
Color has a huge impact on how your video looks and feels. A warm filter can make a scene look cozy and nostalgic, while cooler tones give the vibe of something calm, distant, or even futuristic. Bright and vibrant colors often make videos feel lively and fun, while darker, muted tones are great for creating tension.

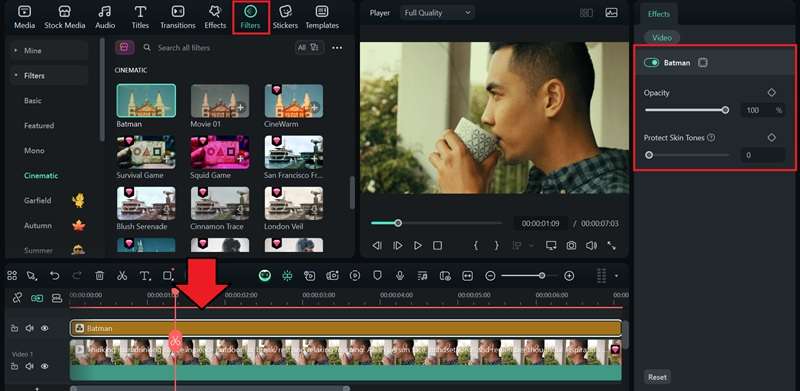
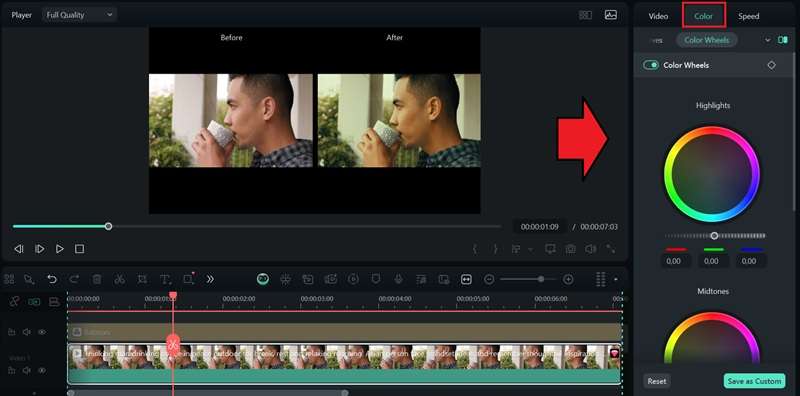
And to get there, filters are the quickest method. By applying one, you can instantly change the atmosphere of your footage. Color grading, on the other hand, gives you more control. It's the process of adjusting brightness, contrast, and tones to achieve a specific visual effect.
How to apply filters to a video
- Head to the Filters tab.
- Browse and choose a filter you like.
- Drag and drop it on the top of your clip in the timeline.
How to adjust color grading in a video
- Select the clip on the timeline.
- Navigate to the color tab on the property panel.
- You'll see different, such as Basic, HSL, Curves, and Color Wheels. Select the one you are most comfortable with and adjust as needed.
4. Rotate and Flip
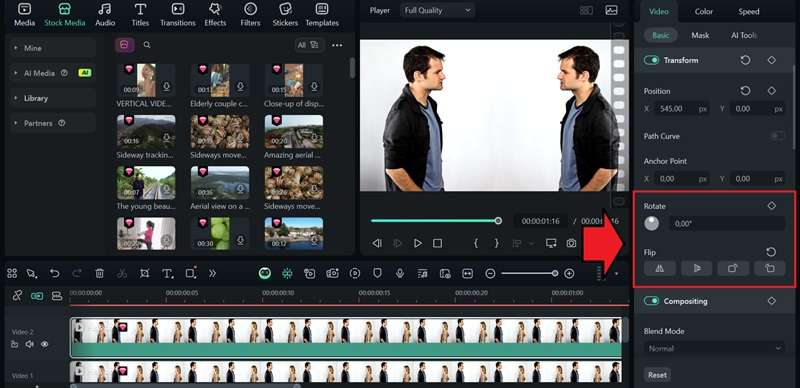
Sometimes a clip just isn't facing the right way, so you need to rotate or flip your clip to fix it. You can also use these tools to create mirrored video effects that bring extra style to your footage.
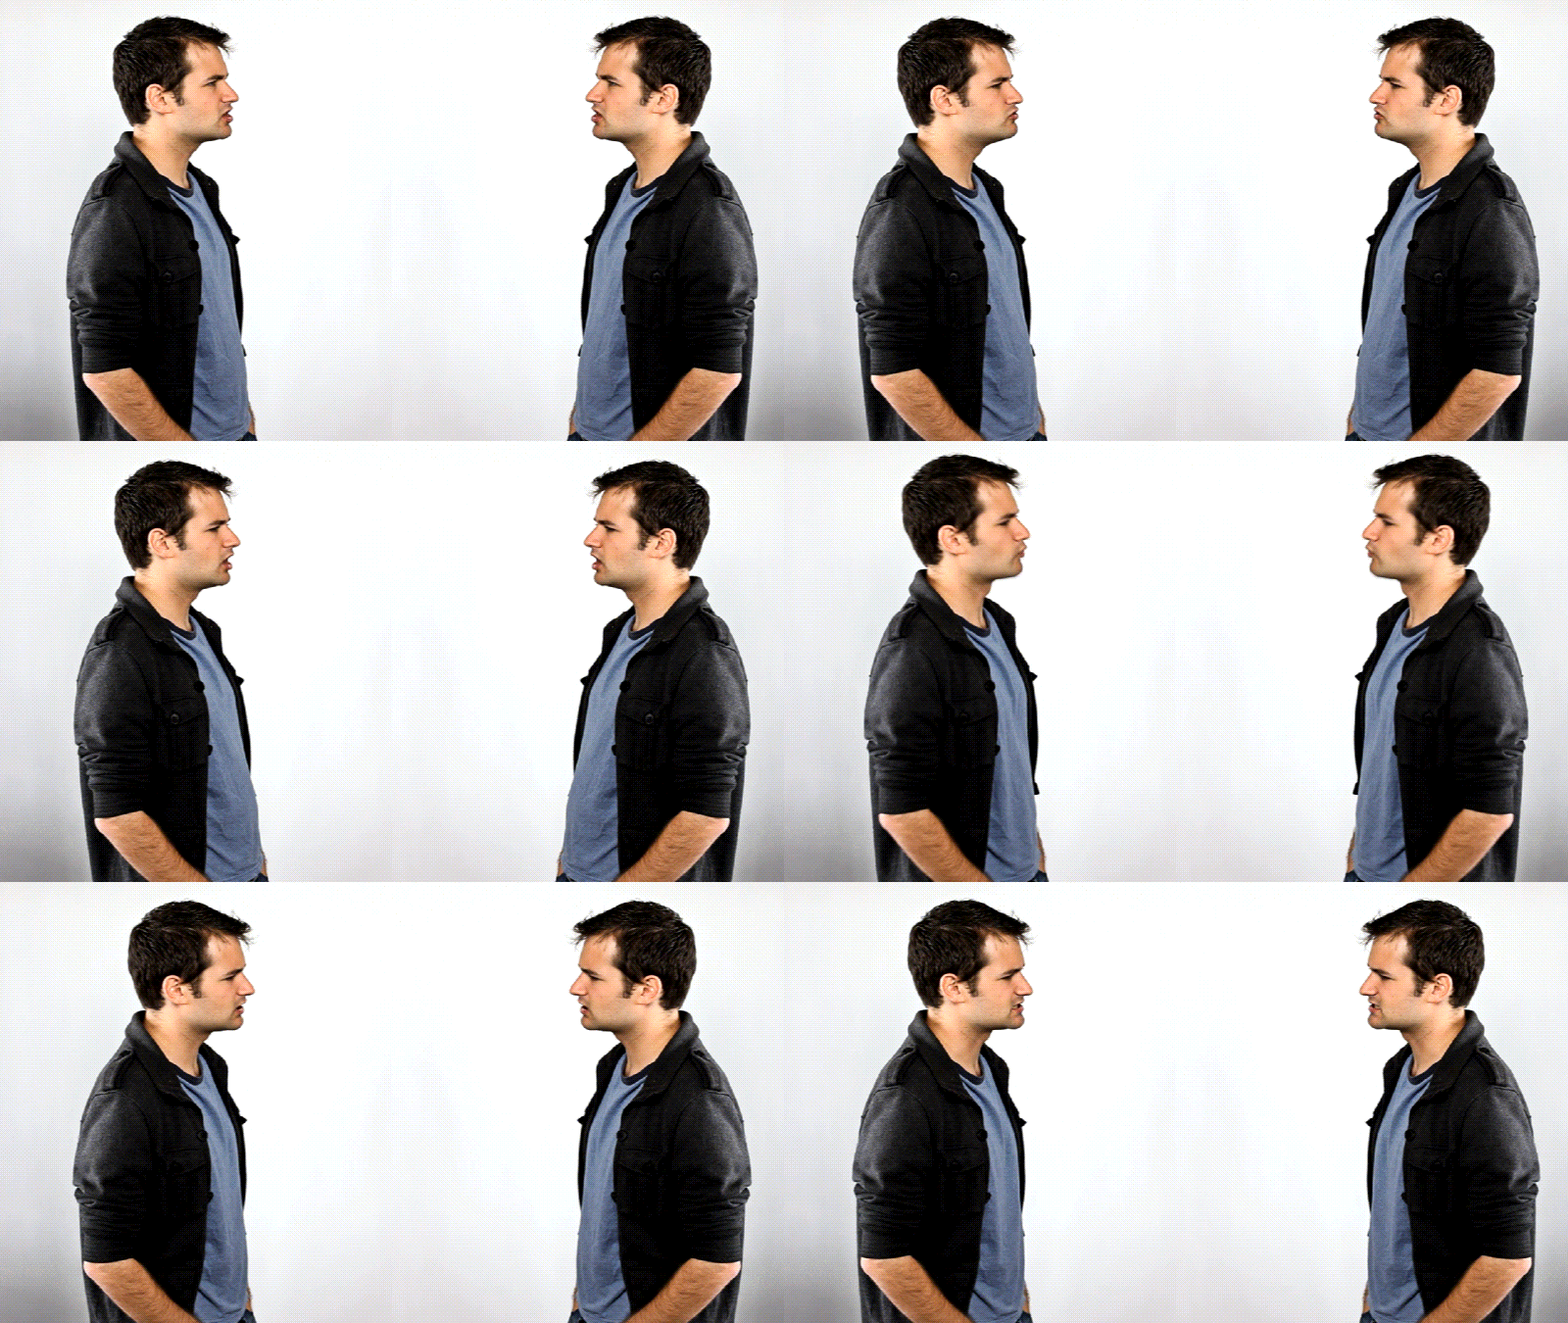
How to rotate and flip a video:
- Select the clip on the timeline.
- Head to the property panel and click the rotate or flip button.
5. Reverse
Reversing a clip is one of the simplest video effects you can add to your video. A famous example is the movie Tenet, which uses reverse motion heavily to create its mind-bending action scenes.
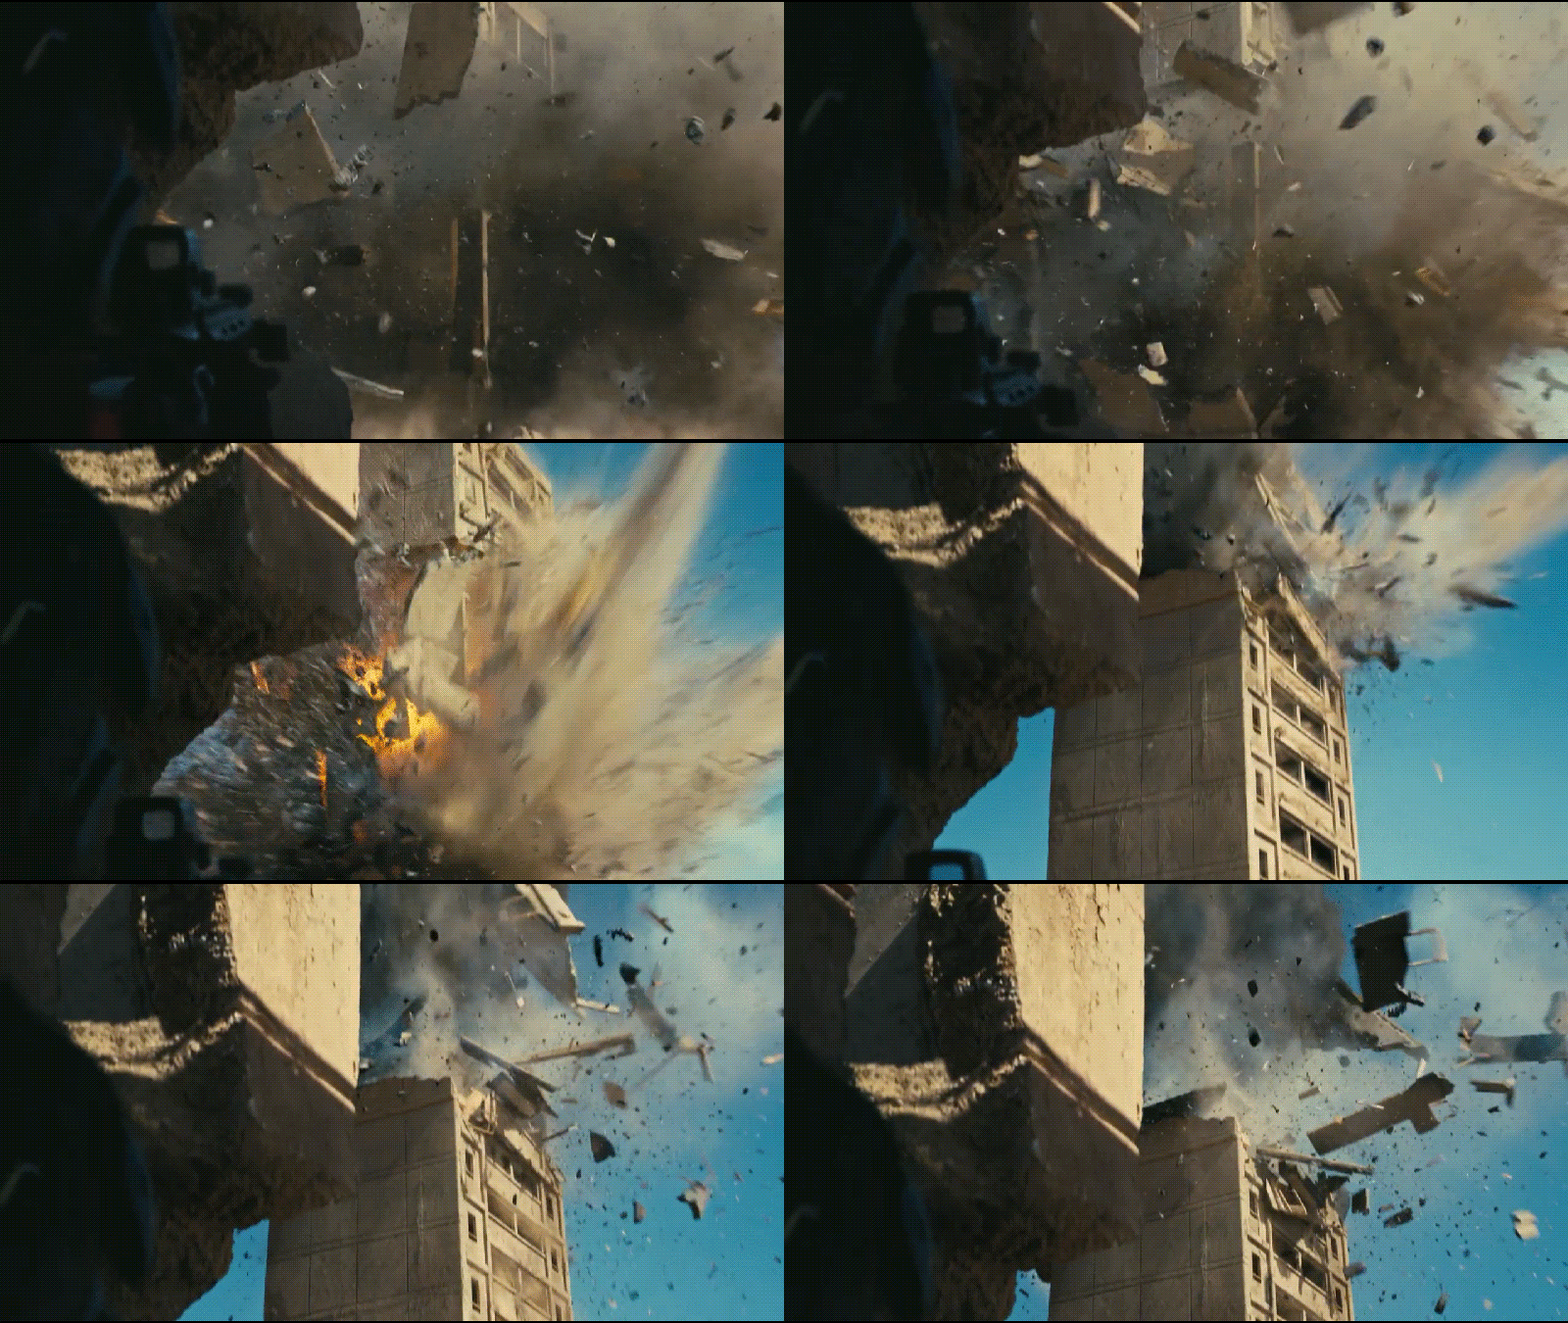
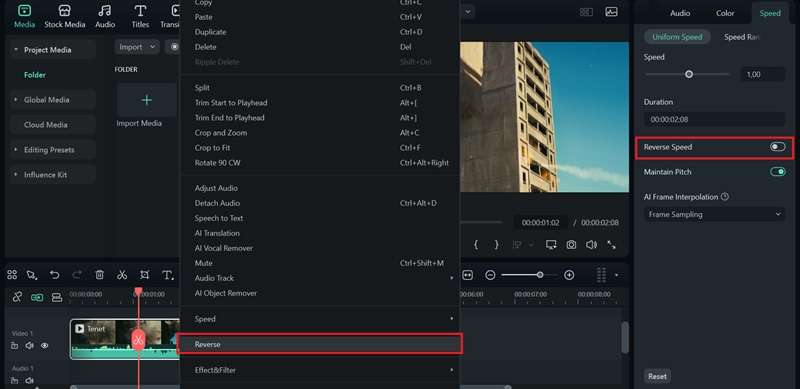
How to reverse a clip:
- Right-click the clip on the timeline and select “reverse.”
- Or open the Speed tab in the property panel and turn on Reverse Speed.
6. Split Screen
Split screen is a video editing special effect that displays two or more videos on the screen at the same time. It's often used to compare moments side by side, highlight different angles of the same scene, or display multiple stories unfolding together. You'll see this effect a lot in reaction videos, interviews, and gaming content.
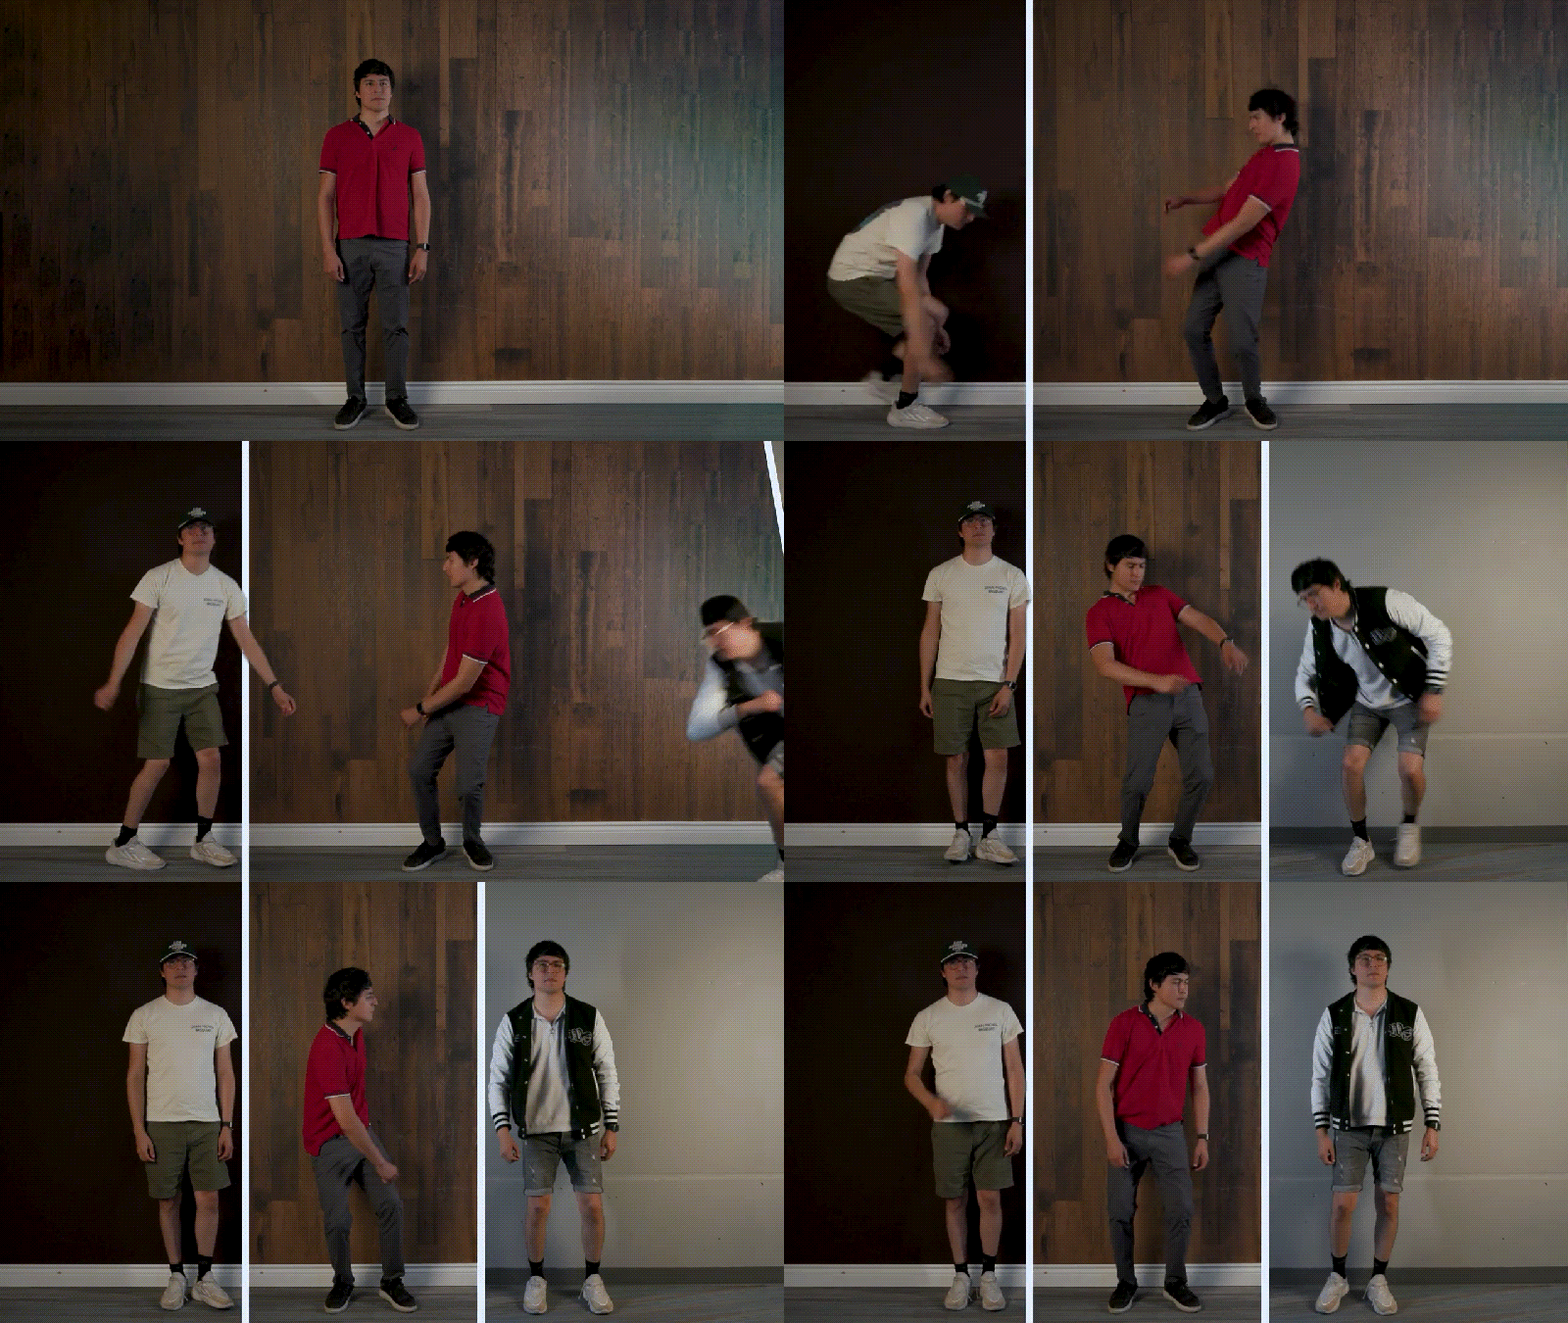
How to apply split screen in your video:
7. Motion Tracking
Motion tracking helps you lock text, graphics, or images onto a moving object in your video. For example, you can attach a caption to someone walking across the frame, blur out a moving face for privacy, or add fun stickers that follow the subject around.

How to use motion tracking:
For more advanced motion tracking, Filmora Premium includes the BorisFX Mocha plugin. With it, you can tackle more complex movements and apply tracking accurately, even in challenging areas of your footage.
8. Pan and Zoom
Pan and zoom is a classic video effect that adds motion to still images or video clips. Instead of keeping the frame static, you can slowly zoom in to focus on a detail, or pan across to reveal more of the scene.
The pan and zoom effect is also often called the “Ken Burns effect,” and you'll see it in many documentaries or slideshows.

How to apply pan and zoom video effects:
9. Masking
You can use masking to cut out certain areas, highlight specific details, or even blend multiple clips together. It lets you hide or reveal parts of a video.
Masking is often used to create video effects like text reveals, cloning (where it looks like there are two of the same person in one frame), or seamless transitions between clips. It can also help with practical edits, such as covering unwanted objects or sharpening focus on a subject.
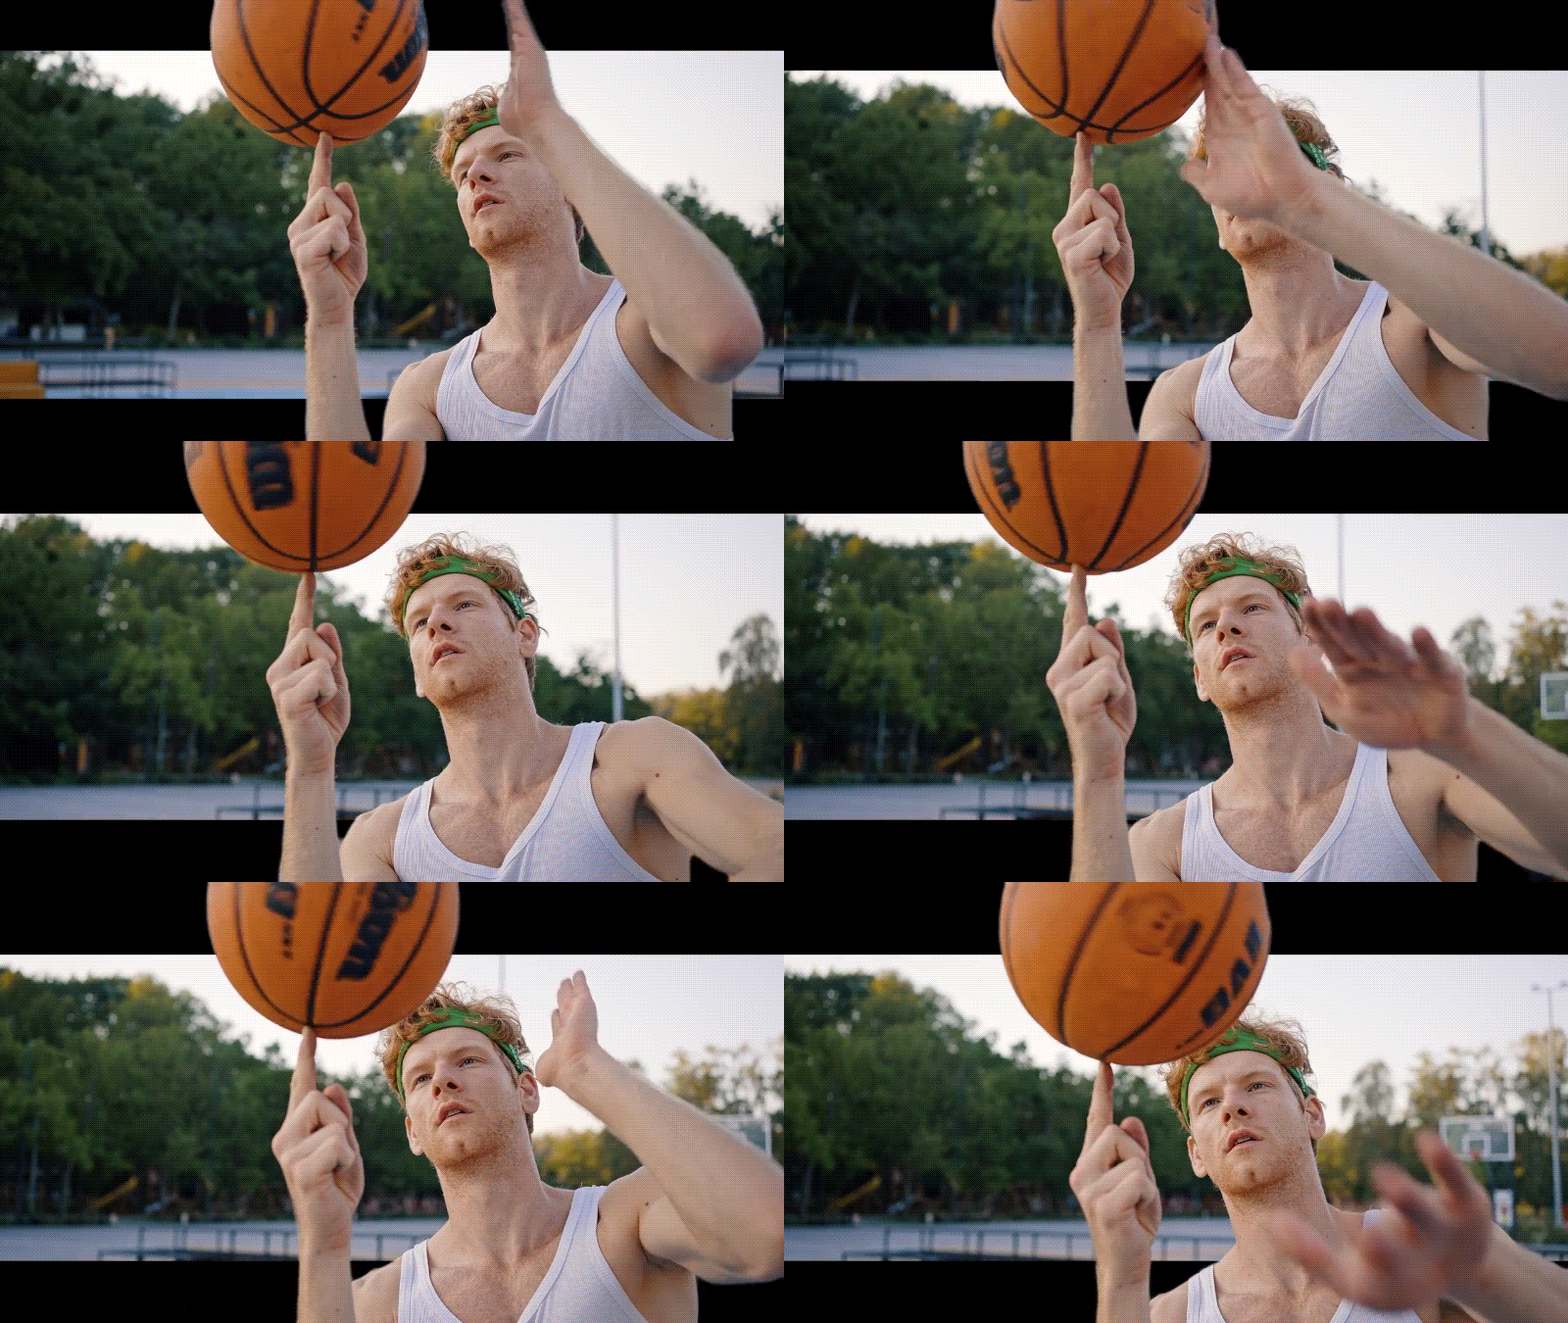
How to use masking in your video:
10. Chroma Key / Green Screen
Chroma key, better known as green screen, is a video editing special effect where you can replace a solid-colored background (usually green or blue) with any image or video. This is how many creators add custom backdrops or create special effects scenes.
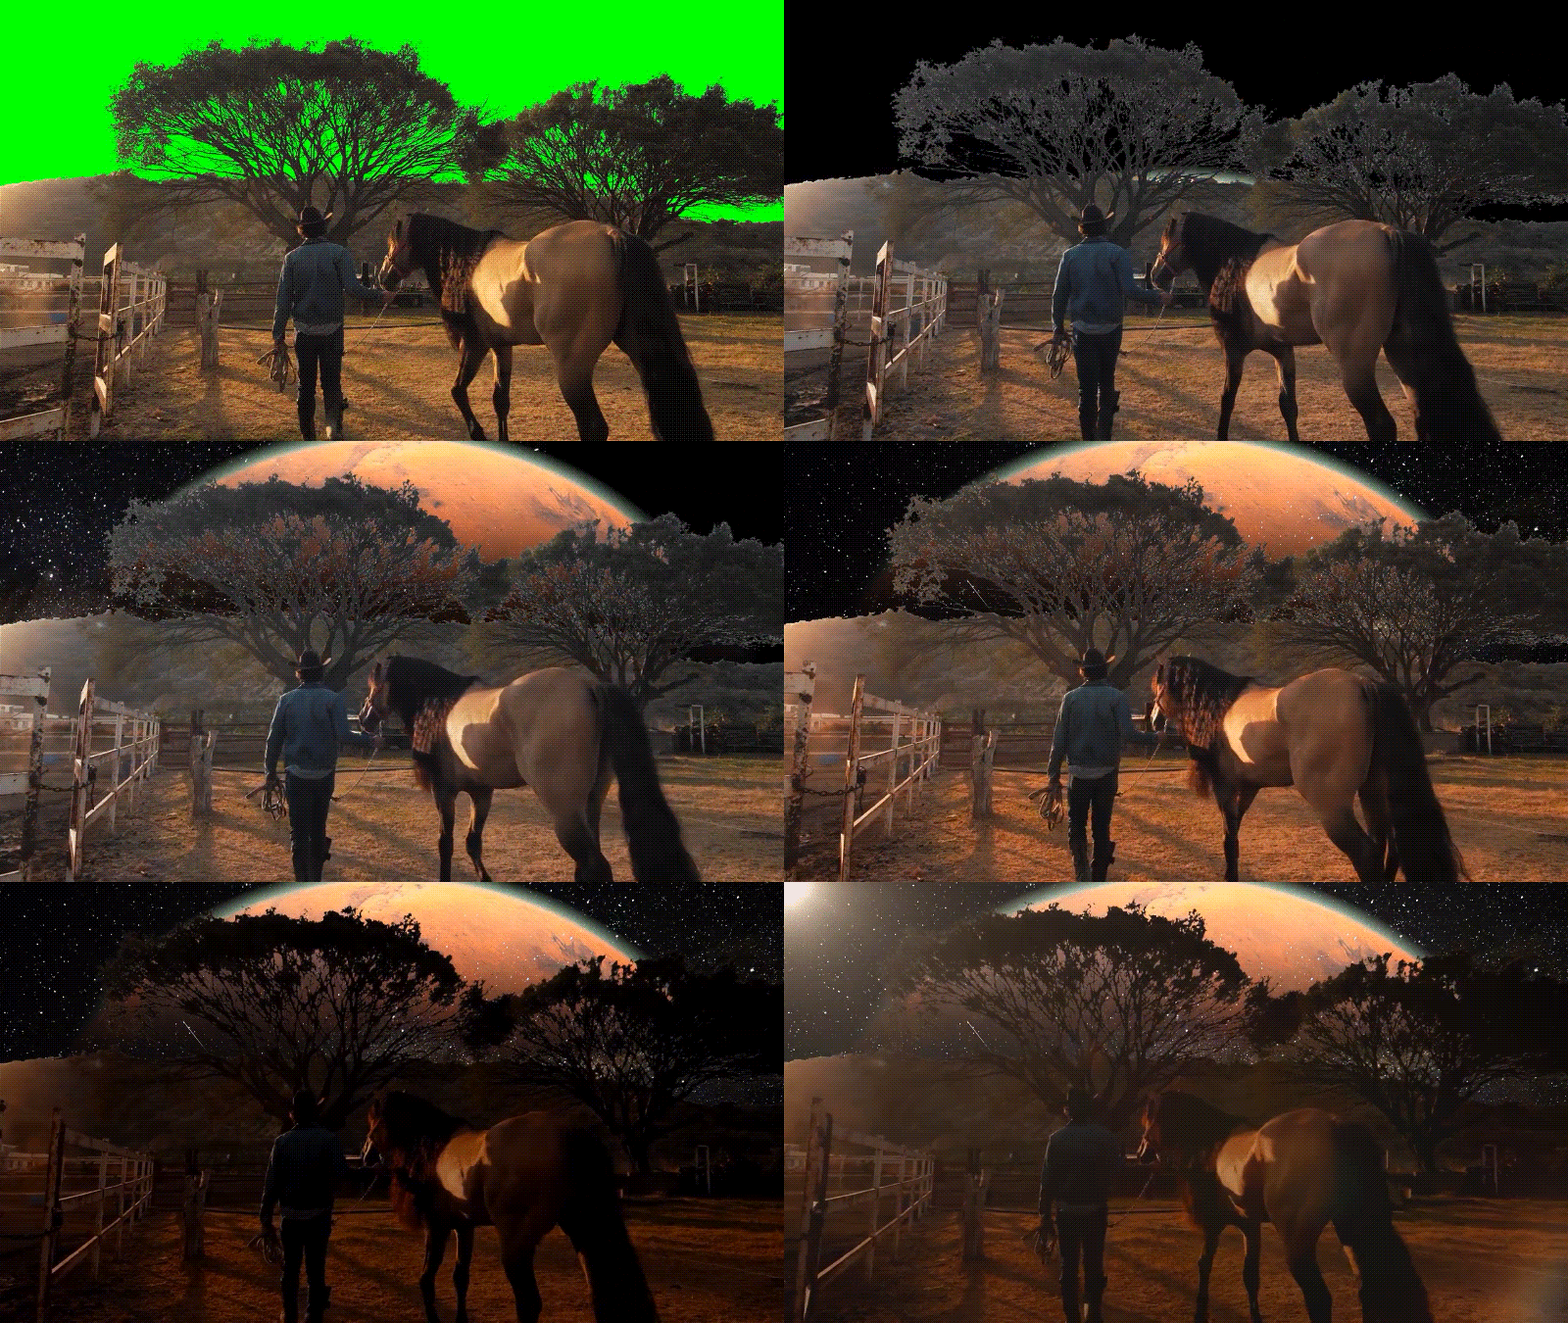
How to apply chroma key (green screen) in a video:
Once you've mastered the essentials like transitions, motion tracking, and green screen, you can start experimenting with special effects that push your creativity even further!
Part 3. Explore More Stylized Effects to Use in Your Videos
Beyond the basics, Filmora also gives you a library of stylized effects that can completely change the vibe of your video. Under the Effects menu, you'll find options like glitch, glow, blur, chromatic aberration, pulse, and plenty more.

How to add special effects to videos:
Step 1: Open Filmora and go to the Effects tab.
Step 2: Download an effect from Filmora Effects Pack and drag it to the timeline.
Step 3: Fine-tune the effect in the property panel by adjusting settings like intensity and opacity.
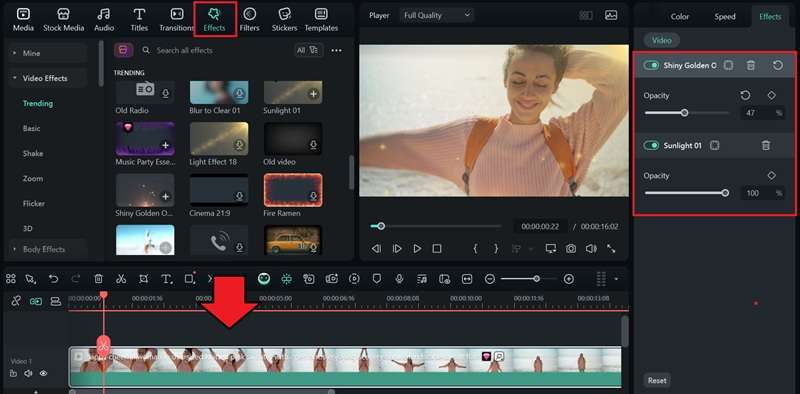
For more options, you can download a Filmora effects pack from Filmstock. Once downloaded, add it to your library and drag it onto the timeline to start using it in your video.
Conclusion
Adding special effects to your video is what gives your videos that extra edge, turning simple clips into something that looks straight out of the cinema. To do it easily, you can use an editor like Filmora. You can experiment with transitions, filters, motion tracking, green screen, and more with just a few clicks.
With Filmora's built-in library and downloadable effects packs, you'll always have new ways to make your video stand out.
Frequently Asked Questions
-
Do video effects lower video quality?
Video effects don't automatically lower quality, but it depends on how they're applied. Overusing heavy effects or applying them incorrectly may cause artifacts, reduce sharpness, or affect clarity. In most cases, your export settings, such as resolution and bitrate, have a bigger impact on final video quality than the effects themselves.Video effects don't automatically lower quality, but it depends on how they're applied. Overusing heavy effects or applying them incorrectly may cause artifacts, reduce sharpness, or affect clarity. In most cases, your export settings, such as resolution and bitrate, have a bigger impact on final video quality than the effects themselves.Can I add multiple video effects to a video?Can I add multiple video effects to a video? -
Can I add multiple video effects to a video?
Yes, you can layer as many effects as you like. For example, you might apply a filter, add motion tracking, and use a green screen effect all in one clip.Yes, you can layer as many effects as you like. For example, you might apply a filter, add motion tracking, and use a green screen effect all in one clip.How long does it take to render videos with effects?How long does it take to render videos with effects? -
How long does it take to render videos with effects?
Rendering time depends on three factors: the length of your video, the number and complexity of effects used, and your computer's hardware. Simple effects render quickly, while advanced ones like motion tracking or green screen may take longer. Filmora also supports hardware acceleration to speed things up.Rendering time depends on three factors: the length of your video, the number and complexity of effects used, and your computer's hardware. Simple effects render quickly, while advanced ones like motion tracking or green screen may take longer. Filmora also supports hardware acceleration to speed things up.Do video effects lower video quality?Video effects don't automatically lower quality, but it depends on how they're applied. Overusing heavy effects or applying them incorrectly may cause artifacts, reduce sharpness, or affect clarity. In most cases, your export settings, such as resolution and bitrate, have a bigger impact on final video quality than the effects themselves.Can I add multiple video effects to a video?Yes, you can layer as many effects as you like. For example, you might apply a filter, add motion tracking, and use a green screen effect all in one clip.How long does it take to render videos with effects?Rendering time depends on three factors: the length of your video, the number and complexity of effects used, and your computer's hardware. Simple effects render quickly, while advanced ones like motion tracking or green screen may take longer. Filmora also supports hardware acceleration to speed things up.Do video effects lower video quality?Do video effects lower video quality? -
Do video effects lower video quality?
Video effects don't automatically lower quality, but it depends on how they're applied. Overusing heavy effects or applying them incorrectly may cause artifacts, reduce sharpness, or affect clarity. In most cases, your export settings, such as resolution and bitrate, have a bigger impact on final video quality than the effects themselves.Video effects don't automatically lower quality, but it depends on how they're applied. Overusing heavy effects or applying them incorrectly may cause artifacts, reduce sharpness, or affect clarity. In most cases, your export settings, such as resolution and bitrate, have a bigger impact on final video quality than the effects themselves.Can I add multiple video effects to a video?Can I add multiple video effects to a video? -
Can I add multiple video effects to a video?
Yes, you can layer as many effects as you like. For example, you might apply a filter, add motion tracking, and use a green screen effect all in one clip.Yes, you can layer as many effects as you like. For example, you might apply a filter, add motion tracking, and use a green screen effect all in one clip.How long does it take to render videos with effects?How long does it take to render videos with effects? -
How long does it take to render videos with effects?
Rendering time depends on three factors: the length of your video, the number and complexity of effects used, and your computer's hardware. Simple effects render quickly, while advanced ones like motion tracking or green screen may take longer. Filmora also supports hardware acceleration to speed things up.Rendering time depends on three factors: the length of your video, the number and complexity of effects used, and your computer's hardware. Simple effects render quickly, while advanced ones like motion tracking or green screen may take longer. Filmora also supports hardware acceleration to speed things up.


 100% Security Verified | No Subscription Required | No Malware


