For the Best Results, Use the Latest Version.
-
Preparations
-
Account
-
Get Started & Basic Settings
-
Compatibility & Tech Specs
-
Performance Settings
-
-
Creating Projects
-
Creating New Projects
-
-
Importing & Recording
-
Video Editing for Windows
-
Basic Video Editing
- Enable/Disable Clip in Windows
- Magnetic Timeline for Windows
- Dual Monitor Setup for Video Editing on Windows
- Select All Clips on Timeline for Windows
- Manage Timeline and Tracks on Windows
- Auto Ripple for Windows
- Split & trim video
- Crop & Pan & Zoom Video in Filmora for Windows
- Compositing
- Change Video Speed on Windows
- Playing videos in reverse
- Mark In and Mark Out for Windows
- Markers for Windows
- Group editing
- Customizable Backgrounds for Videos and Images in Windows
- Video snapshot
- Using freeze frame
- Logo Reveal For Windows
- Auto Enhance in Filmora for Windows
- Applying drop shadow
- Adjustment layer for Windows
- Apply Transforming for Windows
- Video Editing Ruler – Windows
-
Advanced Video Editing
- Drawing Tools for Windows | Filmora Guide
- Create Multi-Camera Clip in Filmora for Windows
- Compound Clip for Windows
- Multi-Clip Editing for Windows
- Filmora Motion Blur | Windows
- Filmora Flicker Removal Guide | Windows
- Apply mask to video
- Creating a PIP Effect for Windows
- Keyframe Graph Editor for Windows
- Add animation keyframing for Windows
- Keyframe Path Curve for Windows
-
AI-Powered Video Editing
- Smart Scene Cut for Windows
- Smart Short Clips for Windows
- AI Face Mosaic for Windows
- Filmora AI Eye Contact- Windows
- AI Video Enhancer for Windows
- AI Text-to-Video for Windows
- Planar Tracking for Windows
- AI Idea to Video for Windows
- Filmora Image to Video for Windows
- Filmora Image to Prompt for Windows
- Instant Cutter Tool for Windows
- AI Extend
- Filmora AI Relight - Windows
- Filmora AI Image Enhancer Guide - Windows
- AI Script to Video Guide for Windows
- AI Text-Based Editing for Windows
- AI Mate Editing for Windows
- Create with instant mode
- ChatGPT Plugin - AI Copywriting
- AI Smart Cutout for Windows
- Lens correction on Windows
- Auto Reframe Video for Windows
- AI Portrait Cutout
- Scene detection feature
- AI Smart Masking for Windows
- Make motion tracking
- Video Stabilization for Windows
- AI Video/Photo Object Remover for Windows
- AI Smart Search for Windows
- AI Skin Tone Protection for Windows
- AI Image for Windows
- Chroma key (green screen)
- Super Slow Motion with Optical Flow for Windows
- Video Denoise for Windows
-
-
Audio Editing for Windows
-
Basic Audio Editing
-
Advanced Audio Editing
-
AI-Powered Audio Editing
- Auto synchronization
- AI Sound Effect
- Smart BGM Generation
- AI Voice Enhancer
- How to Execute AI Voice Cloning in Wondershare Filmora?
- AI Music Generator for Windows
- Audio To Video
- AI Vocal Remover for Windows
- AI Auto Beat Sync for Windows
- AI Audio Stretch for Windows
- AI Audio Denoise for Windows
- Silence detection
-
-
Text Editing for Windows
-
Basic Text Editing
-
Advanced Text Editing
-
AI-Powered Text Editing
-
-
Video Customizations
-
Video Effects
-
Audio Effects
-
Transitions
-
Stickers
-
Filters
-
Color Editing
-
Animations
-
Templates
-
Asset Center
-
-
Exporting & Share & Cloud Backup
Crop & Pan & Zoom Video in Filmora for Windows
The Crop and Pan & Zoom tools help you enhance video quality by refining framing and adding motion effects. The Crop tool lets you remove unwanted parts of a clip and adjust it to different aspect ratios like 16:9 or 9:16. Meanwhile, Pan & Zoom creates smooth movement between frames, allowing you to zoom in on details or pan across scenes, making your videos more dynamic, focused, and visually engaging.
Index
Crop Videos and Photos
The Crop tool allows you to remove unwanted parts of a video and adjust the visible frame. You can also set a specific aspect ratio depending on your platform or project needs.
Step 1. Initiate By Creating a Project
To begin, launch Filmora on your device and click the New Project option to create a project. Now, import the video to the tool’s interface and drag it to the editing timeline.
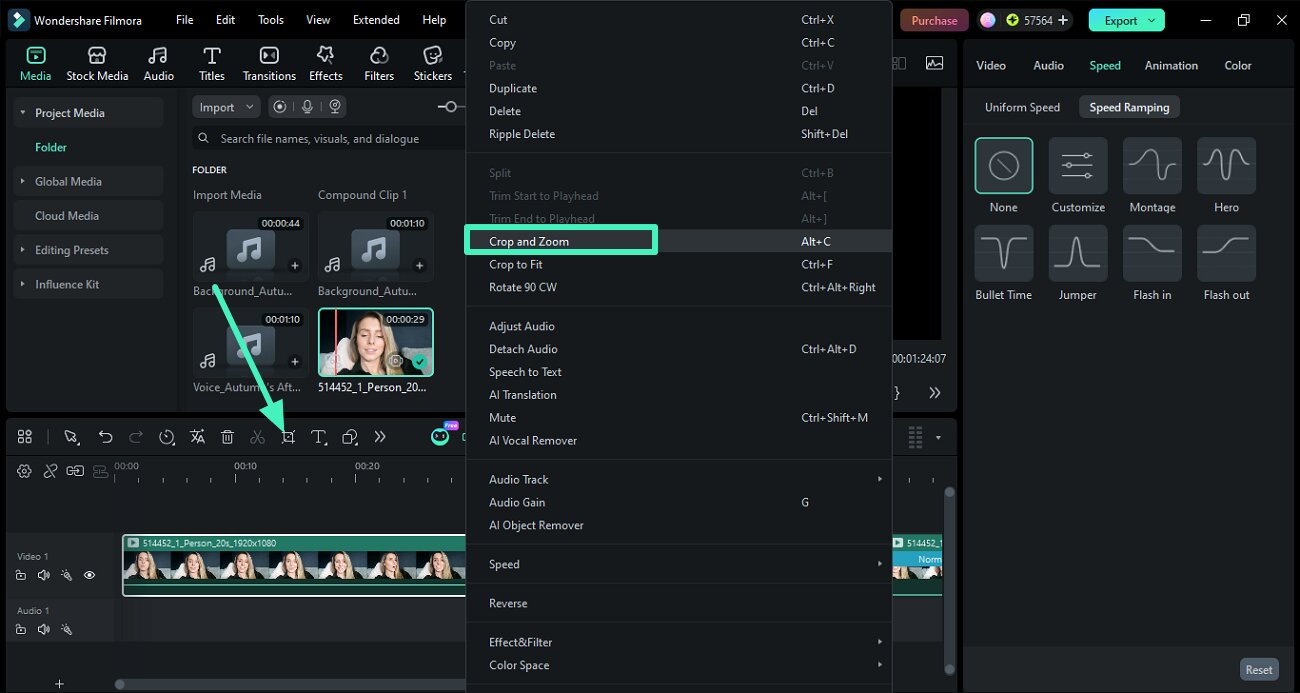
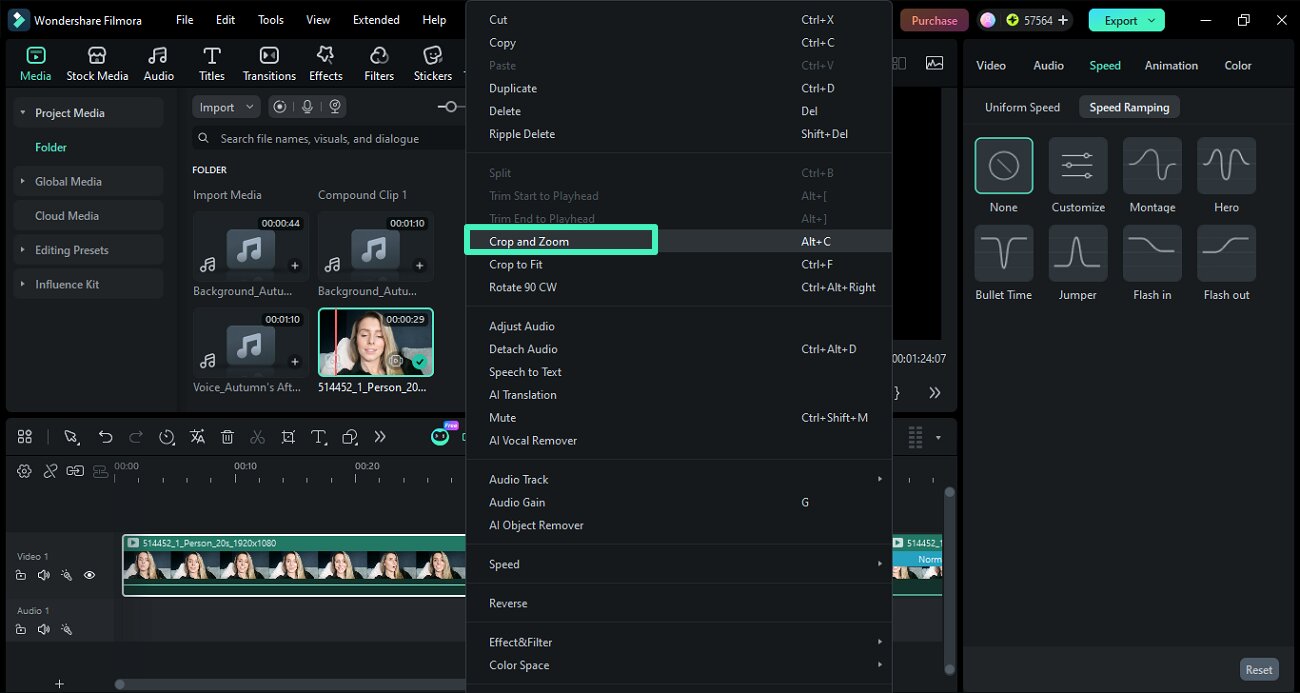
Step 2. Open Crop and Zoom Tool
Select a video clip in the timeline, then click the Crop icon to open the Crop and Zoom panel. Alternatively, right-click the clip and choose Crop and Zoom from the menu.
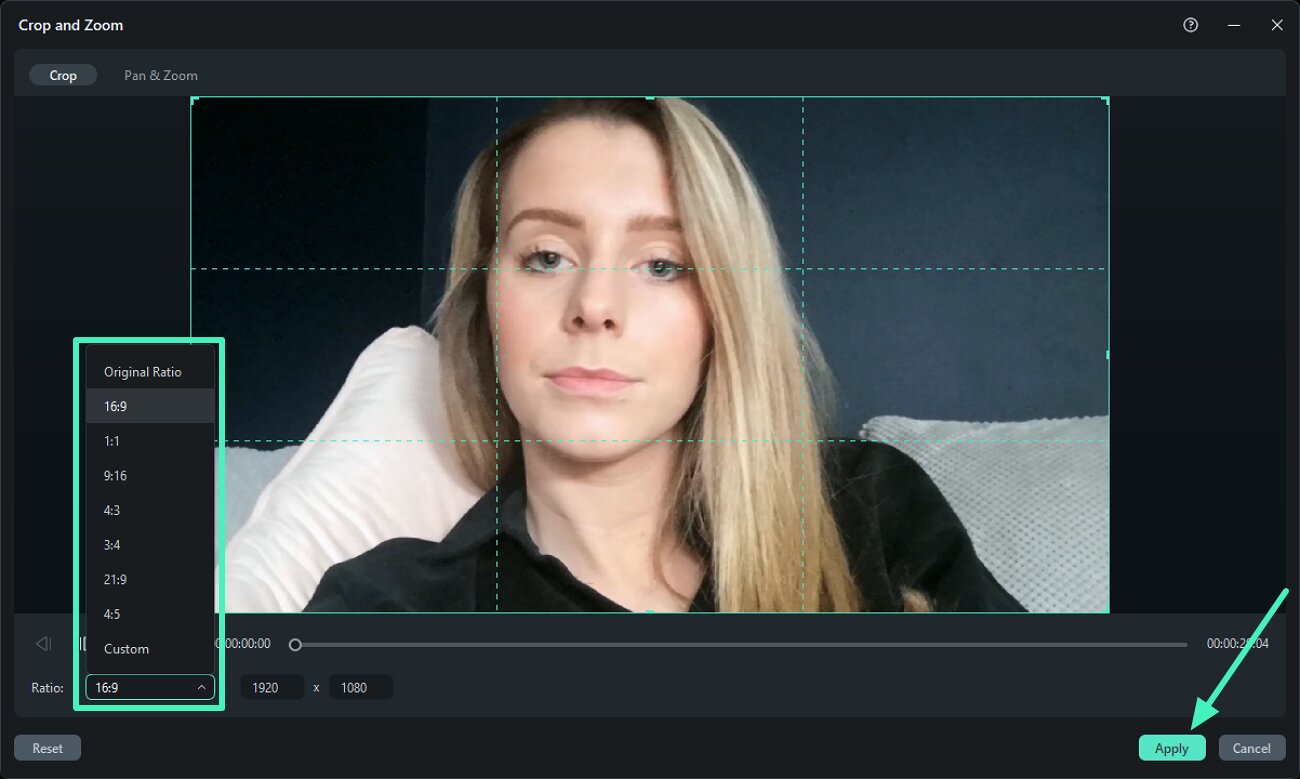
Step 3. Choose Aspect Ratio
Inside the Crop and Zoom panel, select a preset ratio such as 16:9, 4:3, 9:16, 1:1, 3:4, 21:9, 4:5, or set a custom size using the width and height fields. Press the Apply button to save the applied changes.
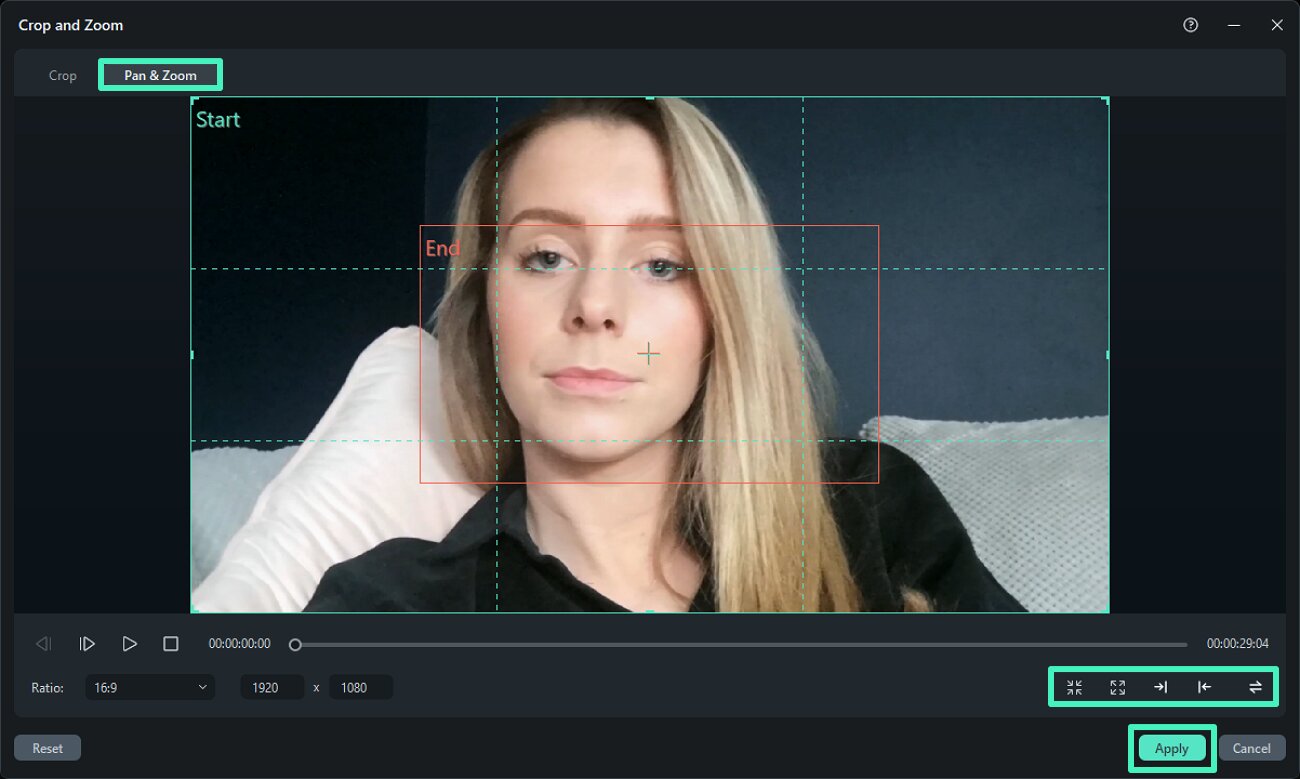
Pan & Zoom for Videos and Photos
The Pan & Zoom feature creates motion effects by moving or zooming between two points in a video. It helps highlight subjects or create cinematic transitions.
Step 1. Open Crop and Zoom Tool
Right-click the video in the timeline and select Crop and Zoom from the menu.
Step 2. Switch to Pan & Zoom Tab
Go to the Pan and Zoom tab, where you will see two frames: a green Start frame and a red End frame. Choose a mode such as Zoom In, Zoom Out, Pan Left, Pan Right, or Swap to control motion direction. Drag and resize the Start and End frames to define how the movement or zoom will appear. Finally, click Apply to save the effect and preview the smooth zoom or pan motion in your video.
Related Posts
Featured Articles
8 Reflection Photography Tips for iPhone You Should Know
Learn how to take reflection pictures on iPhone. Get tips on taking, editing, and enhancing your images with Filmora for perfect results.
Best 9 Screen Recorders for Android | With Pros and Cons
Which screen recorder is best for Android? Check our best screen video recorders for your Android phone and effortlessly catch your high-quality screen recordings!
How To Create Animated Clipart in PowerPoint
What is moving clipart called? Where can I find free animated clipart? How do you add animated clipart to the slide? Here are the answers to all your questions.
Recommended User Guide
Playing videos in reverse
Learn how to play videos in reverse in Filmora 11
Applying drop shadow
Learn how to apply Drop Shadow in Filmora 11
Auto Enhance in Filmora for Windows
Learn how to use Auto Enhance in Filmora 11
