For the Best Results, Use the Latest Version.
-
Preparations
-
Account
-
Get Started & Basic Settings
-
Compatibility & Tech Specs
-
Performance Settings
-
-
Creating Projects
-
Creating New Projects
-
-
Importing & Recording
-
Video Editing for Windows
-
Basic Video Editing
- Enable/Disable Clip in Windows
- Magnetic Timeline for Windows
- Dual Monitor Setup for Video Editing on Windows
- Select All Clips on Timeline for Windows
- Manage Timeline and Tracks on Windows
- Auto Ripple for Windows
- Split & trim video
- Crop & Pan & Zoom Video
- Compositing
- Change video playback speed
- Playing videos in reverse
- Mark In and Mark Out for Windows
- Markers for Windows
- Group editing
- Customizable Backgrounds for Videos and Images in Windows
- Video snapshot
- Using freeze frame
- Logo Reveal For Windows
- Apply auto enhance
- Applying drop shadow
- Adjustment layer for Windows
- Transforming
- Video Editing Ruler – Windows
-
Advanced Video Editing
- Drawing Tools for Windows | Filmora Guide
- Create Multi-Camera Clip
- Compound Clip for Windows
- Multi-Clip Editing for Windows
- Filmora Flicker Removal Guide | Windows
- Apply mask to video
- Creating a PIP effect
- Keyframe Graph Editor for Windows
- Add animation keyframing for Windows
- Keyframe Path Curve for Windows
-
AI-Powered Video Editing
- Smart Scene Cut for Windows
- Smart Short Clips for Windows
- AI Face Mosaic for Windows
- AI Video Enhancer for Windows
- AI Text-to-Video for Windows
- Planar Tracking for Windows
- AI Idea to Video for Windows
- Filmora Image to Video for Windows
- Filmora Image to Prompt for Windows
- Instant Cutter Tool for Windows
- AI Extend
- Filmora AI Relight - Windows
- Filmora AI Image Enhancer Guide - Windows
- AI Script to Video Guide for Windows
- AI Text-Based Editing for Windows
- AI Mate Editing for Windows
- Create with instant mode
- ChatGPT Plugin - AI Copywriting
- AI Smart Cutout
- Lens correction on Windows
- Auto reframe video
- AI Portrait Cutout
- Scene detection feature
- AI Smart Masking for Windows
- Make motion tracking
- Video Stabilization for Windows
- AI Video/Photo Object Remover for Windows
- AI Smart Search for Windows
- AI Skin Tone Protection for Windows
- AI Image for Windows
- Chroma key (green screen)
- Super Slow Motion with Optical Flow for Windows
- Video Denoise for Windows
-
-
Audio Editing for Windows
-
Basic Audio Editing
-
Advanced Audio Editing
-
AI-Powered Audio Editing
-
-
Text Editing for Windows
-
Basic Text Editing
-
Advanced Text Editing
-
AI-Powered Text Editing
-
-
Video Customizations
-
Video Effects
-
Audio Effects
-
Transitions
-
Stickers
-
Filters
-
Color Editing
-
Animations
-
Templates
-
Asset Center
-
-
Exporting & Share & Cloud Backup
Apply Transforming for Windows
This guide introduces how to apply the transform feature while editing a video.
Step-by-step Guide on How to Activate Transform
You can follow the steps below to activate the feature and transform your clip.
Step 1: Import media to the application
After you launch Filmora, you can drag and drop your files to the timeline.
Step 2: Activate the transform feature
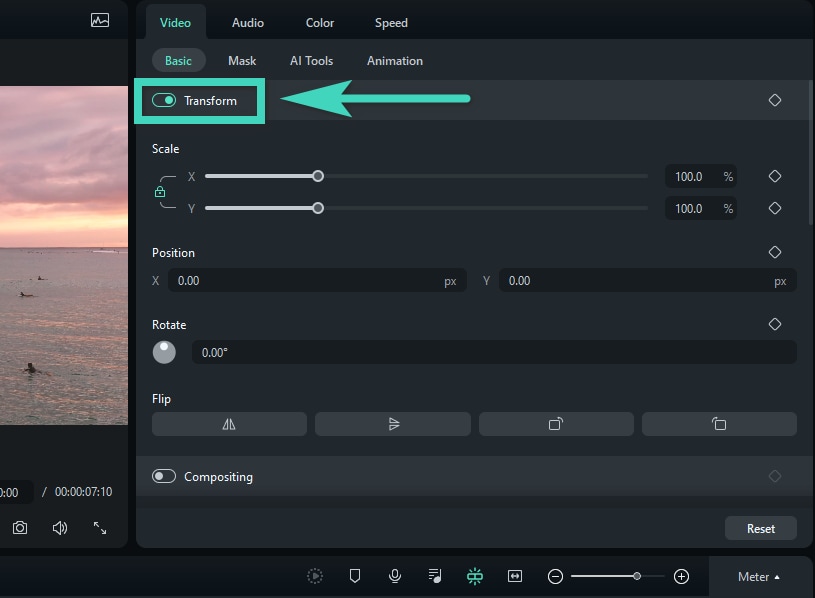
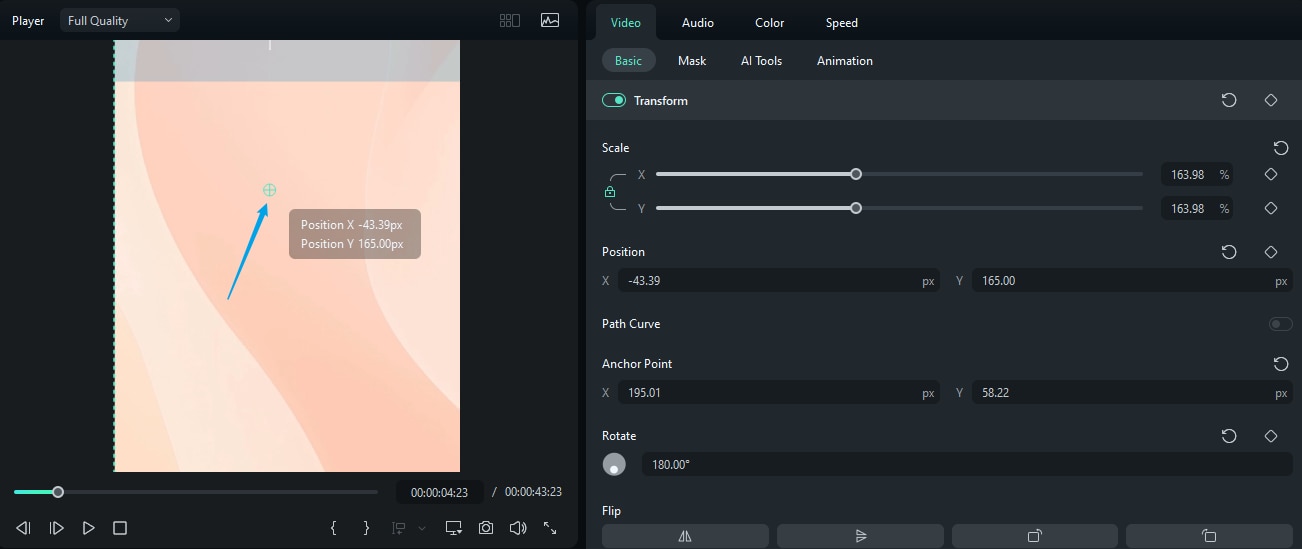
Click the clip in the timeline and find Transform in Video>Basic in the property panel on the right side of the interface. Then, click the button beside Transform to start editing.
Four Uses of Transform
The following are four uses of transform you can apply to edit your videos.
1. Resize Videos
To change the display size of a video, you can use the scaling options in the Transform panel. The updated interface provides two scaling modes:
Uniform Scaling Mode: When the "Uniform Scaling" option is enabled, you can adjust the overall scale of your video while maintaining the original aspect ratio. Simply drag the Width Scaling slider to proportionally resize both width and height simultaneously.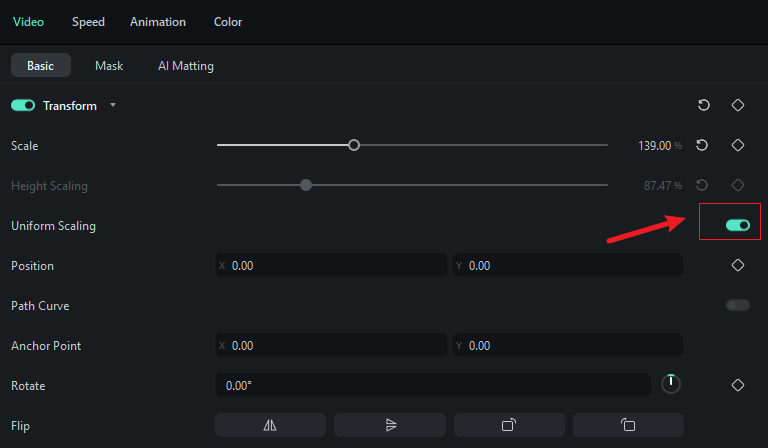
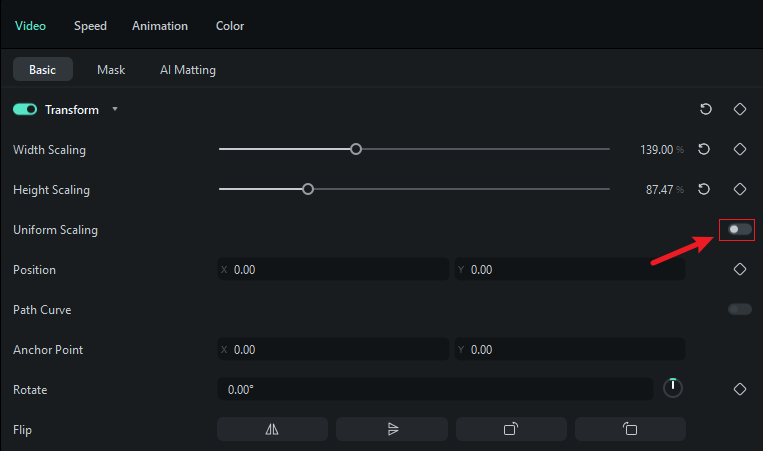
Independent Scaling Mode: When "Uniform Scaling" is disabled, you gain full control over video dimensions:
- Width Scaling: Adjust the horizontal size of your video independently
- Height Scaling: Adjust the vertical size of your video independently
This allows you to freely modify the aspect ratio and create custom video dimensions as needed for your project.
2. Change Position
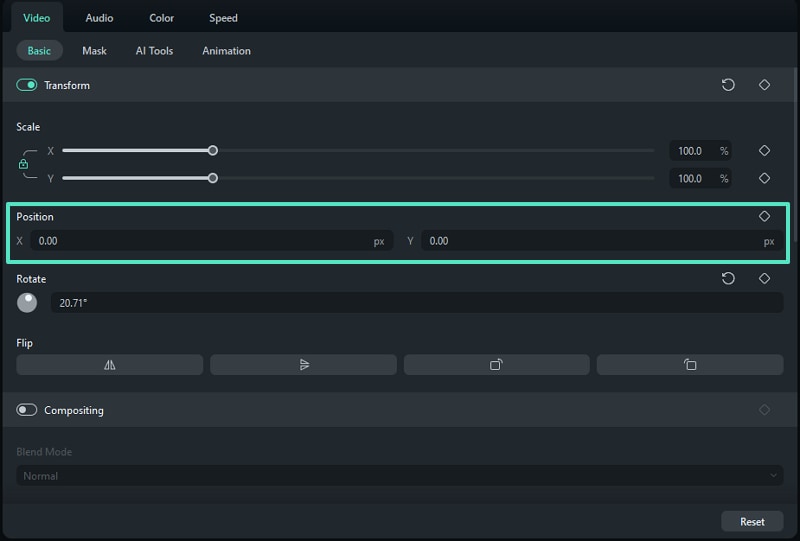
You can apply the Position feature to change the location of the video. Insert numerical values in the Position to adjust where the video is displayed on the screen.
3. Flip or Rotate Videos
Under the Flip tab, there are four choices:
1) Click the Flip Horizontal icon to reverse the clip from left to right, or click the Flip Vertical icon to turn the clip upside down;
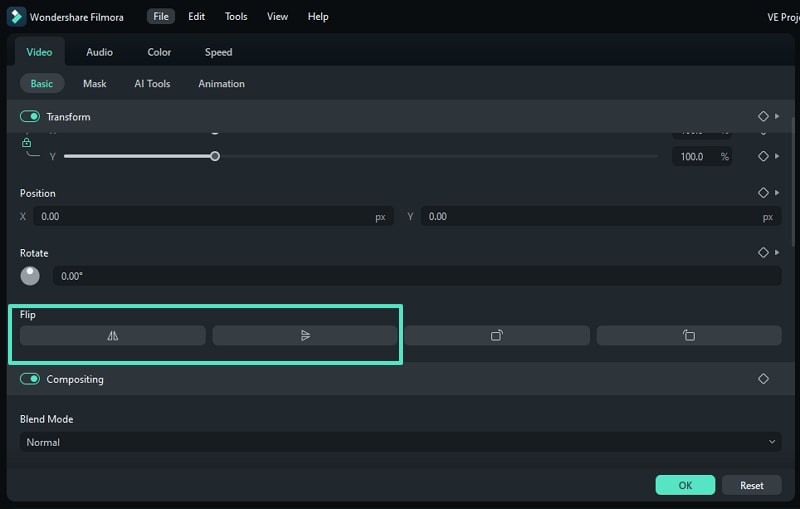
2) Click the rotate Clockwise or Counterclockwise icons to rotate the clip directly;
3) Otherwise, insert a value in the box under the Rotate tab, or drag the dot in the circle, to adjust the angle of the clip.
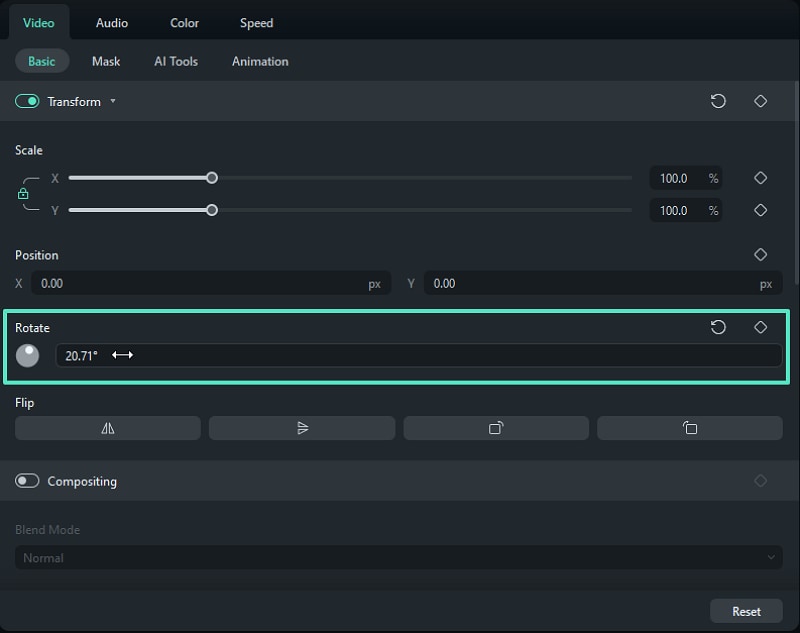
Tip: When you put the mouse cursor in the Rotate value box, the cursor will become a double-ended arrow. If you move the cursor to right, the video clip will rotate clockwise; if move to the left, the clip will rotate counterclockwise.
4. Add Keyframes
Keyframe is a customized way to add animation of transform. Here are the steps to add keyframes to the video.
Step 1: Add the start keyframe
Drag the playhead to where you want to add a keyframe. Then, change the settings in the Transform tab to meet your needs. When you are happy with the changes, click the diamond icon beside the features. If you click the diamond icon beside Transform on the toolbar, all features in the tab will be selected as the feature of this keyframe.
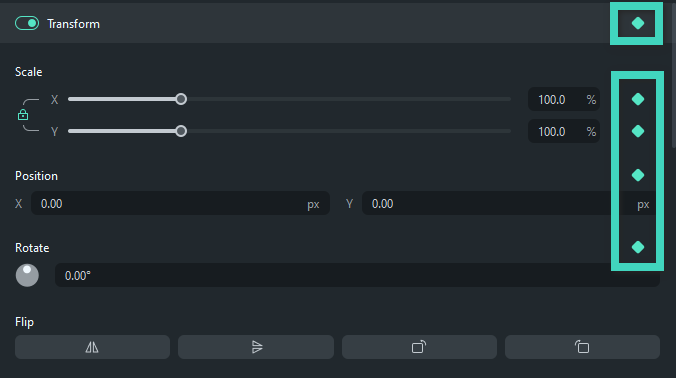
Step 2: Add more keyframes
Repeat the step above to add other keyframes. There is no limit to the maximum of keyframes you add, but the minimum number is two. You need at least one start keyframe and one end keyframe.
When you add all keyframes you need, Filmora will automatically analyze the changes from one to another and output the smooth animation of the transform.
Tips: Now, you can also customize the anchor point position.
The anchor point is the reference center for transformations, and it is set by default at the center of the video. After customizing the anchor point, all transformations will be centered around the new anchor point.
There are two ways to modify the anchor point position:
1- In the property panel, find the Anchor Point and enter the coordinate values.
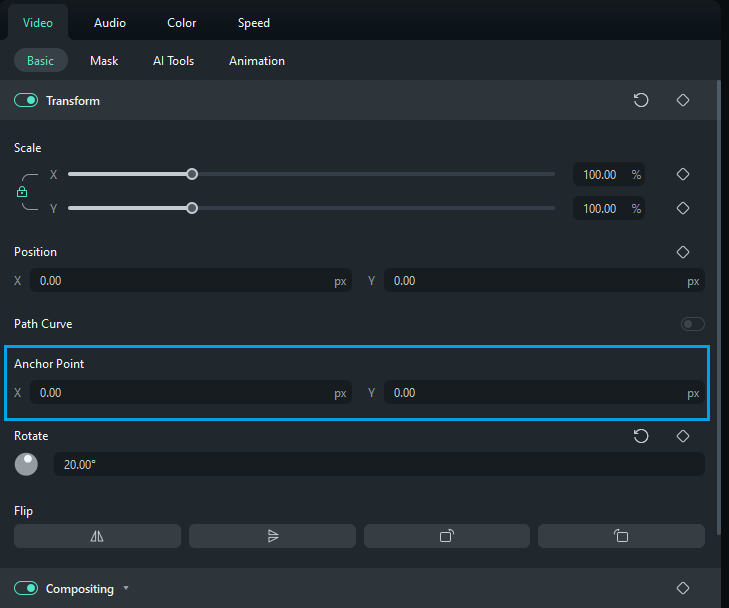
2- After selecting the video, click on the preview screen and directly drag the anchor point icon to adjust the position.
Bonus: Learn more about how to flip video on a Mac or iPhone with Filmora.
Related Posts
Featured Articles
Healthcare Facebook Ads: Compliance, Targeting, and Creative Tips
Start creating healthcare Facebook ads that instantly catch attentio. Get tips on targeting strategies and design ads that boost your medical and wellness campaigns.
How to Make AI CGI Commercial Ad
CGI in advertising helps brands make memorable content for social media and beyond. Check out our guide to learn how to create CGI ads and see examples that work.
Top 10 Audio Normalizers for Windows - Don't Miss It!
Audio normalization is a feature that can be used to increase the overall volume of a file. There are the top 10 audio normalizers that offer sound normalization without diminishing the sound quality of a file.
Recommended User Guide
Adjustment layer for Windows
This guide shows how to create adjustment layers and use them to apply the same effect to multiple clips on the timeline.
Auto Ripple for Windows
With Filmora's Auto Ripple functionality, users do not need to remove them manually.
Enable/Disable Clip in Windows
When working on professional projects as a video editor, turning on and off clips helps with optimized editing. Hence, Wondershare Filmora offers this functionality as a professional editing software.


