For the Best Results, Use the Latest Version.
-
Preparations
-
Account
-
Get Started & Basic Settings
-
Compatibility & Tech Specs
-
Performance Settings
-
-
Creating Projects
-
Creating New Projects
-
-
Importing & Recording
-
Video Editing for Windows
-
Basic Video Editing
- Enable/Disable Clip in Windows
- Magnetic Timeline for Windows
- Dual Monitor Setup for Video Editing on Windows
- Select All Clips on Timeline for Windows
- Manage Timeline and Tracks on Windows
- Auto Ripple for Windows
- Split & trim video
- Crop & Pan & Zoom Video
- Compositing
- Change video playback speed
- Playing videos in reverse
- Mark In and Mark Out for Windows
- Markers for Windows
- Group editing
- Customizable Backgrounds for Videos and Images in Windows
- Video snapshot
- Using freeze frame
- Logo Reveal For Windows
- Apply auto enhance
- Applying drop shadow
- Adjustment layer for Windows
- Transforming
- Video Editing Ruler – Windows
-
Advanced Video Editing
- Drawing Tools for Windows | Filmora Guide
- Create Multi-Camera Clip
- Compound Clip for Windows
- Multi-Clip Editing for Windows
- Filmora Motion Blur | Windows
- Filmora Flicker Removal Guide | Windows
- Apply mask to video
- Creating a PIP effect
- Keyframe Graph Editor for Windows
- Add animation keyframing for Windows
- Keyframe Path Curve for Windows
-
AI-Powered Video Editing
- Smart Scene Cut for Windows
- Smart Short Clips for Windows
- AI Face Mosaic for Windows
- Filmora AI Eye Contact- Windows
- AI Video Enhancer for Windows
- AI Text-to-Video for Windows
- Planar Tracking for Windows
- AI Idea to Video for Windows
- Filmora Image to Video for Windows
- Filmora Image to Prompt for Windows
- Instant Cutter Tool for Windows
- AI Extend
- Filmora AI Relight - Windows
- Filmora AI Image Enhancer Guide - Windows
- AI Script to Video Guide for Windows
- AI Text-Based Editing for Windows
- AI Mate Editing for Windows
- Create with instant mode
- ChatGPT Plugin - AI Copywriting
- AI Smart Cutout
- Lens correction on Windows
- Auto reframe video
- AI Portrait Cutout
- Scene detection feature
- AI Smart Masking for Windows
- Make motion tracking
- Video Stabilization for Windows
- AI Video/Photo Object Remover for Windows
- AI Smart Search for Windows
- AI Skin Tone Protection for Windows
- AI Image for Windows
- Chroma key (green screen)
- Super Slow Motion with Optical Flow for Windows
- Video Denoise for Windows
-
-
Audio Editing for Windows
-
Basic Audio Editing
-
Advanced Audio Editing
-
AI-Powered Audio Editing
-
-
Text Editing for Windows
-
Basic Text Editing
-
Advanced Text Editing
-
AI-Powered Text Editing
-
-
Video Customizations
-
Video Effects
-
Audio Effects
-
Transitions
-
Stickers
-
Filters
-
Color Editing
-
Animations
-
Templates
-
Asset Center
-
-
Exporting & Share & Cloud Backup
HDR
The HDR (Highly Dynamic Range) function mainly targets semi-professionals or professionals whose devices support HDR. HDR materials shot by users or obtained from other channels can be edited, previewed, and exported in Filmora.
Index
Key Functional Features
HDR displays a more comprehensive range of brightness from the darkest to the brightest. In addition, it accommodates more brightness, shadow detail, and saturation for a more natural and realistic display without compromising tones in bright or dark areas.
Note:
You can switch to HDR export when the current device meets the GPU acceleration conditions.Color Space Setting
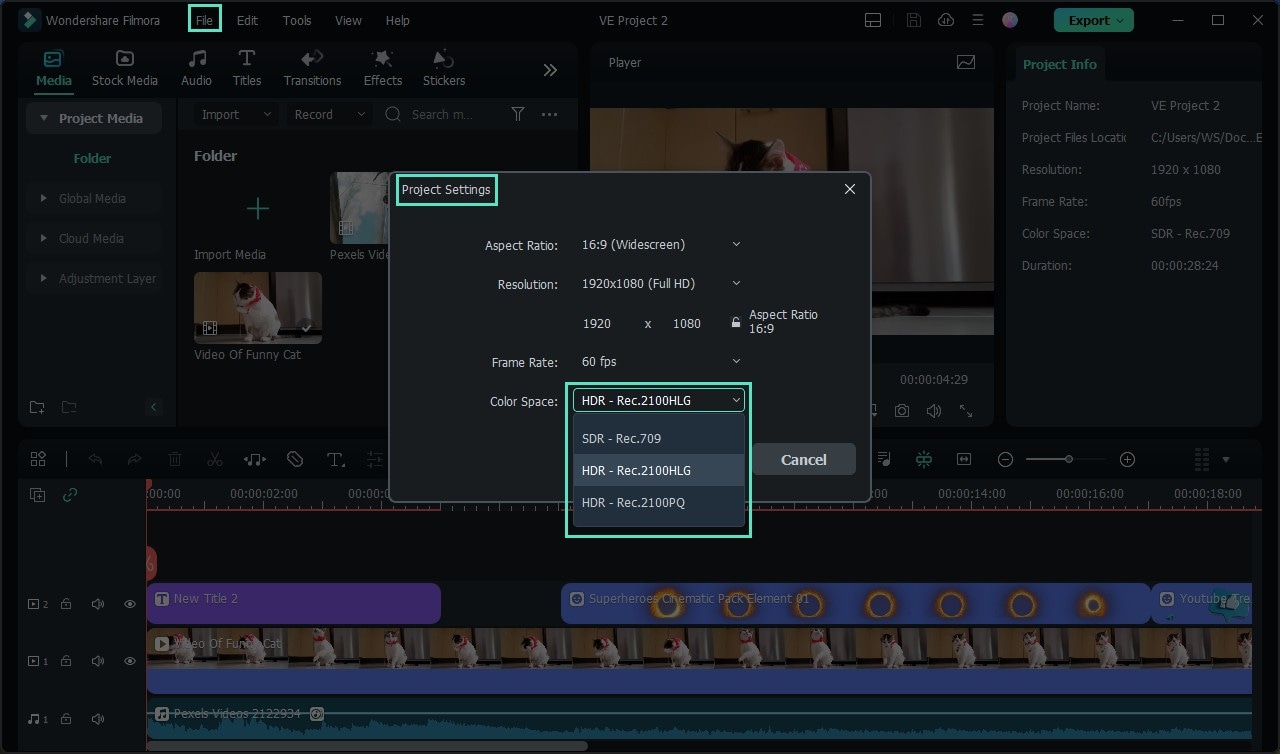
Project Settings
- You can select the preferred HDR option value in the Color Space drop-down menu by clicking File > Project Settings. The default value is SDR - Rec.709.
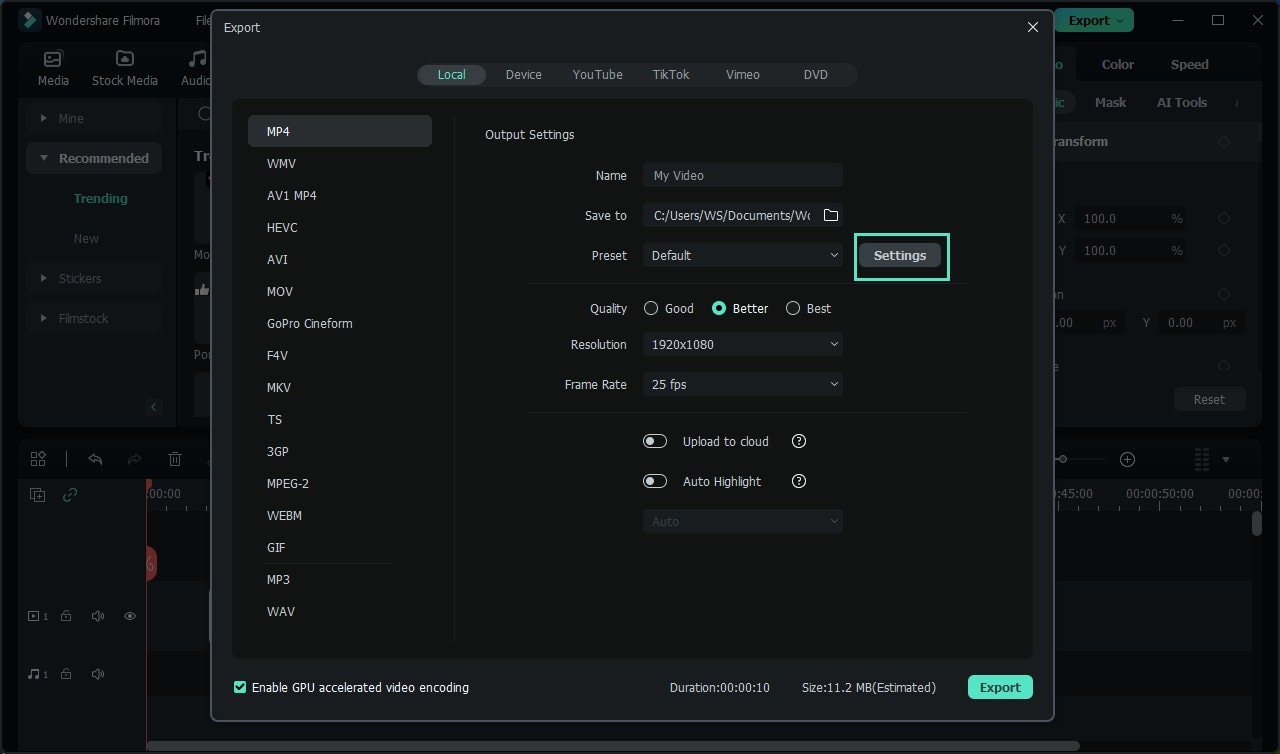
Export Color Space Option
- • You can change Export Color Space to the export settings page: SDR - Rec.709、HDR - Rec.2100HLG、HDR - Rec.2100PQ. You can switch to HDR export when the current device meets the GPU acceleration conditions.
Tips:
The MP3 format export page of Filmora for Windows does not have this setting. The MP3/M4A format of Filmora for Mac does not have this setting.Export Color Space
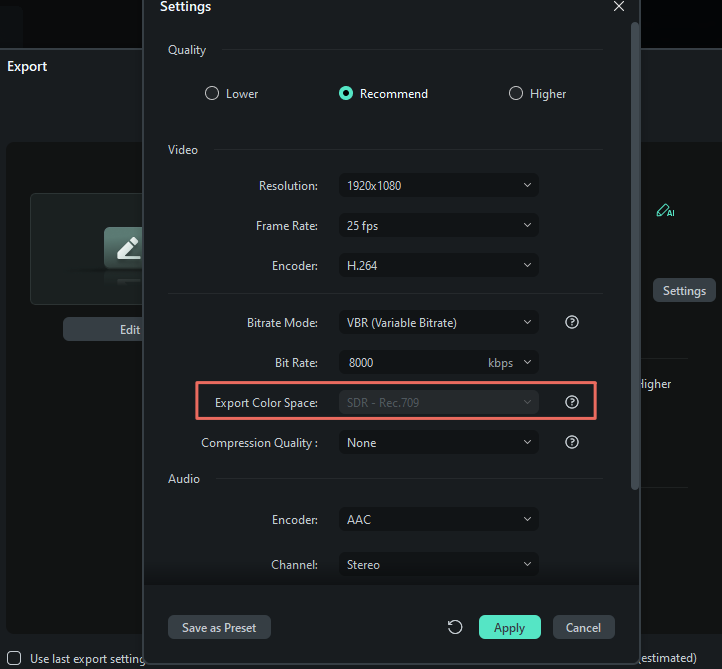
On the Export interface, click SETTINGS. When the Export Color Space is always on, the current device has enabled GPU acceleration (GPU acceleration in the preferences).
If the Export Color Space option displays in gray, GPU acceleration is not available on the current device (GPU acceleration in the preferences). If either of these two conditions is not met, the option displays in gray, and the option value is the default when the option displays in gray (SDR - Rec.709).
Functional Limitations and Reminders
Timeline Rendering
- After rendering in HDR state, the player preview video clarity will be reduced.
GPU Support
- Enable GPU acceleration for preview, rendering, and export. Filmora has a corresponding pop-up reminder on it. After the GPU settings for Windows are adjusted, please restart to take effect.
Export Speed
- The export speed of HDR video is about 4 times slower than that of SDR video.
Device Support
- The preview function of HDR is limited to the case that the device supports and HDR is on. If your device does not support or does not turn on HDR, Filmora will prompt a pop-up window.
Related Posts
Featured Articles
How to Animate Charts in After Effects?
Master After Effects chart animation with our tutorial, then discover Filmora's faster method: upload spreadsheet → instant animated charts. Compare AE vs Filmora. Try free!
What is the Audio Crossfade Transition and How to Use it in FCP
The audio crossfade transition effect in Final Cut Pro is a must-know for anyone who is looking to develop a career in video or audio editing.
Top 5 Video Editors To Embrace Thanksgiving Volunteering Moments
Want to share your Thanksgiving volunteering experience on social media? Then explore the article to get the video editor to help you create such stunning videos!
Recommended User Guide
Proxy video editing
What is Proxy Video Editing
GPU Driver Requirements and GPU Accelerated Rendering
This article provides insight into GPU Accelerated and Hardware Decoding/Encoding in Filmora and Filmora Media Encoder.
