Reaching a global audience can be tough when language and cultural differences get in the way. A localised video helps bridge these gaps, ensuring your message resonates with viewers worldwide. But what is video localization, and why does it matter?
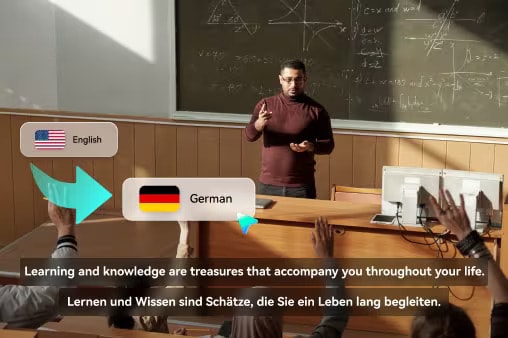
Video localization means adapting your videos to suit different languages, regions, and cultures. This approach can be done through translation, subtitling, or dubbing. The right method makes your content more accessible, engaging, and relatable to diverse audiences.
In this guide, we'll break down the techniques for video localization. It'll show you how to localize videos using Filmora and discuss the benefits and challenges you may face. Let's get started!
In this article
Part 1. Techniques & Methods of Video Localization
Reaching international audiences requires more than just great content. When you localize video content, you need to ensure your message is clear to viewers across different regions. To do this, you need to adapt your videos to their language and culture.
Here are the three primary techniques for video localization:
- Translation (The Foundation): Translation is the starting point of video localization. It involves converting the script or dialogue into the target language. The translated content then forms the basis for other methods like dubbing and subtitling.
- Dubbing (Localized Voiceovers): Dubbing uses the translated script to replace the original audio with localized voiceovers. By matching tone, timing, and emotion, dubbing creates a natural and immersive viewing experience.
- Subtitling (On-Screen Text): Subtitling also uses translated text but displays it as on-screen captions while keeping the original audio intact. Subtitles allow viewers to follow the content in their preferred language without altering the voiceovers.
Part 2. How to Localize Your Video with Filmora
Now that you understand the techniques for creating a localised video, it's time to put them into action. Localizing videos may seem complex, but with the right tools, it becomes much easier. One such tool is Wondershare Filmora, a video editing software that can help you do this process.
Key Features
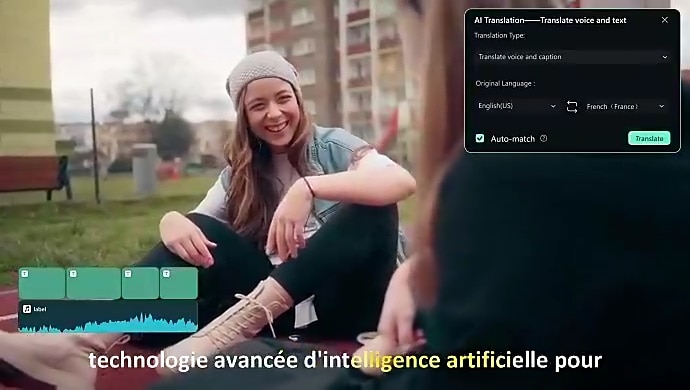
- AI Video Translation: Filmora simplifies the video localization process with its AI Video Translation feature. It allows you to translate, add dubbing, and create subtitles—all in one platform.
- Audio Translation: Filmora can auto-translate your video's audio into the target language. This feature eliminates the need for manual transcription or external tools.
- Support Many Languages: Filmora supports translations for 23 languages with great accuracy. These languages include English, German, Spanish, Chinese, Japanese, and Hindi.
- Voice Cloning: Filmora has an AI Voice Cloning feature that helps you replicate your voice. You can use it to localize the voiceovers (dubbing) while retaining your voice's tone.
- Lip-Sync: To make dubbing even more seamless, Filmora's lip-sync feature matches the localized voiceover with the speaker's mouth movements.
- Speech-to-Text: Its Speech-to-Text feature lets you convert spoken dialogue in your video into accurate, time-synced captions or subtitles. It supports multiple languages, making it a great addition to your localization workflow.
- Subtitle Editor: Adding subtitles is effortless with Filmora's built-in subtitle editor. You can auto-generate subtitles, edit the text, and customize their appearance.
How to Use Filmora to Localize Your Videos
Filmora offers three main methods for localizing video content: AI Video Translation, Voice Cloning, and Speech-to-Text. Here are the guides to help you localize your videos:
Method 1. AI Video Translation: Translating, Dubbing, and Subtitling All at Once
Filmora's AI Translation feature lets you translate, add dubbing, and insert subtitles to your video at once. Here's a simple step-by-step guide on how to use Filmora's AI Translation feature to create a localised video:
Step 1 Start a New Project and Import Your Video
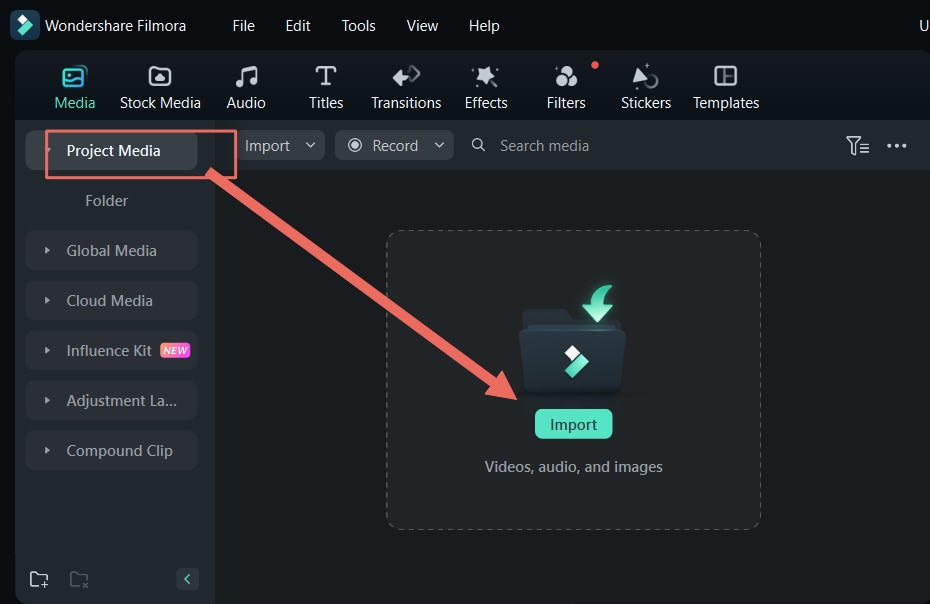
Launch the latest version of Wondershare Filmora on your PC. To start editing the video, go to Create Project > New Project. Then, go to Media > Project Media > Import to upload the video you want to localize.
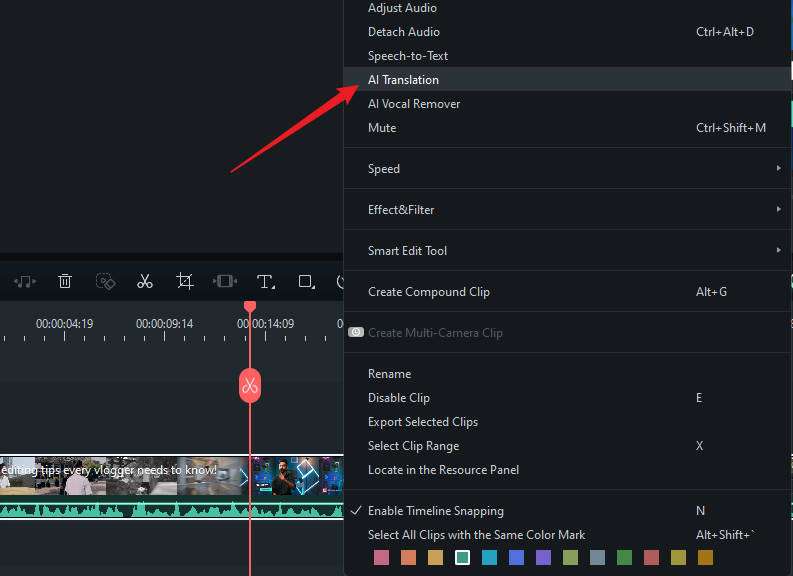
Step 2 Access AI Translation Tool
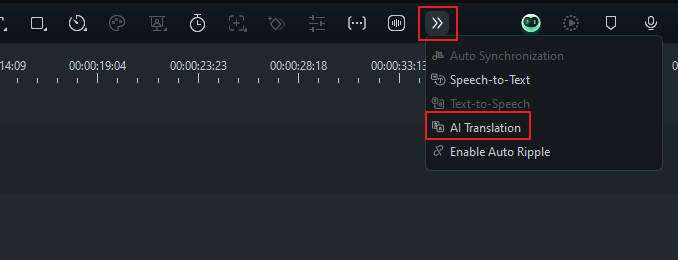
Drag and drop the video file to the timeline and access the AI Translation feature:
- Click the More icon in the toolbar to expand the options and select AI Translation.
- Or, right-click on your video clip in the timeline and choose AI Translation from the menu.
Step 3 Adjust Your Translation Settings
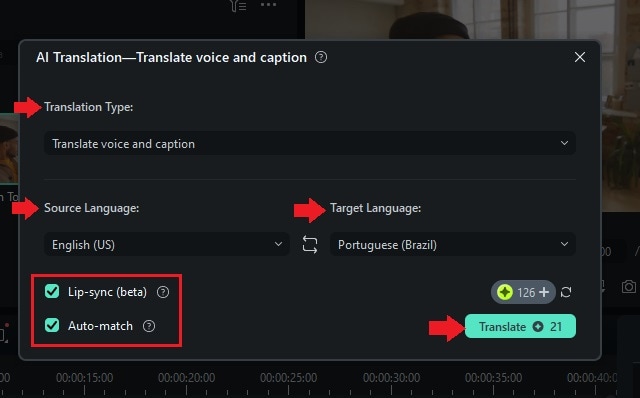
When the settings window appears, configure the following options:
- Translation Type: Choose between “Translate voice and caption” or “Only translate caption.”
- Source Language: Select the language spoken in your video.
- Target Language: Pick the language you want to translate into.
- Lip Sync: Enables dubbing that matches the audio with the speaker's lip movements.
- Auto Match: This tool auto-syncs the transcription with the video timeline.
After setting your preferences, click the Translate button to begin localizing the video.
Step 4 Preview the Translation
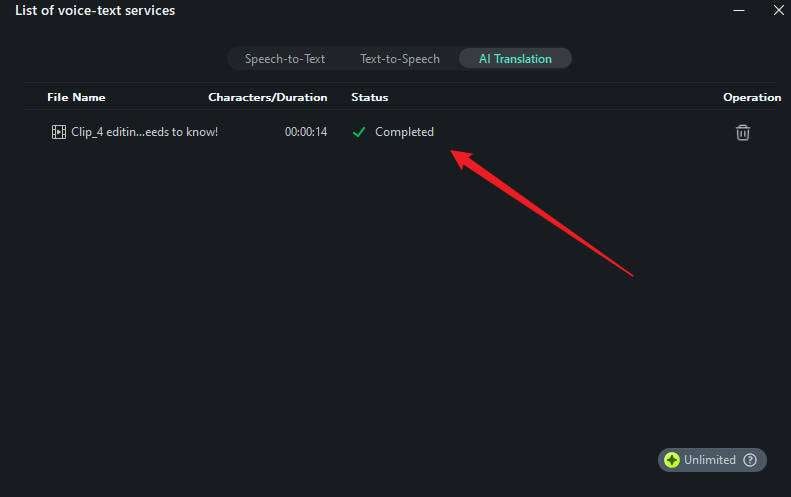
Once the translation is finished, a progress bar will indicate the status.
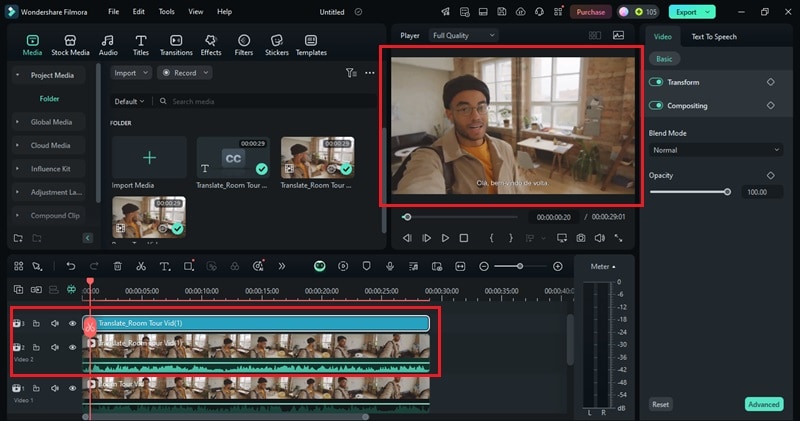
You'll return to the editing workspace with a new translation track added to the timeline. This track includes dubbed audio by cloning the speaker's voice in the video along with translated subtitles. Both dub and subtitles are synchronized with the speaker's lip movements.
Step 5 Export Your Localised Video
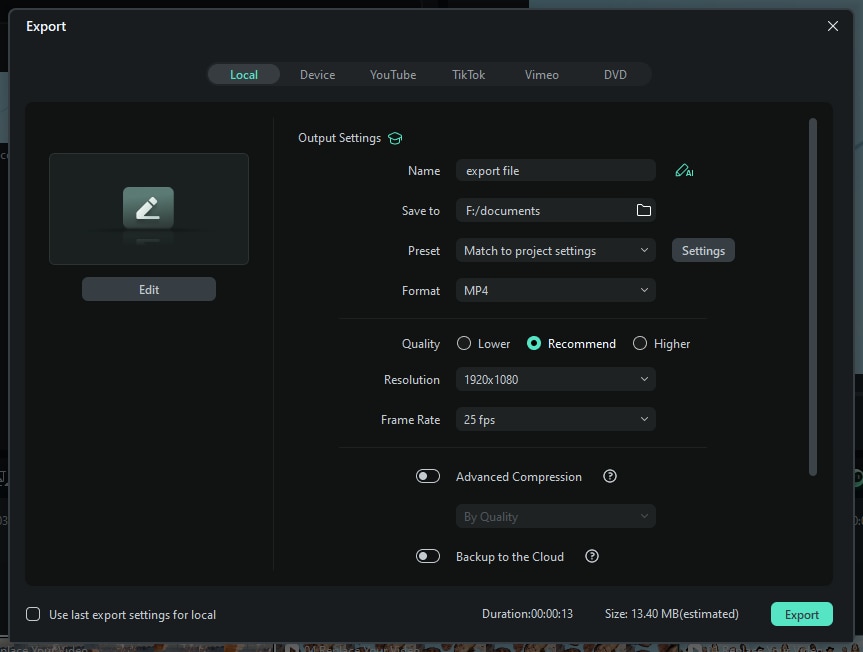
Once you're happy with the final edits, click the Export button. In the export window, adjust the settings, such as video resolution, format, and quality. Finally, click Export to save the localized video to your device.
Watch the video below to see how AI Video Translation works
Method 2. Using Speech-to-Text Feature to Add Subtitles
Use Speech-to-Text feature if you only want to add subtitles, without changing the voice. Follow these steps to create subtitles for your localized video using Filmora's Speech-to-Text (STT) feature.
Step 1 Access the Speech-to-Text Tool
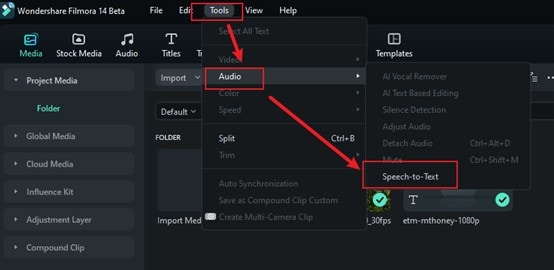
First, select the audio track in the timeline. Then, on the top menu bar, click on Tools > Audio > Speech-to-Text.
Step 2 Set Up the Speech-to-Text Parameters
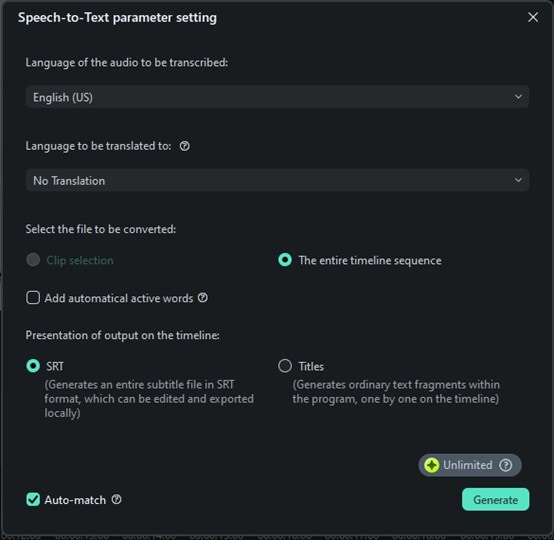
In the parameter settings, configure the following options:
- Language of the audio: Select the language spoken in the audio.
- Language to translate to: Choose the target language for subtitles.
- Auto Match: Enable this option to sync the transcription with the video timeline automatically.
Once all parameters are set, click Generate to begin creating the subtitles.
Step 3 Preview and Edit the Subtitles
When the process is complete, the subtitle track will appear in the video timeline. To make edits, double-click the subtitle track to open the Edit Subtitle window.
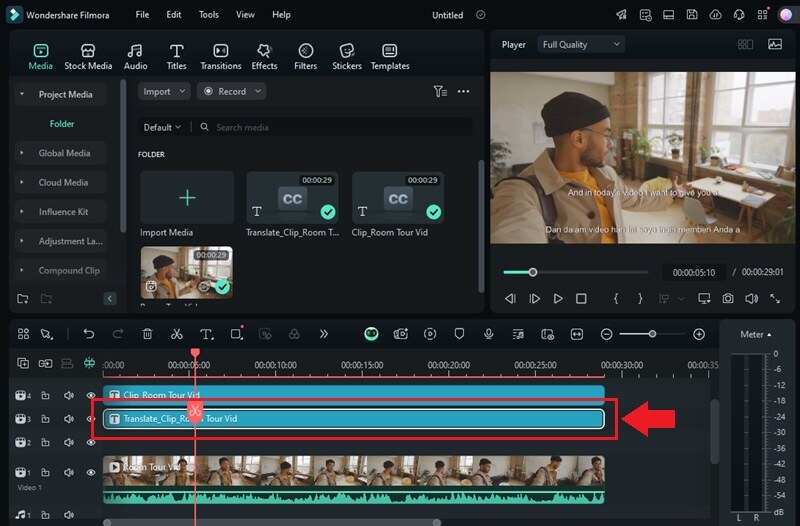
Here, review the text for any errors and make necessary changes. You can also customize the font, style, and appearance to align with your video's theme. Then, click Save to finalize the subtitles.
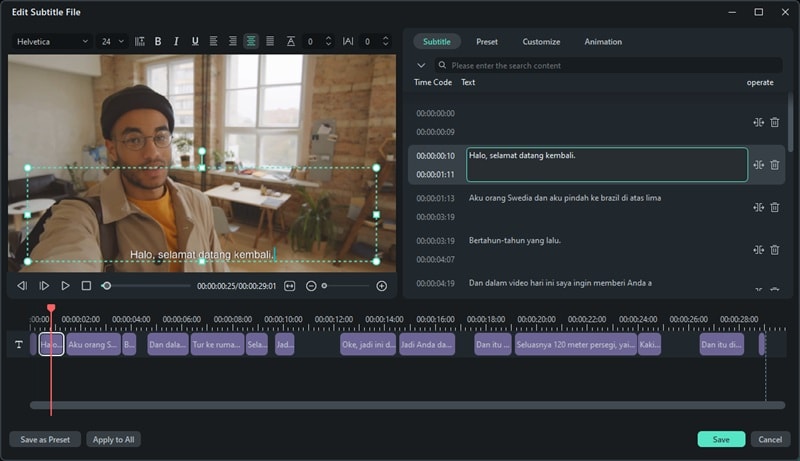
Check out the video below to see how the Speech-to-Text feature automatically generates subtitles.
Method 3. Using Voice Cloning Feature to Dubbing Your Video
If you only want to dub your video content, you can use Filmora's AI Voice Cloning and Text-to-Speech (TTS) features. Follow these steps to add dubbing voice to your localized videos using Filmora's AI tools:
Step 1 Access the AI Voice Cloning Tool
Start by navigating to the Titles tab, selecting a Text Template, and dragging it onto the timeline. Next, click on the Text track in the timeline to open the editing panel on the right. Locate the Text-to-Speech (TTS) option and select the Clone Voice tool to begin.
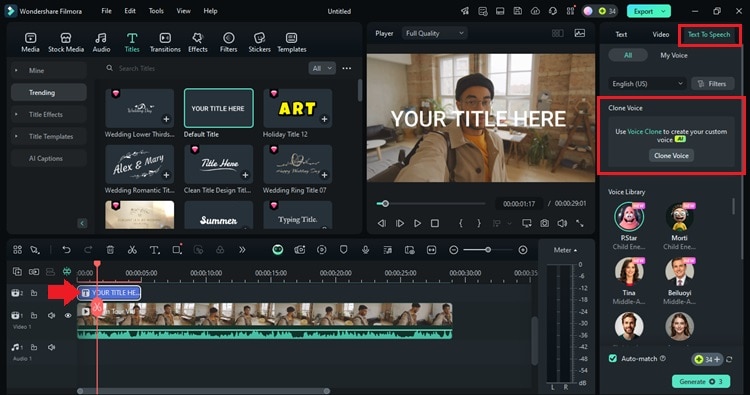
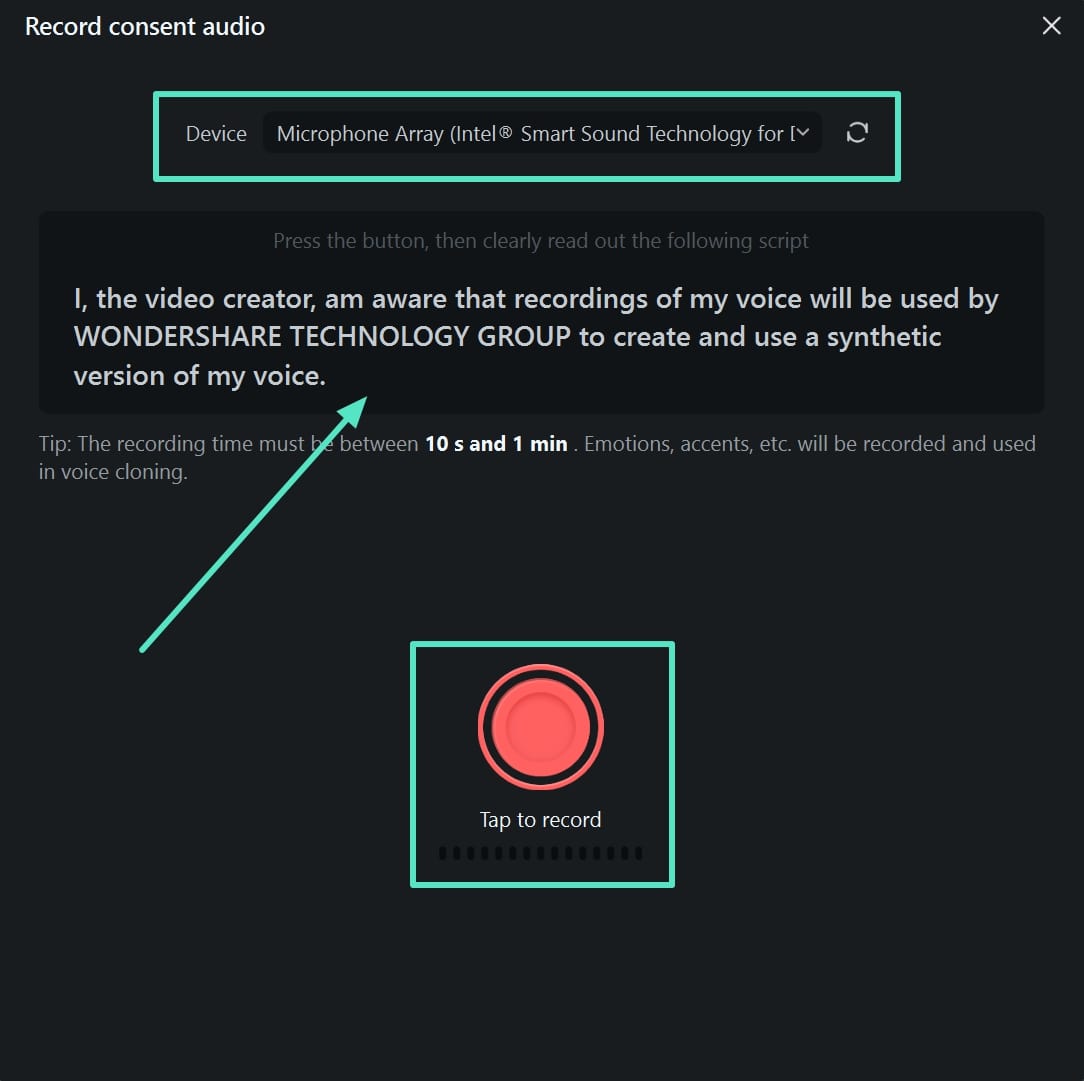
Step 2 Record Consent Audio
A new window will appear, where you'll need to accept the terms of use to enable voice cloning. Select the Record Consent Audio option to proceed. Choose your recording device and read the text provided on the screen. Hit the Red Record button to start recording your voice.
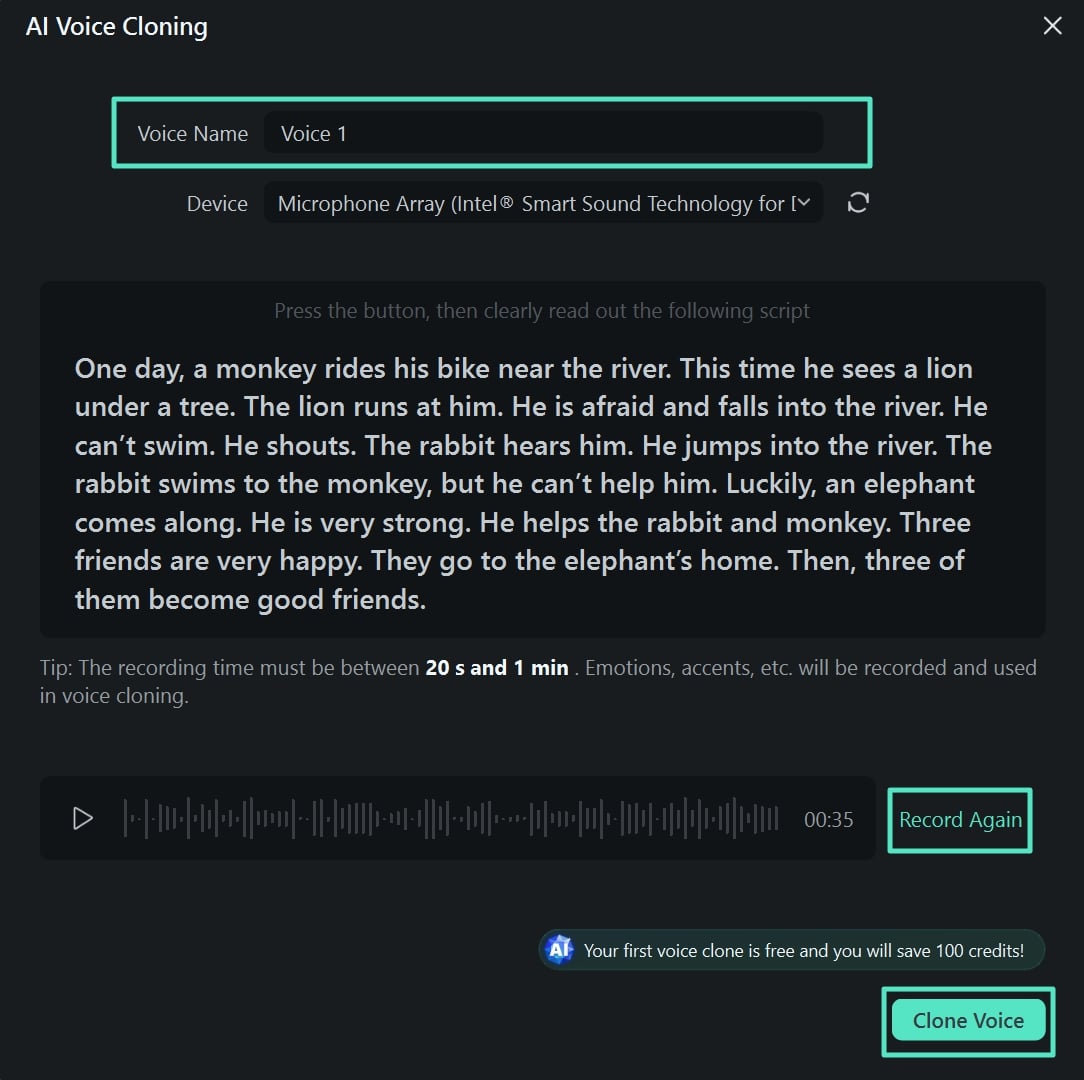
Step 3 Finalize and Clone Your Voice
During the cloning process, you'll need to record two short paragraphs. Once completed, name your voice profile and select Clone Voice to process it. If needed, you can use the Record Again option to refine the recording before proceeding.
Step 4 Apply Your Cloned Voice Using Text-to-Speech
Once the cloning process is complete, your custom voice will appear in the TTS panel on the right. Select your Cloned Voice, type in the text you want converted to speech, and click Generate to add the dubbing to your video.
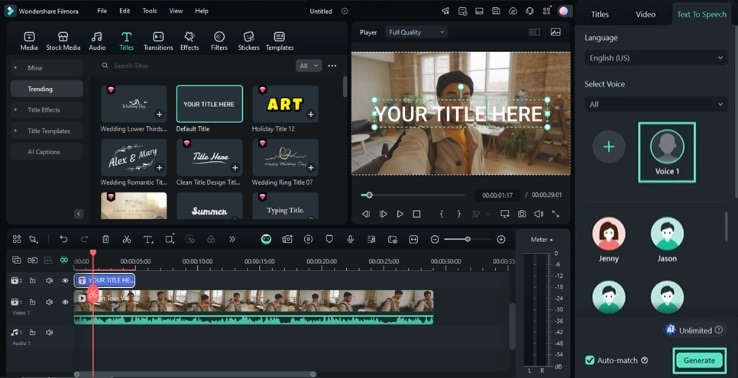
Watch the video below to see how the Voice Cloning feature can dub your video with a custom voice.
Part 3. Benefits and Challenges in Video Localization
Video localisation is a powerful way to connect with international audiences. It allows you to reach audiences worldwide by making your content accessible. Yet, it comes with both significant benefits and challenges. Let's look at the key benefits and common challenges of video localization.
Benefits of Video Localization
- Reach a Larger Audience: Localizing your videos allows you to connect with viewers who speak different languages. This approach can help your brand or content grow on a global scale.
- Enhancing Viewer Experience: When viewers see content in their native language or with accurate subtitles, they feel more engaged. A localized video resonates better and creates a stronger emotional connection.
- Improved Accessibility: Adding subtitles or localized voiceovers ensures that your video content is accessible to multilingual audiences.
- Improving Content Performance: Localized videos often receive better engagement metrics, including higher views, watch time, and shares.
Challenges in Video Localization
- Maintaining Cultural Accuracy: Localization is more than just translating words. You need to adapt jokes, slang, and cultural references to ensure they make sense and don't offend viewers.
- Ensuring Synchronization: Synchronizing audio (dubbing) and subtitles with video visuals can be tricky. Lip-syncing must look natural, and subtitles need to match the timing of the dialogue.
- Consistency Across Many Languages: Maintaining a consistent tone, style, and quality across different languages can be difficult. This requires careful translation and editing to ensure the final content feels cohesive.
Conclusion
Creating a localised video is key to reaching audiences across different languages and cultures. By adapting your content through translation, dubbing, and subtitling, you can overcome language and cultural barriers.
While video localization can present challenges like cultural accuracy and synchronization, tools like Wondershare Filmora simplify the process. With its AI video translation feature, you can translate audio, add localized voiceovers, and create subtitles—all in one place. Start localizing your videos today and unlock new opportunities to reach global audiences!


 100% Security Verified | No Subscription Required | No Malware

