
For the Best Results, Use the Latest Version.
-
Preparations
-
Account
-
Get Started & Basic Settings
-
Compatibility & Tech Specs
-
Performance Settings
-
-
Creating Projects
-
Creating New Projects
-
-
Importing & Recording
-
Video Editing for Windows
-
Basic Video Editing
- Enable/Disable Clip in Windows
- Magnetic Timeline for Windows
- Dual Monitor Setup for Video Editing on Windows
- Select All Clips on Timeline for Windows
- Timeline and Track Management
- Auto Ripple for Windows
- Split & Trim Video
- Crop & Pan & Zoom Video in Filmora for Windows
- Compositing
- Change Video Speed on Windows
- Reverse Video for Windows
- Mark In and Mark Out for Windows
- Markers for Windows
- Group editing
- Customizable Backgrounds for Videos and Images in Windows
- Video Snapshot
- Using Freeze Frame in Filmora for Windows
- Logo Reveal For Windows
- Auto Enhance in Filmora for Windows
- Applying drop shadow
- Adjustment layer for Windows
- Apply Transforming for Windows
- Video Editing Ruler – Windows
-
Advanced Video Editing
- Keyframe Motion Blur for Windows
- Drawing Tools for Windows | Filmora Guide
- Camera Tracking for Windows
- Create Multi-Camera Clip in Filmora for Windows
- Compound Clip for Windows
- Multi-Clip Editing for Windows
- Filmora Motion Blur | Windows
- 360° Video Reframing for Windows
- Track Matte for Windows
- Video Chapters in Filmora on Windows
- Filmora Flicker Removal Guide | Windows
- Create Multi-Screen Videos in Filmora on Windows
- Masking in Filmora on Windows
- Creating a PIP Effect for Windows
- Keyframe Graph Editor for Windows
- Animation Keyframing for Windows
- Keyframe Path Curve
-
AI-Powered Video Editing
- Smart Scene Cut for Windows
- Smart Short Clips for Windows
- AI Face Mosaic for Windows
- Filmora AI Eye Contact- Windows
- AI Video Enhancer for Windows
- AI Text-to-Video for Windows
- Planar Tracking for Windows
- AI Idea to Video for Windows
- AI Media Analysis for Windows
- Filmora Image to Video for Windows
- Filmora Image to Prompt for Windows
- Instant Cutter Tool for Windows
- AI Extend
- Filmora AI Relight - Windows
- Filmora AI Image Enhancer Guide - Windows
- AI Script to Video Guide for Windows
- AI Text-Based Editing for Windows
- AI Mate Editing for Windows
- Instant Mode for Windows
- ChatGPT Plugin - AI Copywriting
- AI Smart Cutout for Windows
- Lens correction on Windows
- Auto Reframe Video for Windows
- AI Portrait Cutout
- Scene Detection for Windows
- AI Smart Masking for Windows
- Motion Tracking on Windows
- Video Stabilization for Windows
- AI Video/Photo Object Remover for Windows
- AI Smart Search for Windows
- AI Skin Tone Protection for Windows
- AI Image for Windows
- Chroma Key (Green Screen) for Windows
- Super Slow Motion with Optical Flow for Windows
- Video Denoise for Windows
-
-
Audio Editing for Windows
-
Basic Audio Editing
-
Advanced Audio Editing
-
AI-Powered Audio Editing
- Auto synchronization
- AI Sound Effects in Filmora for Windows
- Smart BGM Generation on Windows
- AI Voice Enhancer in Filmora
- AI Voice Cloning in Wondershare Filmora
- AI Music Generator for Windows
- Audio To Video
- AI Vocal Remover for Windows
- AI Auto Beat Sync for Windows
- AI Audio Stretch for Windows
- AI Audio Denoise for Windows
- Silence Detection on Windows
-
-
Text Editing for Windows
-
Basic Text Editing
-
Advanced Text Editing
-
AI-Powered Text Editing
-
-
Video Customizations
-
Video Effects
- Filmora VST3 Plugins for Windows
- Filmora OpenFX Plugins for Windows
- Retouch Guide for Windows
- Filmora Pen Tool Tutorial: Motion Paths & Animation Guide
- Animated Charts
- Mocha Filmora - For Windows
- Different Types of Video Effects
- NewBlue FX effects
- Boris FX effects | Filmora Windows Guide
- Body Effects for Windows
- Filmora -Filmstock Asset
-
Audio Effects
-
Transitions
-
Stickers
-
Filters
-
Color Editing
-
Animations
-
Templates
-
Asset Center
-
-
Exporting & Share & Cloud Backup
Audio-Driven Effects
In Filmora, users can employ different audio-driven effects to add a touch of music and dramatic effects to their videos. In its effects library, there are multiple audio-driven effects according to video contexts that you can apply. In this guide, we'll talk you through the procedure of accessing and applying audio-driven effects.
Besides applying and adjusting these effects, Filmora also lets you remove an applied Audio-Driven Effect from the timeline whenever you no longer need it. You can also add effects to Favorites and organize them with tags, making the effects you use often easier to find for future projects.
Add Audio-Driven Effects
Step 1. Choose Audio-Driven Effects
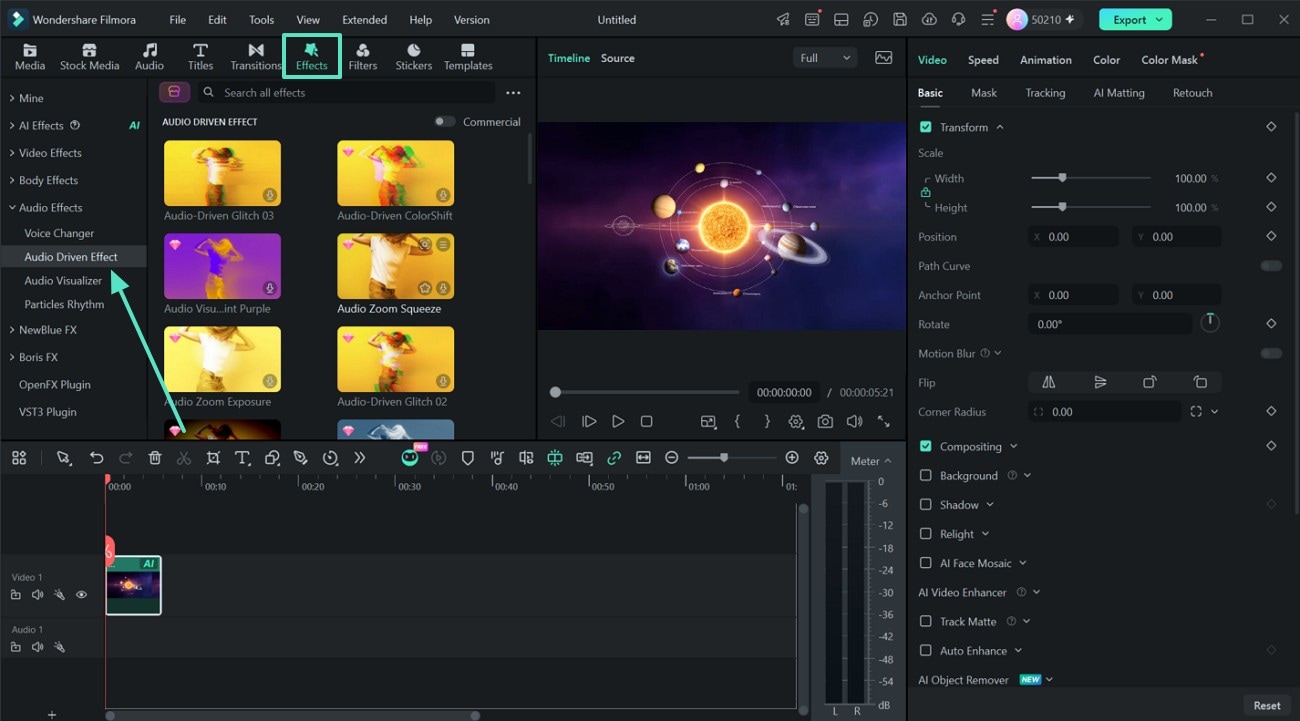
Start a project by placing your video and your audio or music track onto the editing timeline. Go to the top menu, click on the Effects tab, open Audio Effects, and look for Audio-Driven Effects.
Step 2. Add Effect to Timeline
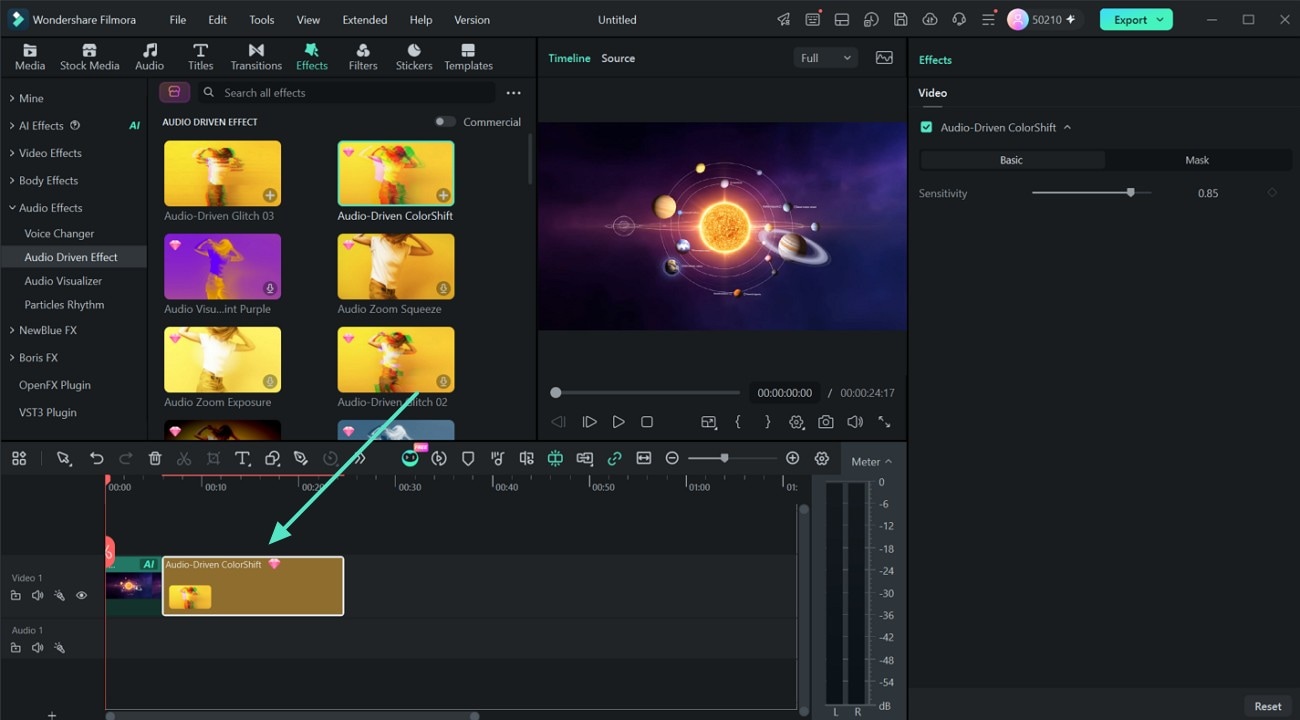
Choose an effect, like a glitch, flash, zoom, or color shift, and drag it onto a separate video track layer right above your footage. Stretch or trim the effect layer so it covers the parts of the video where you want the beat-synchronized action to happen.
Step 3. Adjust the Effect Settings
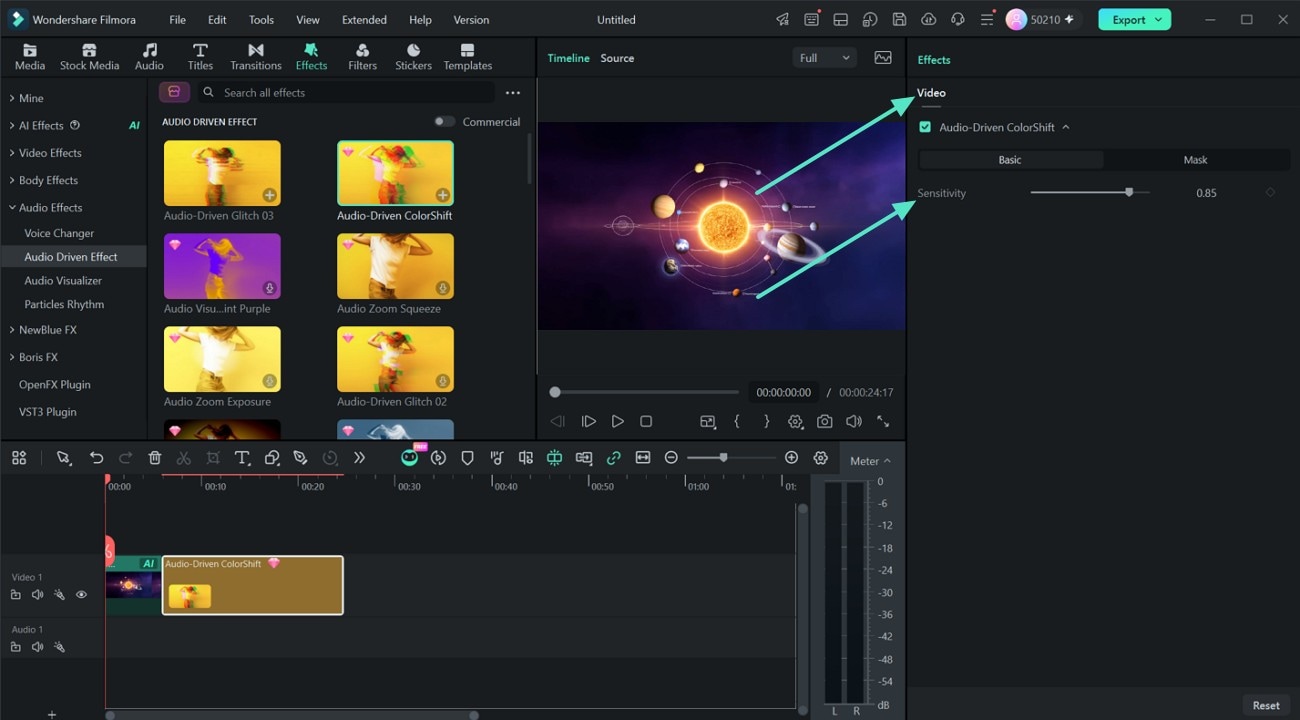
Select the applied effect on the timeline, then open the Video tab in the settings panel on the right. Under Basic, adjust the Sensitivity slider to control how strongly the effect reacts to the audio.
Step 4. Select the Mask Tab
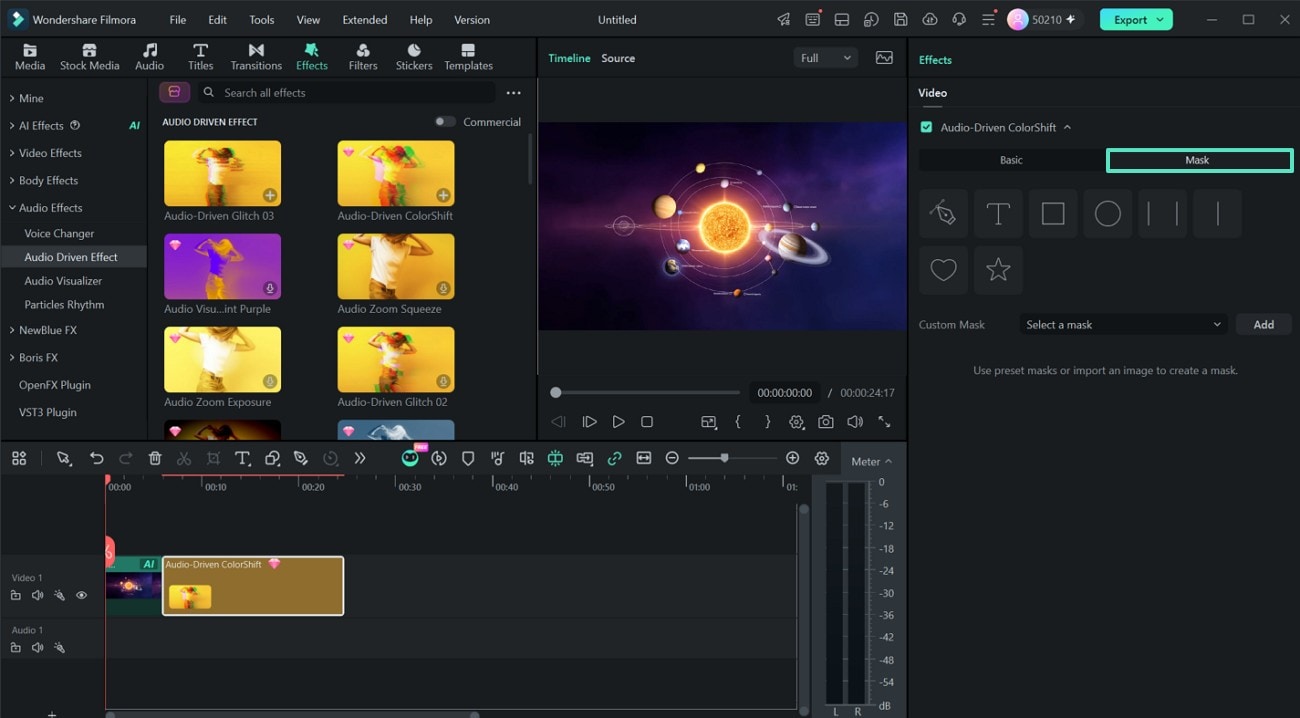
You can also open the Mask tab to limit the effect to a specific part of the frame. This is useful when you want the beat-synced effect to appear only on one area instead of covering the whole video.
Remove Audio-Driven Effects
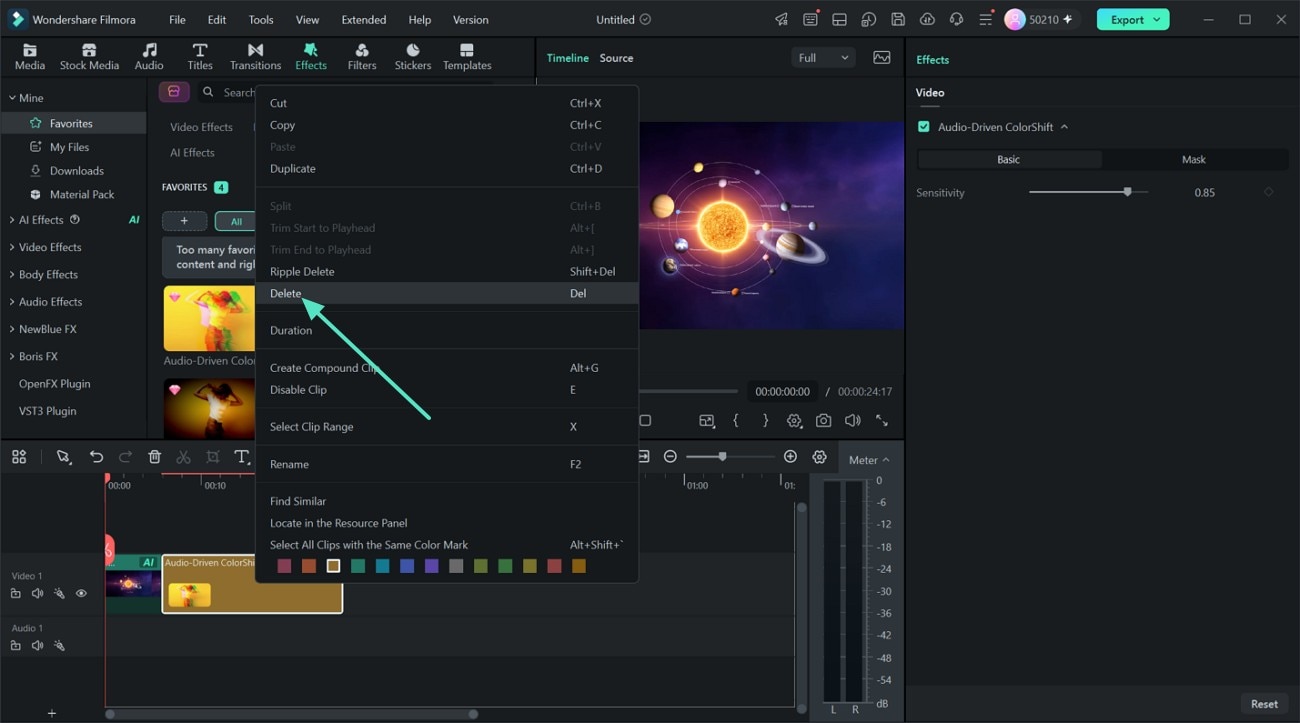
Click the applied effect clip on the timeline so it is highlighted. Right-click the effect and choose Delete from the menu. You can also press the Delete (Del) key on your keyboard to remove it quickly.
Favorite Audio-Driven Effects
Step 1. Choose Add Tag Option
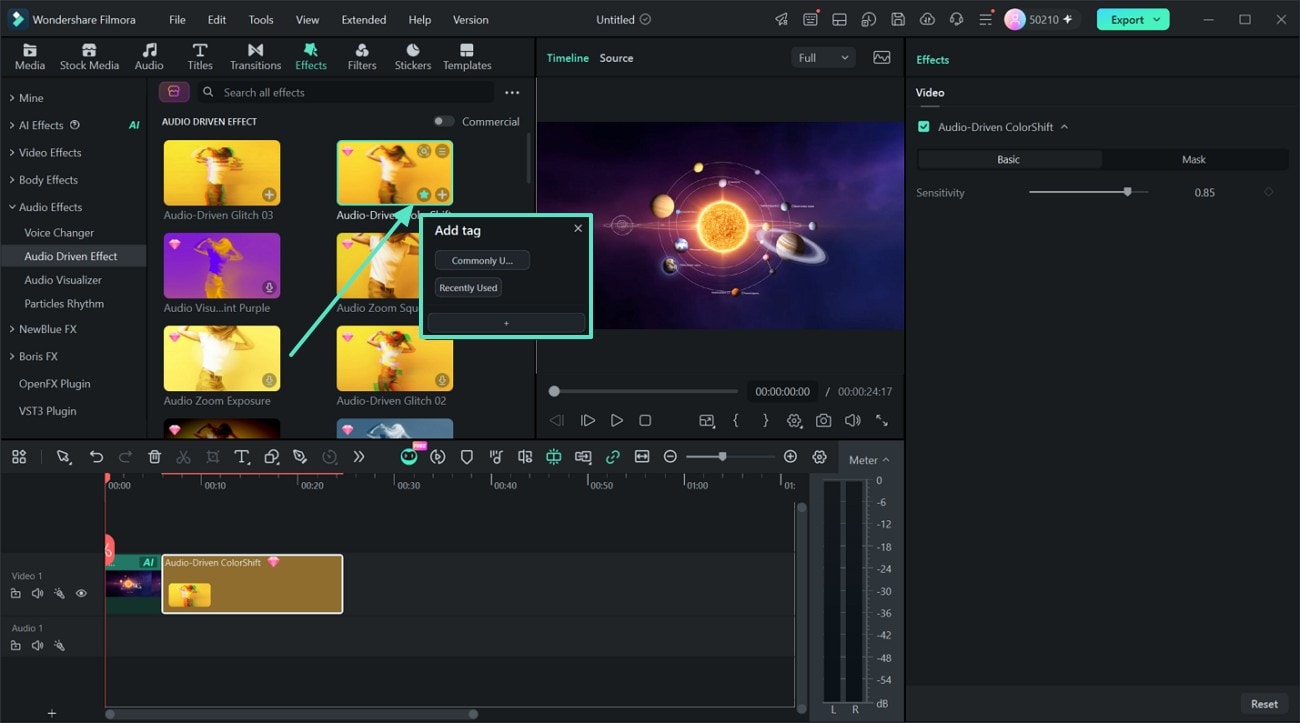
To save an Audio-Driven Effect for quick access later, hover over the effect you like. Click the Star icon on the effect thumbnail to add it to your favorites. Choose Add Tag, select an existing tag such as Recently Used or Commonly Used, or click the + button to create your own tag.
Step 2. Locate the Favorites
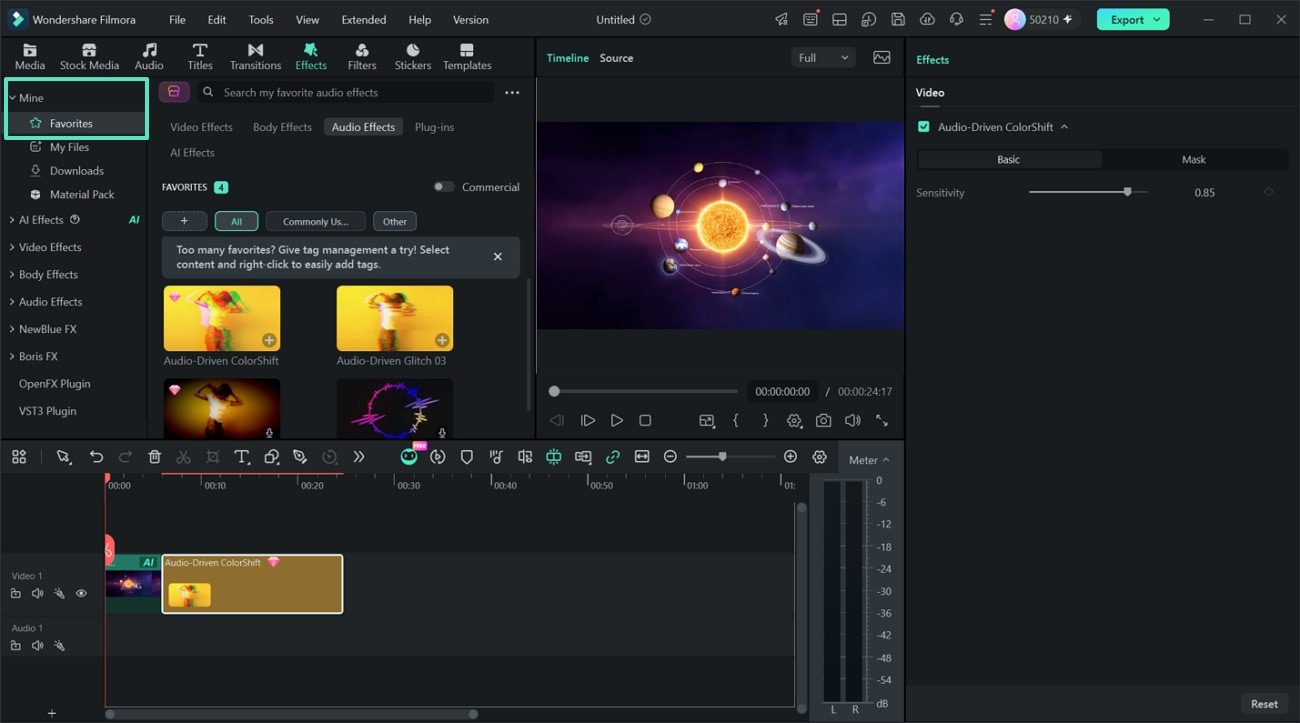
Open Mine > Favorites to quickly access the saved effect. If you used a custom tag, you could also use that tag to keep similar effects grouped together.
Related Posts
Featured Articles
20+ Funny Christmas Story Memes (2026) + How to Make Your Own
Explore 20+ funny Christmas story memes that capture holiday chaos. Plus, learn how to make your own Christmas meme easily with simple tools and effects.
How to Use Live Photos on TikTok – Pro Tips & Tricks!
If you are looking for ways to catch up on the motion images trend, read this article to learn how to do live photos on TikTok conveniently.
5 Ways| How to Record Skype Calls?
Learn to record Skype calls on Windows, Mac, iPhone, and Android. Discover the best options for Skype call recording, including screen recording, recording without the other party knowing, and more.
Recommended User Guide
Audio Visualizer Effects
The function of the Audio Visualizer solves the problem that single audio cannot be distributed as a video on the video platform and can improve the video quality at the same time.
Voice Changer Effects for Windows
If you wish to make changes to the sound of the video or the character's sound, find the effective options in the Voice Changer feature of Filmora.
