For the Best Results, Use the Latest Version.
-
Preparations
-
Account
-
Get Started & Basic Settings
-
Compatibility & Tech Specs
-
Performance Settings
-
-
Creating Projects
-
Creating New Projects
-
-
Importing & Recording
-
Video Editing for Windows
-
Basic Video Editing
- Enable/Disable Clip in Windows
- Magnetic Timeline for Windows
- Dual Monitor Setup for Video Editing on Windows
- Select All Clips on Timeline for Windows
- Manage Timeline and Tracks on Windows
- Auto Ripple for Windows
- Split & trim video
- Crop & Pan & Zoom Video
- Compositing
- Change Video Speed on Windows
- Playing videos in reverse
- Mark In and Mark Out for Windows
- Markers for Windows
- Group editing
- Customizable Backgrounds for Videos and Images in Windows
- Video snapshot
- Using freeze frame
- Logo Reveal For Windows
- Apply auto enhance
- Applying drop shadow
- Adjustment layer for Windows
- Transforming
- Video Editing Ruler – Windows
-
Advanced Video Editing
- Drawing Tools for Windows | Filmora Guide
- Create Multi-Camera Clip
- Compound Clip for Windows
- Multi-Clip Editing for Windows
- Filmora Motion Blur | Windows
- Filmora Flicker Removal Guide | Windows
- Apply mask to video
- Creating a PIP effect
- Keyframe Graph Editor for Windows
- Add animation keyframing for Windows
- Keyframe Path Curve for Windows
-
AI-Powered Video Editing
- Smart Scene Cut for Windows
- Smart Short Clips for Windows
- AI Face Mosaic for Windows
- Filmora AI Eye Contact- Windows
- AI Video Enhancer for Windows
- AI Text-to-Video for Windows
- Planar Tracking for Windows
- AI Idea to Video for Windows
- Filmora Image to Video for Windows
- Filmora Image to Prompt for Windows
- Instant Cutter Tool for Windows
- AI Extend
- Filmora AI Relight - Windows
- Filmora AI Image Enhancer Guide - Windows
- AI Script to Video Guide for Windows
- AI Text-Based Editing for Windows
- AI Mate Editing for Windows
- Create with instant mode
- ChatGPT Plugin - AI Copywriting
- AI Smart Cutout
- Lens correction on Windows
- Auto reframe video
- AI Portrait Cutout
- Scene detection feature
- AI Smart Masking for Windows
- Make motion tracking
- Video Stabilization for Windows
- AI Video/Photo Object Remover for Windows
- AI Smart Search for Windows
- AI Skin Tone Protection for Windows
- AI Image for Windows
- Chroma key (green screen)
- Super Slow Motion with Optical Flow for Windows
- Video Denoise for Windows
-
-
Audio Editing for Windows
-
Basic Audio Editing
-
Advanced Audio Editing
-
AI-Powered Audio Editing
-
-
Text Editing for Windows
-
Basic Text Editing
-
Advanced Text Editing
-
AI-Powered Text Editing
-
-
Video Customizations
-
Video Effects
-
Audio Effects
-
Transitions
-
Stickers
-
Filters
-
Color Editing
-
Animations
-
Templates
-
Asset Center
-
-
Exporting & Share & Cloud Backup
Smart Scene Cut for Windows
Smart Scene Cut is a video editing technology used to capture the highlights of a video. It is primarily used in the rough-cut stage to intelligently identify, segment, and extract key moments, elements, and objects from long videos. The extracted clips can then be selected and added to the main timeline for editing, helping users quickly create short videos.
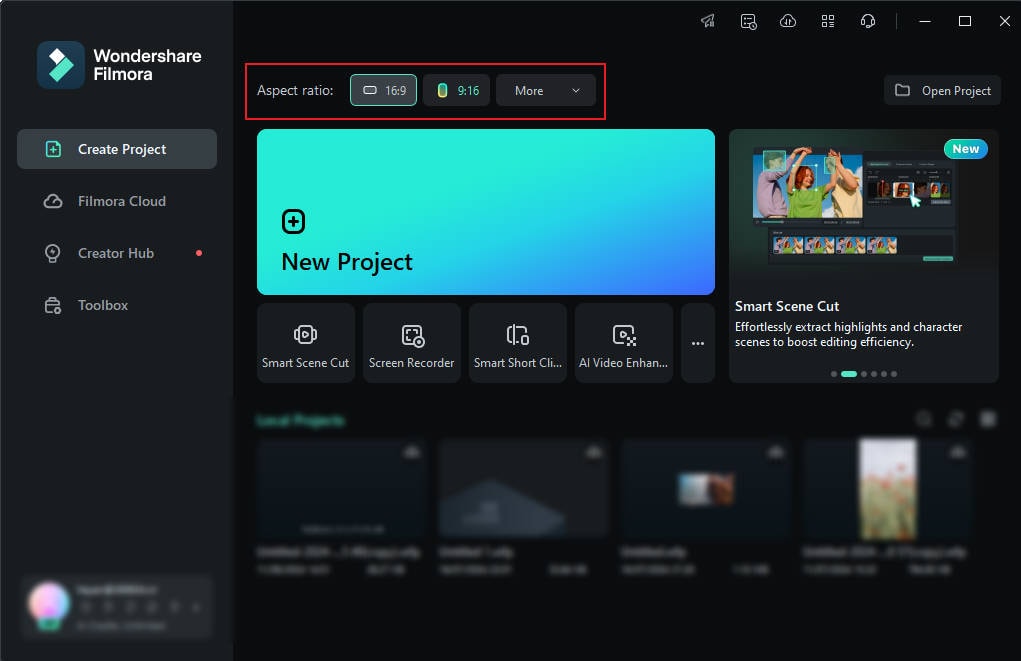
Step 1: Download and Select the Appropriate Size
Launch Filmora on your computer. On the launch page, select the aspect ratio specification for the video you will import.
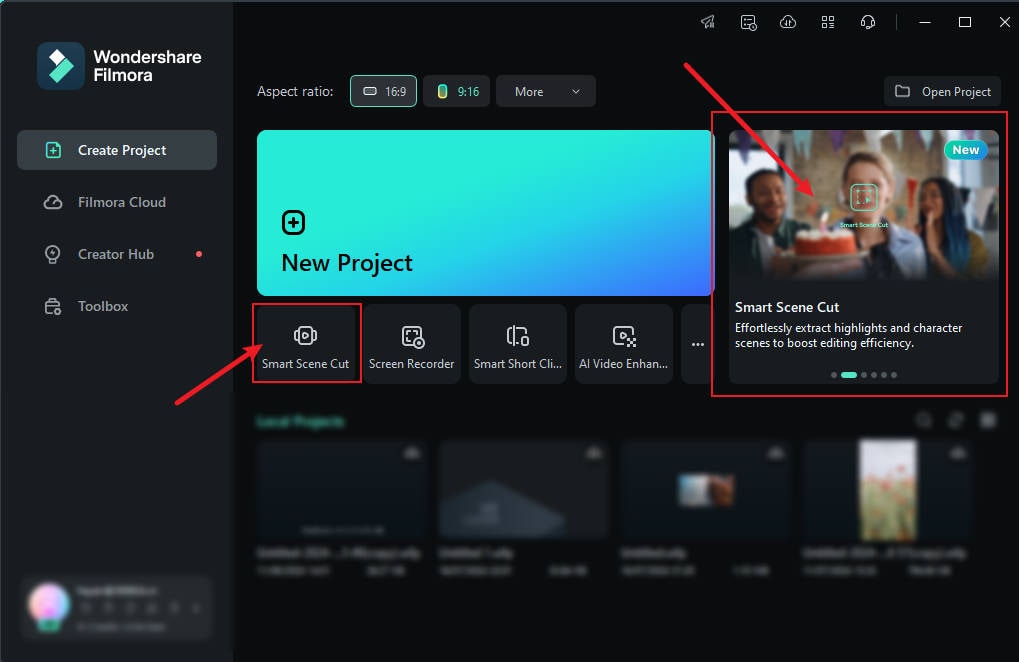
Step 2: Locate Smart Scene Cut
Method 1: On the startup page, there are two selection windows for the Smart Scene Cut feature. Clicking on them takes you directly to the Smart Scene Cut interface.
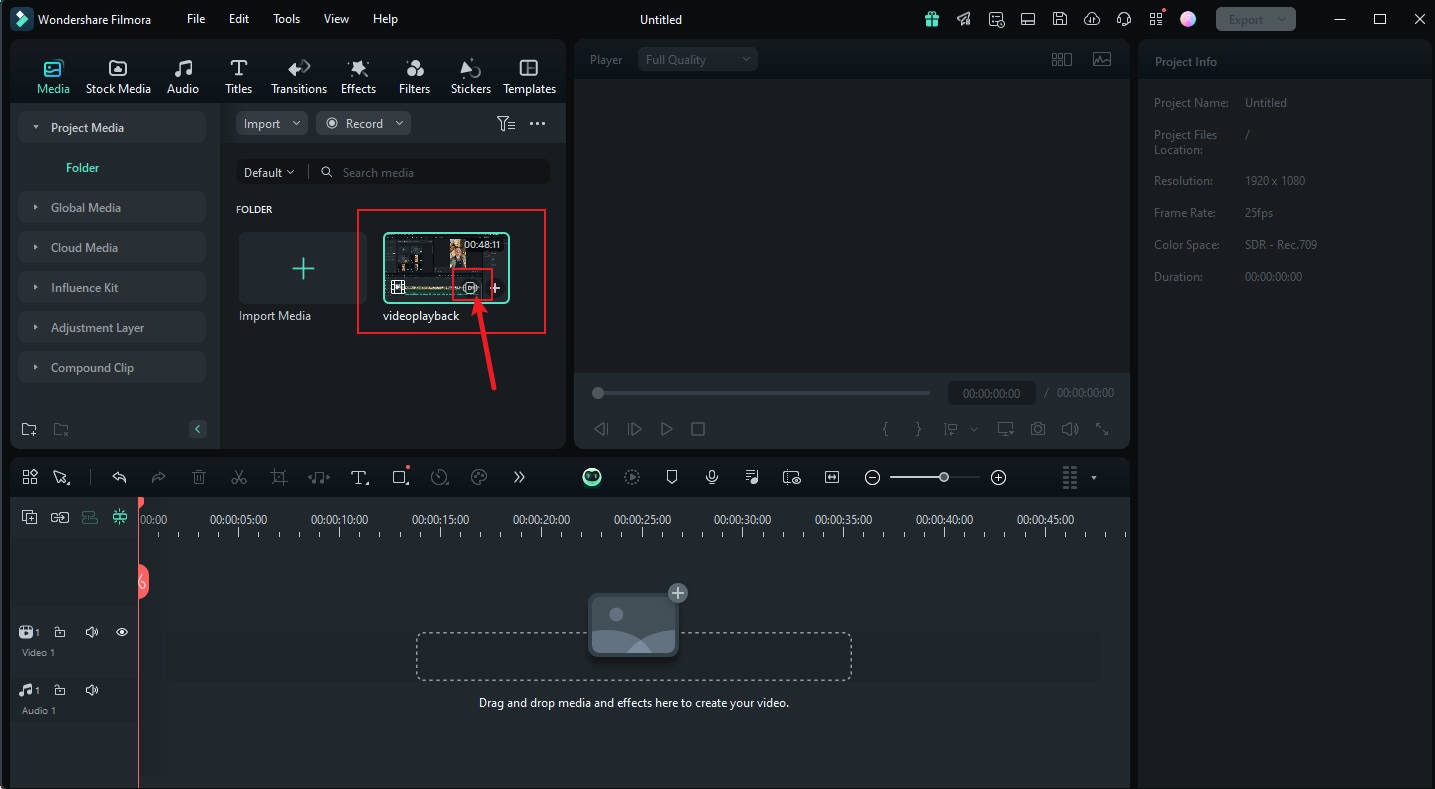
Method 2: Import your video clips and click the "Smart Scene Cut" option on the video thumbnail.
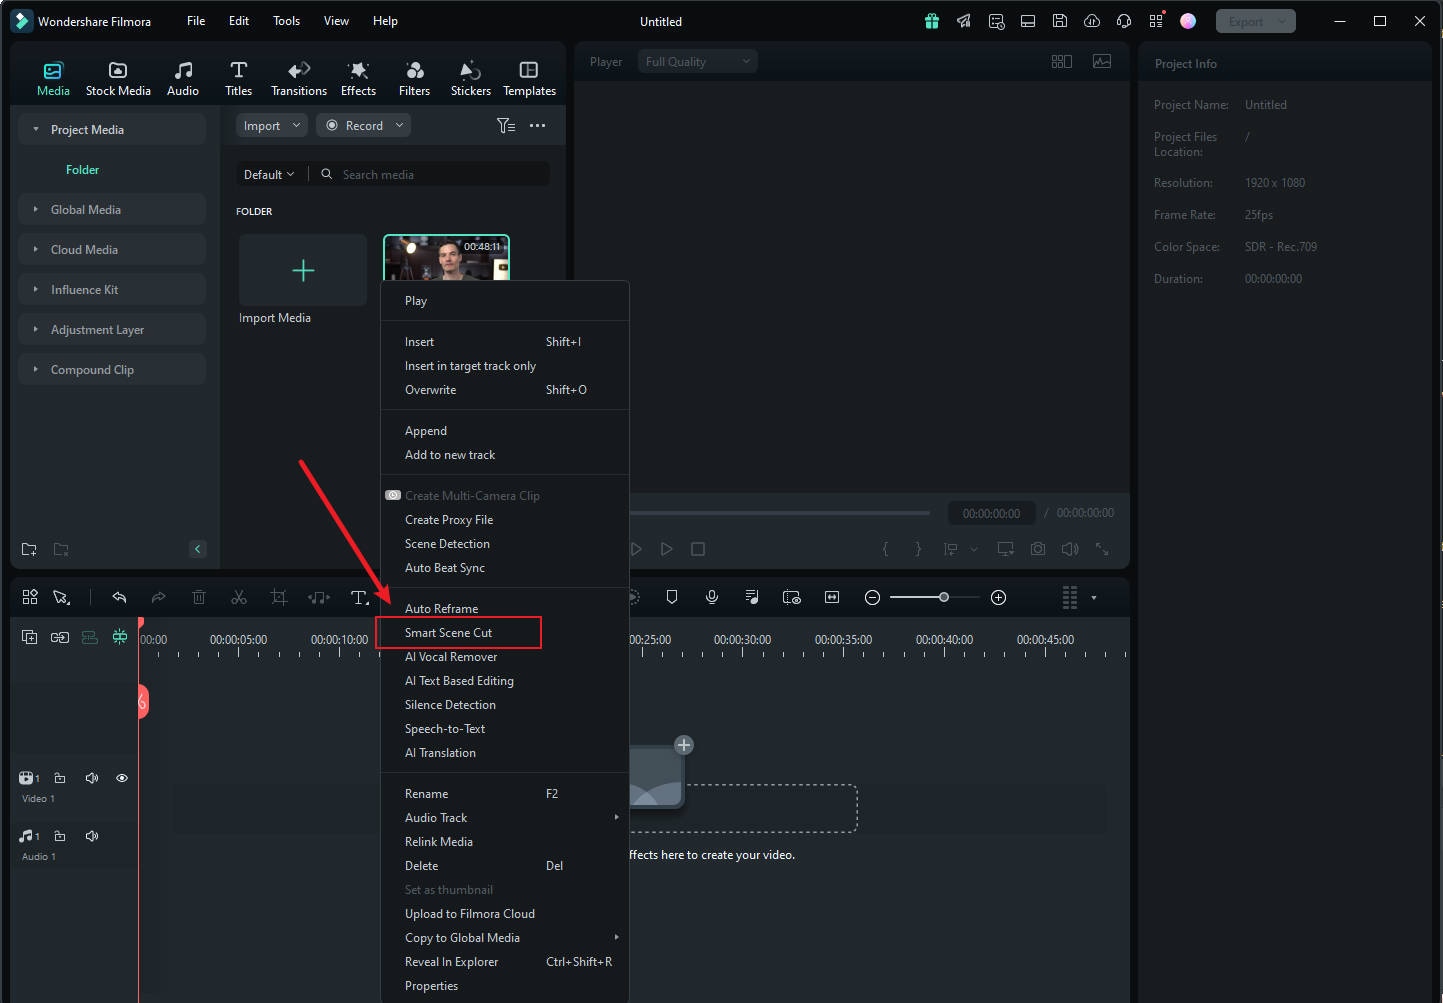
Method 3: Right-click on a video. Select "Smart Scene Cut" to access the interface of the unique operation.
Step 3: Enter the Smart Scene Cut Feature Page
After clicking to enter the Smart Scene Cut operation page, you can select ten objects for recognition. Subsequently, highlight clips will be extracted based on the objects you choose. Once you've made your selection, you can click "Start."
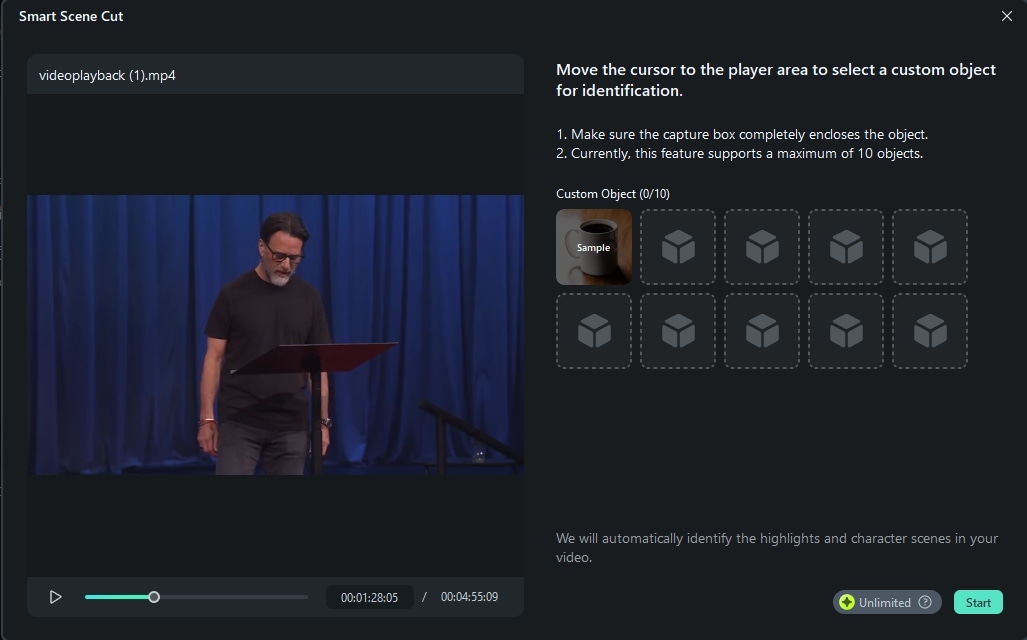
Note:
You can only select a maximum of 10 objects yet.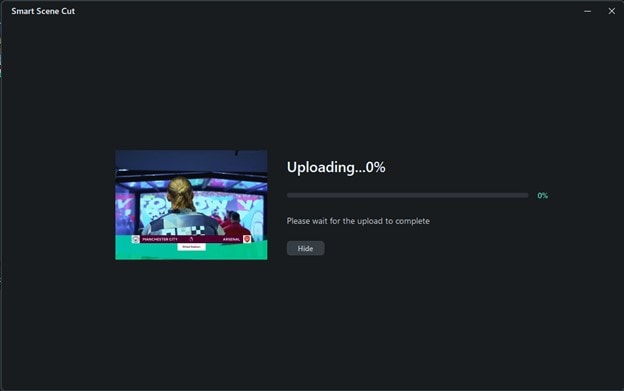
Step 4: View Progress and Edit Entry
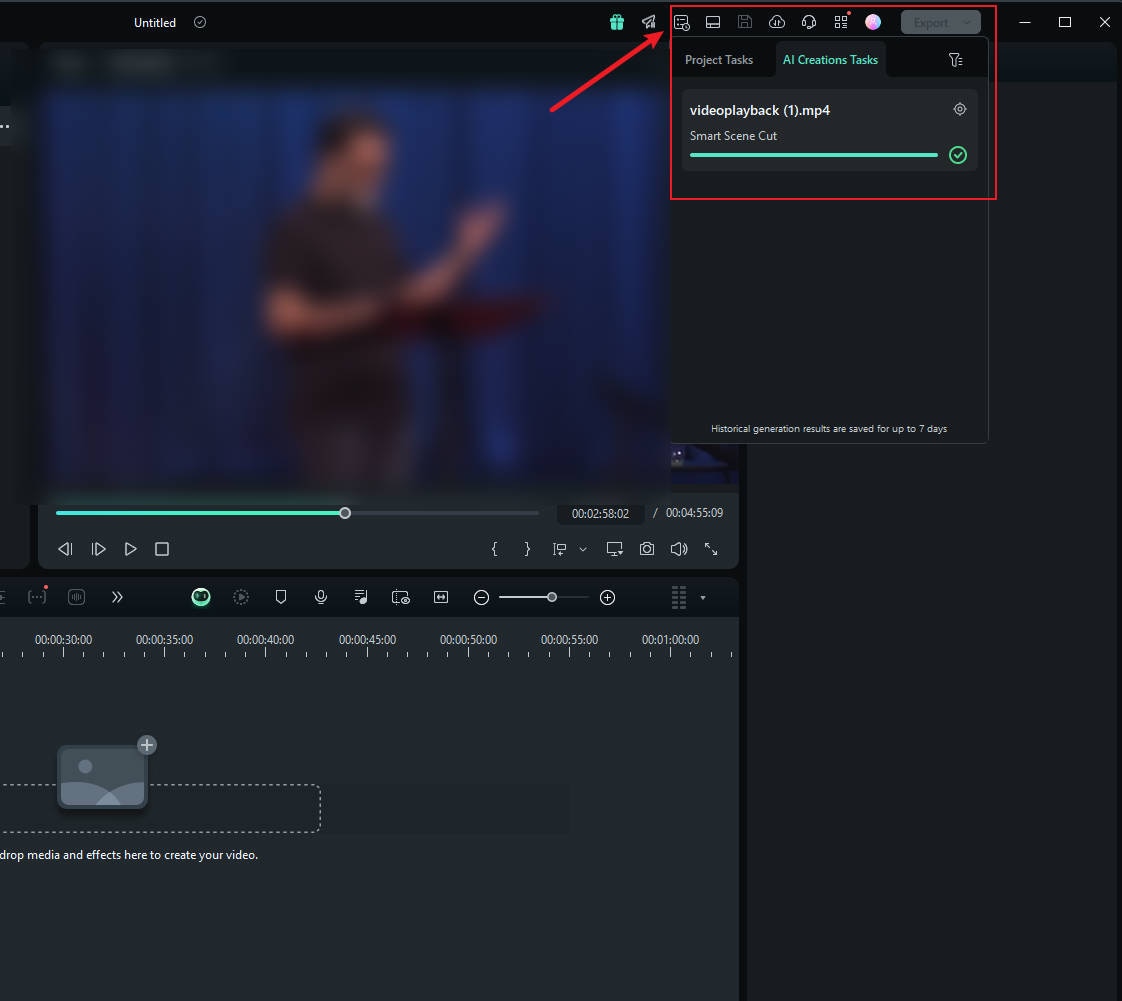
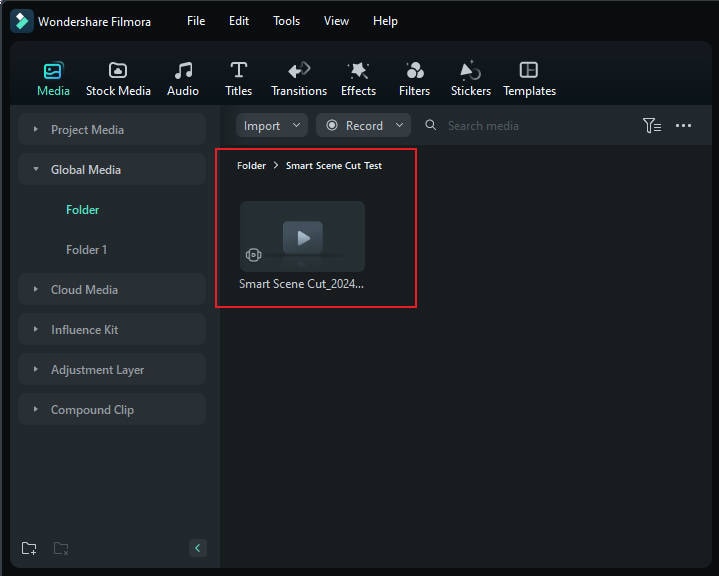
You can click "Hide" to hide the window, and in the "Task List > AI Creations Tasks" window, you can see the task progress.
In the "Media Folder", there is a folder button in the top left corner of the video. Clicking it allows you to view the completed results.
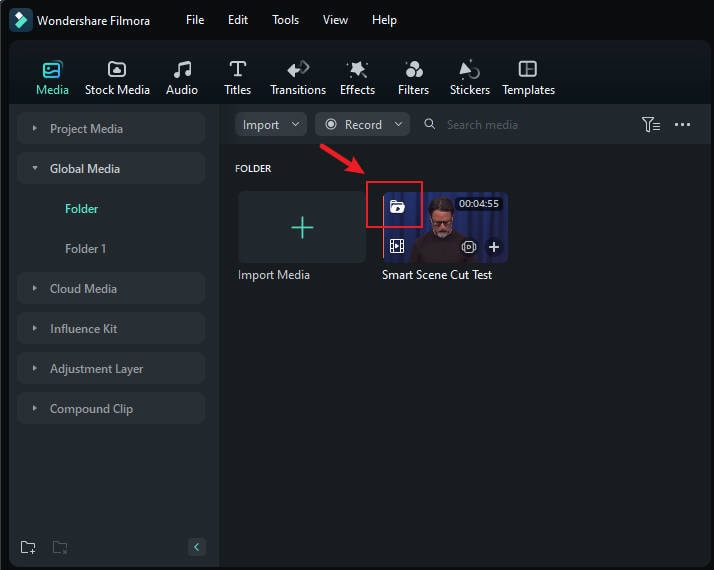
Double-click the video with your mouse to enter the edit page.
Note:
If you don't click "Hide" during the generation process, the result preview page mentioned below will appear directly.Step 5: View the Completed Results
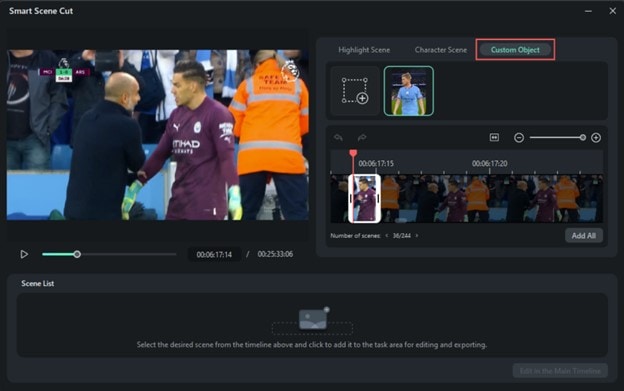
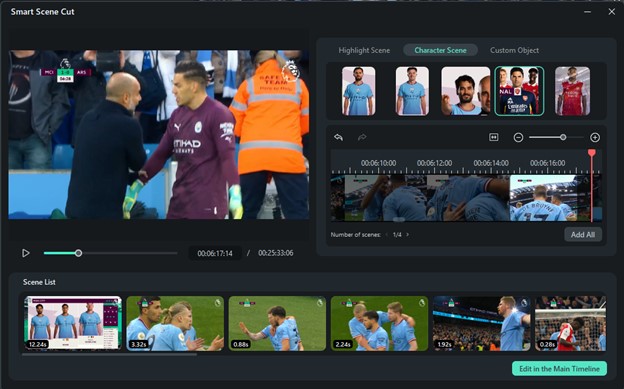
On the smart scene cut results page, you can see three selection categories: "Highlight Scene," "Character Scene," and "Custom Object".
Highlight Scene
This can help intelligently capture highlight scenes. You can select the segments you find impressive and add them to the timeline for further editing on the main track.

Character Scene
This can smartly extract highlights based on character scenes, emphasizing key segments.

Custom Object
You can also capture custom elements you want in the video. Filmora will track the relevant fragments from the entire video.
Edit in the Main Timeline
After selecting all your scenes, click "Edit in the Main Timeline".
Step 6: Edit in the Main Timeline
With your highlight clips in the main timeline, you can edit them as per requirement. For example, you can add text, sound effects, transitions, etc.

Step 7: Export and Share
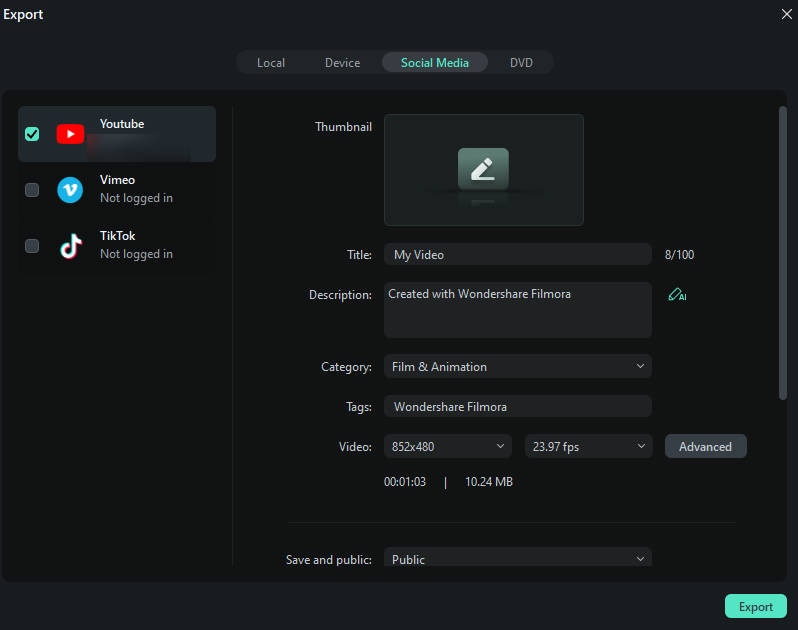
Choose a destination and set the format to "MP4" or another video format. Edit other export settings as needed and then click "Export".
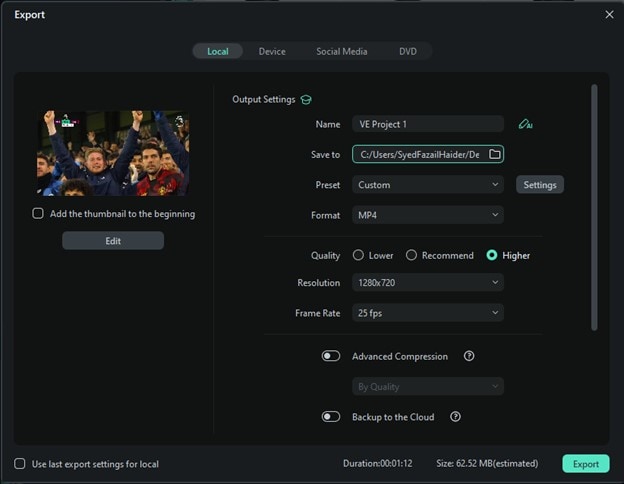
You can also choose to import directly to social media platforms, where you can customize the video's thumbnail, title, description, etc.
Related Posts
Featured Articles
Use No Watermark Video Cropper to Crop Your Videos Free
Explore the best video cropper with no watermark online and learn how to use it to crop your videos for free. No hidden cost—just follow the steps below.
7 Effective Convert Twitter Video to MP4 Tools
Facing a hard time while sharing an X video across devices? Read this article and learn about the top 7 tools and effectively convert Twitter video to MP4.
Top-Notched 6 Free Online Screen Recorders
Want to record your screen online? Discover the six best free online screen recorders and an excellent desktop alternative.
Recommended User Guide
Make motion tracking
The Motion Tracker tool lets you track movement in your video and have objects like elements, videos, images, and text follow that movement.
ChatGPT Plugin - AI Copywriting
Auto-generate your video scripts, captions, descriptions, and more with ChatGPT in Filmora
Filmora AI Relight - Windows
Learn how to use Filmora AI Relight on Windows to relight photos and enhance lighting with AI for professional results.
