For the Best Results, Use the Latest Version.
-
Preparations
-
Account
-
Get Started & Basic Settings
-
Compatibility & Tech Specs
-
Performance Settings
-
-
Creating Projects
-
Creating New Projects
-
-
Importing & Recording
-
Video Editing for Windows
-
Basic Video Editing
- Enable/Disable Clip in Windows
- Magnetic Timeline for Windows
- Dual Monitor Setup for Video Editing on Windows
- Select All Clips on Timeline for Windows
- Manage Timeline and Tracks on Windows
- Auto Ripple for Windows
- Split & trim video
- Crop & Pan & Zoom Video in Filmora for Windows
- Compositing
- Change Video Speed on Windows
- Playing videos in reverse
- Mark In and Mark Out for Windows
- Markers for Windows
- Group editing
- Customizable Backgrounds for Videos and Images in Windows
- Video snapshot
- Using Freeze Frame in Filmora for Windows
- Logo Reveal For Windows
- Auto Enhance in Filmora for Windows
- Applying drop shadow
- Adjustment layer for Windows
- Apply Transforming for Windows
- Video Editing Ruler – Windows
-
Advanced Video Editing
- Drawing Tools for Windows | Filmora Guide
- Create Multi-Camera Clip in Filmora for Windows
- Compound Clip for Windows
- Multi-Clip Editing for Windows
- Filmora Motion Blur | Windows
- Video Chapters in Filmora on Windows
- Filmora Flicker Removal Guide | Windows
- Apply mask to video
- Creating a PIP Effect for Windows
- Keyframe Graph Editor for Windows
- Add animation keyframing for Windows
- Keyframe Path Curve for Windows
-
AI-Powered Video Editing
- Smart Scene Cut for Windows
- Smart Short Clips for Windows
- AI Face Mosaic for Windows
- Filmora AI Eye Contact- Windows
- AI Video Enhancer for Windows
- AI Text-to-Video for Windows
- Planar Tracking for Windows
- AI Idea to Video for Windows
- Filmora Image to Video for Windows
- Filmora Image to Prompt for Windows
- Instant Cutter Tool for Windows
- AI Extend
- Filmora AI Relight - Windows
- Filmora AI Image Enhancer Guide - Windows
- AI Script to Video Guide for Windows
- AI Text-Based Editing for Windows
- AI Mate Editing for Windows
- Instant Mode in Filmora
- ChatGPT Plugin - AI Copywriting
- AI Smart Cutout for Windows
- Lens correction on Windows
- Auto Reframe Video for Windows
- AI Portrait Cutout
- Scene detection feature
- AI Smart Masking for Windows
- Motion Tracking on Windows
- Video Stabilization for Windows
- AI Video/Photo Object Remover for Windows
- AI Smart Search for Windows
- AI Skin Tone Protection for Windows
- AI Image for Windows
- Chroma key (green screen)
- Super Slow Motion with Optical Flow for Windows
- Video Denoise for Windows
-
-
Audio Editing for Windows
-
Basic Audio Editing
-
Advanced Audio Editing
-
AI-Powered Audio Editing
- Auto synchronization
- AI Sound Effects in Filmora for Windows
- Smart BGM Generation on Windows
- AI Voice Enhancer in Filmora
- AI Voice Cloning in Wondershare Filmora
- AI Music Generator for Windows
- Audio To Video
- AI Vocal Remover for Windows
- AI Auto Beat Sync for Windows
- AI Audio Stretch for Windows
- AI Audio Denoise for Windows
- Silence Detection on Windows
-
-
Text Editing for Windows
-
Basic Text Editing
-
Advanced Text Editing
-
AI-Powered Text Editing
-
-
Video Customizations
-
Video Effects
-
Audio Effects
-
Transitions
-
Stickers
-
Filters
-
Color Editing
-
Animations
-
Templates
-
Asset Center
-
-
Exporting & Share & Cloud Backup
AI Vocal Remover for Windows
AI Vocal Remover feature uses advanced AI algorithms to separate vocals from music or background soundtracks in both audio and video files efficiently. It offers high-quality vocal isolation without noticeable loss of audio fidelity, making it ideal for music production. The tool supports multi-speaker separation, allowing individual tracking of different voices in dialogues or interviews for precise editing.
Index
Method 1: Using the Timeline Option Panel
Step 1. Start Filmora and Create a New Project
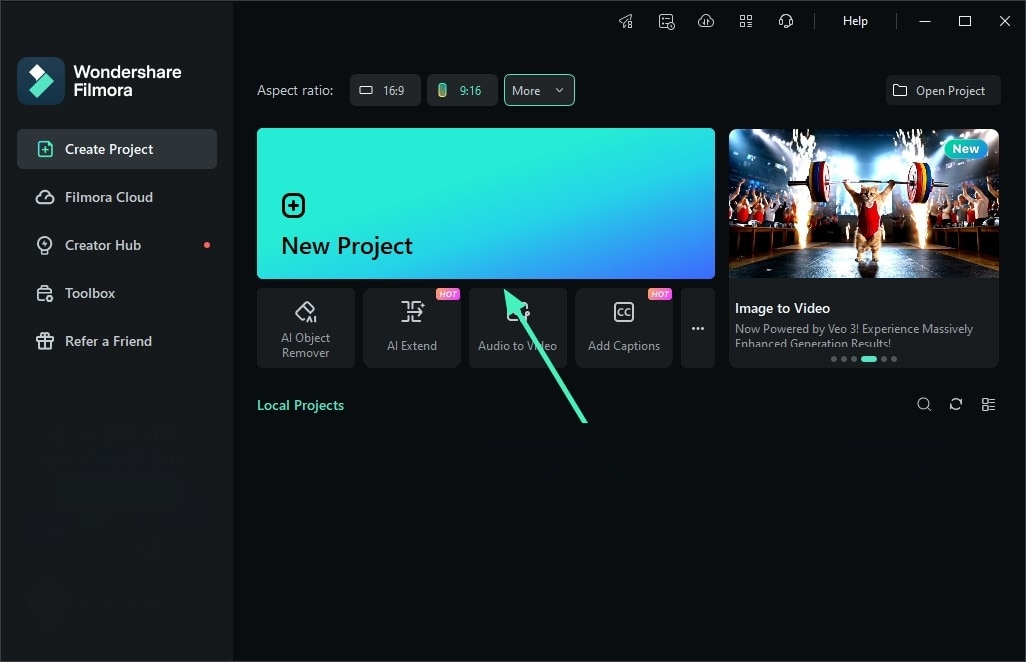
Begin by downloading Filmora for your desktop and then click to start it. Next, proceed to log in or sign up through the "Profile" icon at the top. Afterward, navigate to the control panel on the left-hand side and choose the "Create Project" option. From the various tabs visible in the main menu, click the "New Project" tab.

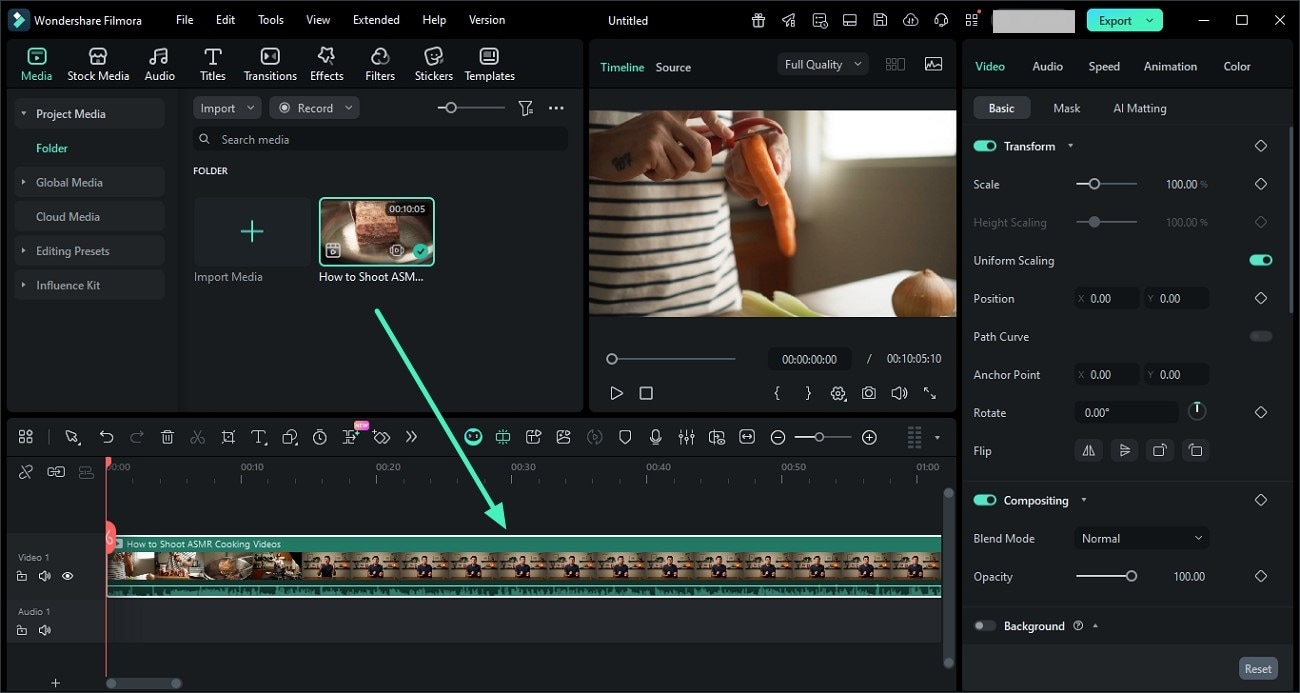
Step 2. Import Files and Add to Timeline
Once you reach the main interface of Filmora, select "Media" from the custom toolbar and click on the "Files" icon to import your files into Filmora. Now, select the imported files, drag and drop them to the timeline panel.

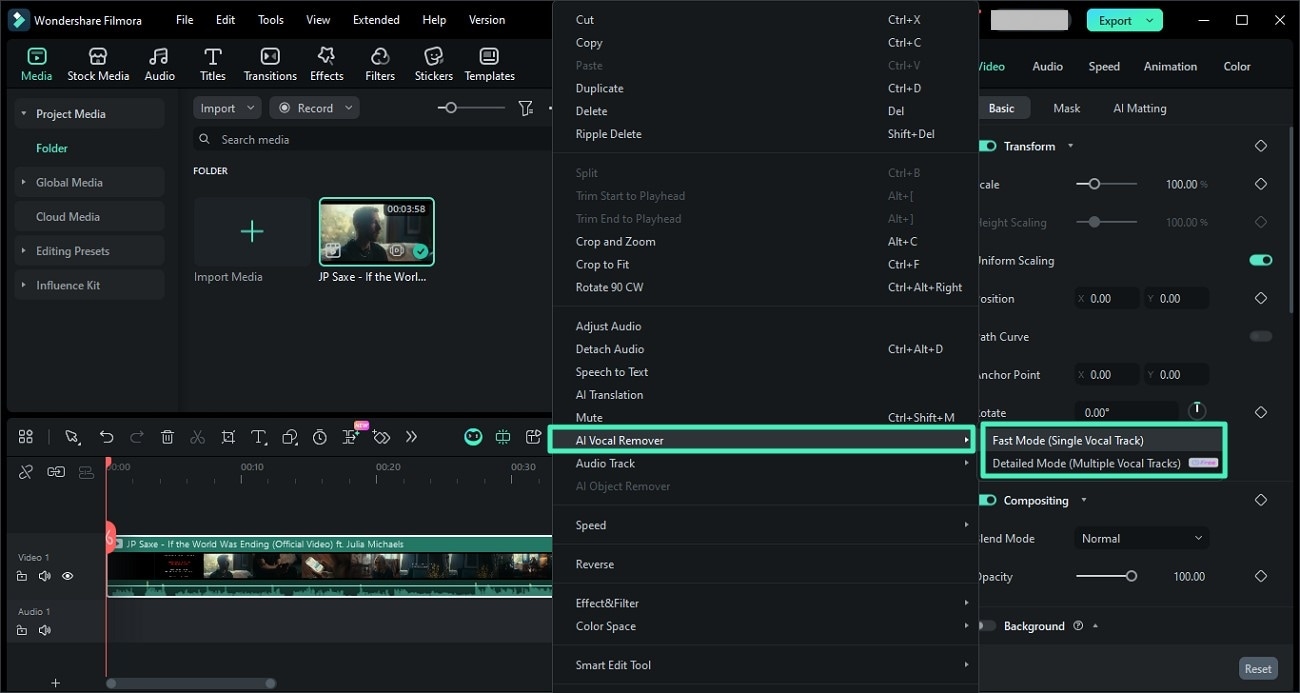
Step 3. Access the AI Vocal Remover Functionality
Now, head to the timeline and right-click on the video to enable the list. From here, choose the "AI Vocal Remover" option and select the mode from the expanded options, such as "Detailed Mode" or "Fast Mode".
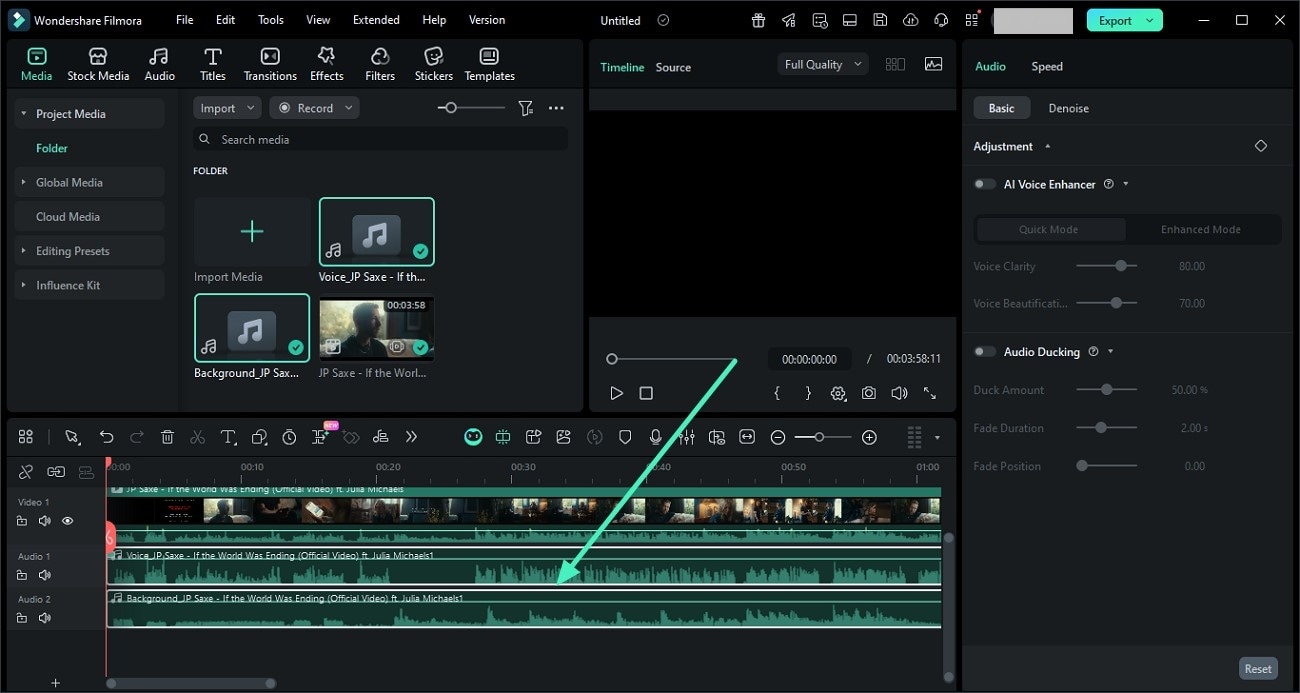
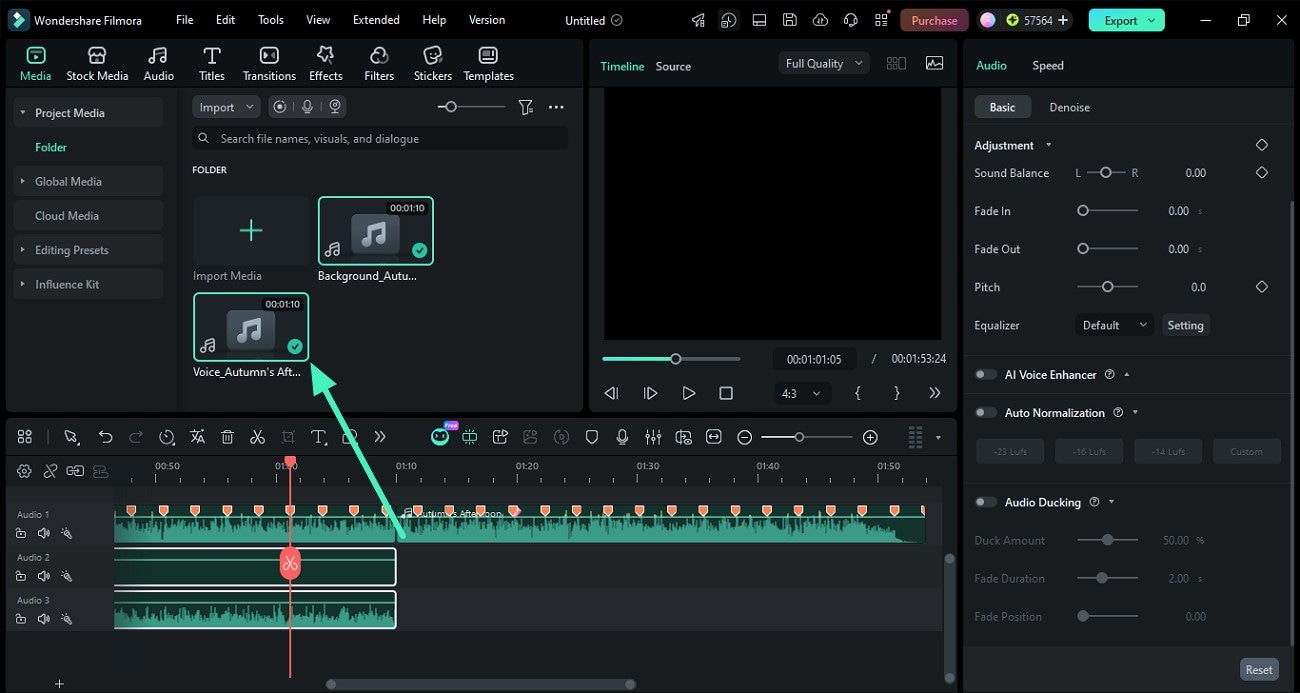
Step 4. Preview the Extracted Files in Fast Mode
Once you press "Fast Mode", wait for the tool to extract the audio files and access them within the timeline below the video track.
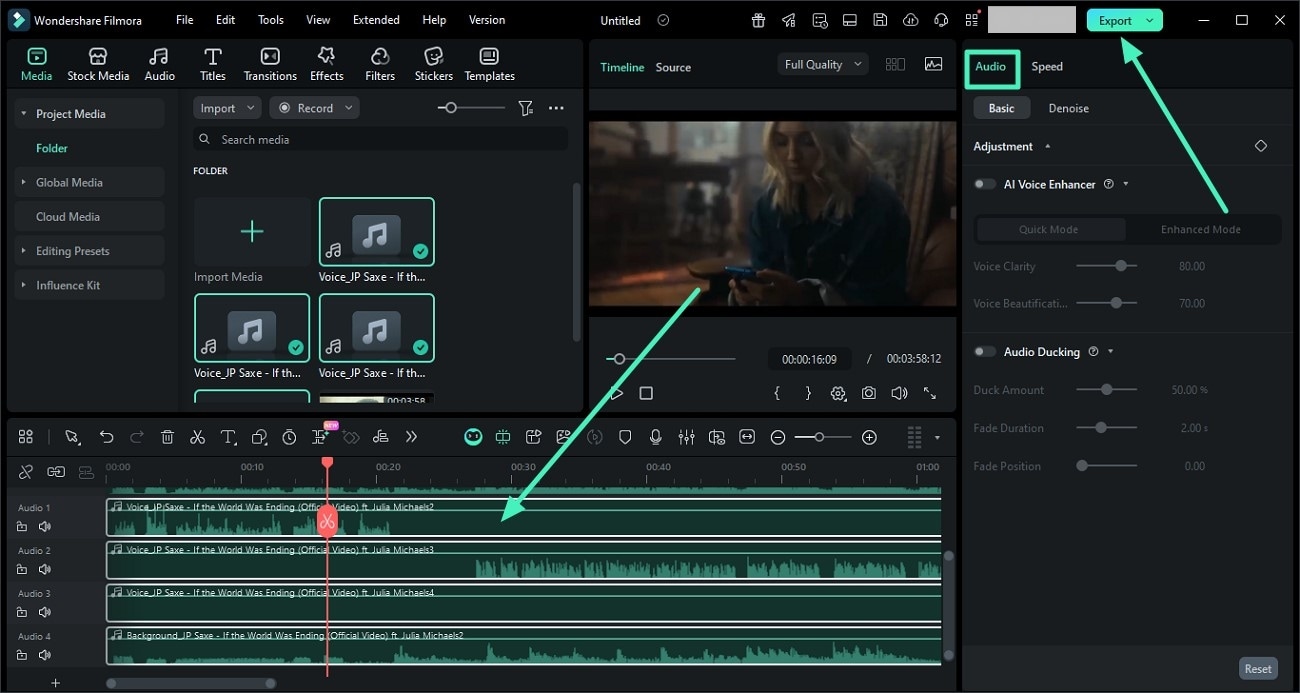
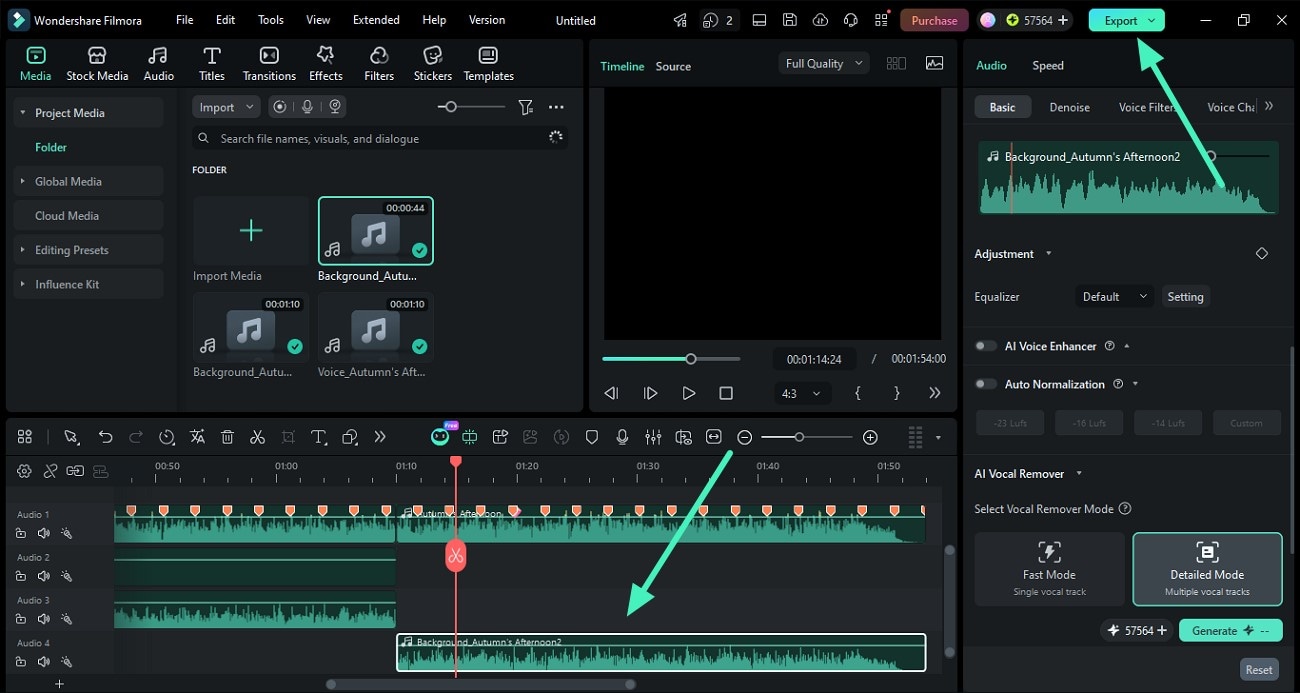
Step 5. View Files Extracted in Detailed Mode
If you choose the "Detailed Mode", more detailed versions with multi-speaker separation in each track will be extracted by the tool. You can access the vocals of each speaker separately and a single "Background" music within the timeline and modify them by accessing the panel on the right. Once you are satisfied with the results, press the "Export" button to save the results.
Method 2: Using the Top Toolbar
Step 1. Start Filmora and Create a New Project
Begin by downloading Filmora for your desktop and then click to start it. Next, proceed to log in or sign up through the "Profile" icon at the top. Afterward, navigate to the control panel on the left-hand side and choose the "Create Project" option. From the various tabs visible in the main menu, click the "New Project" tab.
Step 2. Import Files and Add to Timeline
Once you reach the main interface of Filmora, select "Media" from the custom toolbar and click on the "Files" icon to import your files into Filmora. Now, select the imported files, drag and drop them to the timeline panel.
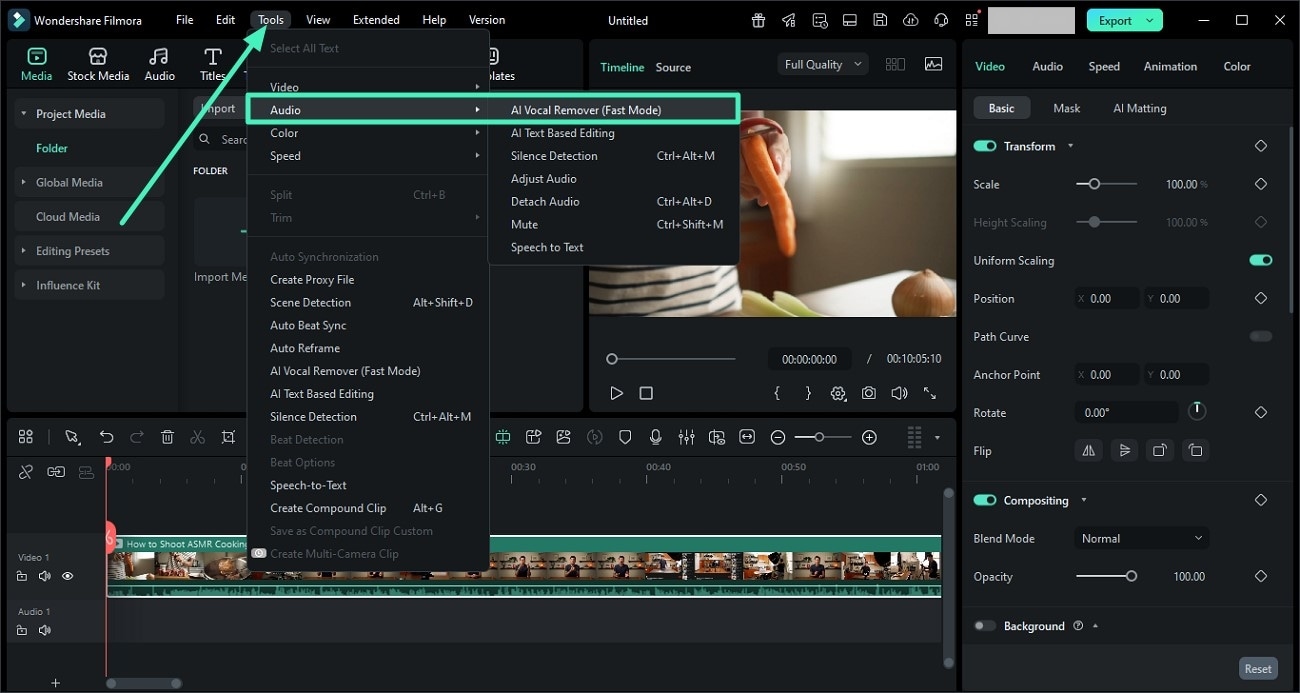
Step 3. Enable the AI Vocal Removal Functionality
Next, select this music clip in the timeline, navigate toward the "Tools" tab at the top toolbar, and click it. From the dropdown menu, choose the "Audio" option and select "AI Vocal Remover (Fast Mode)".
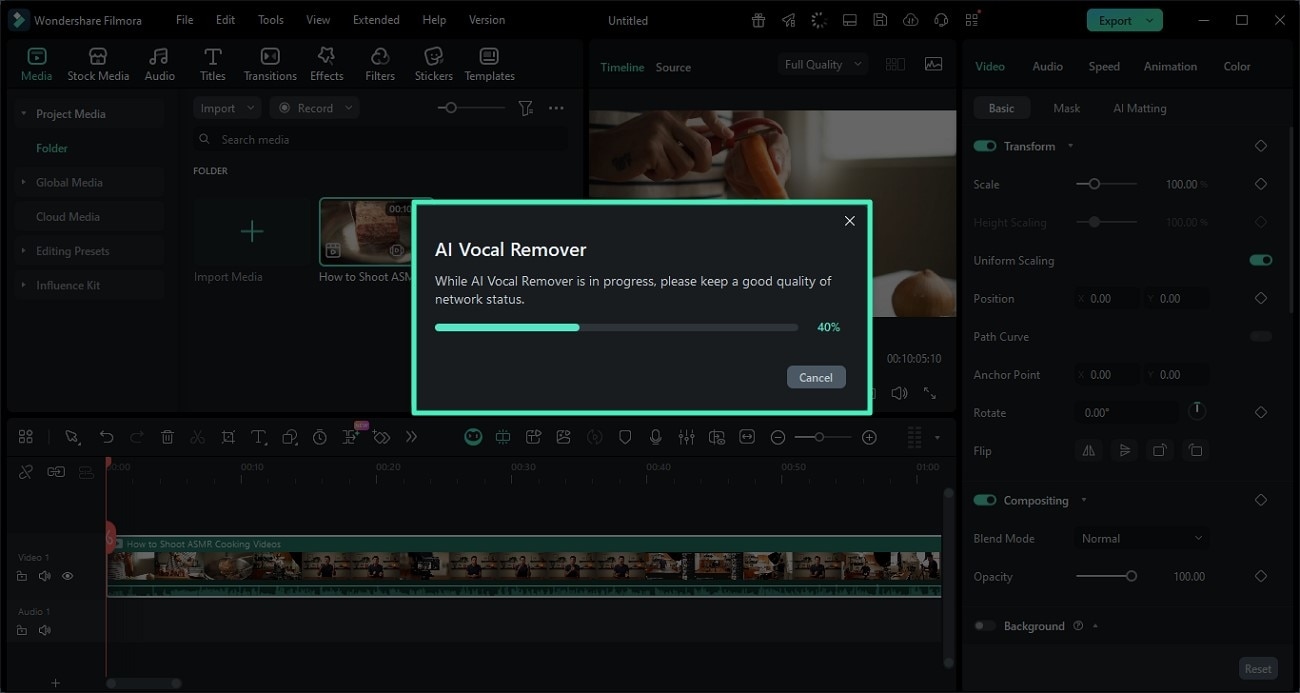
Step 4. Review Progress of Extraction
Once you select the feature, the tool will instantly begin the audio extraction process. Review the progress in the small window within the interface.
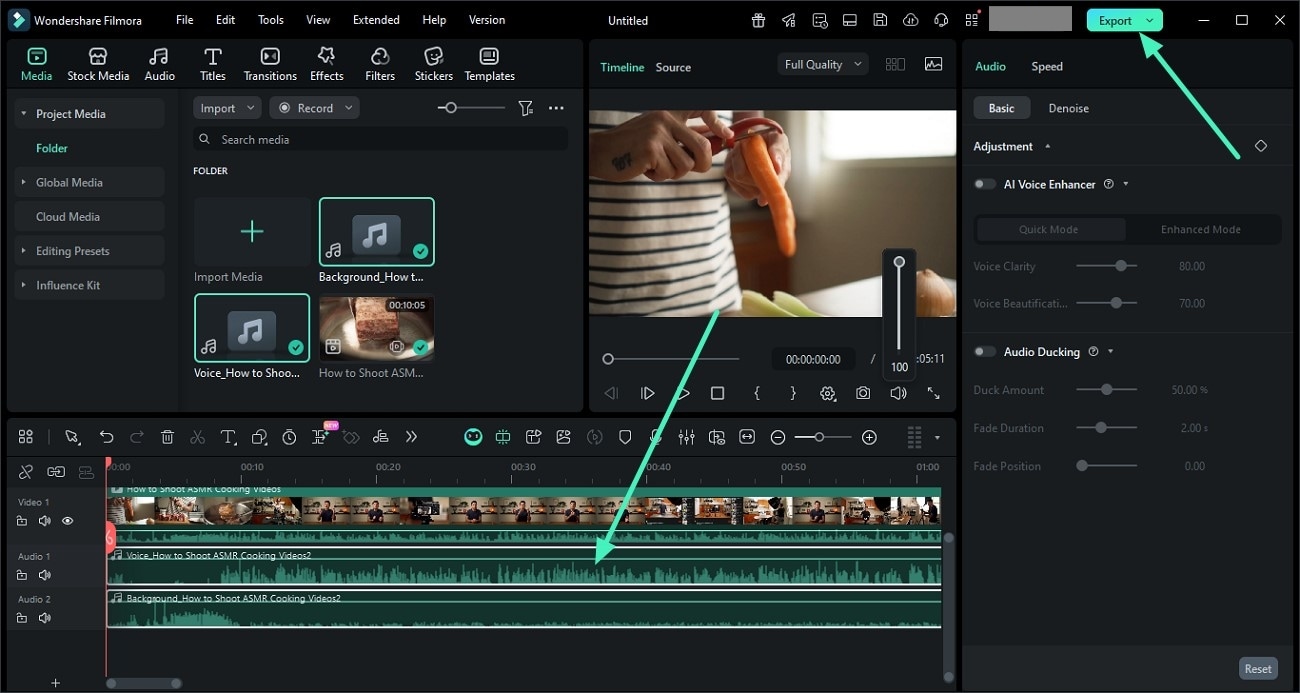
Step 5. Access Extracted Audio and Modify
When the vocals are successfully removed, review the audio track below the video track within the timeline. Make changes to the audio by accessing the modification functions within the panel on the right. Once you are satisfied with the results, head to the top-right corner of the interface and hit the "Export" button to save the final output.
Method 3: Using the Top Toolbar
Step 1. Access Vocal Remover Choose Mode
After importing the audio, head to the properties panel on the right and scroll through the Basic section under Audio. Now, locate the Vocal Remover option and select the Fast Mode. Click the Generate button on the right to begin the process.
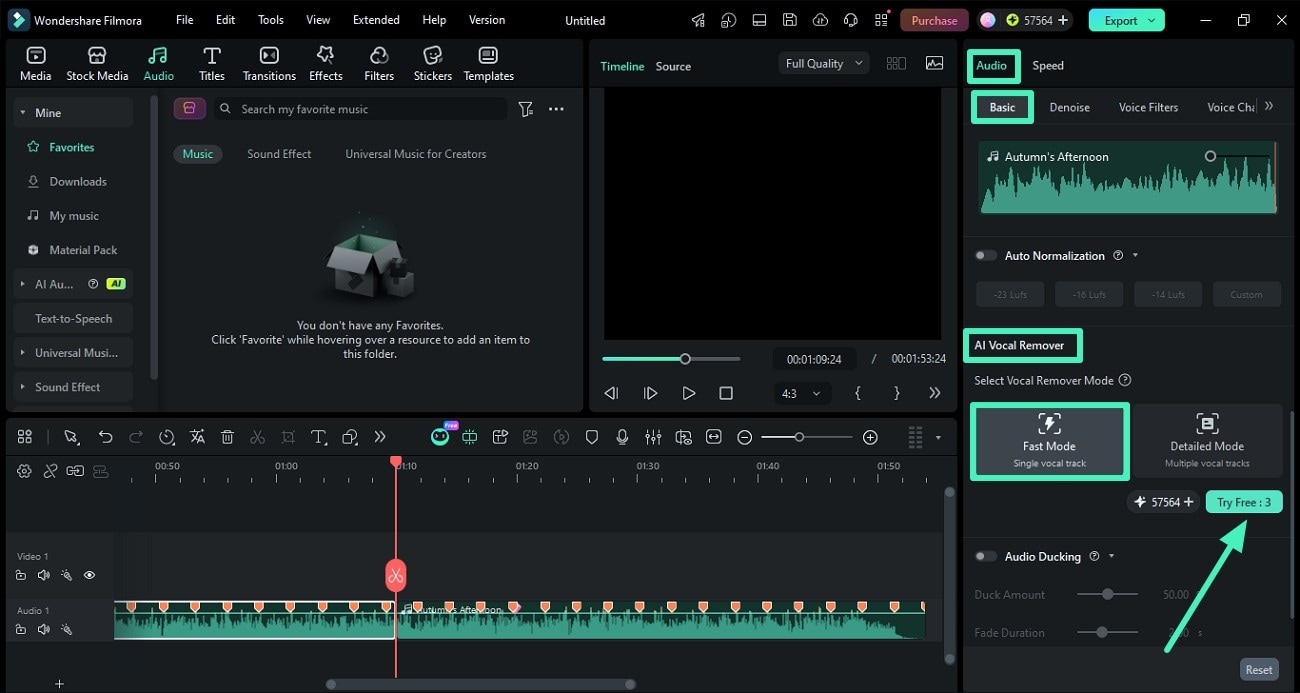
Step 2. Preview Removed Vocal
Once you press Generate, the tool will instantly begin the process. After completion, the audio file will be available within the Media section for you to review.
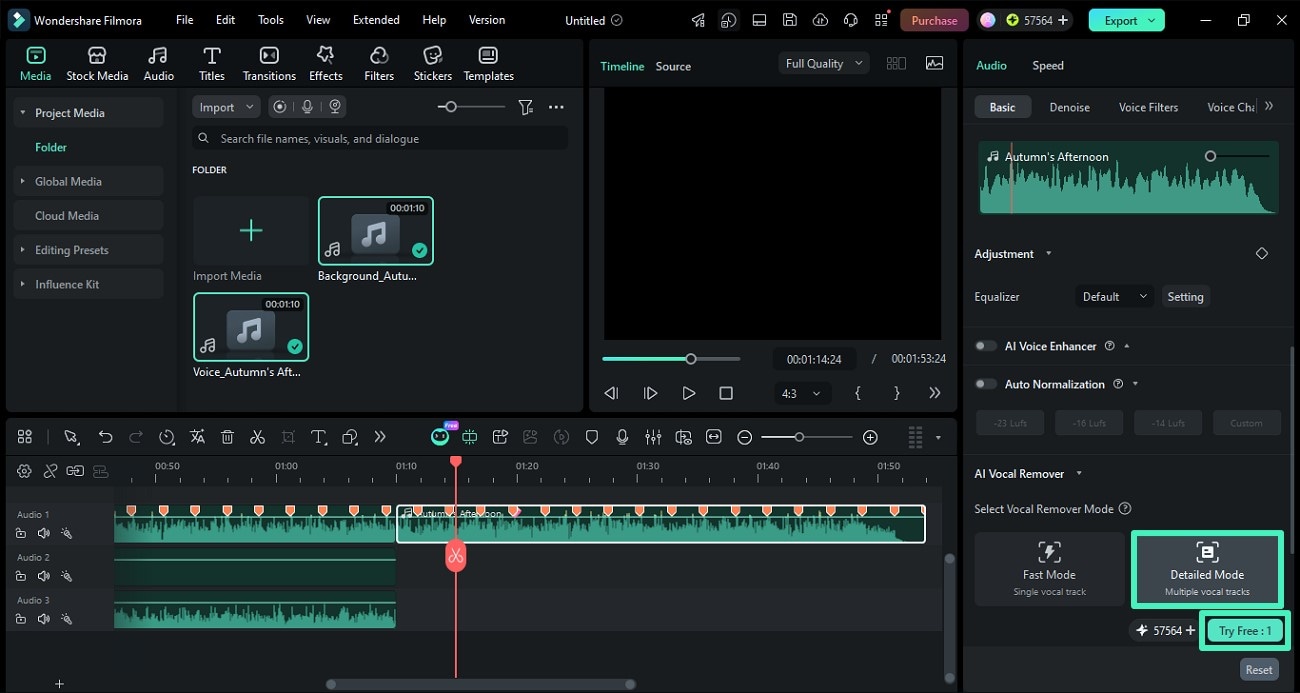
Step 3. Choose Detailed Mode
To perform an in-depth vocal remover, choose the Detailed Mode from the properties panel on the right. This generation now costs 25 Filmora credits per generation. Press the Generate button to execute the process.
Step 4. Review Final File and Save
Once the detailed vocal removal process is completed, play the file and preview. Once satisfied, hit the Export button to save the results.
Related Posts
Featured Articles
Top 5 Inspiring Nonprofit Videos That Spark Change
Want to know how to make an effective nonprofit video? Read this guide, where we discuss practical examples that create an impact in 2026.
Mastering Video Editing Through Kinemaster Transitions
Do you want to give a professional look to your video? Read that article and learn how you can use the Kinemaster transitions to create a smooth flow.
Top 8 Screencastify Alternatives to Try
Is Screencastify not meeting your recording needs? Check out these alternatives to Screencastify and find easy-to-use tools for all your screen capture needs.
Recommended User Guide
AI Audio Denoise for Windows
AI approach is trained by deep learning model with a great amount of data. It performs better in removing the noise, generating a new clear audio signal with distortion at the minimum.
AI Voice Cloning in Wondershare Filmora
Do you wish to clone a video recording or tutorial in your voice? Using basic text presets and easy voice training, create a perfect clone of your voice.
