For the Best Results, Use the Latest Version.
Filmora User Guide for Mac
-
Preparations for Mac
-
Account (Mac)
-
Get Started & Basic Settings (Mac)
- Release notes for Mac
- Latest Versions and Features for Mac
- Get Started on Mac - Full Guide
- Download/register/uninstall on Mac
- Panel Layout on Mac
- Keyboard shortcuts on Mac
- Touchbar on Mac
- Change playback quality on Mac
- Render preview files on Mac
- Manage Timeline on Mac
- Media for use on Mac
- Logo Reveal For Mac
- Marked Favorites for Mac
-
Compatibility & Tech Specs (Mac)
-
Performance Settings (Mac)
-
-
Creating Projects - Mac
-
Creating New Projects (Mac)
-
-
Importing & Recording - Mac
-
Importing (Mac)
-
Recording (Mac)
-
-
Video Editing for Mac
-
Basic Video Editing for Mac
- Edit Live Photos on Mac
- Enable/Disable Clip for Mac
- Magnetic Timeline For Mac
- Dual Monitor Setup for Video Editing on Mac
- Select All Clips on Timeline for Mac
- Auto Ripple for Mac
- Split & Cut Videos on Mac
- Compositing on Mac
- Crop and zoom on Mac
- Playback Zoom Level for Mac
- Change Speed on Mac
- Play Video in Reverse on Filmora for Mac
- Mark In and Mark Out for Mac
- Markers for Mac
- Group Clips in Filmora for Mac
- Customized Backgrounds for Videos and Images in Mac
- Video snapshot on Mac
- Freeze Frame on Mac
- Auto enhance on Mac
- Applying Drop Shadow for Mac
- Adjustment Layer for Mac
- Mark Clips in Filmora for Mac
- Video Editing Ruler – Mac
- Apply Transforming for Mac
-
Advanced Video Editing for Mac
- Text Animation Path for Mac
- Create Multi-Camera Clip for Mac
- Filmora Motion Blur | Mac
- Drawing Tools for Mac | Filmora Guide
- Compound Clips for Mac
- AI Video Enhancer for Mac
- Video Chapters in Filmora for Mac
- Filmora Flicker Removal Guide | Mac
- Multi-Clip Editing for Mac
- Keyframe Graph Editor for Mac
- Add Animation Keyframing in Filmora for Mac
- Multi-Frame in Filmora on Mac
- Masking in Filmora on Mac
- PIP (Picture in Picture) in Filmora on Mac
-
AI-Powered Video Editing for Mac
- Smart Scene Cut for Mac
- Smart Short Clips for Mac
- Filmora AI Eye Contact - Mac
- Filmora Image to Video for Mac
- AI Idea to Video for Mac
- AI Text-to-Video for Mac
- Instant Cutter Tool on Mac
- AI Face Mosaic for Mac
- Filmora Image to Prompt for Mac
- Keyframe Path Curve for Mac
- Filmora AI Image Enhancer Guide – macOS
- Planar Tracking for Mac
- Filmora AI Relight - Mac
- AI Extend For Mac
- AI Script-to-Video for Mac
- AI Text-Based Editing in Mac
- Create With Instant Mode on Mac
- ChatGPT Plugin - AI Copywriting on Mac
- AI Smart Cutout in Filmora for Mac
- Auto reframe on Mac
- Lens Correction in Filmora for Mac
- AI Portrait Cutout on Mac
- Scene detection on Mac
- AI Smart Masking for Mac
- AI Mate Editing for Mac
- Motion Tracking on Mac
- Video Stabilization for Mac
- AI Video/Photo Object Remover for Mac
- AI Smart Search for Mac
- AI Skin Tone Protection for Mac
- Green screen on Mac
- Super Slow Motion with Optical Flow for Mac
- AI Stylizer for Mac
- Video Denoise for Mac
-
-
Audio Editing for Mac
-
Basic Audio Editing for Mac
-
Advanced Audio Editing for Mac
-
AI-Powered Audio Editing for Mac
- Audio To Video for Mac
- AI Sound Effect for Mac
- Smart BGM Generation on Mac
- AI Voice Enhancer for Mac
- Audio Stretch for Mac
- AI Audio Denoise for Mac
- Auto Synchronization on Mac
- AI Vocal Remover for Mac
- AI Auto Beat Sync for Mac
- AI Music Generator for Mac
- AI Voice Cloning on Mac
- Silence Detection on Mac
-
-
Text Editing for Mac
-
Basic Text Editing for Mac
-
Advanced Text Editing for Mac
-
AI-Powered Text Editing for Mac
-
-
Video Customizations for Mac
-
Video Effects (Mac)
-
Audio Effects (Mac)
-
Transitions (Mac)
-
Stickers (Mac)
-
Filters (Mac)
-
Color Editing (Mac)
-
Animations (Mac)
-
Templates (Mac)
-
Asset Center (Mac)
-
-
Exporting & Share & Cloud Backup - Mac
Filmora Tutorial Videos
Filmora 13 & 14 User Guide in PDF
Filmora 12 User Guide in PDF
Filmora 11 User Guide in PDF
Filmora 9 & 10 User Guide
AI Vocal Remover for Mac
For Mac users, Filmora offers a comprehensive solution for removing vocals from video files effortlessly - AI Vocal Removal. It supports multi-speaker detection, making it ideal for podcasts, interviews, and group recordings by isolating each voice on separate tracks. This advanced feature allows creators to remix, produce karaoke tracks, or clean up dialogue with professional precision.
Index
Method 1: From the Timeline Options Panel
Step 1. Start Filmora and Create a New Project
After completing Filmora's installation on your Mac, open it. Once you have logged into your account or created a new one, navigate to the "New Project" button on the main screen and log in to it.
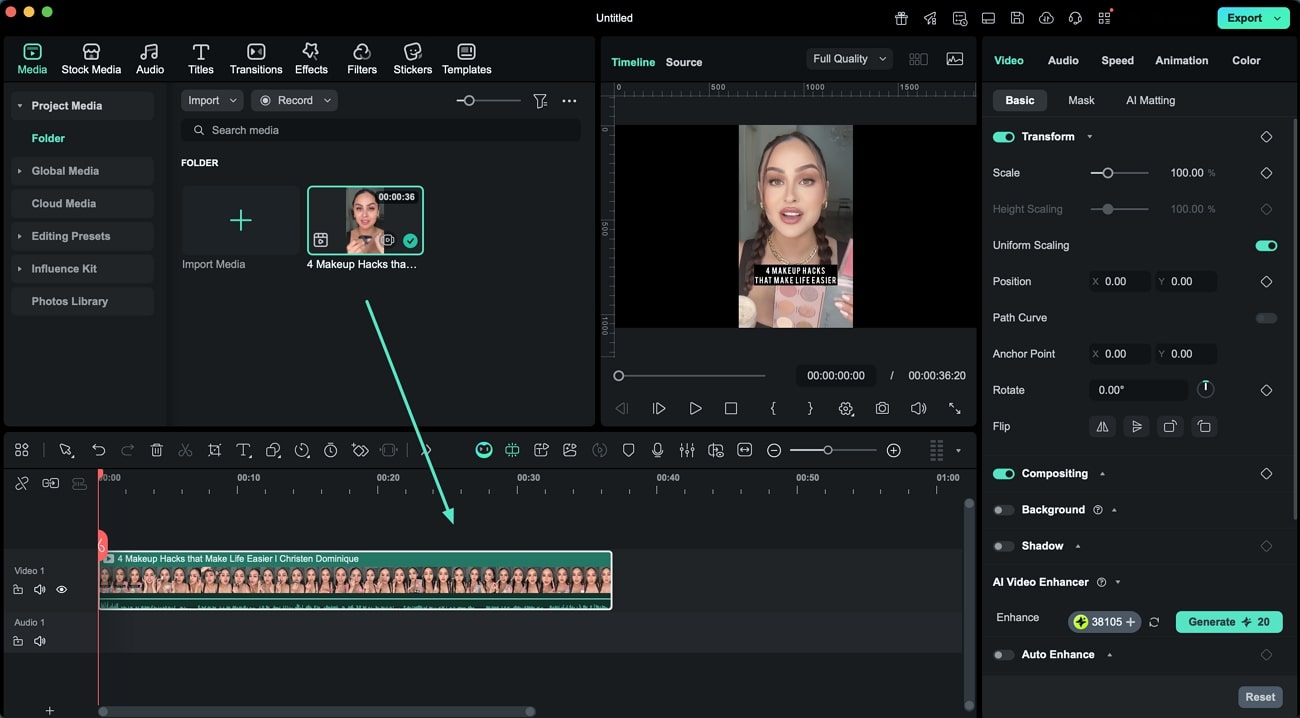
Step 2. Bring your Video to the Timeline
Once the main interface of Filmora is displayed on your screen, navigate towards the "Media" section and press the "Import" button to import your files. After your files are imported into the Media library, drag them with the help of your mouse and drop them on a timeline track.
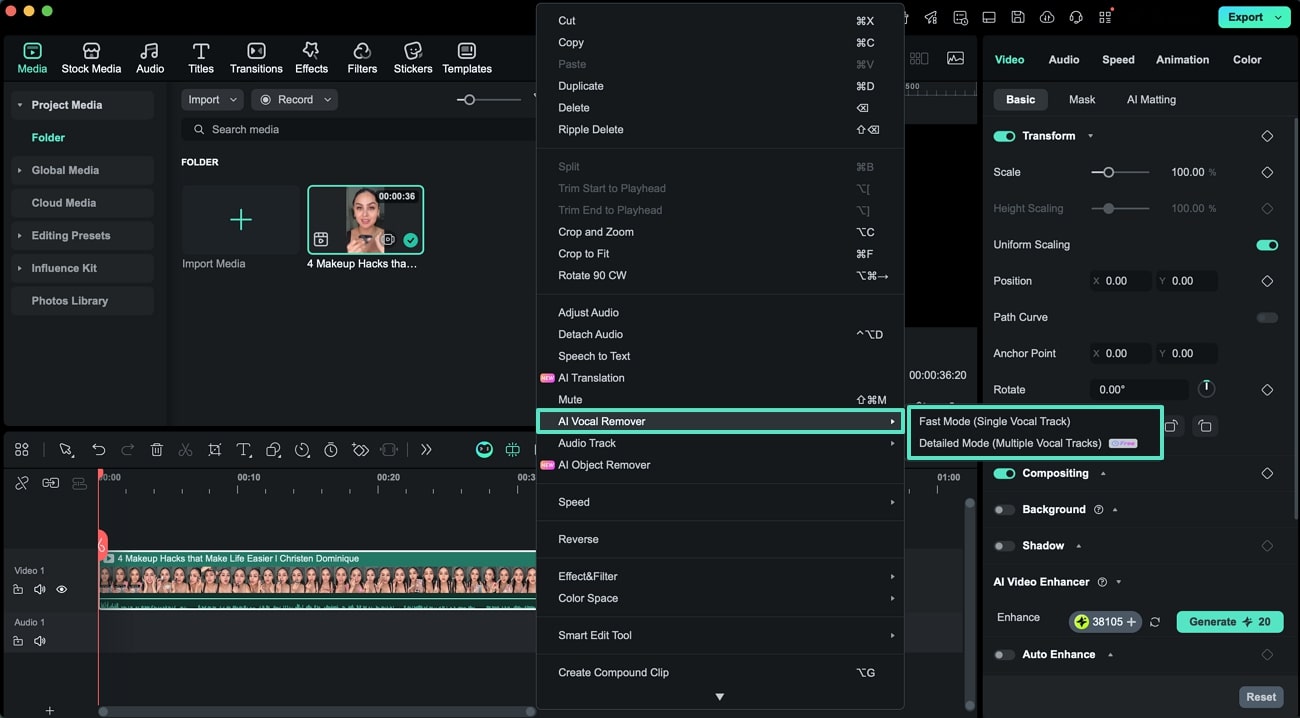
Step 3. Access the Vocal Remover Tool
Now select the clip into the timeline and right-click on it. From the drop-down appearing on the window, find and choose the "AI Vocal Remover" option. Now select the mode such as "Fast Mode" or "Detailed Mode", from the expanded list.
Step 4. Preview Fast Mode Extraction
Once you select "Fast Mode", preview the progress within the interface. The basic vocal extraction will be executed with the audio files separated in the timeline. You can perform further editing on the audio as well as the video track.
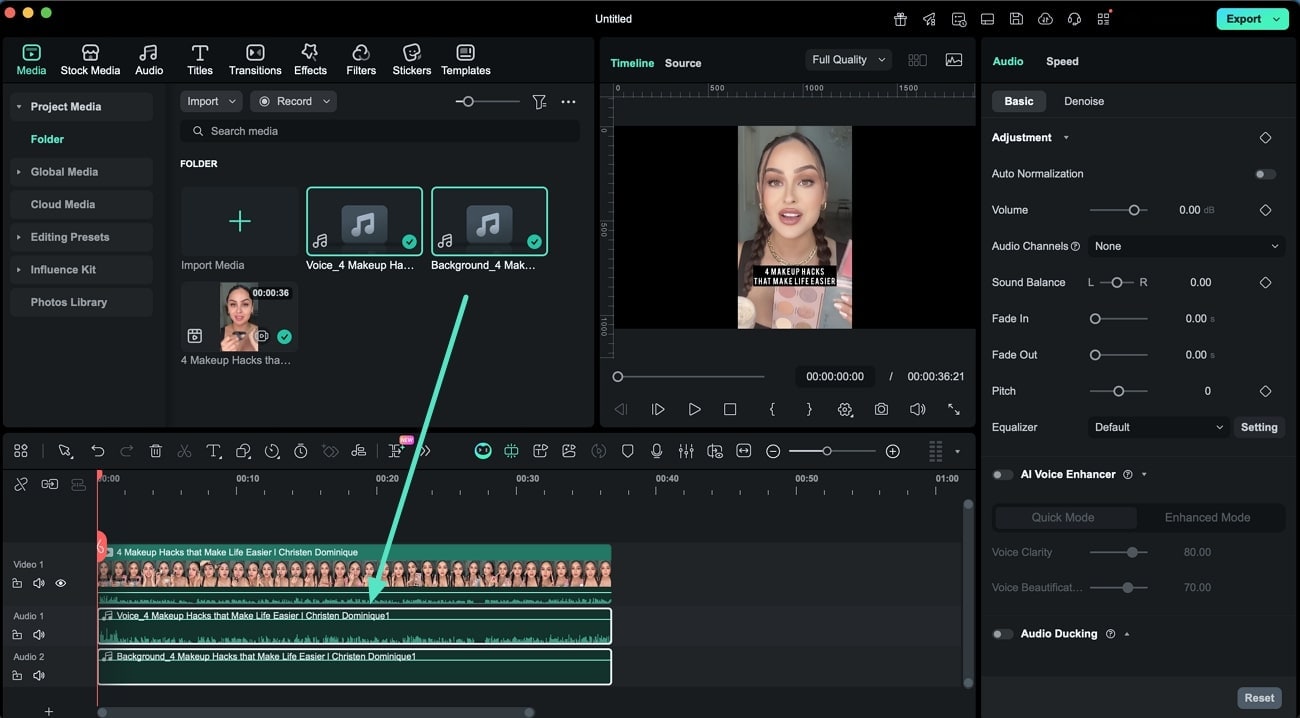
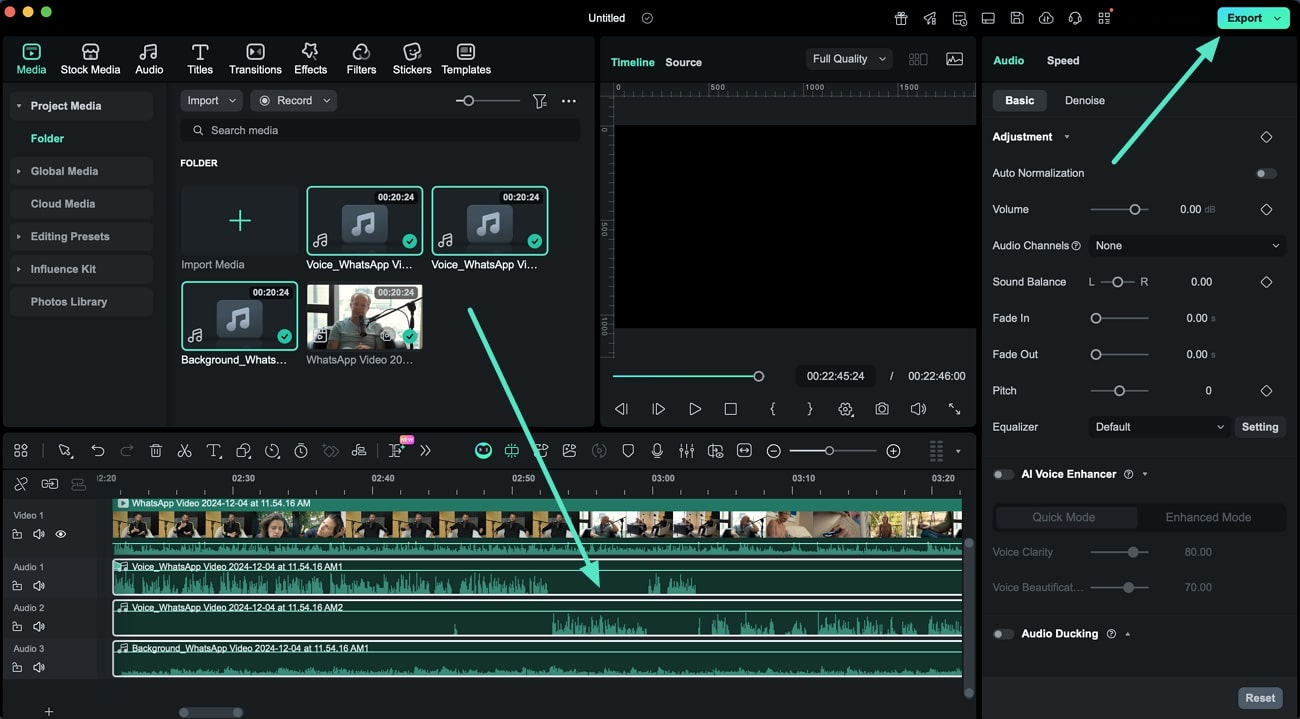
Step 5. Acquire Detailed Mode Extraction
When you select the "Detailed Mode", the timeline will display multiple "Voice" clips (one for each detected speaker) and a single "Background" music. You can access them within the timeline below the video track. Acquire the panel on the right to modify the audio according to your preferences. Once you are satisfied with the results, go to the top-right corner of the interface and press the "Export" button to save the results.
Method 2: Using the Top Toolbar
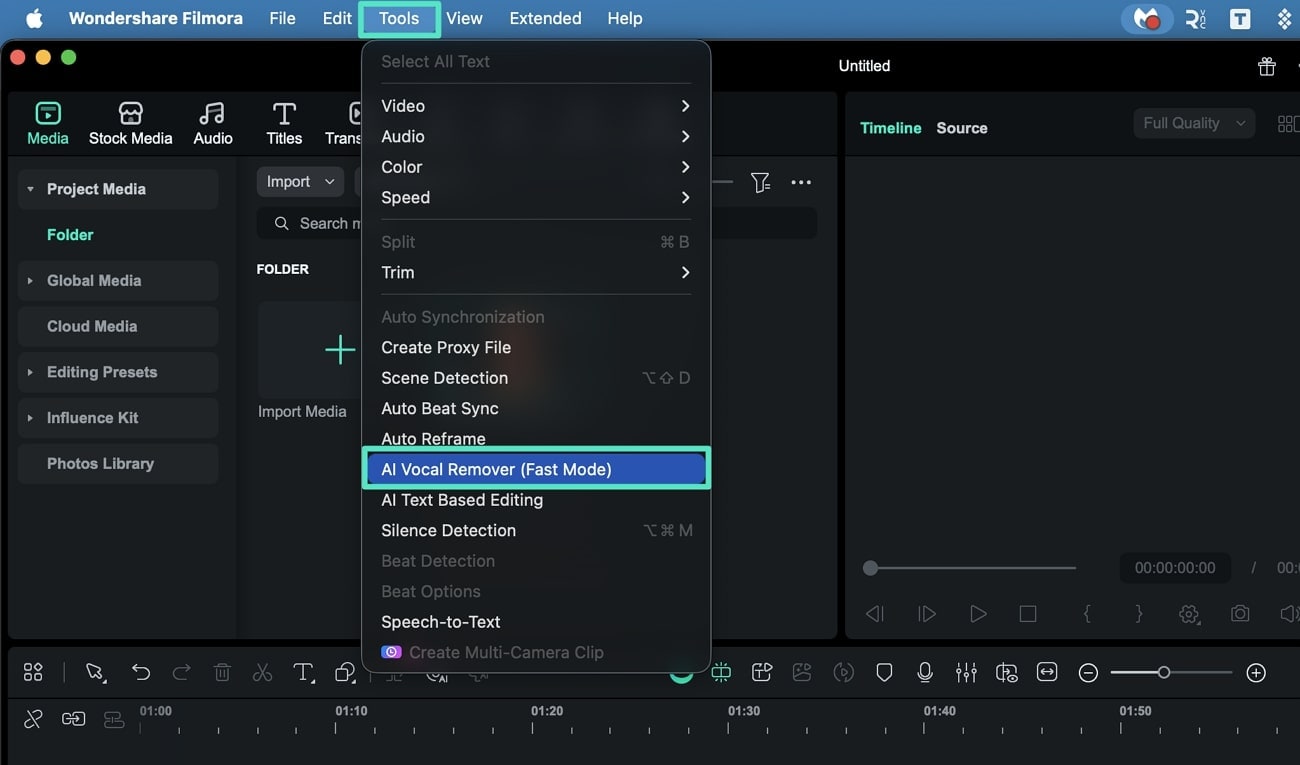
Step 1. Enable the Vocal Removal
Bring the clip to the timeline, select it, and navigate towards the toolbar at the top of the screen. A drop-down menu will appear by selecting the "Tools" tab, where you can click on the "AI Vocal Remover (Fast Mode)", and the process will start. The progress of vocal removal will be shown on your device in a small window.
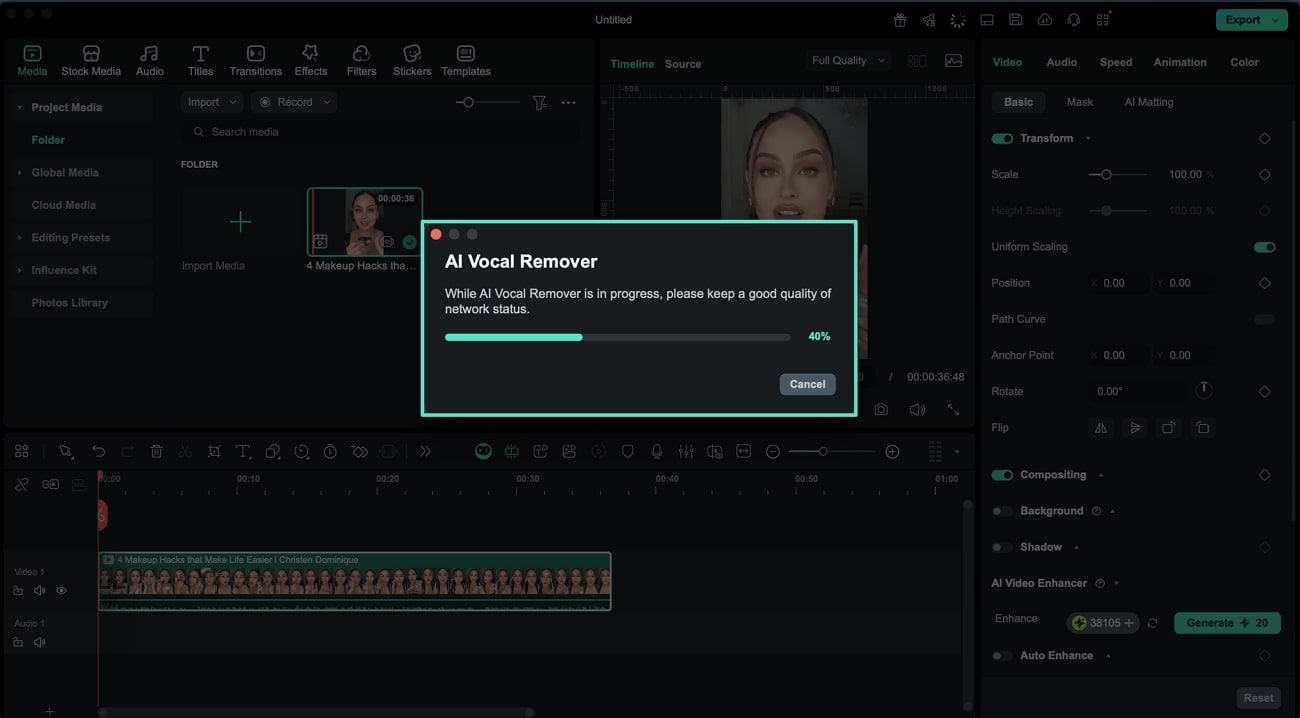
Step 2. Review Extraction Progress
After selecting the feature, the tool immediately starts extracting the audio. You can monitor the progress in the small window embedded within the interface, allowing you to stay updated on the extraction status.
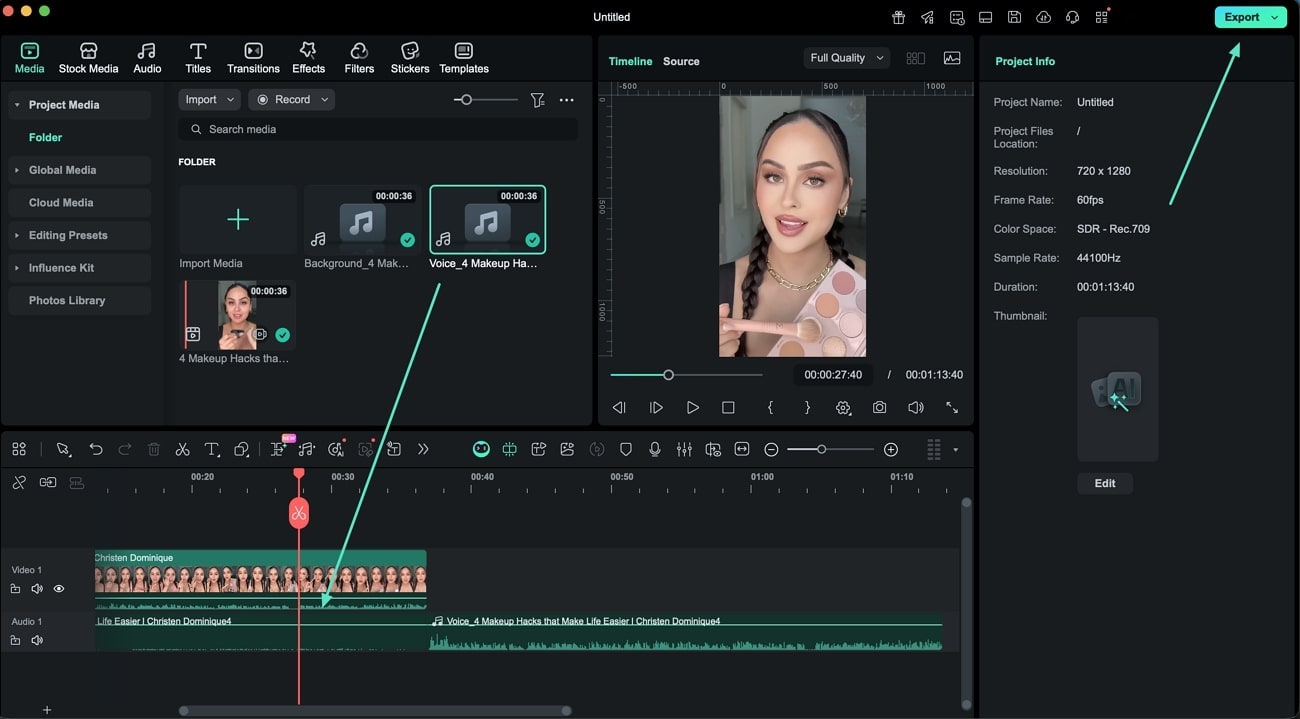
Step 3. Access and Edit Extracted Audio
After the vocals are removed successfully, locate the audio track beneath the video layer on the timeline. Use the editing tools located in the panel on the right to make any adjustments to the audio. When satisfied with your edits, click the "Export" button positioned at the interface's top-right corner to save your final audio output.
Method 3: Using Properties Panel
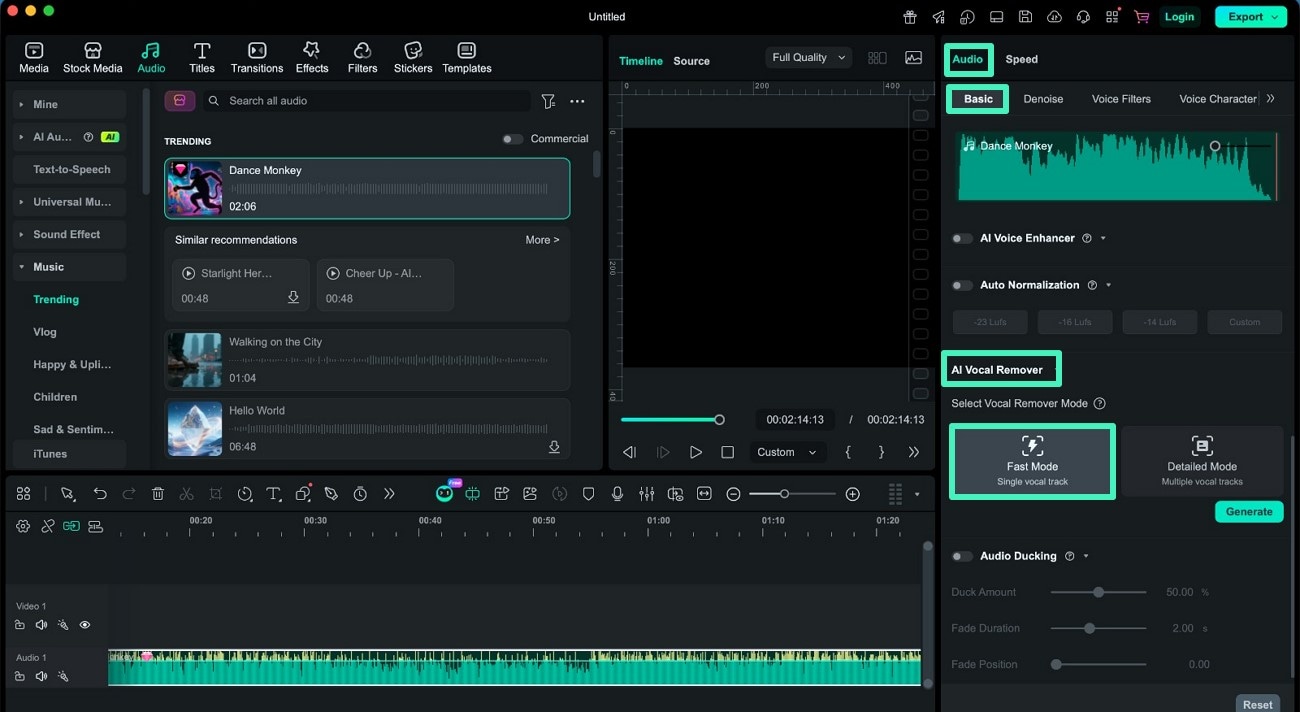
Step 1. Open Vocal Remover and Select Fast Mode
After adding your audio file to the timeline, move to the Properties panel located on the right side of the interface. Under the Audio section, find the Vocal Remover feature and choose Fast Mode to begin quick vocal separation. Click the Generate button to let the tool begin vocal extraction.
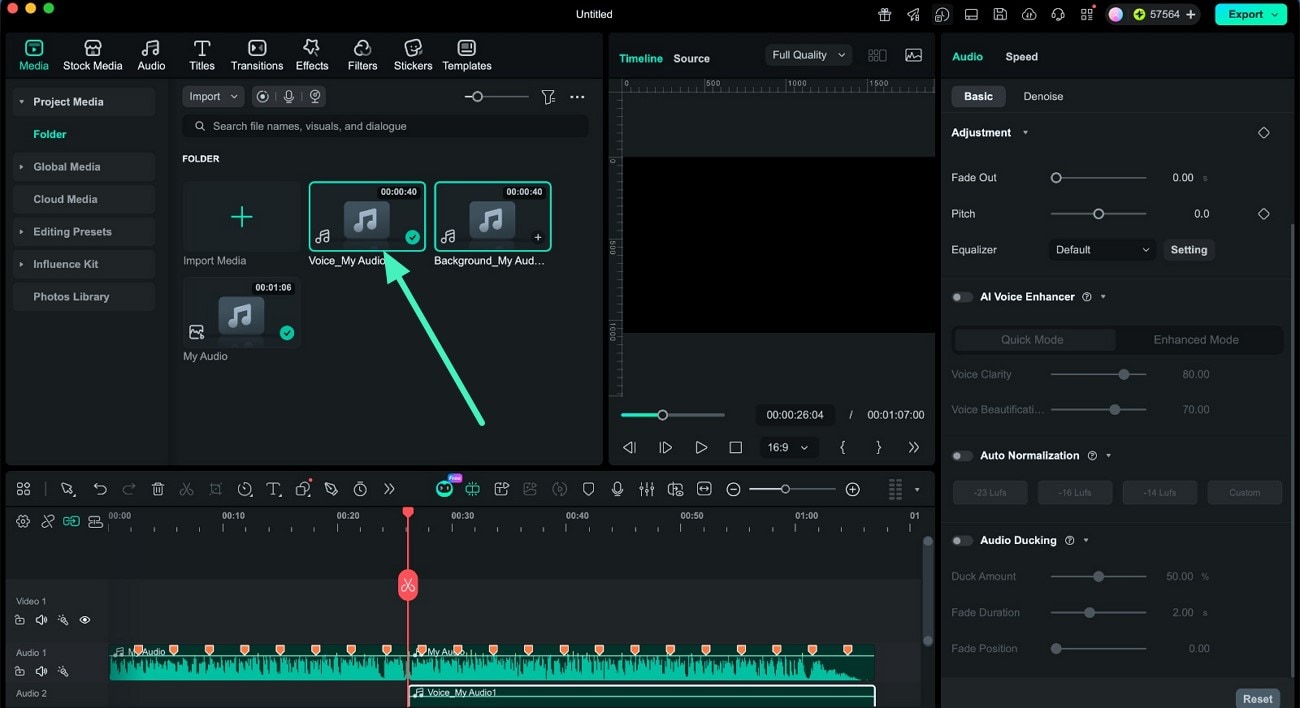
Step 2. Preview the Processed Audio
Once Fast Mode is activated, Filmora will automatically process the audio in seconds. After completion, the separated file will appear in the Media library, allowing you to preview the instrumental or vocal track before continuing.
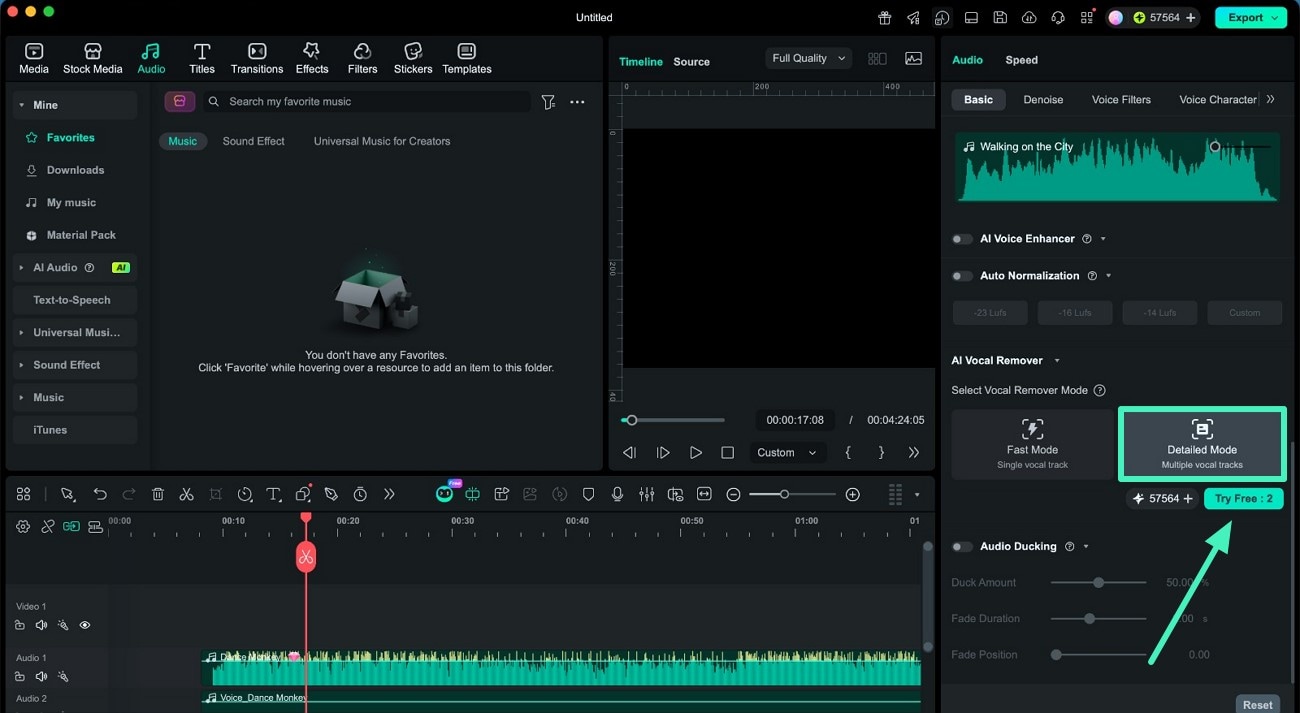
Step 3. Switch to Detailed Mode for Better Accuracy
If you need more precise vocal separation, return to the Properties panel and select Detailed Mode from the Vocal Remover settings. Click the Generate button to execute the process. This advanced processing option delivers cleaner results and currently consumes 25 Filmora credits for each generation.
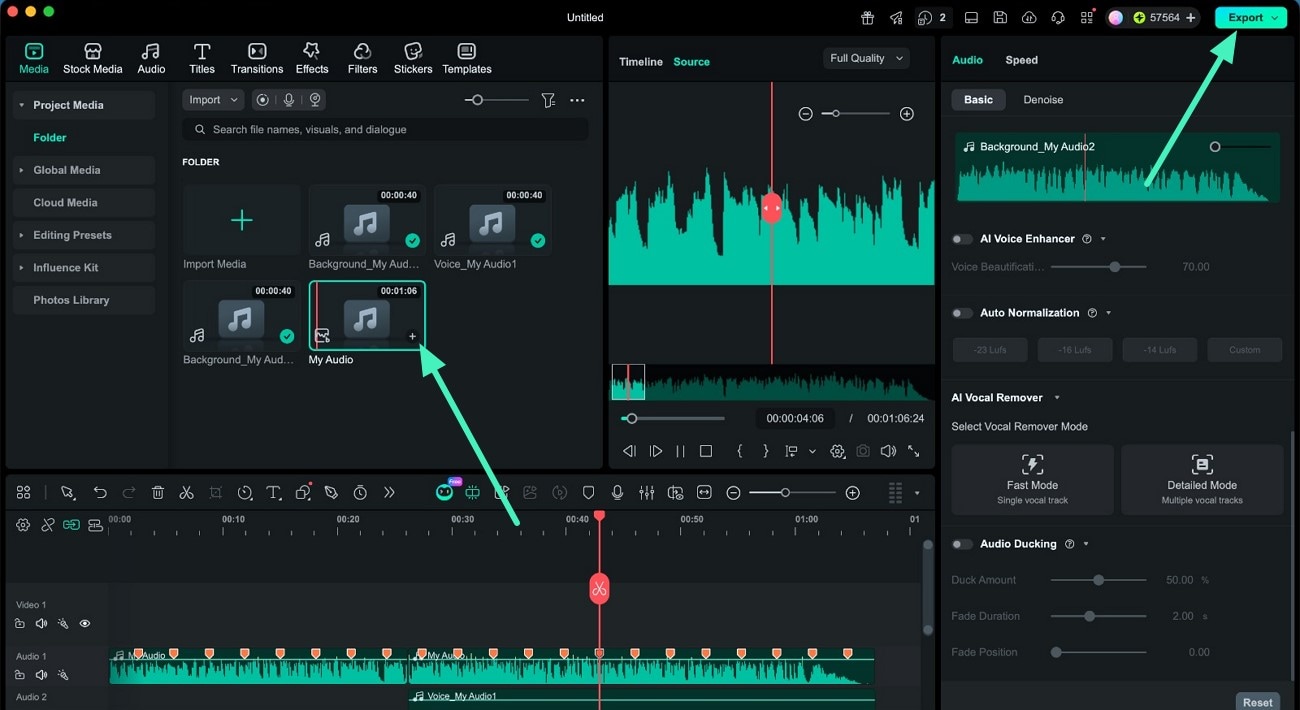
Step 4. Review the Final Output and Export
After the detailed processing finishes, play the edited audio to check the final quality. When satisfied with the results, click the Export button and save the processed file to your Mac device.
Related Posts
Featured Articles
Learn more popular articles from Wondershare.
Step-by-Step Guide: Resizing Videos in iMovie on Your Mac
A complete guide to resizing videos in iMovie on Mac. Follow our step-by-step guide to adjust aspect ratios and optimize your videos for any platform without any hassle.
Top-picked Face Blur Video Apps for Androids/ iPhones and Desktop Users
Looking for the best app to blur faces in video? Explore this list of X face blur video apps. For Android and iPhone. From automatic face tracking to manual face blurring, this list contains several tools to choose from for your online security.
21 Best Free Anime Websites to Watch Anime Online (2026 Update)
Looking for where to watch anime for free? Our guide ranks 21 top anime websites. Discover legal, safe platforms to stream new releases & classics online now!
Recommended User Guide
Learn how to use more features.
Silence Detection on Mac
Learn to perform silence detection in Filmora for Mac
AI Audio Denoise for Mac
This guide helps you remove unsatisfying background sounds with just several clicks of the mouse. When you find the audio in the video is difficult to distinguish, use AI Audio Denoise, then you don’t need to record the video again.
AI Sound Effect for Mac
In this guide, we are going to learn all about sound effect generation with Filmora's AI technology.
