
For the Best Results, Use the Latest Version.
Filmora User Guide for Mac
-
Preparations for Mac
-
Account (Mac)
-
Get Started & Basic Settings (Mac)
- Release Notes for Mac
- Latest Version and Features for Mac
- Get Started on Mac - Full Guide
- Download/register/uninstall on Mac
- Panel Layout on Mac
- Keyboard Shortcuts in Mac
- Touchbar on Mac
- Change playback quality on Mac
- Render preview files on Mac
- Manage Timeline in Mac
- Media for use on Mac
- Logo Reveal For Mac
- Marked Favorites for Mac
-
Compatibility & Tech Specs (Mac)
-
Performance Settings (Mac)
-
-
Creating Projects - Mac
-
Creating New Projects (Mac)
-
-
Importing & Recording - Mac
-
Importing (Mac)
-
Recording (Mac)
-
-
Video Editing for Mac
-
Basic Video Editing for Mac
- Edit Live Photos on Mac
- Enable/Disable Clip for Mac
- Magnetic Timeline For Mac
- Dual Monitor Setup for Video Editing on Mac
- Select All Clips on Timeline
- Auto Ripple for Mac
- Split & Cut Videos on Mac
- Compositing on Mac
- Crop and zoom on Mac
- Playback Zoom Level for Mac
- Change Speed on Mac
- Play Video in Reverse on Filmora for Mac
- Mark In and Mark Out for Mac
- Markers for Mac
- Group Clips in Filmora for Mac
- Customized Backgrounds for Videos and Images in Mac
- Video snapshot on Mac
- Freeze Frame on Mac
- Auto enhance on Mac
- Applying Drop Shadow for Mac
- Adjustment Layer for Mac
- Mark Clips in Filmora for Mac
- Video Editing Ruler – Mac
- Apply Transforming for Mac
-
Advanced Video Editing for Mac
- Keyframe Motion Blur for Mac
- Camera Tracking for Mac
- Keyframe Path Curve for Mac
- Text Animation Path for Mac
- Create Multi-Camera Clip for Mac
- Filmora Motion Blur | Mac
- Drawing Tools for Mac | Filmora Guide
- Track Matte for Mac
- Compound Clips for Mac
- 360° Video Reframing for Mac
- AI Video Enhancer for Mac
- Video Chapters in Filmora for Mac
- Filmora Flicker Removal Guide | Mac
- Multi-Clip Editing for Mac
- Keyframe Graph Editor for Mac
- Create Multi-Screen Videos in Filmora on Mac
- Animation Keyframing for Mac
- Masking in Filmora on Mac
- PIP (Picture in Picture) in Filmora on Mac
-
AI-Powered Video Editing for Mac
- Smart Scene Cut for Mac
- Smart Short Clips for Mac
- Filmora AI Eye Contact - Mac
- Filmora Image to Video for Mac
- AI Idea to Video for Mac
- AI Text-to-Video for Mac
- AI Media Analysis for Mac
- Instant Cutter Tool on Mac
- AI Face Mosaic for Mac
- Filmora Image to Prompt for Mac
- Filmora AI Image Enhancer Guide – macOS
- Planar Tracking for Mac
- Filmora AI Relight - Mac
- AI Extend For Mac
- AI Script-to-Video for Mac
- AI Text-Based Editing in Mac
- Create With Instant Mode on Mac
- ChatGPT Plugin - AI Copywriting on Mac
- AI Smart Cutout in Filmora for Mac
- Auto reframe on Mac
- Lens Correction in Filmora for Mac
- AI Portrait Cutout on Mac
- Scene detection on Mac
- AI Smart Masking for Mac
- AI Mate Editing for Mac
- Motion Tracking on Mac
- Video Stabilization for Mac
- AI Video/Photo Object Remover for Mac
- AI Smart Search for Mac
- AI Skin Tone Protection for Mac
- Green screen on Mac
- Super Slow Motion with Optical Flow for Mac
- AI Stylizer for Mac
- Video Denoise for Mac
-
-
Audio Editing for Mac
-
Basic Audio Editing for Mac
-
Advanced Audio Editing for Mac
-
AI-Powered Audio Editing for Mac
- Audio To Video for Mac
- AI Sound Effect for Mac
- Smart BGM Generation on Mac
- AI Voice Enhancer for Mac
- Audio Stretch for Mac
- AI Audio Denoise for Mac
- Auto Synchronization on Mac
- AI Vocal Remover for Mac
- AI Auto Beat Sync for Mac
- AI Music Generator for Mac
- AI Voice Cloning on Mac
- Silence Detection on Mac
-
-
Text Editing for Mac
-
Basic Text Editing for Mac
-
Advanced Text Editing for Mac
-
AI-Powered Text Editing for Mac
-
-
Video Customizations for Mac
-
Video Effects (Mac)
-
Audio Effects (Mac)
-
Transitions (Mac)
-
Stickers (Mac)
-
Filters (Mac)
-
Color Editing (Mac)
-
Animations (Mac)
-
Templates (Mac)
-
Asset Center (Mac)
-
-
Exporting & Share & Cloud Backup - Mac
Filmora Tutorial Videos
Filmora 15 User Guide in PDF
Filmora 13 & 14 User Guide in PDF
Filmora 12 User Guide in PDF
Filmora 11 User Guide in PDF
Filmora 9 & 10 User Guide
AI Color Palette for Mac (Color Match)
Color Match has been upgraded to AI Color Palette. This new tool utilizes advanced AI algorithms to more accurately extract and apply color palettes from videos or images. AI Color Palette supports matching the color between reference frames and the target shots to create a consistent look across your videos.
If you need color correction but may not have expertise in detailed color adjustments, this guide will show you how to apply AI Color Palette to your videos or images on macOS:
Index
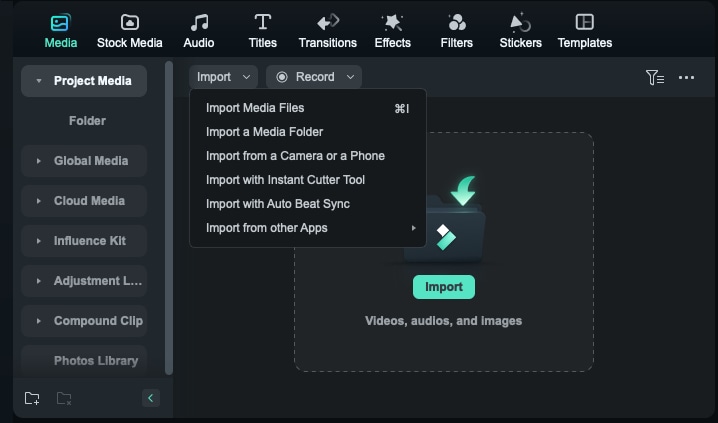
Step 1: Import and Add Media Files to the Timeline
If you have Filmora installed, launch the program and create a new project. Import the color reference video or image and the footage you want to adjust from your computer, then add them to the timeline.
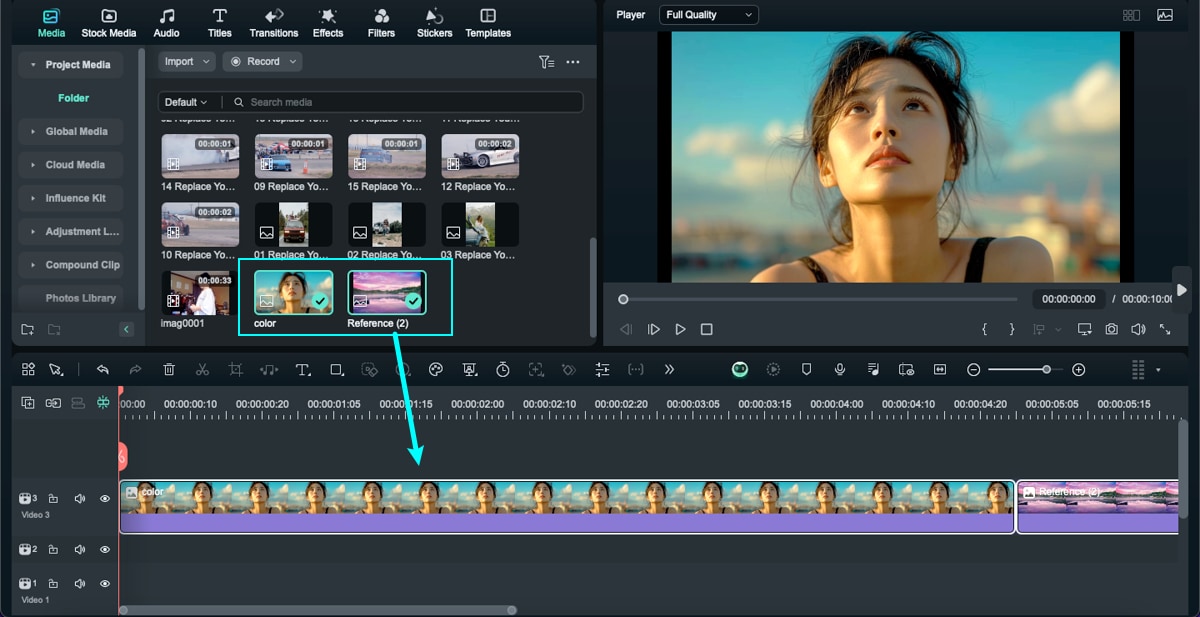
Step 2: Enable AI Color Palette
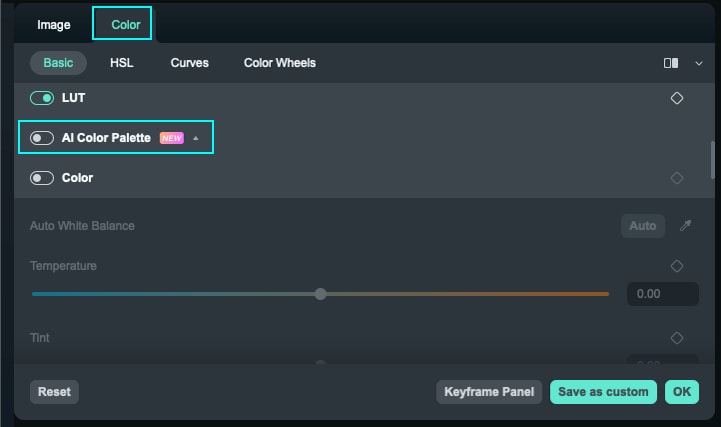
Double-click the clip on the timeline that you want to adjust the color for, opening the editing panel. Then, navigate to Color > Basic and click the button next to AI Color Palette to activate the feature.
Step 3: Choose the Reference Frame
Method 1: From Timeline
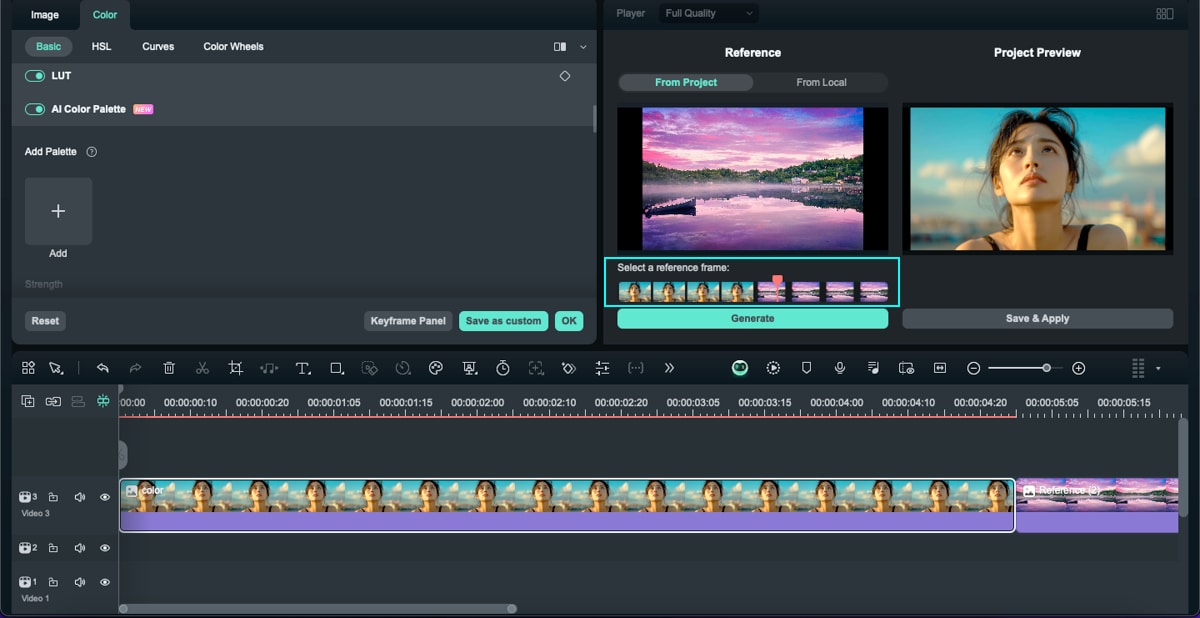
Click the "Timeline" button, select an imported media file, drag the slider to choose the reference frame, and click "Generate".
Method 2: From Local File
Click the "Local File" button to import a local file. If you want to select a different file, click the "Replace" button above. Move the cursor to choose the reference frame and click "Generate".
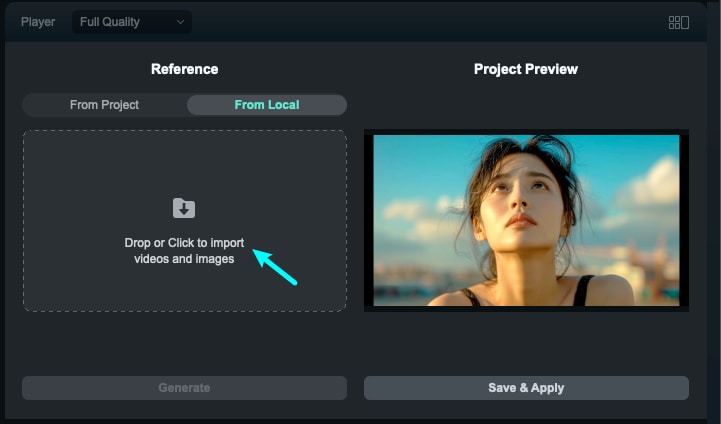
Step 4: Preview and Adjust the Setting
View the video on the right side of the preview panel. Adjust the strength in the property panel, drag the slider in the property panel to change the strength of matching colors. The range of settings is from 0 to 100. When you finish adjusting the strength, click OK and check the adjusted result.
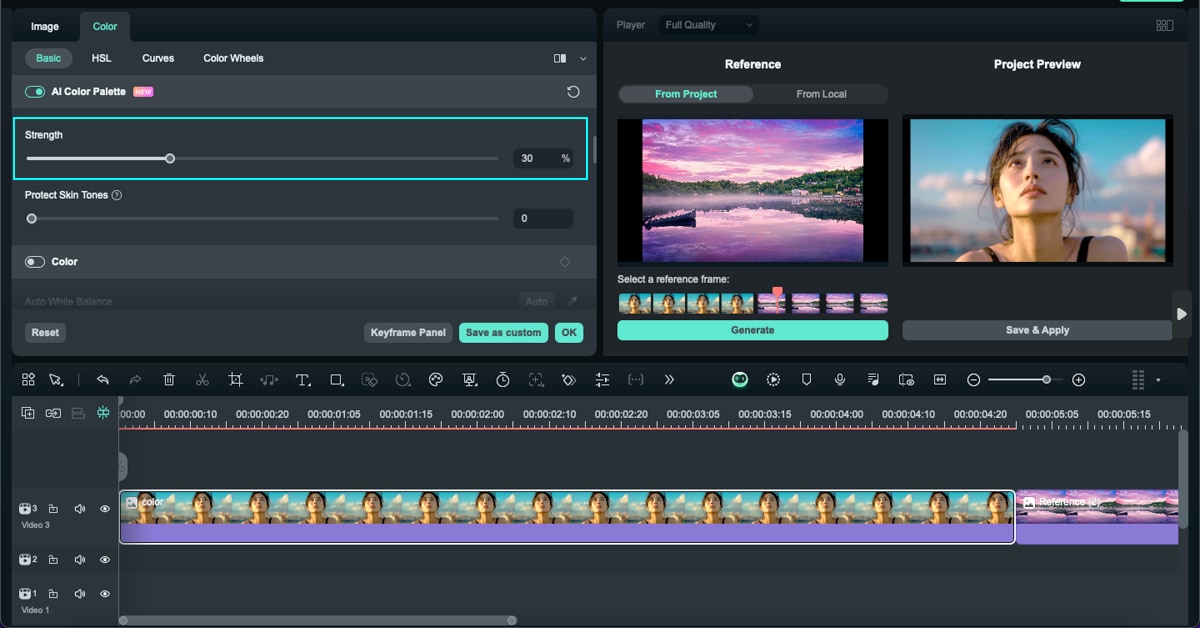
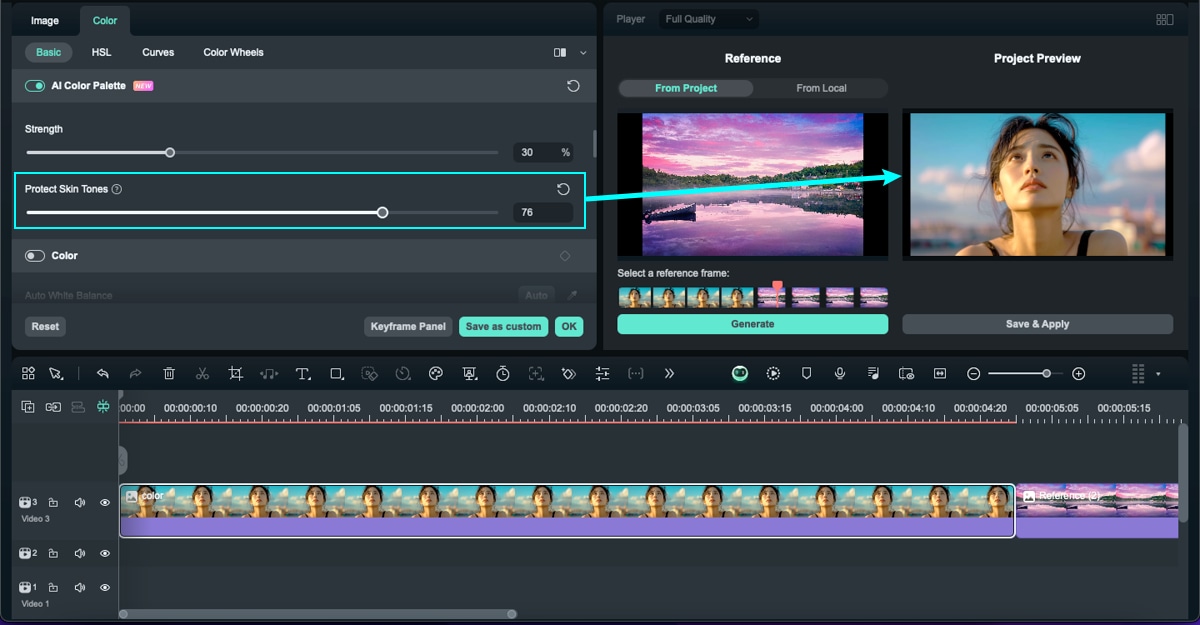
Enable Protect skin tones and adjust the settings in the property panel if there are people in the video.
Step 5: Save and Apply the Color Palette
After completing the color adjustments, click Save and Apply to exit the color palette mode.
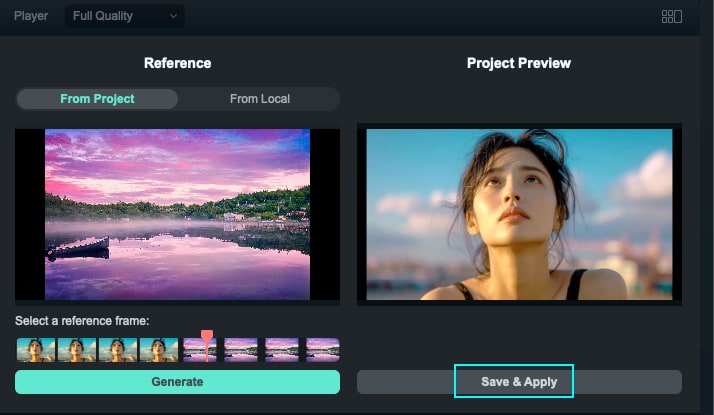
A customized color palette template will be generated automatically in the properties panel. You can also click the cloud button above to store it in the cloud.
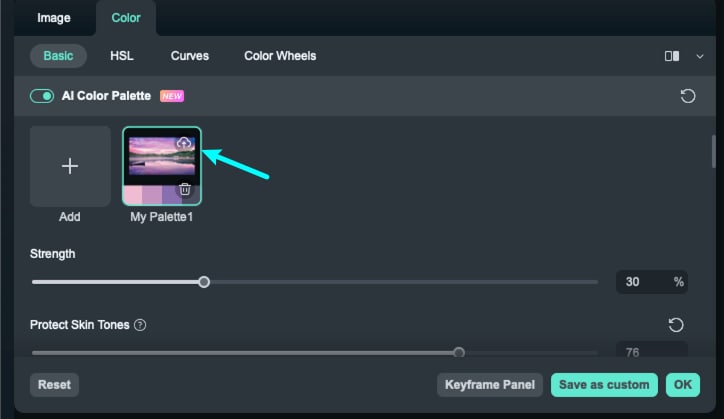
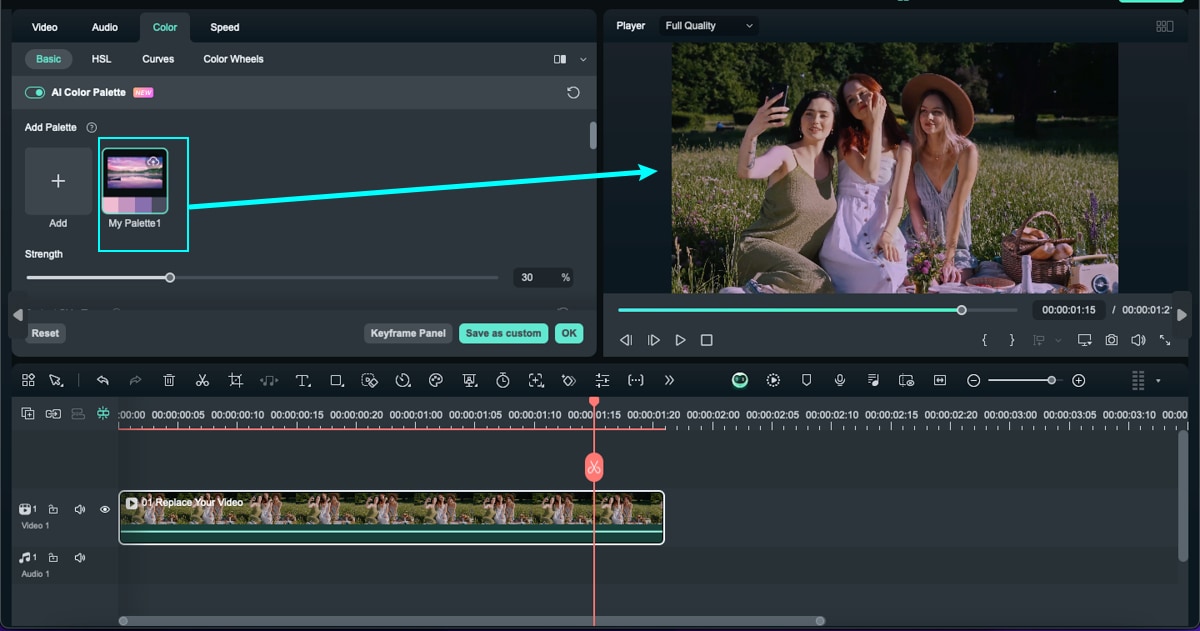
When importing new media files, click on the saved palette template in the AI Color Palette section to apply it with a single click.
Step 6: Remove Color Palette Adjustment
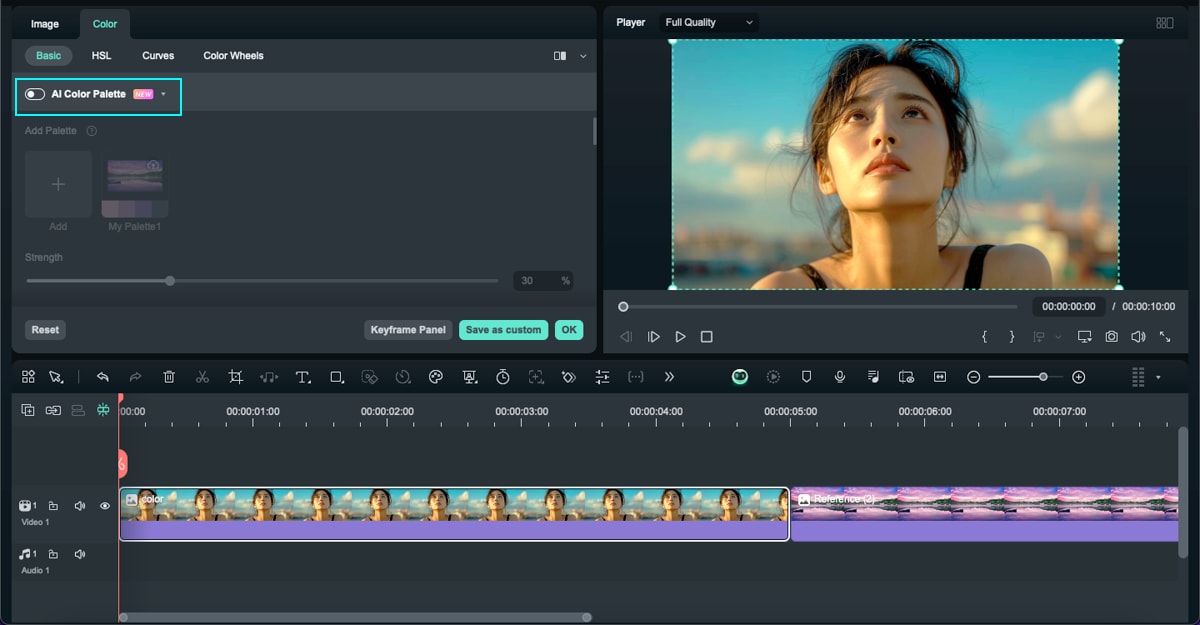
If you want to remove the adjustments, navigate to Color > Basic and click the button next to AI Color Palette to deactivate the feature. Then, the changes would be removed.
Step 7: Export and Share
Click Export when you finish editing and choose the format you want to save.
Related Posts
Featured Articles
Learn more popular articles from Wondershare.
What is the Razor Tool and How to Use the Premiere Pro Razor Tool?
Struggling with messy timelines when cutting clips in Premiere Pro? The Razor Tool (shortcut C) lets you cut video/audio precisely. Learn step-by-step use, key shortcuts (Ctrl+K/Cmd+K), fix gaps/pops, and try Filmora for easier cutting.
Apowersoft Screen Recorder Full Review and Its Alternative
What is an Apowersoft screen recorder? Know our professional review about it. We'll take an in-depth look at its key features, functionalities, ease of use, user reviews, and many more.
Choosing Between Audacity and Adobe Audition in 2026: A Comprehensive Comparison
Find out which audio editing software is superior in 2026. Our detailed comparison of Audacity and Adobe Audition covers all the key aspects you need to know.
Recommended User Guide
Learn how to use more features.
Pro Video Scopes for Mac
Wondershare Filmora, being a professional video editor, offers four types of video scopes.
Color Comparison View for Mac
In the pursuit of editing, color maintenance upholds the integrity of your content, and Filmora presents its Color Comparison View for you to master color editing.
Advanced Color Adjustment for Mac
Filmora offers various color correction and adjustment features, including the HSL function, RGB, and color wheels.
