For the Best Results, Use the Latest Version.
-
Preparations for Mac
-
Account (Mac)
-
Get Started & Basic Settings (Mac)
- Release notes for Mac
- Latest Versions and Features for Mac
- Get Started on Mac - Full Guide
- Download/register/uninstall on Mac
- Panel Layout on Mac
- Keyboard shortcuts on Mac
- Touchbar on Mac
- Change playback quality on Mac
- Render preview files on Mac
- Manage timeline on Mac
- Media for use on Mac
- Logo Reveal For Mac
- Marked Favorites for Mac
-
Compatibility & Tech Specs (Mac)
-
Performance Settings (Mac)
-
-
Creating Projects - Mac
-
Creating New Projects (Mac)
-
-
Importing & Recording - Mac
-
Importing (Mac)
-
Recording (Mac)
-
-
Video Editing for Mac
-
Basic Video Editing for Mac
- Edit Live Photos on Mac
- Enable/Disable Clip for Mac
- Magnetic Timeline For Mac
- Select All Clips on Timeline for Mac
- Auto Ripple for Mac
- Split & cut videos on Mac
- Compositing on Mac
- Crop and zoom on Mac
- Playback Zoom Level for Mac
- Change speed on Mac
- Play video in reverse on Mac
- Mark In and Mark Out for Mac
- Markers for Mac
- Group clips on Mac
- Customized Backgrounds for Videos and Images in Mac
- Video snapshot on Mac
- Freeze frame on Mac
- Auto enhance on Mac
- Applying Drop Shadow for Mac
- Adjustment Layer for Mac
- Mark clip on Mac
- Video Editing Ruler – Mac
- Apply Transforming for Mac
-
Advanced Video Editing for Mac
-
AI-Powered Video Editing for Mac
- Smart Scene Cut for Mac
- Smart Short Clips for Mac
- Image to Video for Mac
- AI Idea to Video for Mac
- AI Text-to-Video for Mac
- Instant Cutter Tool on Mac
- AI Face Mosaic for Mac
- Keyframe Path Curve for Mac
- Planar Tracking for Mac
- AI Extend For Mac
- AI Script-to-Video for Mac
- AI Text-Based Editing in Mac
- Create With Instant Mode on Mac
- ChatGPT Plugin - AI Copywriting on Mac
- AI Smart Cutout for Mac
- Auto reframe on Mac
- Lens correction on Mac
- AI Portrait Cutout on Mac
- Scene detection on Mac
- AI Smart Masking for Mac
- AI Mate Editing for Mac
- Motion Tracking on Mac
- Stabilize video on Mac
- AI Object Remover For Mac
- AI Smart Search for Mac
- AI Skin Tone Protection for Mac
- Green screen on Mac
- Super Slow Motion with Optical Flow for Mac
- AI stylizer on Mac
- Video Denoise for Mac
-
-
Audio Editing for Mac
-
Basic Audio Editing for Mac
-
Advanced Audio Editing for Mac
-
AI-Powered Audio Editing for Mac
- Audio To Video for Mac
- AI Sound Effect for Mac
- Smart BGM Generation for Mac
- AI Voice Enhancer for Mac
- Audio Stretch for Mac
- AI Audio Denoise for Mac
- Auto synchronization for Mac
- AI Vocal Remover for Mac
- Auto Beat Sync on Mac
- AI Music Generator for Mac
- How to Perform AI Voice Cloning in Wondershare Filmora?
- Silence detection on Mac
-
-
Text Editing for Mac
-
Basic Text Editing for Mac
-
Advanced Text Editing for Mac
-
AI-Powered Text Editing for Mac
-
-
Video Customizations for Mac
-
Video Effects (Mac)
-
Audio Effects (Mac)
-
Transitions (Mac)
-
Stickers (Mac)
-
Filters (Mac)
-
Color Editing (Mac)
-
Animations (Mac)
-
Templates (Mac)
-
Asset Center (Mac)
-
-
Exporting & Share & Cloud Backup - Mac
AI Smart Cutout for Mac
This guide shows you detailed steps for cutting out a subject from images or videos by AI Smart Cutout, only with several clicks.
AI Smart Cutout has been trained thousands of times to accurately recognize the edge of the targeted image. It allows you to get the output with neat, smooth, and clear edges. Enough brush settings are provided in the system if you want to make more precise adjustments.
Apply AI Smart Cutout to Images on Mac
You can follow the steps below to process images with Smart Cutout on Mac.
Step 1: After launching the Filmora application, drag the image from your computer or the library to the processing area.
Step 2: One-click the image and select AI Tools in the Video tab. Open the Smart Cutout function by clicking the button next to it. Then, click the icon in the center of the section below Smart Cutout to start the process.
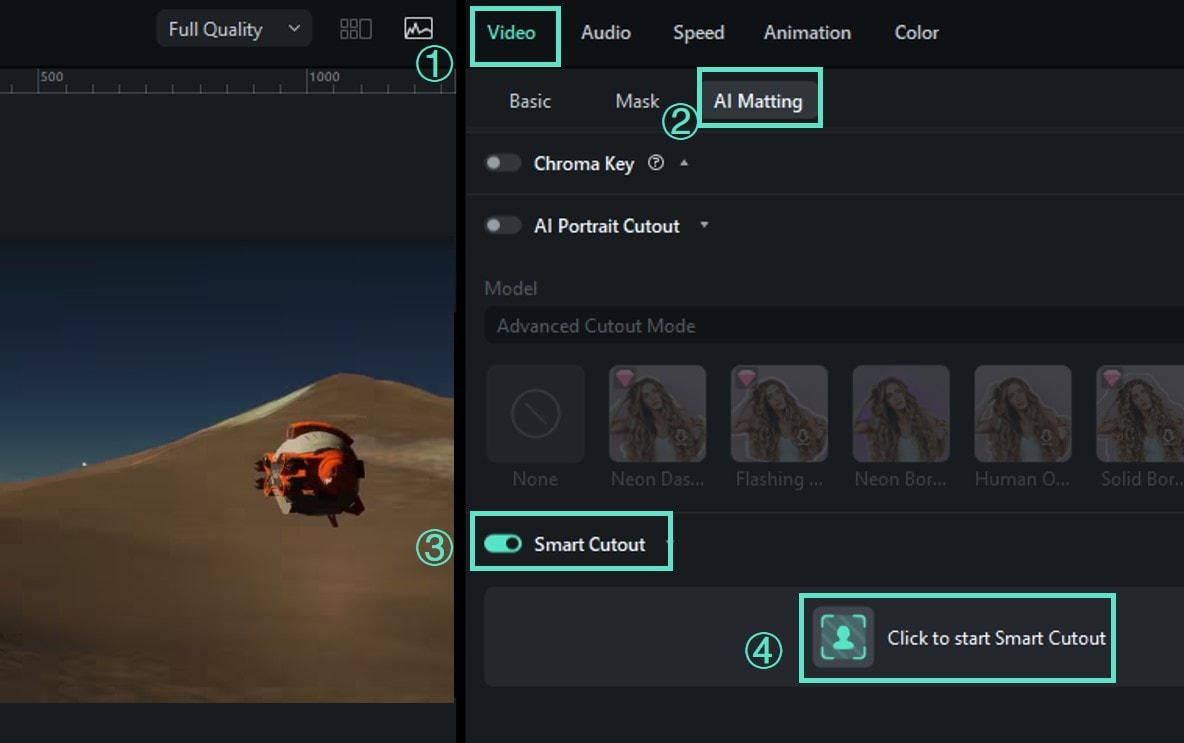
Step 3: Draw the subject you need with the brush icon and adjust it with the eraser icon. The palm icon is used to move the picture to where you want to adjust it precisely.

Filmora also provides a simple and advanced mode to change some features. The Simple Mode of Smart Cutout on the right side of the interface includes the settings for Brush Size, Edge Thickness, and Edge Feather.
- You can change the Brush Size with this setting when drawing the needed subject. The default size is 30, and you can set it from 1 to 300.
- Edge Thickness refers to the margin that encircles the subject you want to retain. The default is 0, but you can set the range from -100 to 100.
- You can use Edge Feather to adjust harsh edges and is a nice way to blend images, which is especially needed when dealing with hair. Its default figure is 0, and you can set it up to 20.
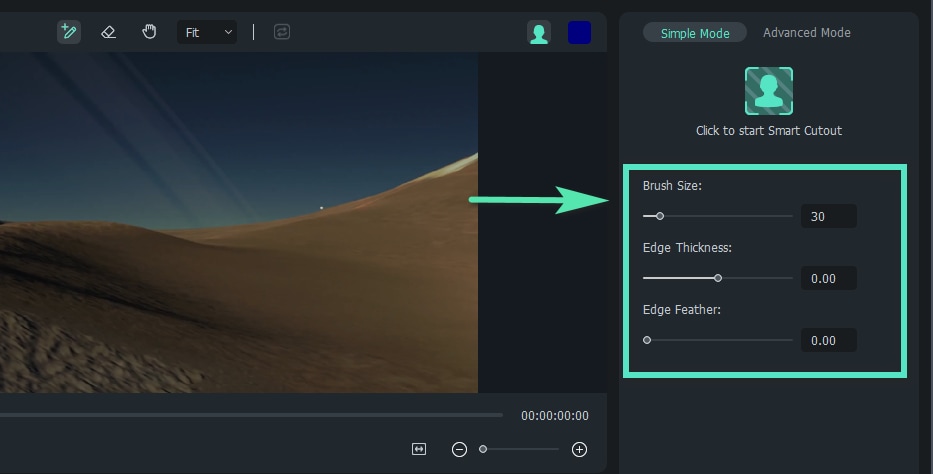
Tip: In Filmora, you can decide whether to retain the subject chosen or the background by clicking the Invert Foreground/Backg icon, as marked in the image below.

Step 4: Set the background by clicking the bust icon on the upper side of the interface. You can choose the settings from Toggle Alpha Overby, Toggle Transparency Grid, Toggle Transparency Black, or Toggle Alpha.
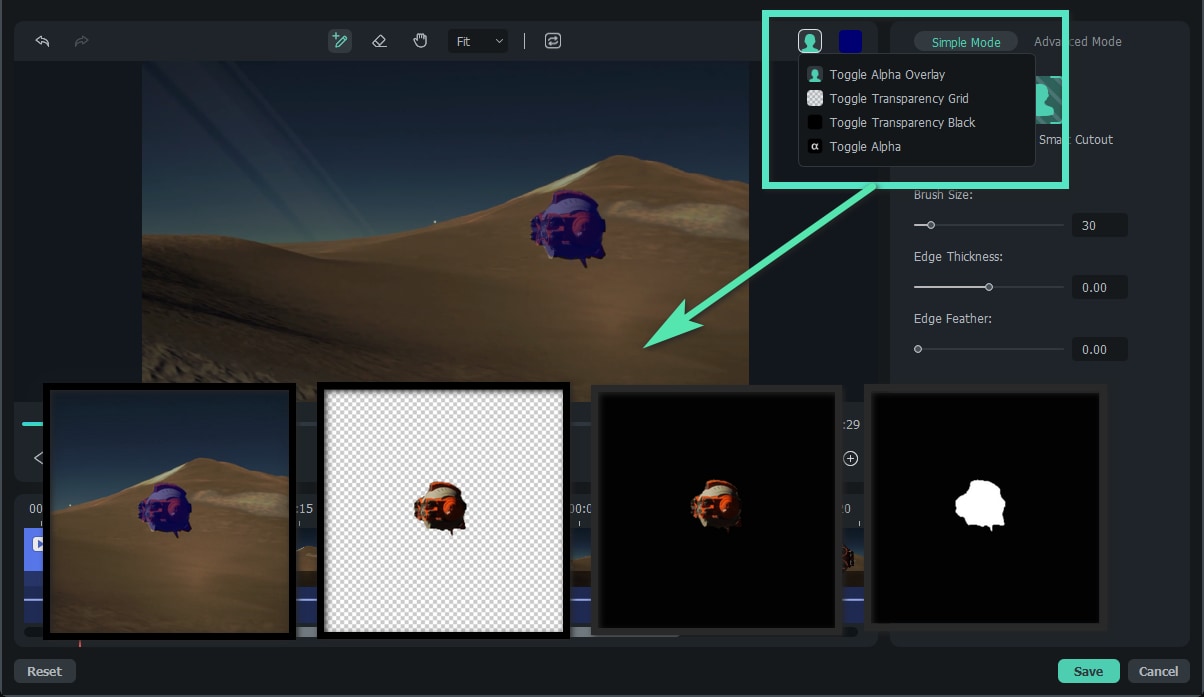
Step 5: Save the modification by clicking OK.
Apply AI Smart Cutout to Videos on Mac
You can follow the procedures below to use this tool on Mac.
Step 1: Launch Filmora and add the video.
Step 2: Find the Smart Cutout function under the Video>AI Tools section and open it. Click the button indicating Click to start Smart Cutout in the center of the section.
Step 3: Draw the subject in the video. Set the Edge Thickness and Edge Feature if needed, and click the bust icon in the Simple Mode tab to process the task.
Step 4: Change the background of the video by clicking the bust icon in the upper right corner. Find Click to start the Smart Cutout icon in the Simple Mode section and click it. Then, Filmora will extract the selected subject from the whole video and export the output in a short while.
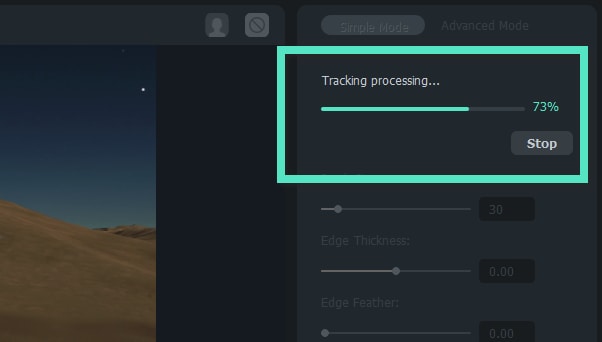
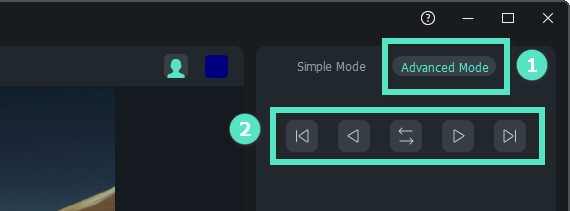
Step 5: Also, Filmora enables you to track the motion with settings in the Advanced Mode section. You can choose from Track One Section Reverse, Track Reverse, Track Forward and Reverse, Track Forward, and Track One Section Forward, based on your needs to adjust the object to be tracked.
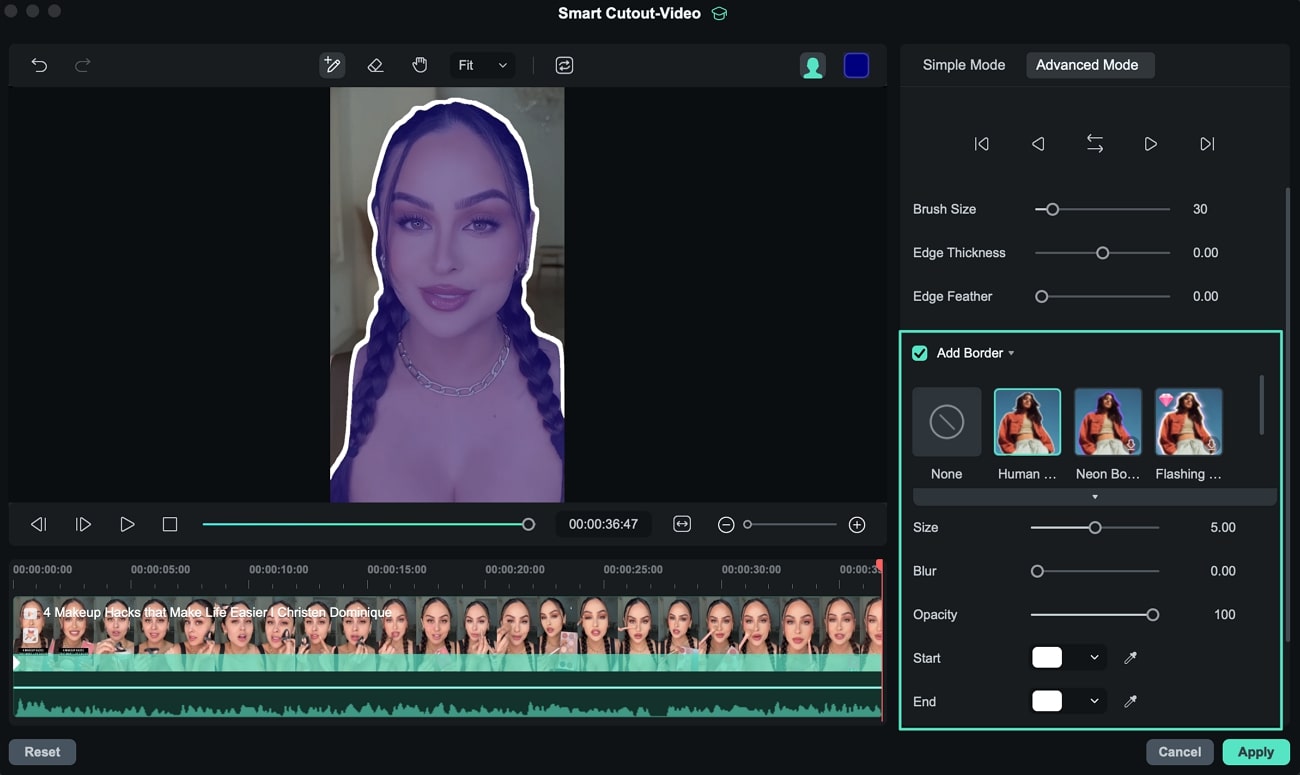
Step 6. Once the tracking is completed, enable the Add Border option and select the border of your choice. Adjust the size and other attributes by dragging the sliders and pressing Apply to save the results.
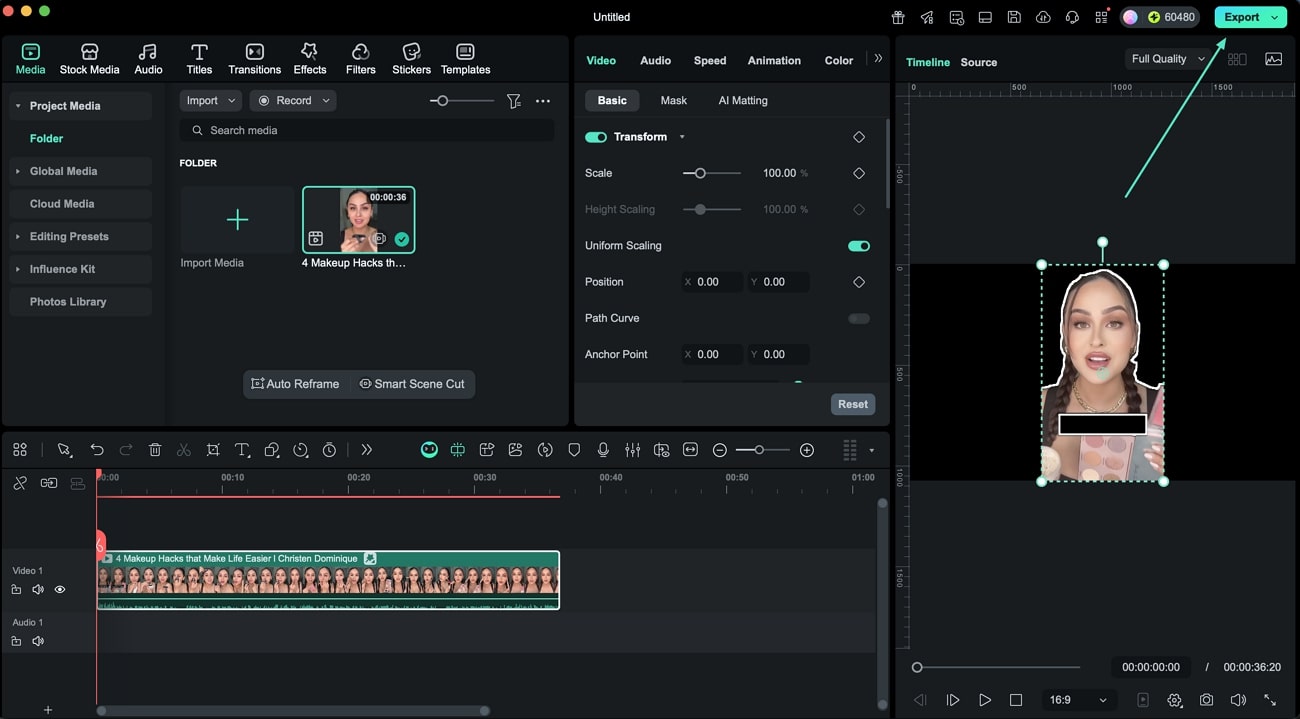
Step 7. Preview the isolated subject within the preview window, and once you are satisfied with the results, hit the Export button to save.
Related Posts
Featured Articles
How to Transfer Sticker from Telegram to WhatsApp in Seconds
Got your favorite Telegram stickers that you wish you could add to WhatsApp? Follow our step-by-step below on how to transfer Telegram stickers to WhatsApp.
A Comprehensive Guide to Pinterest Marketing
Looking to boost your brand's presence on Pinterest? Explore effective Pinterest marketing strategies and learn how to create engaging videos with Filmora to increase user engagement.
Apowersoft Screen Recorder Full Review and Its Alternative
What is an Apowersoft screen recorder? Know our professional review about it. We'll take an in-depth look at its key features, functionalities, ease of use, user reviews, and many more.
Recommended User Guide
AI Portrait Cutout on Mac
Overview of AI Portrait.
Green screen on Mac
Learn how to use Chroma Key in Filmora for Mac.
AI Face Mosaic for Mac
The AI Face Mosaic feature is an advanced tool designed to recognize and protect faces in videos or images automatically. Utilizing intelligent mosaic application technology, this feature can track and cover faces in real-time, ensuring that privacy is safeguarded regardless of face movement within the frame.


