For the Best Results, Use the Latest Version.
-
Preparations for Mac
-
Account (Mac)
-
Get Started & Basic Settings (Mac)
- Release notes for Mac
- Latest Versions and Features for Mac
- Get Started on Mac - Full Guide
- Download/register/uninstall on Mac
- Panel Layout on Mac
- Keyboard shortcuts on Mac
- Touchbar on Mac
- Change playback quality on Mac
- Render preview files on Mac
- Manage timeline on Mac
- Media for use on Mac
- Logo Reveal For Mac
- Marked Favorites for Mac
-
Compatibility & Tech Specs (Mac)
-
Performance Settings (Mac)
-
-
Creating Projects - Mac
-
Creating New Projects (Mac)
-
-
Importing & Recording - Mac
-
Importing (Mac)
-
Recording (Mac)
-
-
Video Editing for Mac
-
Basic Video Editing for Mac
- Edit Live Photos on Mac
- Enable/Disable Clip for Mac
- Magnetic Timeline For Mac
- Select All Clips on Timeline for Mac
- Auto Ripple for Mac
- Split & cut videos on Mac
- Compositing on Mac
- Crop and zoom on Mac
- Playback Zoom Level for Mac
- Change speed on Mac
- Play video in reverse on Mac
- Mark In and Mark Out for Mac
- Markers for Mac
- Group clips on Mac
- Customized Backgrounds for Videos and Images in Mac
- Video snapshot on Mac
- Freeze frame on Mac
- Auto enhance on Mac
- Applying Drop Shadow for Mac
- Adjustment Layer for Mac
- Mark clip on Mac
- Video Editing Ruler – Mac
- Apply Transforming for Mac
-
Advanced Video Editing for Mac
-
AI-Powered Video Editing for Mac
- Smart Scene Cut for Mac
- Smart Short Clips for Mac
- Image to Video for Mac
- AI Idea to Video for Mac
- AI Text-to-Video for Mac
- Instant Cutter Tool on Mac
- AI Face Mosaic for Mac
- Keyframe Path Curve for Mac
- Planar Tracking for Mac
- AI Extend For Mac
- AI Script-to-Video for Mac
- AI Text-Based Editing in Mac
- Create With Instant Mode on Mac
- ChatGPT Plugin - AI Copywriting on Mac
- AI Smart Cutout for Mac
- Auto reframe on Mac
- Lens correction on Mac
- AI Portrait Cutout on Mac
- Scene detection on Mac
- AI Smart Masking for Mac
- AI Mate Editing for Mac
- Motion Tracking on Mac
- Stabilize video on Mac
- AI Object Remover For Mac
- AI Smart Search for Mac
- AI Skin Tone Protection for Mac
- Green screen on Mac
- Super Slow Motion with Optical Flow for Mac
- AI stylizer on Mac
- Video Denoise for Mac
-
-
Audio Editing for Mac
-
Basic Audio Editing for Mac
-
Advanced Audio Editing for Mac
-
AI-Powered Audio Editing for Mac
- Audio To Video for Mac
- AI Sound Effect for Mac
- Smart BGM Generation for Mac
- AI Voice Enhancer for Mac
- Audio Stretch for Mac
- AI Audio Denoise for Mac
- Auto synchronization for Mac
- AI Vocal Remover for Mac
- Auto Beat Sync on Mac
- AI Music Generator for Mac
- How to Perform AI Voice Cloning in Wondershare Filmora?
- Silence detection on Mac
-
-
Text Editing for Mac
-
Basic Text Editing for Mac
-
Advanced Text Editing for Mac
-
AI-Powered Text Editing for Mac
-
-
Video Customizations for Mac
-
Video Effects (Mac)
-
Audio Effects (Mac)
-
Transitions (Mac)
-
Stickers (Mac)
-
Filters (Mac)
-
Color Editing (Mac)
-
Animations (Mac)
-
Templates (Mac)
-
Asset Center (Mac)
-
-
Exporting & Share & Cloud Backup - Mac
Working with Proxy
Once all the video clips you’d like to use in your next video are transferred from the camera to a computer and organized properly, you can start thinking about the most efficient way of piecing them together.
That’s where the creation of proxy files comes in, as you don’t have to work with the original size RAW files. Instead, you can create proxies that are significantly smaller than the video files your camera has captured and still export the video in the 4K or UHD resolution.
This is a simple and yet very effective video editing technique that makes the video editing process much smoother since it will shorten the amount of time your computer needs to render previews or perform any other video editing task.
What is Proxy Video Editing and How Does a Proxy Work?
Proxy video editing is a great option if the computer you’re using for editing has a modest amount of RAM or if its processor is not powerful enough to support the demanding tasks of applying complex visual effects.
Even though proxy files can shorten the amount of time you need to spend in the editing room, this video editing technique is only useful in a particular context. So what are the benefits of proxy video editing, exactly?
Check our guide about How to build a computer for 4K video editing
When Should You Use Proxy Video Editing?
Whether or not you can benefit from using proxy files during the video editing process depends on how powerful the computer you are using to edit videos is.
If you have a laptop or a desktop computer that meets all of the video editor’s advanced technical specifications, then creating proxy files won’t boost the software’s performance significantly.
However, if you are editing on a device that is primarily designed for web browsing or an older model of a PC or a Mac computer, then reducing the resolution of the files you use in your projects can save you some time or even prevent the software from crashing at a crucial moment.
How to Create and Use Proxy in Filmora
Video content creators who often shoot their videos with action cameras and other devices that can record video in 4K resolution can easily create proxy files in Filmora.
So, once you’ve installed Filmora on your Mac or PC computer, you should just double click on its desktop icon and after the app’s welcome window pops up on the screen, you should just click on the New Project option.
Head over to the File menu, when the new project opens and locate the Preferences option. Alternatively, you can use the CTRL+SHIFT+, keyboard shortcut to bring up the Preferences window and then click on the Performance tab.
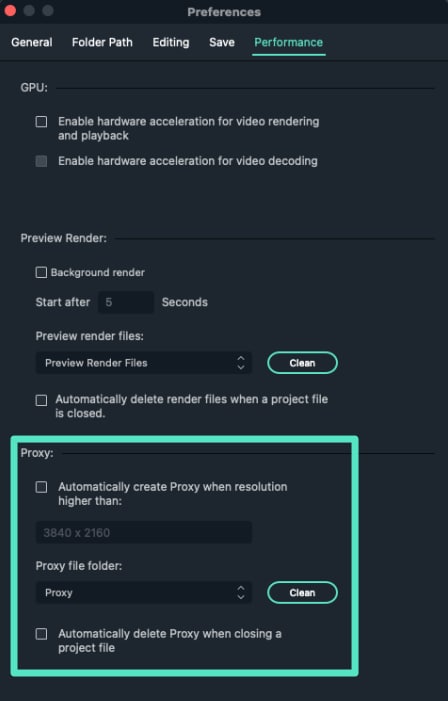
Make sure that the Enable GPU Acceleration option is activated by clicking on the appropriate checkbox and proceed to select your computer’s graphics card from the drop-down menu. Click on the checkbox that is located next to the Automatically create proxies when media resolution is higher than: option in the Proxy menu, and then pick either 1280x720p or 1920x1080p resolution. You can also choose a folder on your computer’s hard drive where all proxy media files are going to be saved by clicking on the Browse button in the Proxy Location submenu.
In case you want to delete all proxy files you created after you’ve completed a project, you can enable the Automatically delete proxies when a project is closed option and then click on the OK button to confirm the changes.
Go to the Media Panel to start importing media files you’d like to use in your project and Filmora will automatically create proxies for each file that has a resolution that is higher than the resolution you’ve specified earlier.
Keep in mind that the amount of time Filmora is going to need to create proxy files depends on the size of source files and the number of files you are transcoding at the same time.
Related Posts
Featured Articles
Step by Step: Add Grain to Photoshop
Learn how to add grain in Photoshop using the Add Noise filter, Grain filter, and film grain overlays. Discover step-by-step methods and a more manageable alternative with Filmora for a quick, cinematic effect.
Repurpose Video with AI for Social Media | 4 Ways
Repurposing video content for different platforms doesn’t need to be complex if you are using AI tools like Filmora Smart Short Clips. Learn how to maximize your content’s reach with minimal effort here.
How to Edit Video with Color Grading & Correction
Understand color grading and color correction. Find a stepwise guide on how to edit a video with color correction using the best editing software.
Recommended User Guide
GPU Driver Requirements and Rendering for Mac
You will learn about GPU rendering and hardware encoding about Filmora for Mac here.
HDR Seting on Mac
Learn how to use and edit HDR in Filmora.
