For the Best Results, Use the Latest Version.
-
Preparations for Mac
-
Account (Mac)
-
Get Started & Basic Settings (Mac)
- Release notes for Mac
- Latest Versions and Features for Mac
- Get Started on Mac - Full Guide
- Download/register/uninstall on Mac
- Panel Layout on Mac
- Keyboard shortcuts on Mac
- Touchbar on Mac
- Change playback quality on Mac
- Render preview files on Mac
- Manage timeline on Mac
- Media for use on Mac
- Logo Reveal For Mac
- Marked Favorites for Mac
-
Compatibility & Tech Specs (Mac)
-
Performance Settings (Mac)
-
-
Creating Projects - Mac
-
Creating New Projects (Mac)
-
-
Importing & Recording - Mac
-
Importing (Mac)
-
Recording (Mac)
-
-
Video Editing for Mac
-
Basic Video Editing for Mac
- Edit Live Photos on Mac
- Enable/Disable Clip for Mac
- Magnetic Timeline For Mac
- Select All Clips on Timeline for Mac
- Auto Ripple for Mac
- Split & cut videos on Mac
- Compositing on Mac
- Crop and zoom on Mac
- Playback Zoom Level for Mac
- Change speed on Mac
- Play video in reverse on Mac
- Mark In and Mark Out for Mac
- Markers for Mac
- Group clips on Mac
- Customized Backgrounds for Videos and Images in Mac
- Video snapshot on Mac
- Freeze frame on Mac
- Auto enhance on Mac
- Applying Drop Shadow for Mac
- Adjustment Layer for Mac
- Mark clip on Mac
- Video Editing Ruler – Mac
- Apply Transforming for Mac
-
Advanced Video Editing for Mac
-
AI-Powered Video Editing for Mac
- Smart Scene Cut for Mac
- Smart Short Clips for Mac
- Image to Video for Mac
- AI Idea to Video for Mac
- AI Text-to-Video for Mac
- Instant Cutter Tool on Mac
- AI Face Mosaic for Mac
- Keyframe Path Curve for Mac
- Planar Tracking for Mac
- AI Extend For Mac
- AI Script-to-Video for Mac
- AI Text-Based Editing in Mac
- Create With Instant Mode on Mac
- ChatGPT Plugin - AI Copywriting on Mac
- AI Smart Cutout for Mac
- Auto reframe on Mac
- Lens correction on Mac
- AI Portrait Cutout on Mac
- Scene detection on Mac
- AI Smart Masking for Mac
- AI Mate Editing for Mac
- Motion Tracking on Mac
- Stabilize video on Mac
- AI Object Remover For Mac
- AI Smart Search for Mac
- AI Skin Tone Protection for Mac
- Green screen on Mac
- Super Slow Motion with Optical Flow for Mac
- AI stylizer on Mac
- Video Denoise for Mac
-
-
Audio Editing for Mac
-
Basic Audio Editing for Mac
-
Advanced Audio Editing for Mac
-
AI-Powered Audio Editing for Mac
- Audio To Video for Mac
- AI Sound Effect for Mac
- Smart BGM Generation for Mac
- AI Voice Enhancer for Mac
- Audio Stretch for Mac
- AI Audio Denoise for Mac
- Auto synchronization for Mac
- AI Vocal Remover for Mac
- Auto Beat Sync on Mac
- AI Music Generator for Mac
- How to Perform AI Voice Cloning in Wondershare Filmora?
- Silence detection on Mac
-
-
Text Editing for Mac
-
Basic Text Editing for Mac
-
Advanced Text Editing for Mac
-
AI-Powered Text Editing for Mac
-
-
Video Customizations for Mac
-
Video Effects (Mac)
-
Audio Effects (Mac)
-
Transitions (Mac)
-
Stickers (Mac)
-
Filters (Mac)
-
Color Editing (Mac)
-
Animations (Mac)
-
Templates (Mac)
-
Asset Center (Mac)
-
-
Exporting & Share & Cloud Backup - Mac
GPU Driver Requirements and Rendering for Mac
GPU Acceleration reduces the stress that video editing software applies to the CPU and improves the speed and efficiency of the software.
1. GPU Driver Requirements
Learn about the GPU and GPU driver requirements for Wondershare Filmora V12 for Mac.
To get the best video editing experience with Filmora for Mac, it is recommended to make sure your GPU meets the below requirements:
Operating System: macOS V13 (Ventura), macOS V12 (Monterey), macOS v11 (Big Sur), macOS v10.15 (Catalina), macOS v10.14 (Mojave).
Processor: Intel i5 or better multicore processor, 2 GHz or above
Memory: 8 GB RAM (16 GB required for HD and 4K videos).
Also, keep your macOS updated to ensure your GPU Driver is up to date. Click System Requirements for Filmora Mac to learn more details.
2. How to Enable GPU Acceleration in Filmora for Mac?
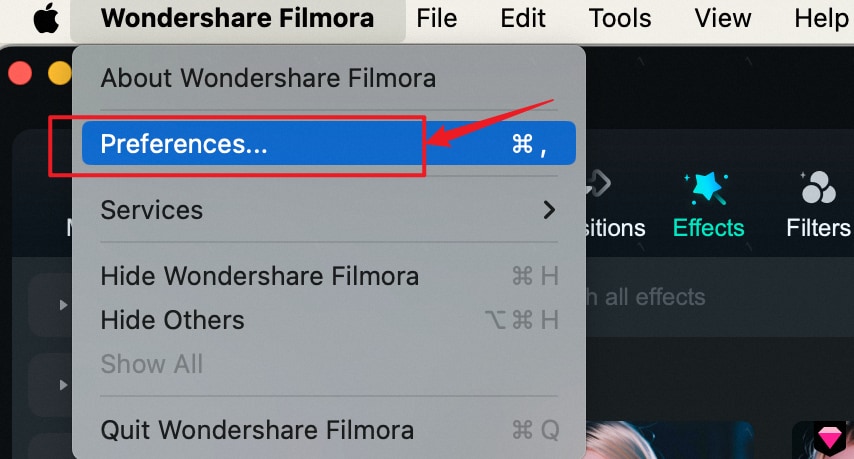
1Click Wondershare Filmora > Preference.
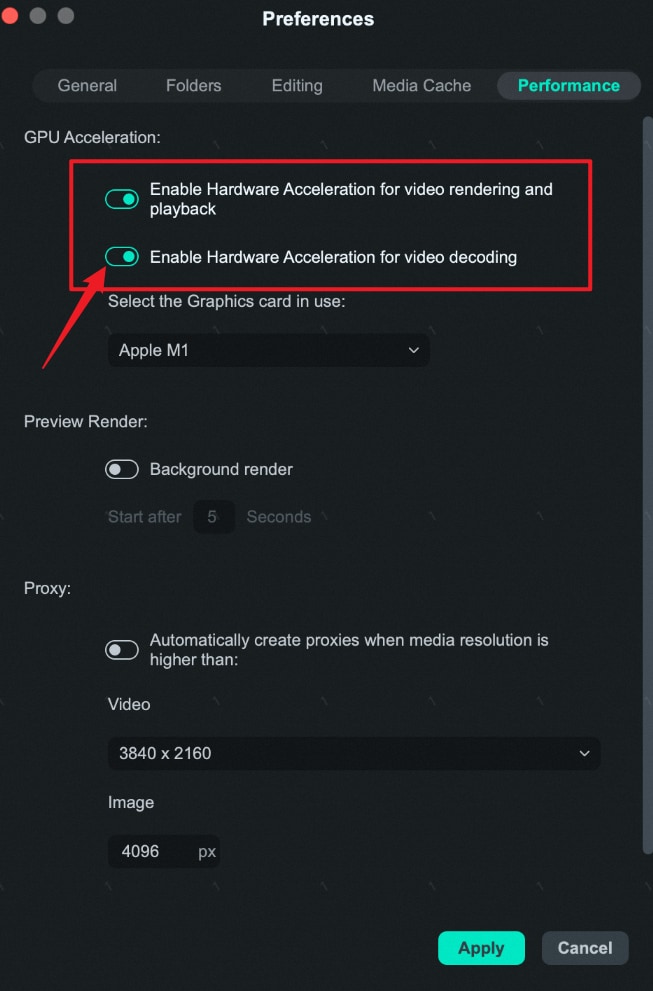
2Choose Performance Tab.
3Under the GPU section, check the boxes in front of "Enable hardware acceleration for video rendering and playback".
4If you would also like to enable hardware acceleration for video decoding, you can also check the box in front of it.


Related Posts
Featured Articles
How to Write an Attractive Vlog Script: A 2025 Guide
Want to learn how to write a vlog script for any kind of content? Read this guide, where we discuss the ways that you can use to turn viewers into fans.
Spooky Halloween Font Resources for Designers: Top Picks
Are you excited about Halloween? It's time to enrich your content with scary Halloween fonts and effects to engage more audiences.
Avclabs Video Enhancer AI | A Detailed Review
Do you feel confused if it is good to use Avclabs video enhancer AI? Check this article to learn its key features, performance, user ratings, pros and cons, and how to steps.
Recommended User Guide
Working with proxy on Mac
Once all the video clips you’d like to use in your next video are transferred from the camera to a computer and organized properly, you can start thinking about the most efficient way of piecing them together.
HDR Seting on Mac
Learn how to use and edit HDR in Filmora.
