Are you tired of watching your OBS recordings and noticing that the audio doesn’t quite match the video? This is a common issue faced by many content creators and live streamers. OBS Studio, while powerful, sometimes struggles with syncing audio and video, leading to delays or mismatches.
When OBS audio and video are out of sync, it can create a jarring experience for your audience, making your content appear unprofessional. These sync problems can be incredibly frustrating when you've put in the effort to create high-quality content.
Fortunately, there are effective solutions to fix these issues. With the right approach, you can ensure that your audio and video are perfectly synchronized, providing a seamless experience for your viewers.
This article will guide you on how to fix audio-video sync issues in OBS. We’ll cover the most common reasons for these problems and provide you with multiple methods to sync audio and video in OBS perfectly.
In this article
Part 1. Common Reasons for OBS Audio-Video Sync Problems
So, what's causing your OBS video and audio to be out of sync? Let's take a look at the possible reasons.
- Hardware Issues: Faulty audio devices such as malfunctioning microphones or headsets, can introduce delays. Insufficient system resources like an overburdened CPU or GPU may struggle to process and lead to sync issues.
- Software Conflicts: Outdated drivers or incompatible applications running in the background can disrupt the smooth functioning of OBS, causing synchronization problems.
- OBS Settings: Within OBS settings, incorrect configurations can lead to sync issues. Selecting the wrong audio source or using improper synchronization settings can easily cause the OBS audio video out of sync.
- Network Latency: For those live streaming, network latency can be another source of trouble. A slow or unstable internet connection can cause delays in the transmission of audio or video, leading to sync issues.
Part 2: Advanced Methods to Fix OBS Audio and Video Out of Sync
Fixing sync issues often requires a bit of technical know-how, but with the following methods, you’ll be able to sync audio and video in OBS easily.
[Method 1]. Using OBS's Studio Built-in Synchronization:
OBS Studio offers built-in tools to help you fix audio-video sync issues. It allows you to manually adjust settings to achieve perfect synchronization. Let's see how it works.
Step-by-Step Process
- Step 1: Open OBS Studio on your computer. Then, Click on the "Settings" button in the bottom right corner of the OBS Studio interface.
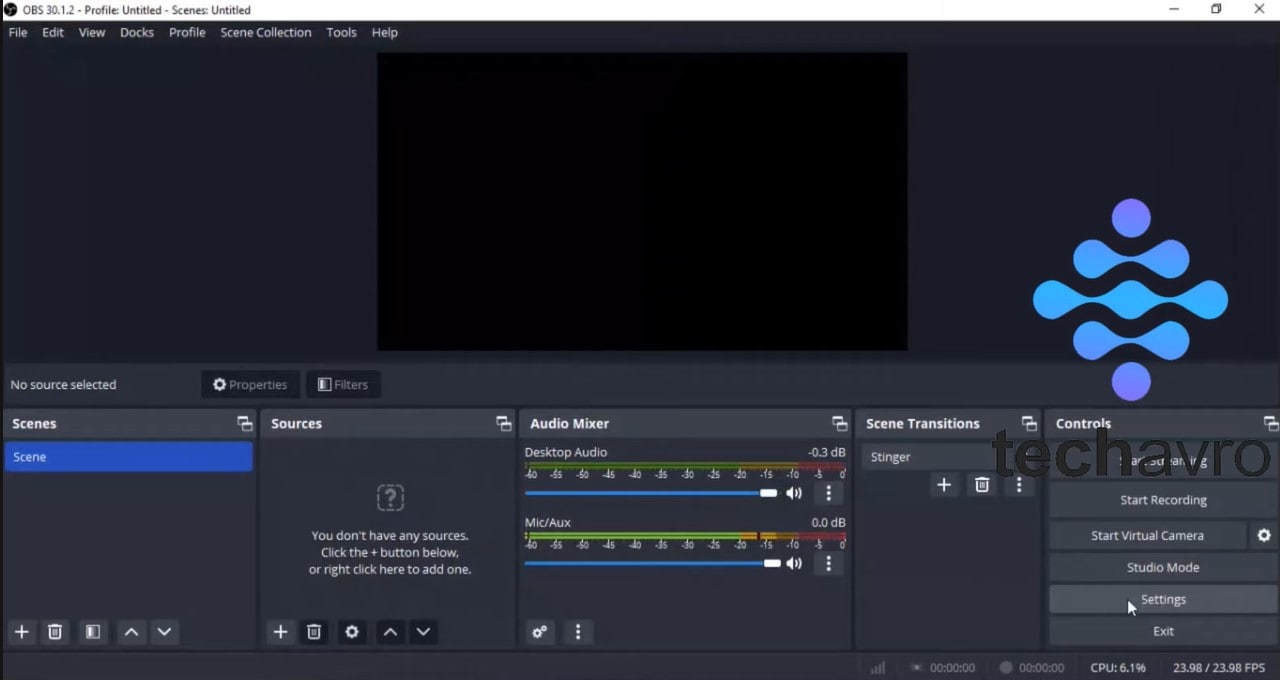
- Step 2. In the settings window, select the "Audio" tab.
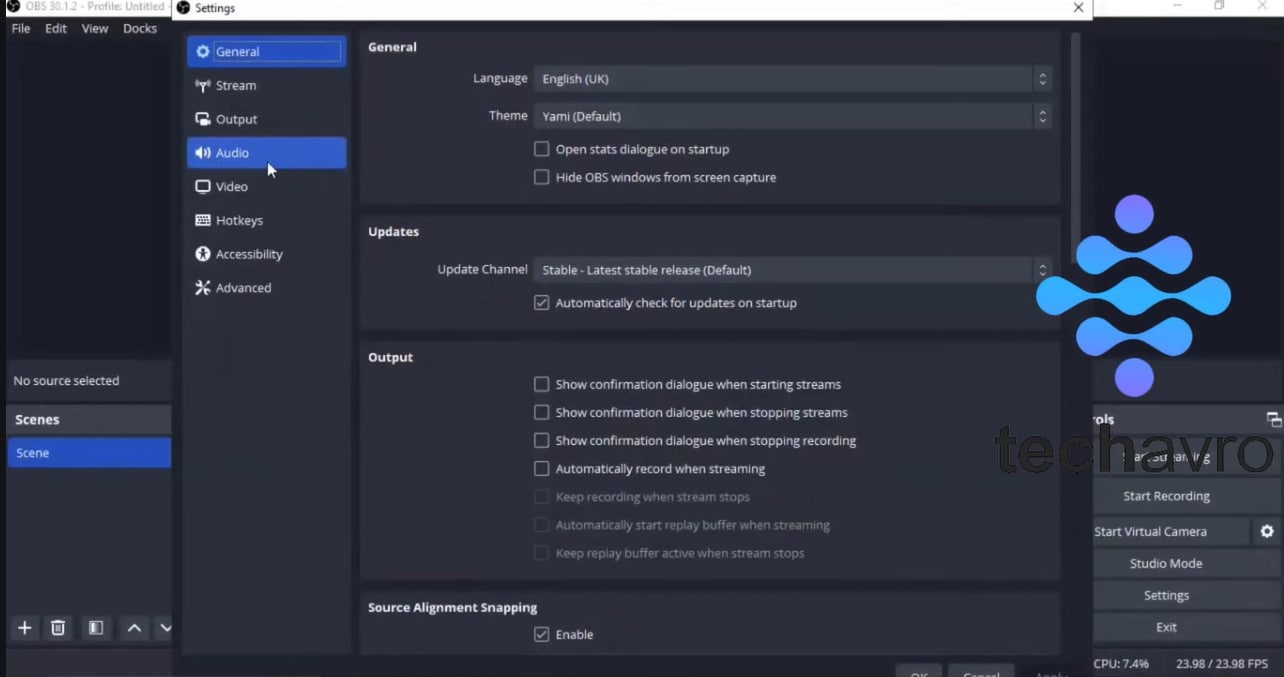
- Step 3. Under "Devices," ensure that your desired audio input device is selected. This is typically your microphone. If you have multiple audio sources, you can add them by clicking the "+" button.
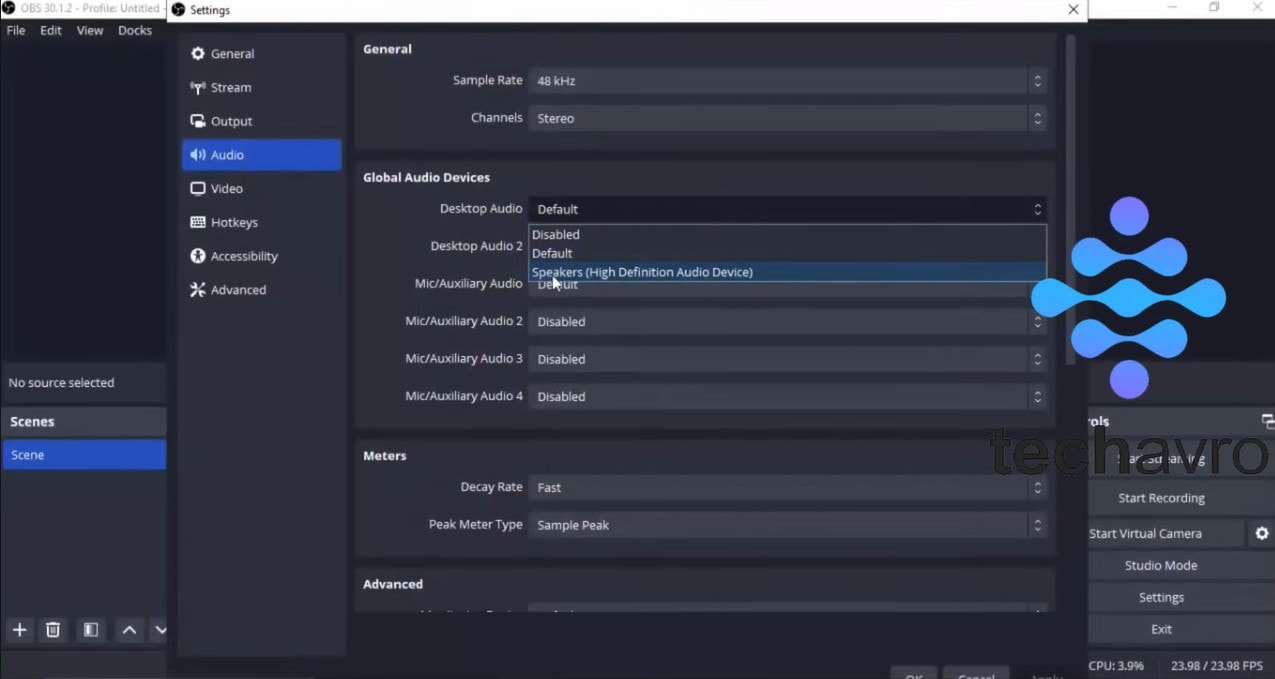
- Step 4. Use the sliders to adjust the input and output volume levels as needed.
- Step 5. If you're experiencing audio-video sync problems, try adjusting the "Sync Offset" value in the advanced audio properties of the audio source. Small adjustments of a few milliseconds can often resolve sync issues.
- Step 6. Click the "+" button in the "Sources" list to add a new source. Choose the appropriate source type (e.g., Display Capture, Video Capture Device, etc.) based on your video input. Configure the source settings according to your needs.
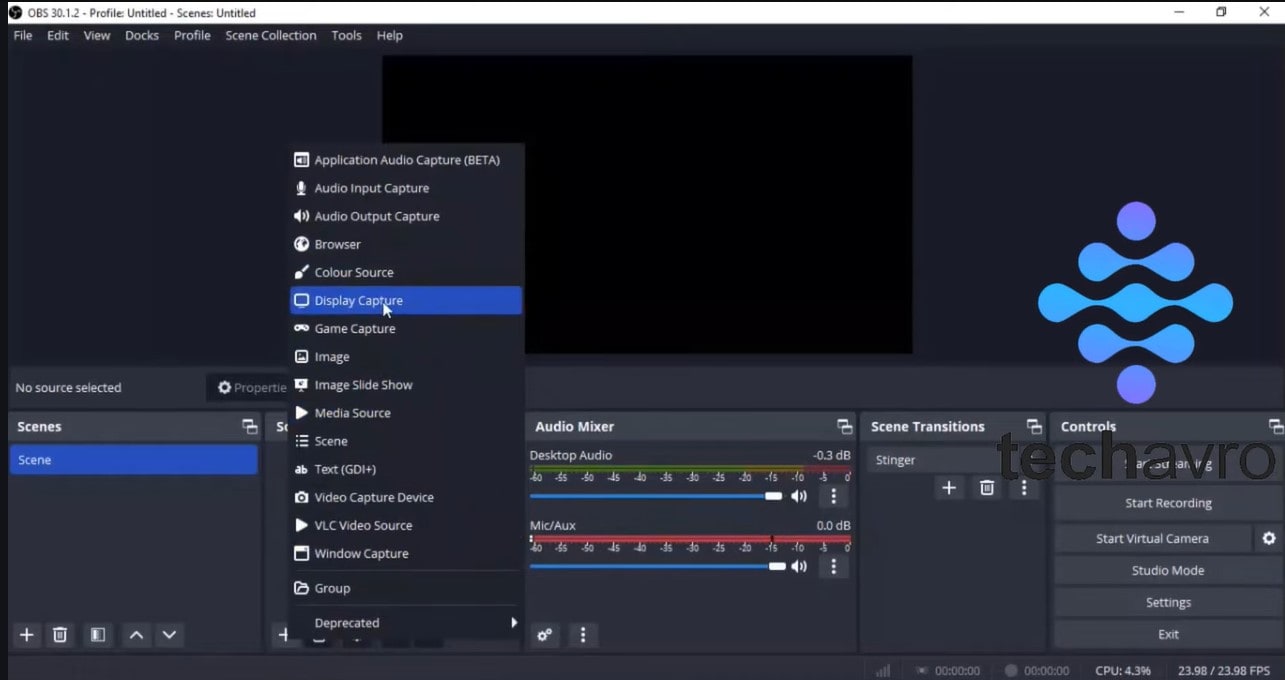
- Step 7. Use headphones or speakers to monitor if your OBS audio and video are in sync while adjusting settings. Look for visual cues (like lip movements) to ensure proper synchronization.
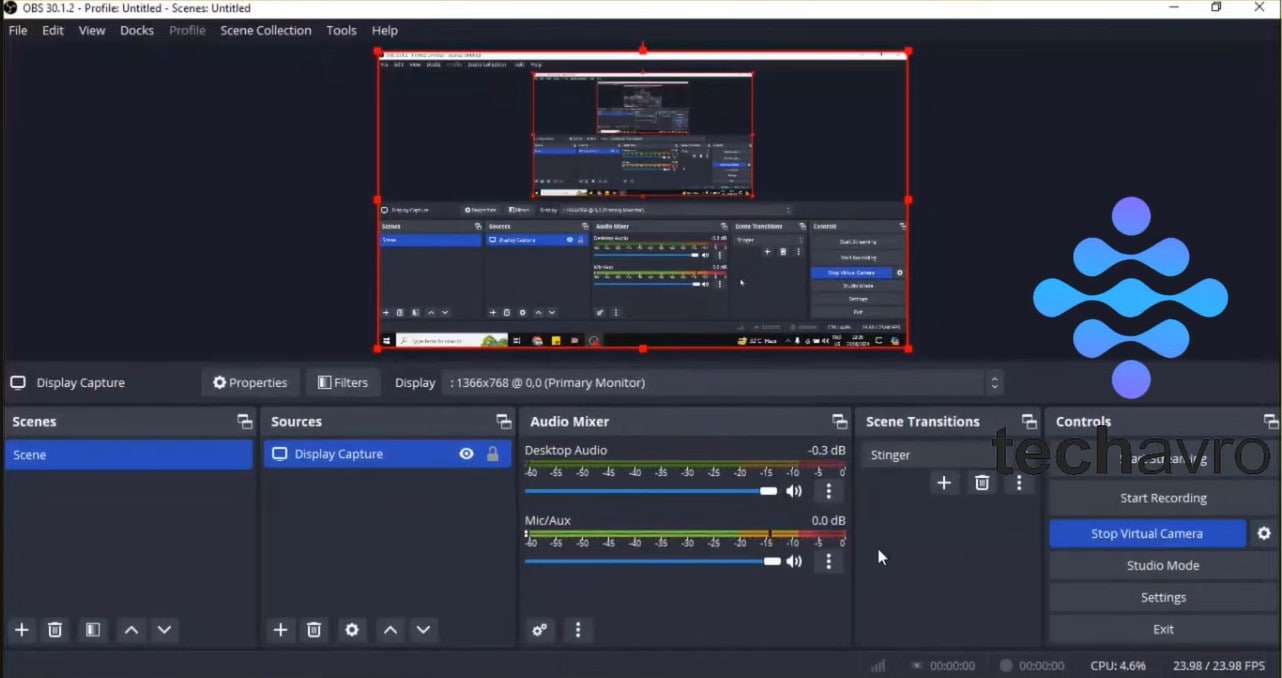
[Method 2] OBS Audio Video Sync Using Wondershare Filmora Auto Beat Sync
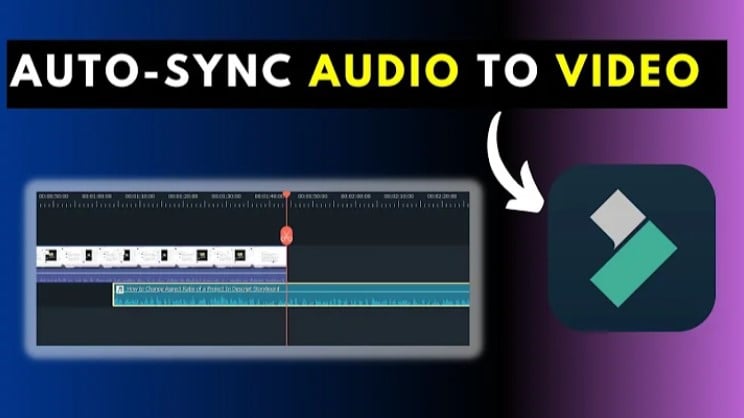
If you've tried the OBS built-in method and still find your OBS video and audio out of sync, don't worry! There's a powerful video and audio editing software that can help: Wondershare Filmora. This software offers a range of features to enhance your videos, and one of its standout tools is Auto Beat Sync.
Specifically designed to address audio-video synchronization issues, Auto Beat Sync analyzes your video and audio tracks to identify the optimal alignment. By understanding the rhythm and pace of your content, it automatically adjusts the audio to match the visual perfectly.
Step-by-Step Process
Let's break down the steps to sync audio and video using Filmora Auto Beat Sync.
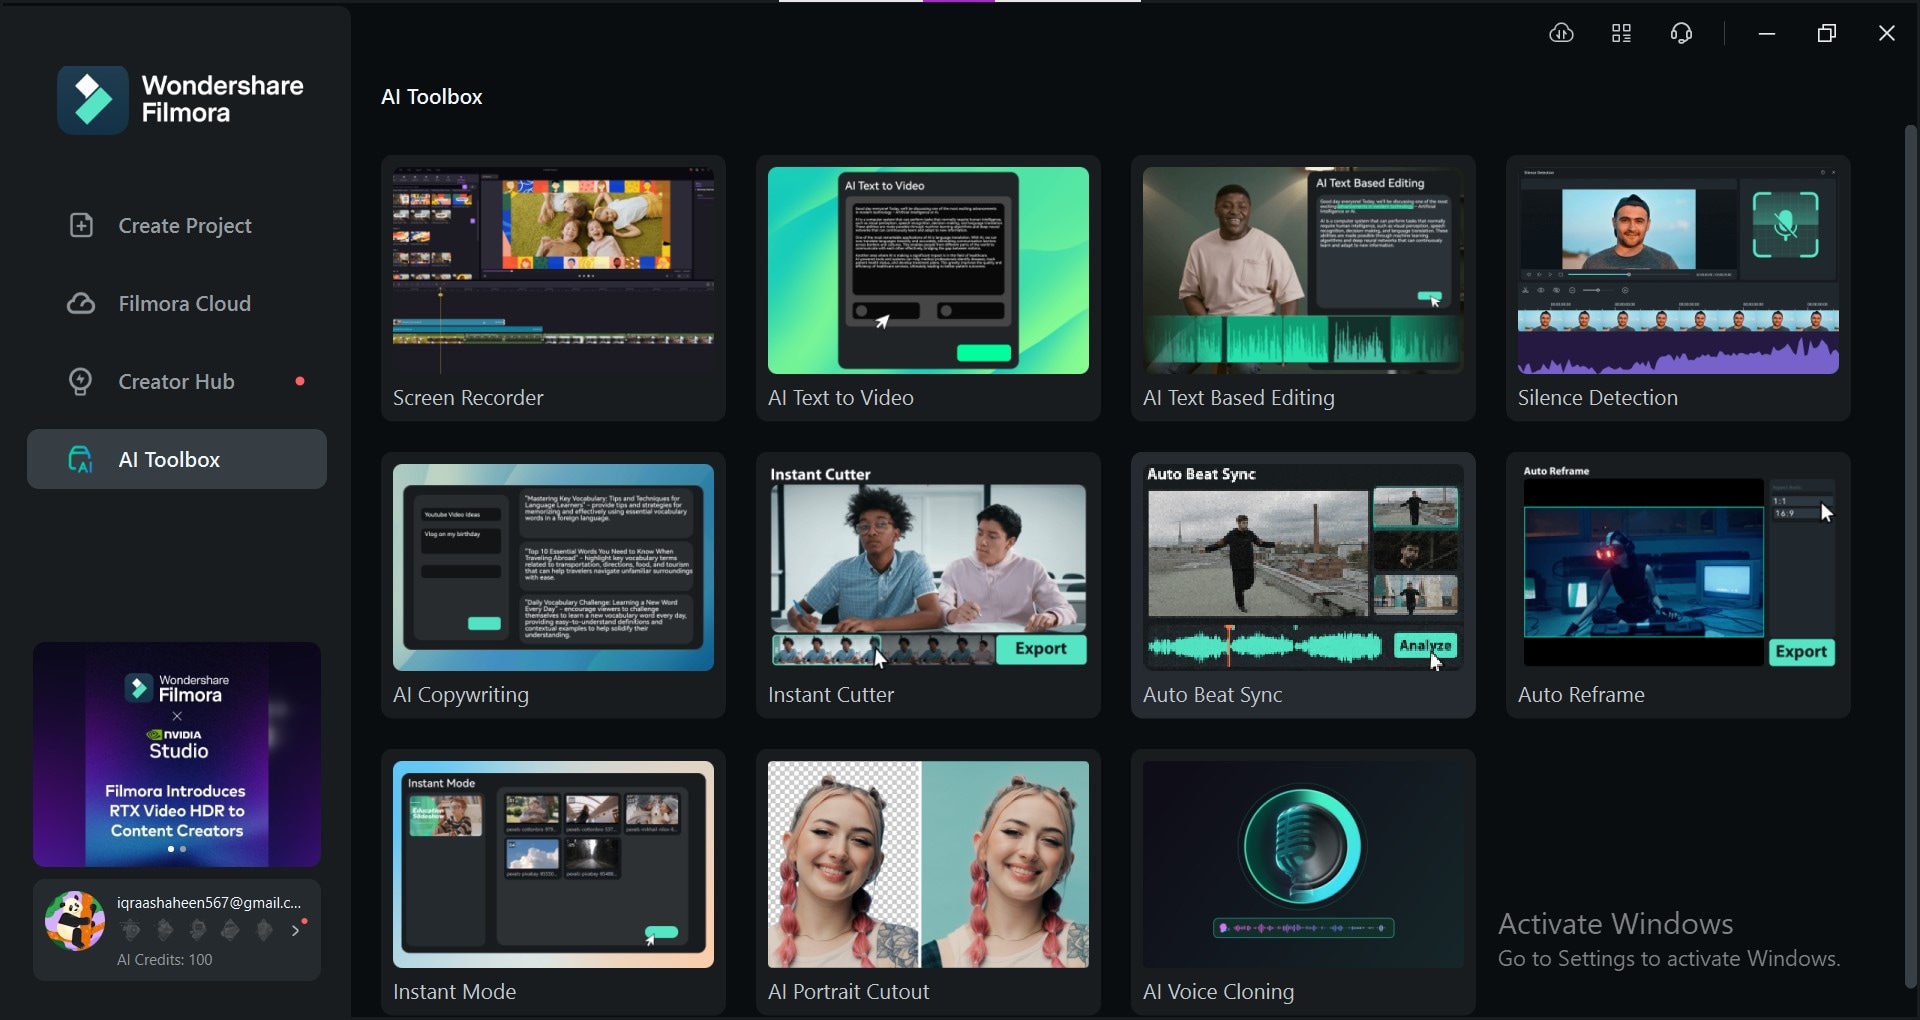
- Step 1. Access Auto Beat Sync Feature:
Open Wondershare Filmora on your computer and go to the AI Toolbox. There you’ll find “Auto Beat Sync”. Click on it to sync your OBS audio video.
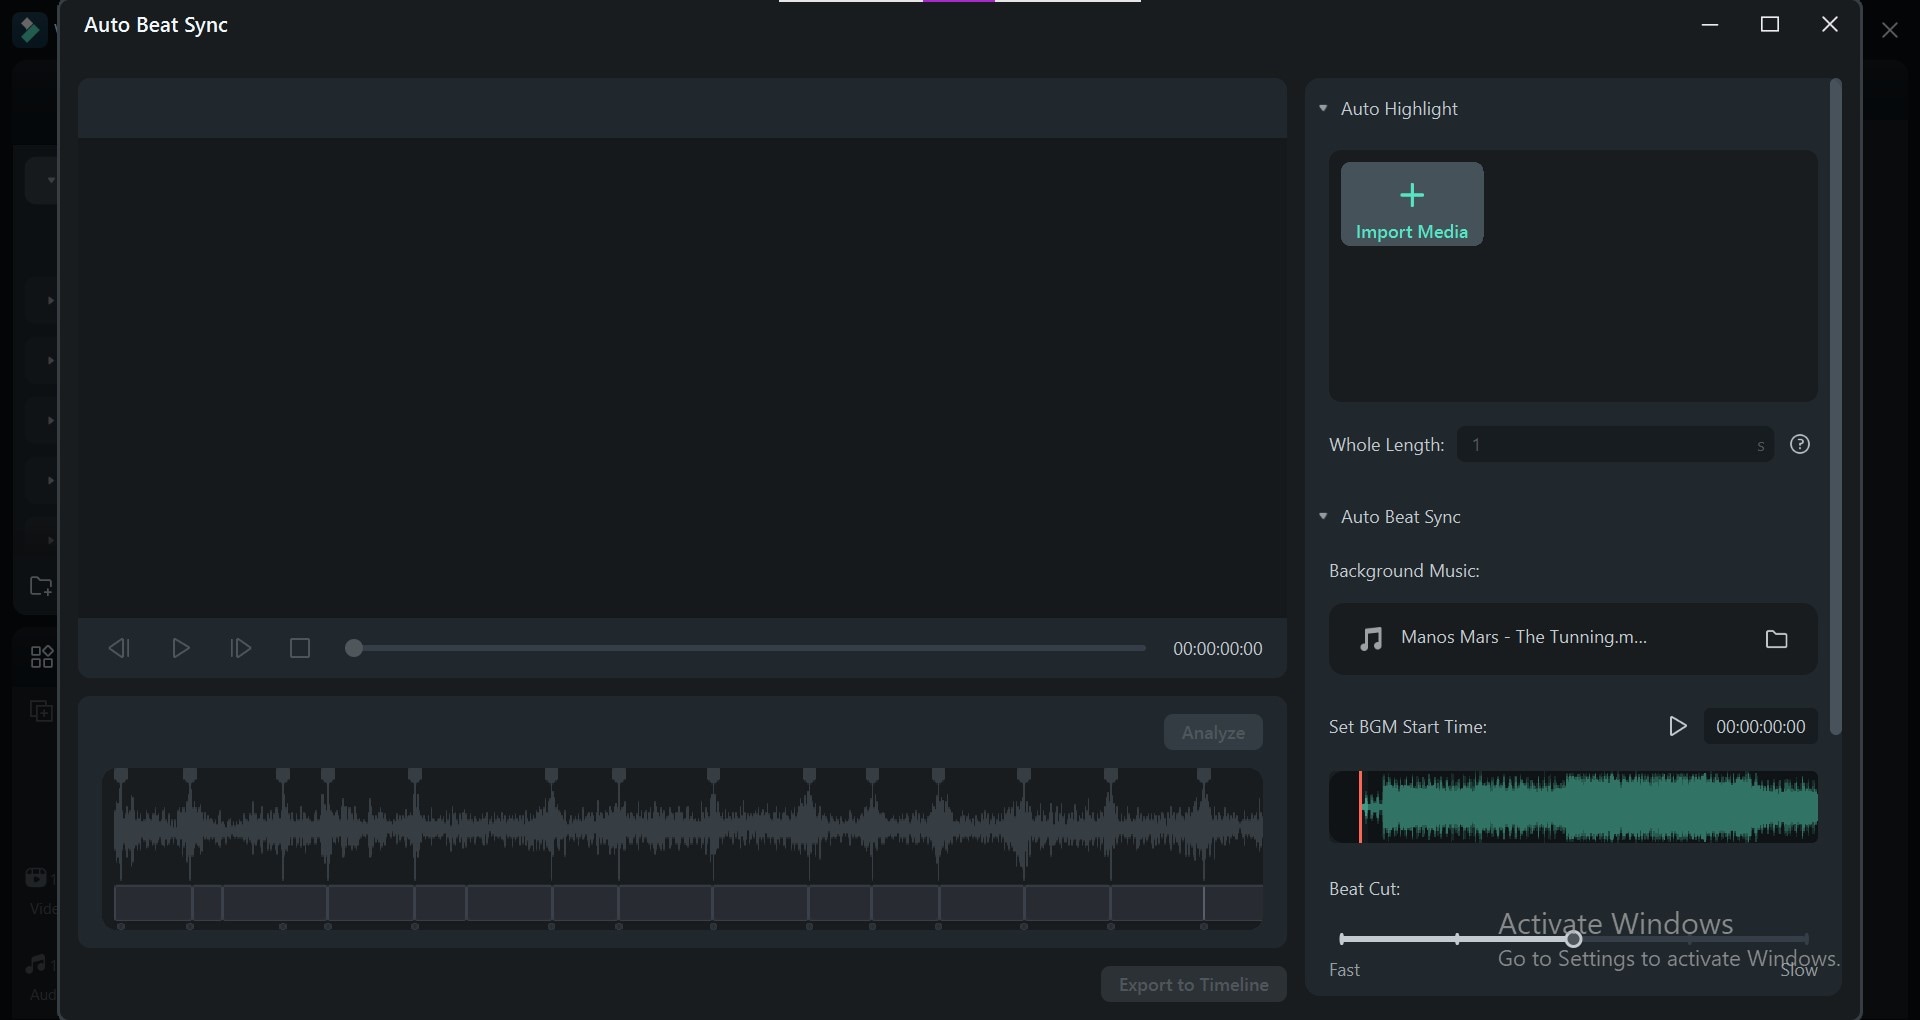
- Step 2. Import Your OBS Recording:
Now import the OBS recording file that's experiencing the sync issue into the software. Drag and drop the file into the Filmora timeline to activate the editing panel.
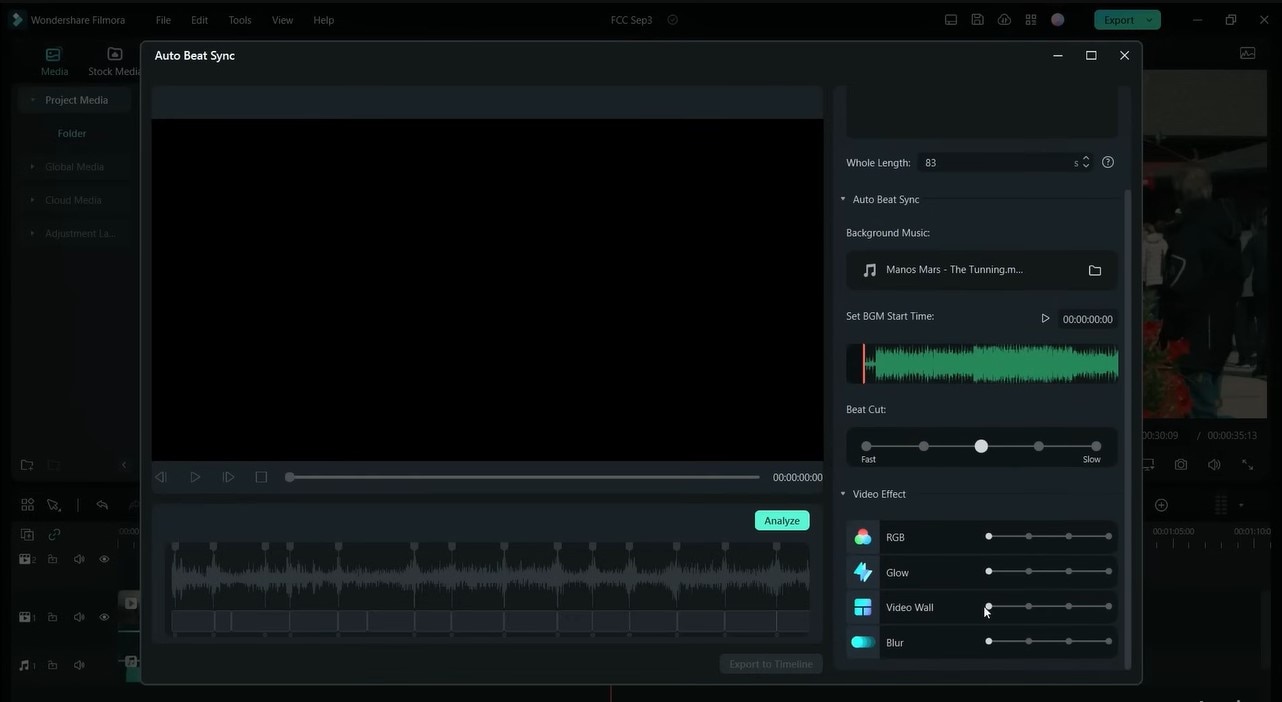
- Step 3. Analyze Audio and Video:
After that, click> Analyze and Filmora will initiate an analysis of your video and audio content. Filmora examines the tracks to identify synchronization points. This will automatically adjust your audio to match the video.
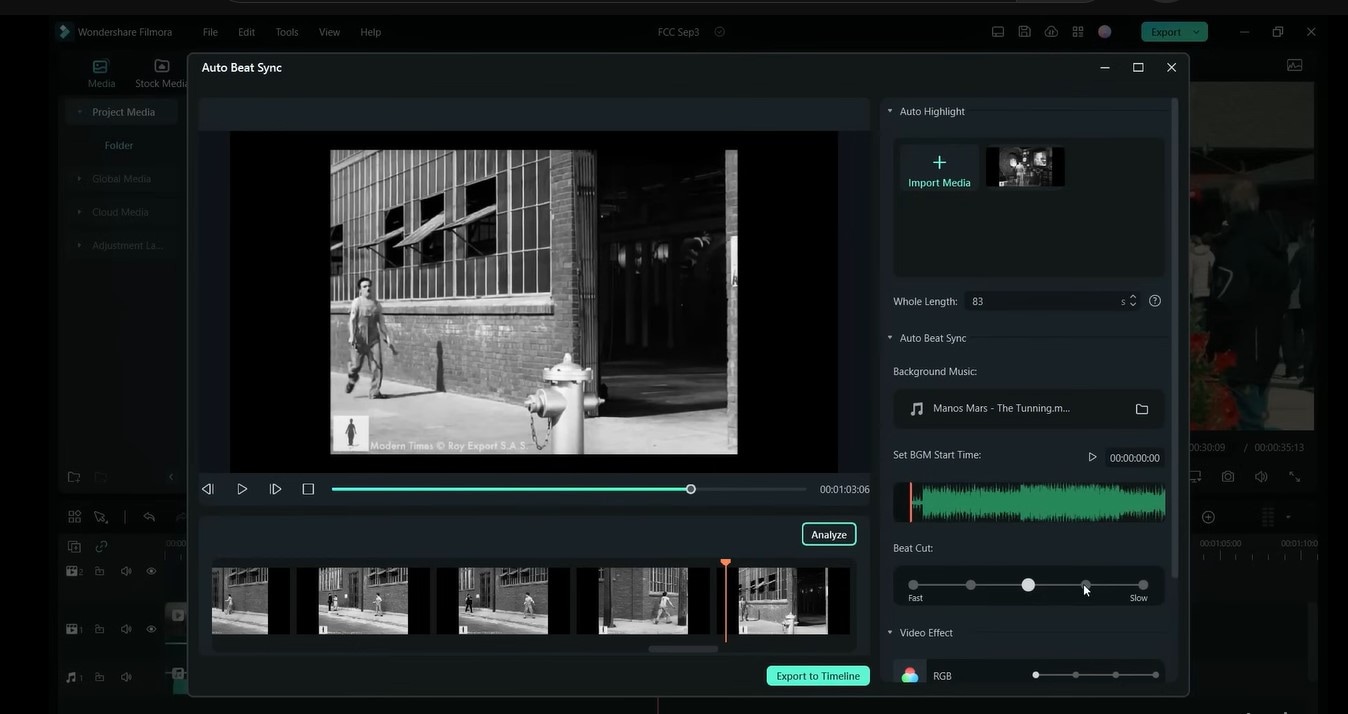
- Step 4. Review and Export:
Review the synchronized video carefully to ensure that the audio and video are perfectly aligned.Once you're satisfied with the synchronization, export your video. Filmora offers various export options, allowing you to choose the desired format, resolution, and other settings.
Part 3: Basic Technical Solutions for OBS Audio-Video Sync Issues
For those who prefer a hands-on approach, here are some basic technical solutions to sync audio and video in OBS:
- Solution 1: Make sure all your cables are securely plugged in and functioning properly. Loose connections can cause interruptions in audio or video signals, leading to sync issues.
- Solution 2: Keep your operating system, graphics drivers, and audio drivers up-to-date. Outdated drivers can cause performance issues and interfere with OBS’s ability to maintain sync.
- Solution 3: Make sure you've selected the correct audio source in OBS. Adjust buffer size and latency settings as needed, and experiment with different audio devices to find the best configuration.
- Solution 4: Ensure your CPU and GPU have enough capacity to handle the workload. Close unnecessary applications and processes to free up resources for OBS.
Part 4: Resolve Specific OBS Audio Delay Issues
You may experience various delay issues in OBS, here are a few methods to fix them.
Audio Delays Caused by OBS Zoom Feature
The OBS Zoom feature is designed to zoom in or out on specific areas of your screen. However, adjusting the zoom level during recording or streaming can sometimes lead to OBS audio-video sync issues. To resolve these delays, follow these steps:
- Step 1. Open OBS and click the + button in the Sources panel.
Step 2. Select "Window Capture" and choose the window you want to zoom in or out of.
- Step 3. Right-click on the Window Capture source and choose "Filters".
- Step 4. Click the + button and select "Crop/Pad".
- Step 5. Adjust the Left, Right, Top, and Bottom values to crop the window to the desired zoom level.
- Step 6. Click "Close" and resize the Window Capture source in the Preview panel to fit your screen.
Note: If you continue to experience audio delay issues, you can adjust the FPS (frames per second) of the Window Capture source in the Properties window. Lowering the FPS can help reduce CPU usage and improve audio synchronization.
Audio Delay Issues Caused by Cache and Cookies
Cache and cookies are temporary files your web browser stores to enhance website performance and loading speed. However, if these files become corrupted or outdated, they can contribute to OBS sync audio and video delay issues. Clearing your cache and cookies can effectively resolve these delays. Here's how to do it for different browsers:
- Google Chrome: Click the> Menu in the top-right corner and select Settings. Navigate to Privacy and Security and click> Clear browsing data. Choose a time range, check the boxes for Cookies and other site data and Cached images and files, then click Clear data.
- Firefox: Click the>Menuin the top-right corner and select Options. Go to Privacy & Security and find Cookies and Site Data. Click> Clear Data, check the boxes for Cookies and Site Data and Cached Web Content, then click> Clear.
- Microsoft Edge: Click the >Menuin the top-right corner and choose Settings. Go to Privacy, search, and services, then select Choose what to clear. Select the time range, check the boxes for Cookies and other site data and Cached images and files, and click> Clear
Resolve Audio Delay Issues with Virtual Speakers
Virtual Speaker allows your computer to function as a speaker for other devices like smartphones or tablets, which can be handy for playing audio from multiple sources. However, if the connection is unstable or the devices are incompatible, you might encounter OBS audio-video sync delay issues. To resolve these delays, follow these steps:
- Verify that both your computer and the external device are connected to the same Wi-Fi network.
- On your device, go to> Settings and select> Bluetooth. Enable Bluetooth and pair your device with your computer.
- On your computer, open the Control Panel and go to Sound. Click on the Playback tab and set your device as the default playback device.
- In OBS, navigate to> Settings and select> Audio. Set your device as the Desktop Audio Deviceand click OK.
- If you continue to experience audio delays, try adjusting the Audio Sample Rate. Ensure that the sample rate on your device matches the sample rate configured in OBS and your audio device settings.
Fix OBS Audio Delay Issues Caused by Live Gamer Ultra
The Live Gamer Ultra is a powerful capture card that allows you to record and stream 4K HDR video at 60 frames per second, making it ideal for capturing high-quality gameplay from consoles or PCs. However, if you experience OBS audio video out of sync while using it with OBS, it may be due to outdated drivers or mismatched settings. Here’s how to resolve these issues:
- Step 1. Connect the Live Gamer Ultra to both your computer and your console or PC.
- Step 2. Visit the official website and download the latest drivers and software for the Live Gamer Ultra. Install them to ensure optimal performance.
- Step 3. Open OBS and click the + button in the Sources panel. Select Video Capture Device and choose the Live Gamer Ultra as your device.
- Step 4. Click on Configure Video, and select the Video Format that matches the output settings of your console or PC. Click OK.
- Step 5. In the Properties window, adjust the Resolution and FPS settings for your video capture device to match your recording requirements.
- Step 6. If you’re still experiencing audio delays, adjust the Sync Offset of the video capture device in the Mixer panel. Fine-tune the offset by milliseconds to synchronize the audio with the video.
Conclusion
In this guide, we discussed various methods to fix OBS audio-video sync issues, from adjusting hardware connections and updating drivers to using OBS’s built-in synchronization tools. Resolving sync problems can sometimes require a combination of techniques, so it’s essential to try different methods until you find the one that works best for your setup.
For those seeking a more automated and professional solution, Filmora's Auto Beat Sync feature offers an easy and efficient way to sync audio and video in OBS recordings. By using this feature, you can ensure your streams and recordings are perfectly synchronized, providing a professional-quality experience for your audience.


