


 100% Security Verified | No Subscription Required | No Malware


 ChatGPT
 Perplexity
 Gemini
 Claude
 Grok
Grok
Green screen effects create magic in films, promotional ads, home videos, and social media reels. You can integrate different backgrounds and produce countless storylines with this editing technique. While you mostly see green screen applications in big-budget films, they can be incorporated into other formats. So, whether you’re a content creator, a digital artist, an educator, or a small business, learning about it is beneficial to your craft.
While Adobe After Effects is mainly used to add motion graphics to your video, you can also key in the green screen in the tool. In this article, learn how to master editing green screen in After Effects and take your projects to the next level. Keep on reading to find out!
In this article
Part 1. Green Screen and Chroma Key in After Effects
Outstanding nature scenes, flying carpets, and spaceships cruising through the vast galactic space are filmed using green screens. Through this technique, one can create scenes in different landscapes and locations without the need to move, travel, and spend lots of money on logistics. It brings convenience, flexibility, and boundless creative opportunities.
How does it work? A particular color in a video can be replaced with another color or a combination of different color sets using chroma keying. Imagine a weather forecaster showing you the latest forecast in your daily morning show with moving clouds on the backdrop. You can use the chroma key for the green screen in After Effects to achieve this result for your video projects.
Part 2. Why Use After Effects for Professional Green Screen Editing
Adobe’s suite of tools is top-of-line in professional editing, including Adobe After Effects. It’s mainly motion graphic software and is best used to create amazing motion effects for your videos. You can make 3D animation, title sequences, and hyper-realistic effects. Using Adobe After Effects chroma key, you can replace the background with more interesting designs. Most professionals use this tool as it has:
- Advanced editing features to create unique motion graphics and effects for your videos.
- Seamless integration capabilities with other Adobe Applications (Ex. Premier Pro).
- Integrated AI tools like the Rotor Brush for object removal or Content-Aware Fill.
- Allows for the creation of motion graphic templates with capabilities for sharing and collaboration with other users.
- Like other Adobe applications, it also supports various formats like MPEG, AAC, MP4A, MP3, WAV, and more.
Part 3. Use Chroma Key in After Effects to Remove Green Screen
If you’re now wondering how to use After Effect for green screen effect, here’s a detailed guide to help you. Make sure you have your After Effects ready and installed in your PC before starting.
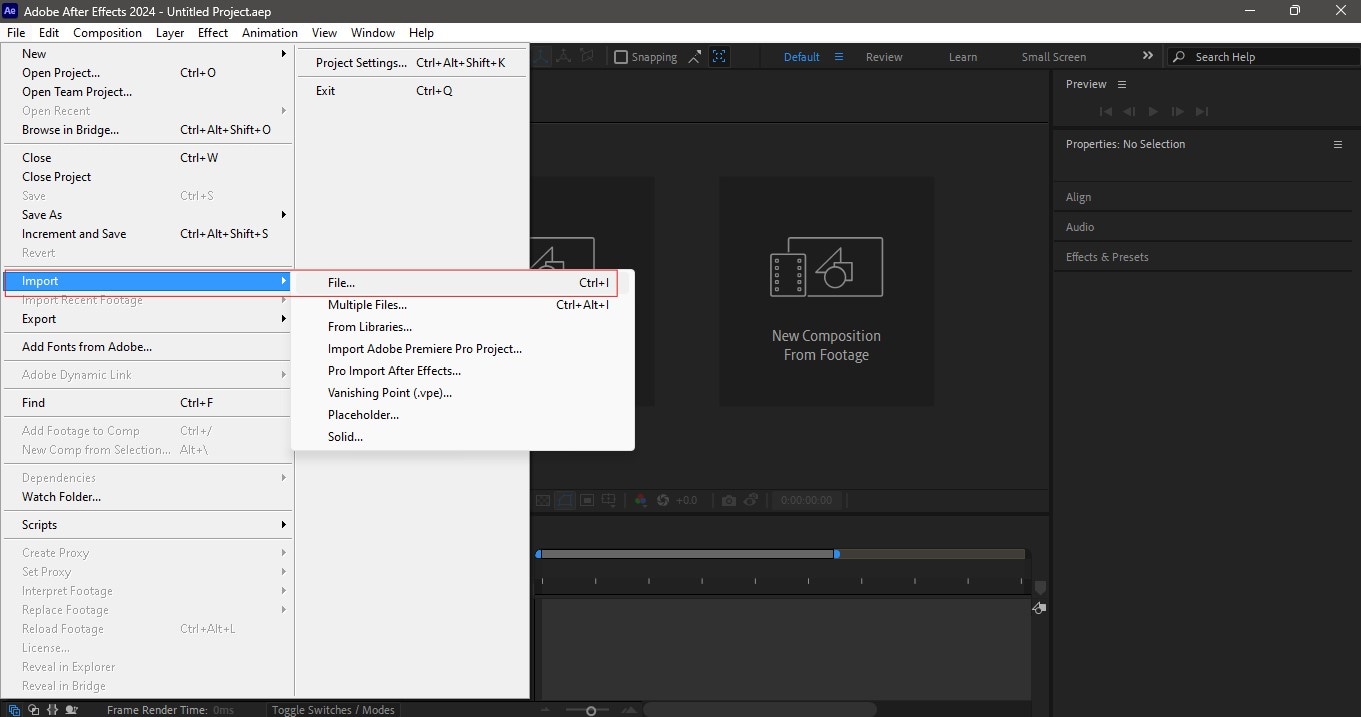
Step 1: With your After Effects tool open, import your video by going to File, choose Import, then select File. Select the green screen clip you want to edit.
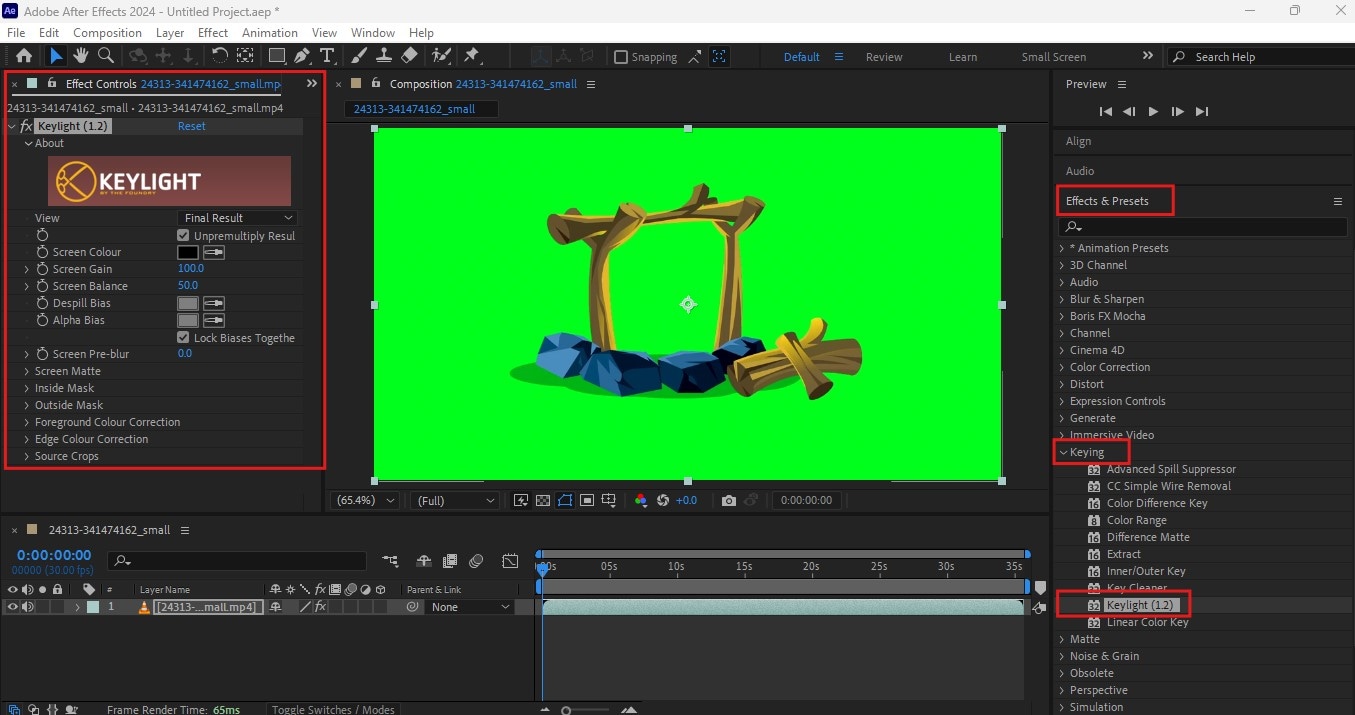
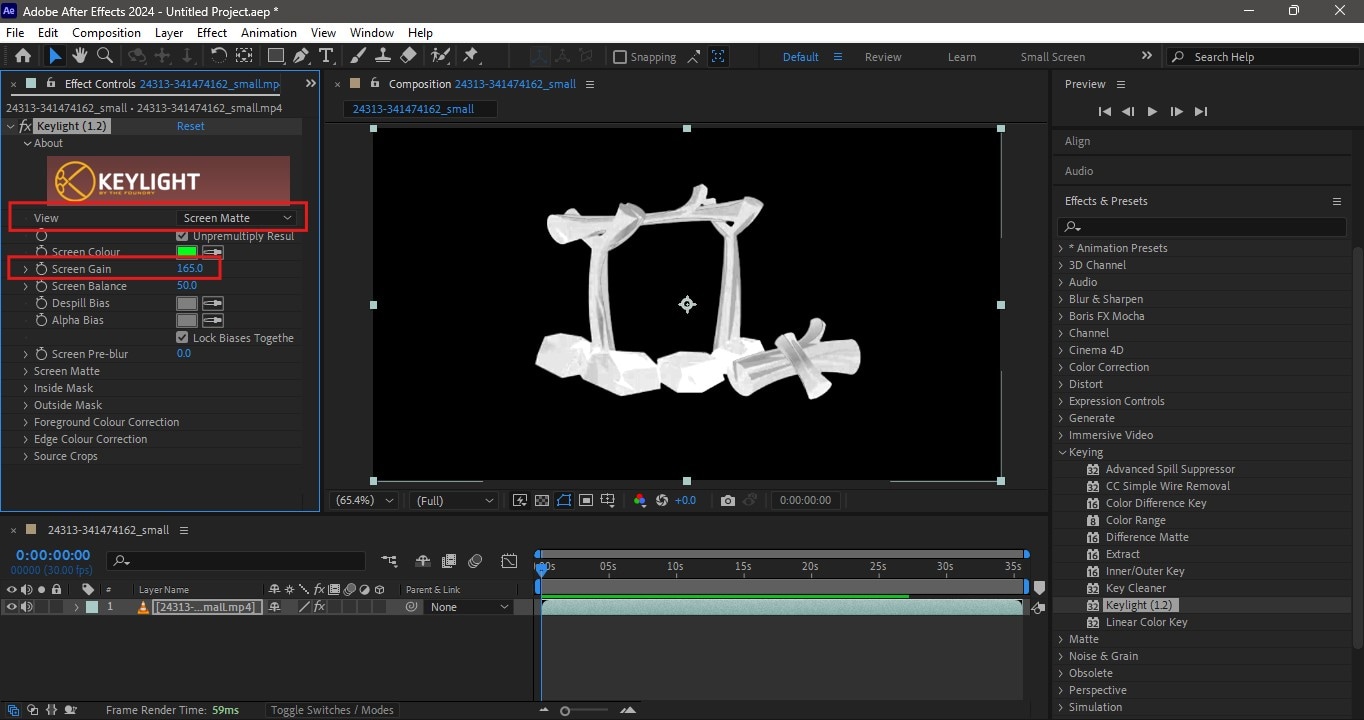
Step 2: Drag your video to the timeline start. After that, head over to the Effects and Presets panel on the right side of your screen. Find the Keylight folder and select the effect tagged as Keylight. Click and drag the effect to your video clip, which will then enable the Effects Control Panel on the left-side portion of the screen.
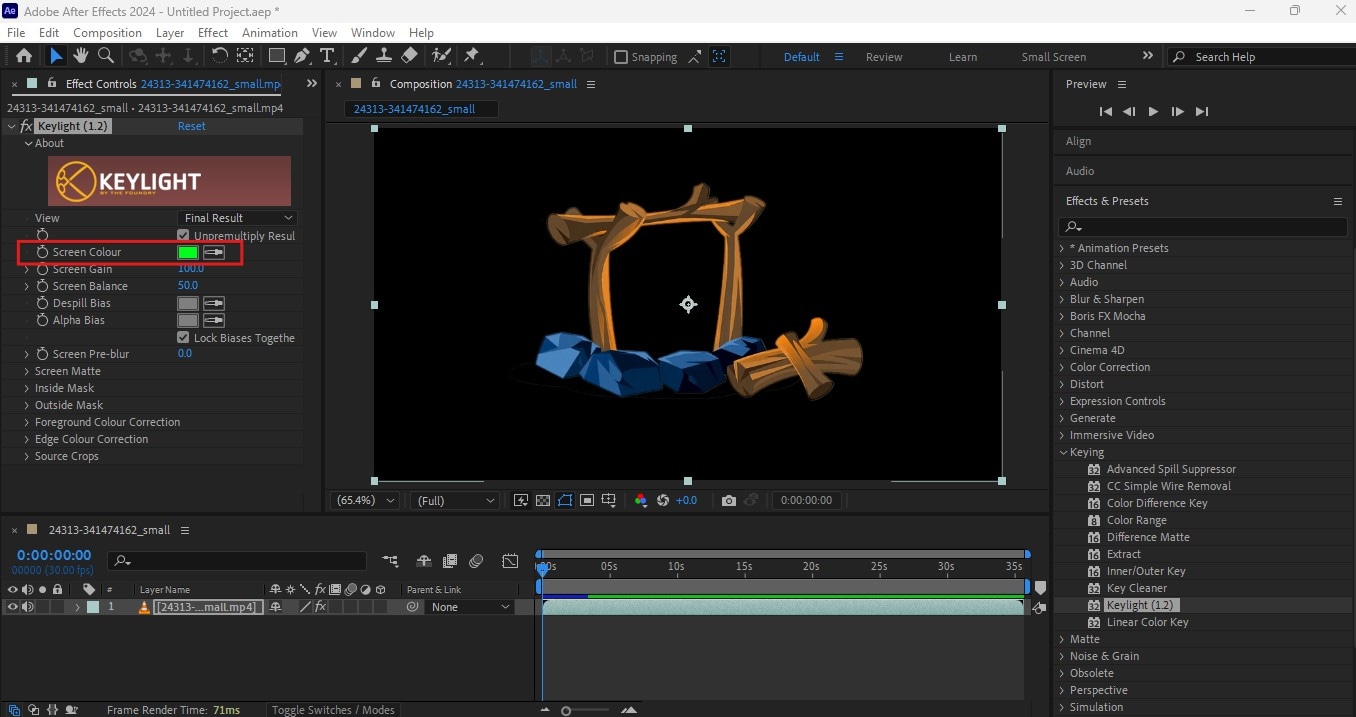
Step 3: In the Effects Panel, go to Screen Color. Using the Color Picker tool, hover and click on the area of your video with the green color. This will pick the exact shade of green from your video and instantly remove it. You can then see the green color effectively removed and you’re now left with a transparent background.
Step 4: Bonus Tip: To further enhance your keying results, you can go to View then choose Screen Matte in the drop-down menu beside it. From here, you can see if there are green screen spills or remaining green color. You can subdue that by adjusting your Screen Gain to your preferred intensity. Go back to View and choose Final Result to continue editing.
Step 5. Import your background clip and drag it to your timeline. Resize and adjust the video as necessary until you’re satisfied with the placing.
With Adobe After Effects Chroma Key capability, you can smoothly replace your background with different designs and effortlessly combine multiple videos into one unique content.
Part 4. Tips in Effectively Using Chroma Key
With the steps above, you can edit the green screen in After Effects or other tools and create the same results. However, there are little tweaks that you can do to take a step further. These may seem to be inconsequential at first but may spell the difference between good and great green screen content. Some of it is tips on how to handle technical issues commonly encountered when editing a green screen video.
- Use the Refine Edge tool and Edge Blur in After Effects to clean up or smooth out edges, giving a more natural blend between the background and the subject. For Filmora, you can utilize the Edge Thickness, Tolerance, and Edge Feather sliders for this same purpose.
- You can deal with unwanted objects or problematic areas in After Effects during green screen edits using masks. In Filmora, you can use the AI Object Remover to effectively remove any unwanted spots, lines, or way objects.
- During filming, ensure your subject is evenly lit to avoid shadows. The use of multiple soft lights around the subject really helps in creating that uniform lighting.
- If there are unfortunate spills during post-production, you can use the Advance Spill Suppressor in After Effects to remove green color spills on your subject.
- Use a Color Correction tool to match your subject and background’s lighting and color temperature. This will help in blending both videos naturally and make it look like one whole shot.
Bonus Part:Alternative Tools for Green Screen Keying
While the chroma key in After Effects is an incredible feature, the tool is mostly used for motion graphics and video effects. If you’re looking for other editing software to help you in your video projects, you’ll find an abundance of it. However, these are the three top editing tools you can take a look at as alternatives.
Wondershare Filmora [Highly-Recommended]
Wondershare Filmora’s robust editing platform has a complete set of tools, including a chroma key to help you edit green screen videos. Although you can find many advanced tools on its platform, the interface is both for professionals and beginners. To get a good glimpse of what Filmora can do for you, here are some of its key features:
- Complete set of editing tools from the very basic to advanced tools for complex processes, including AI tools like chroma key, AI portrait, AI music, and more.
- Portfolio of unique resources from video effects, stock footage, stickers, and audio tracks.
- Multi-platform software available in Windows, Mac, and mobile for flexible work.
Like editing the green screen in After Effects, here’s a similar easy way to do it in Filmora.
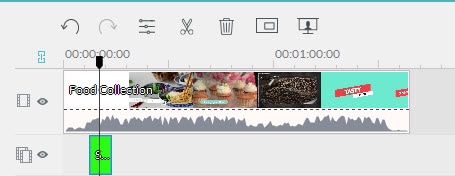
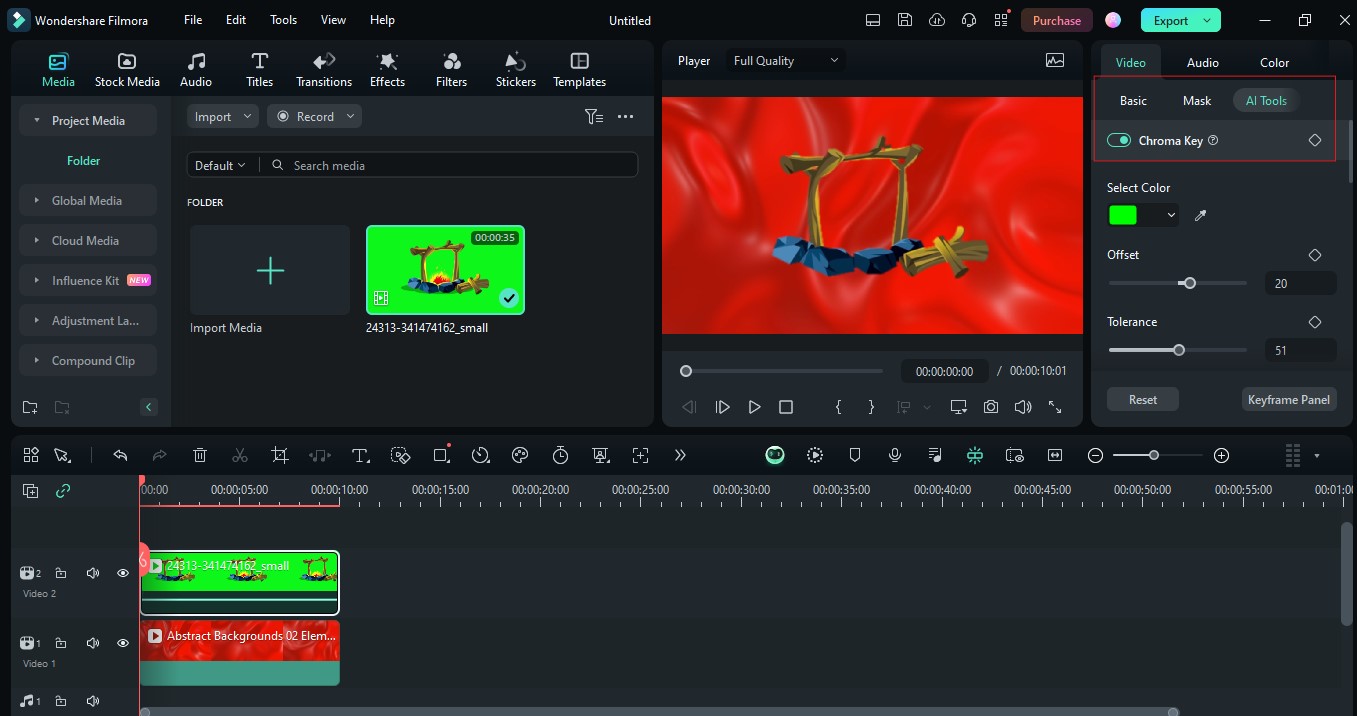
Step 1: With Filmora tool open, go to New Project. Import your green screen clip and background clip by clicking on Import. Select your clips and drag it to the timeline for editing.
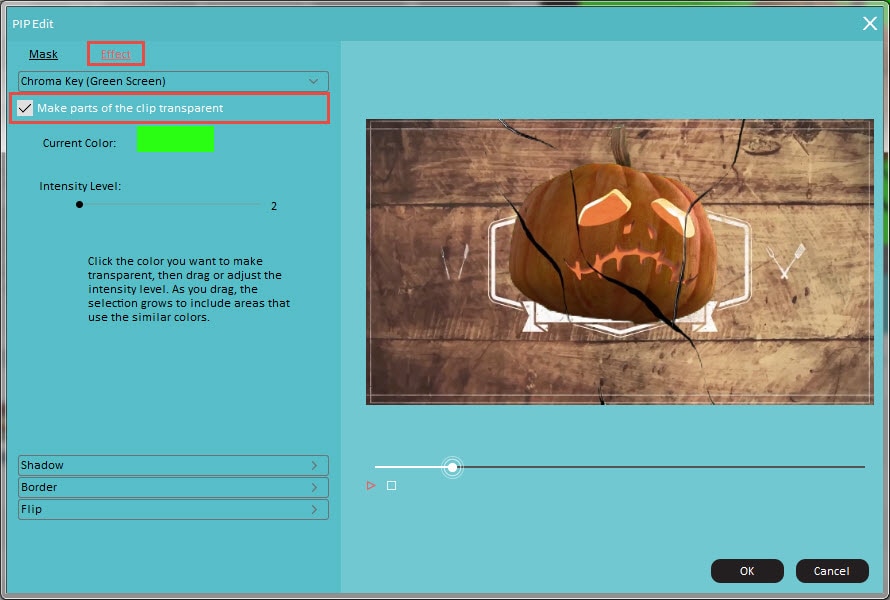
Step 2: Ensure to click your green screen clip first then head over to AI Tools and enable the Chroma Key. You’ll then instantly see the green color removed and replaced with your background clip. You can also use the Color Picker tool to select the exact shade of green in your video. Adjust your thickness, feather, and tolerance sliders to your preference.
Premier Pro [For Professionals]
Like After Effects, most professional video editors have Premier Pro in their arsenal. It’s a highly-regarded tool in video editing. Not only does it have advanced editing tools, but it also supports a wide variety of video formats, audio formats, motion graphics templates, and collaboration tools. If you’re a frequent user of the Adobe ecosystem, then it’s easier for you to integrate After Effects projects to Premier Pro and vice versa.
Final Cut Pro [For Mac Users]
Mac users have the advantage of this powerful editing tool. This tool is known to have fast performance, multi-camera editing, 3D-animation modeling capabilities, and chroma key tools like After Effects. If you’re a MacOS user, it’s easy to edit and compile your video projects from your device or any other MacOS device. Unlike similar sophisticated software, Final Cut Pro takes a shorter learning curve for first-time users as its interface is designed in a superbly organized way, making it very easy for one to get familiar with.
Conclusion
Now that you know how to use the chroma key in After Effects, you can create your own green screen videos, blend various backgrounds, and create stunning content where your creativity can take you. Aside from using After Effects for green screen effects, you can also find other sophisticated tools, like Filmora, Premier Pro, or Final Cut Pro, to fulfill your professional editing needs. With Filmora, you can have the benefits of a high-quality grade editor but without the steep learning curve or the complicated interface. Keep exploring Filmora’s rich editing suite and find yourself immersed in incredible software.
