For the Best Results, Use the Latest Version.
-
Preparations for Mac
-
Account (Mac)
-
Get Started & Basic Settings (Mac)
- Release notes for Mac
- Latest Versions and Features for Mac
- Get Started on Mac - Full Guide
- Download/register/uninstall on Mac
- Panel Layout on Mac
- Keyboard shortcuts on Mac
- Touchbar on Mac
- Change playback quality on Mac
- Render preview files on Mac
- Manage Timeline on Mac
- Media for use on Mac
- Logo Reveal For Mac
- Marked Favorites for Mac
-
Compatibility & Tech Specs (Mac)
-
Performance Settings (Mac)
-
-
Creating Projects - Mac
-
Creating New Projects (Mac)
-
-
Importing & Recording - Mac
-
Importing (Mac)
-
Recording (Mac)
-
-
Video Editing for Mac
-
Basic Video Editing for Mac
- Edit Live Photos on Mac
- Enable/Disable Clip for Mac
- Magnetic Timeline For Mac
- Dual Monitor Setup for Video Editing on Mac
- Select All Clips on Timeline for Mac
- Auto Ripple for Mac
- Split & cut videos on Mac
- Compositing on Mac
- Crop and zoom on Mac
- Playback Zoom Level for Mac
- Change speed on Mac
- Play video in reverse on Mac
- Mark In and Mark Out for Mac
- Markers for Mac
- Group clips on Mac
- Customized Backgrounds for Videos and Images in Mac
- Video snapshot on Mac
- Freeze frame on Mac
- Auto enhance on Mac
- Applying Drop Shadow for Mac
- Adjustment Layer for Mac
- Mark clip on Mac
- Video Editing Ruler – Mac
- Apply Transforming for Mac
-
Advanced Video Editing for Mac
-
AI-Powered Video Editing for Mac
- Smart Scene Cut for Mac
- Smart Short Clips for Mac
- Image to Video for Mac
- AI Idea to Video for Mac
- AI Text-to-Video for Mac
- Instant Cutter Tool on Mac
- AI Face Mosaic for Mac
- Keyframe Path Curve for Mac
- Planar Tracking for Mac
- AI Extend For Mac
- AI Script-to-Video for Mac
- AI Text-Based Editing in Mac
- Create With Instant Mode on Mac
- ChatGPT Plugin - AI Copywriting on Mac
- AI Smart Cutout for Mac
- Auto reframe on Mac
- Lens correction on Mac
- AI Portrait Cutout on Mac
- Scene detection on Mac
- AI Smart Masking for Mac
- AI Mate Editing for Mac
- Motion Tracking on Mac
- Video Stabilization for Mac
- AI Object Remover For Mac
- AI Smart Search for Mac
- AI Skin Tone Protection for Mac
- Green screen on Mac
- Super Slow Motion with Optical Flow for Mac
- AI stylizer on Mac
- Video Denoise for Mac
-
-
Audio Editing for Mac
-
Basic Audio Editing for Mac
-
Advanced Audio Editing for Mac
-
AI-Powered Audio Editing for Mac
- Audio To Video for Mac
- AI Sound Effect for Mac
- Smart BGM Generation for Mac
- AI Voice Enhancer for Mac
- Audio Stretch for Mac
- AI Audio Denoise for Mac
- Auto synchronization for Mac
- AI Vocal Remover for Mac
- Auto Beat Sync on Mac
- AI Music Generator for Mac
- How to Perform AI Voice Cloning in Wondershare Filmora?
- Silence detection on Mac
-
-
Text Editing for Mac
-
Basic Text Editing for Mac
-
Advanced Text Editing for Mac
-
AI-Powered Text Editing for Mac
-
-
Video Customizations for Mac
-
Video Effects (Mac)
-
Audio Effects (Mac)
-
Transitions (Mac)
-
Stickers (Mac)
-
Filters (Mac)
-
Color Editing (Mac)
-
Animations (Mac)
-
Templates (Mac)
-
Asset Center (Mac)
-
-
Exporting & Share & Cloud Backup - Mac
Importing
When it comes to importing media content into Wondershare Filmora, it supports importing content up to 4K in resolution. Multiple functions can be processed across these media files when added across the Media Library. However, it is vital to understand the various methods of importing media files into Filmora Mac.
Note:
A Media Library is provided for you to organize your media clips to easily and quickly catch assets for your projects.How to Import Media Files
There are 3 ways to import media files to Filmora.
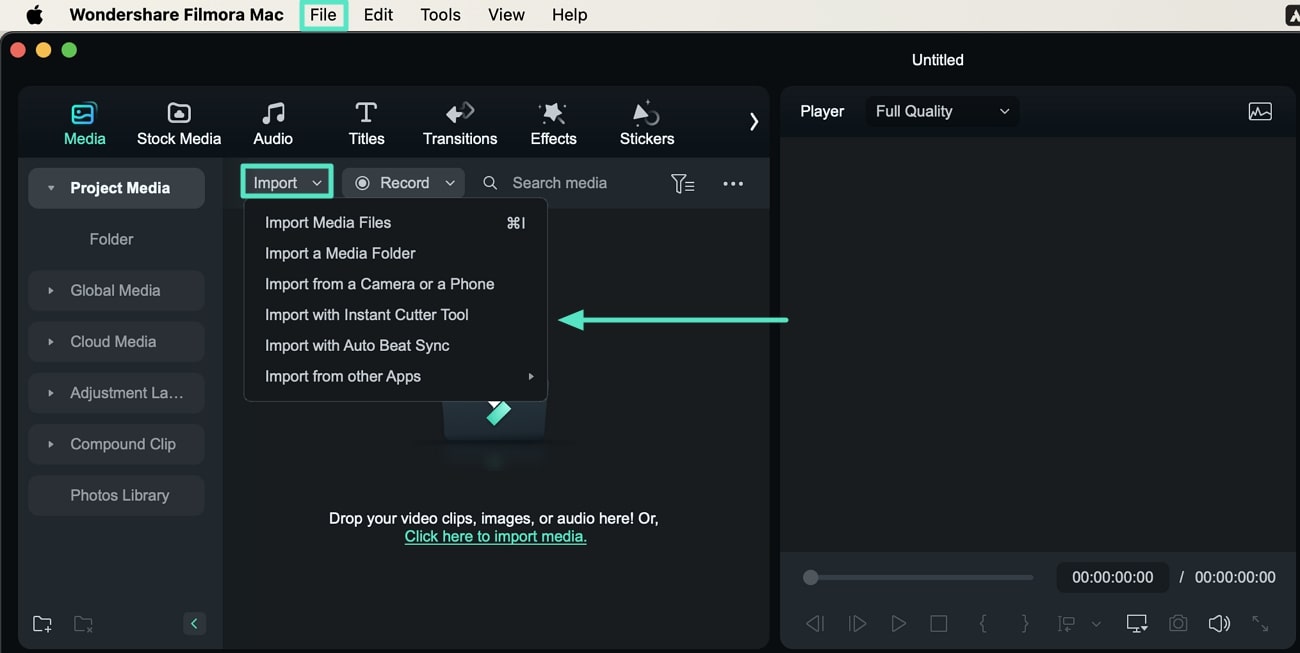
Way 1. From the Import Button or File Tab
To import a specific file into Filmora, click the “Import” button and select the options available on the menu. A similar menu can be accessed from the “File" tab at the top of the window.

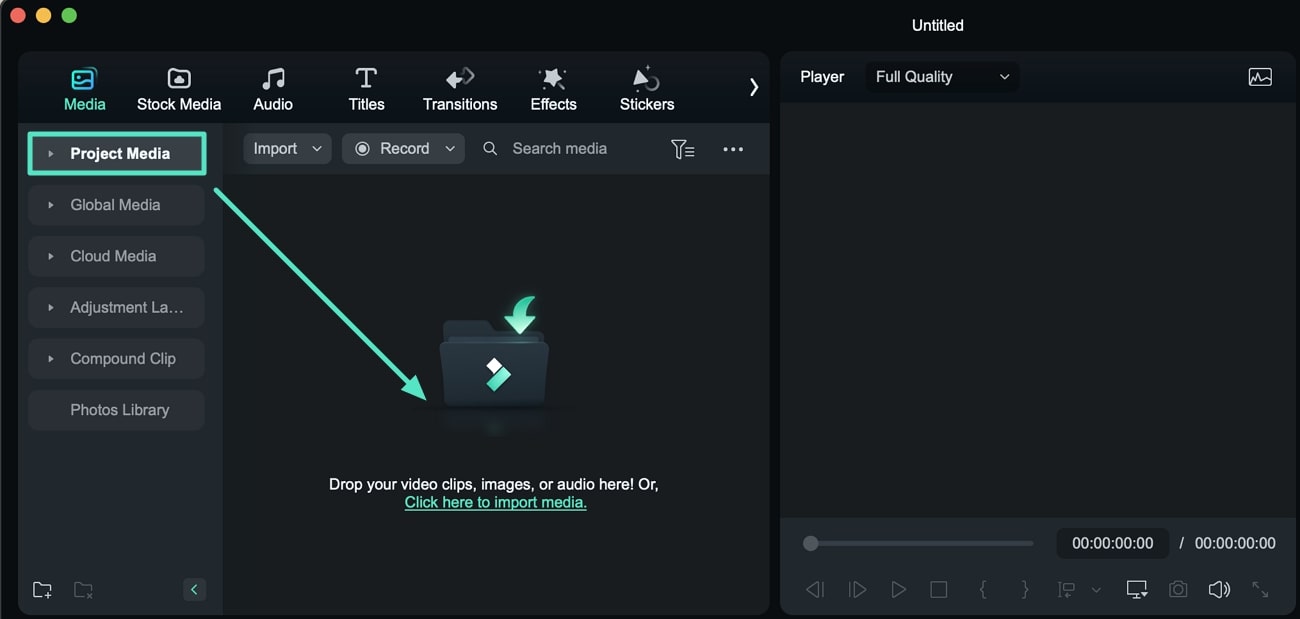
Way 2. From Project Media
For importing files to Filmora Mac, you can perform the process through the “Project Media" section. You will find the option "Click here to import media," which opens the explorer window for adding the media file.

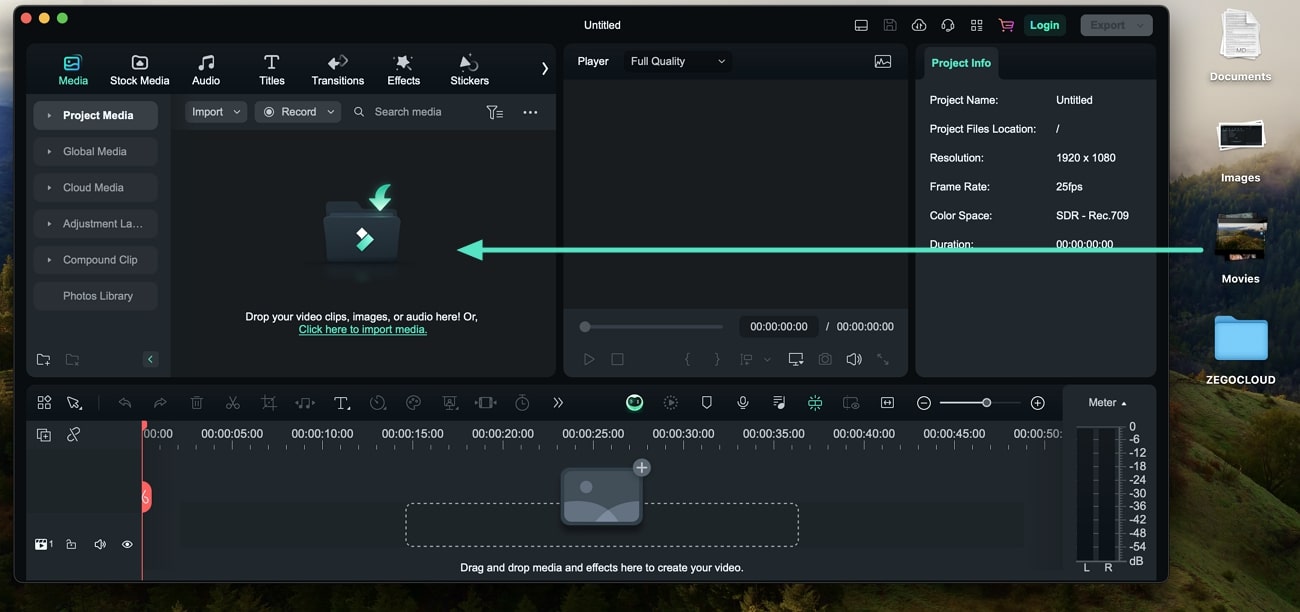
Way 3. From Drag and Drop
When importing media files to Filmora, you can easily drag and drop the media files into Filmora to add them across the media panel.

How To Make Image Sequence Into a Video
- To begin importing an image sequence, click on "Import" to upload your JPEG/JPG files, or you can also drag and drop them directly into the media library. Make sure to select the first image in the sequence, tick the "Import as image sequence" option, and then press "Open." Ensure that your images are in JPEG format and sequentially named (for example, image001.jpg, image002.jpg).

- To add the sequence to your project timeline, simply drag the entire sequence from the media library to the timeline. If you need to adjust the duration of any image, right-click on it within the timeline and make the necessary adjustments.

- When you're ready to export your video, click on the "Export" button, select the desired video format and frame rate, specify where you want to save the file, and then click "Export" again to generate your video. your video.

Related Posts
Featured Articles
How to Convert Video Audio to Text With Fantastic Results
Want to turn a video’s audio into text? Discover the best video audio-to-text converter and essential tips for excellent results.
How To Blur Faces in Videos with Movavi [2025]
In this article, we will show you how you can blur faces in videos with Movavi video editing software, and explain how to apply Blur effects with alternative editing software such as Filmora.
3 Ways To Add Transitions In Final Cut Pro
Using the transitions in Final Cut Pro can be tricky. Read this article and learn all the methods available to apply the Final Cut Pro Transitions to videos.
Recommended User Guide
Import Media from Third-Party Drives on Mac
Filmora makes it possible to import media from third party drives, including Google Drive, One Drive and Dropbox.
Import Subprojects on Mac
Learn how to efficiently manage multiple projects in Filmora for Mac. Import subprojects to reuse media, timelines, and templates, streamlining your editing workflow and enhancing collaboration.
