For the Best Results, Use the Latest Version.
-
Preparations for Mac
-
Account (Mac)
-
Get Started & Basic Settings (Mac)
- Release notes for Mac
- Latest Versions and Features for Mac
- Get Started on Mac - Full Guide
- Download/register/uninstall on Mac
- Panel Layout on Mac
- Keyboard shortcuts on Mac
- Touchbar on Mac
- Change playback quality on Mac
- Render preview files on Mac
- Manage timeline on Mac
- Media for use on Mac
- Logo Reveal For Mac
- Marked Favorites for Mac
-
Compatibility & Tech Specs (Mac)
-
Performance Settings (Mac)
-
-
Creating Projects - Mac
-
Creating New Projects (Mac)
-
-
Importing & Recording - Mac
-
Importing (Mac)
-
Recording (Mac)
-
-
Video Editing for Mac
-
Basic Video Editing for Mac
- Edit Live Photos on Mac
- Enable/Disable Clip for Mac
- Magnetic Timeline For Mac
- Select All Clips on Timeline for Mac
- Auto Ripple for Mac
- Split & cut videos on Mac
- Compositing on Mac
- Crop and zoom on Mac
- Playback Zoom Level for Mac
- Change speed on Mac
- Play video in reverse on Mac
- Mark In and Mark Out for Mac
- Markers for Mac
- Group clips on Mac
- Customized Backgrounds for Videos and Images in Mac
- Video snapshot on Mac
- Freeze frame on Mac
- Auto enhance on Mac
- Applying Drop Shadow for Mac
- Adjustment Layer for Mac
- Mark clip on Mac
- Video Editing Ruler – Mac
- Apply Transforming for Mac
-
Advanced Video Editing for Mac
-
AI-Powered Video Editing for Mac
- Smart Scene Cut for Mac
- Smart Short Clips for Mac
- Image to Video for Mac
- AI Idea to Video for Mac
- AI Text-to-Video for Mac
- Instant Cutter Tool on Mac
- AI Face Mosaic for Mac
- Keyframe Path Curve for Mac
- Planar Tracking for Mac
- AI Extend For Mac
- AI Script-to-Video for Mac
- AI Text-Based Editing in Mac
- Create With Instant Mode on Mac
- ChatGPT Plugin - AI Copywriting on Mac
- AI Smart Cutout for Mac
- Auto reframe on Mac
- Lens correction on Mac
- AI Portrait Cutout on Mac
- Scene detection on Mac
- AI Smart Masking for Mac
- AI Mate Editing for Mac
- Motion Tracking on Mac
- Stabilize video on Mac
- AI Object Remover For Mac
- AI Smart Search for Mac
- AI Skin Tone Protection for Mac
- Green screen on Mac
- Super Slow Motion with Optical Flow for Mac
- AI stylizer on Mac
- Video Denoise for Mac
-
-
Audio Editing for Mac
-
Basic Audio Editing for Mac
-
Advanced Audio Editing for Mac
-
AI-Powered Audio Editing for Mac
- Audio To Video for Mac
- AI Sound Effect for Mac
- Smart BGM Generation for Mac
- AI Voice Enhancer for Mac
- Audio Stretch for Mac
- AI Audio Denoise for Mac
- Auto synchronization for Mac
- AI Vocal Remover for Mac
- Auto Beat Sync on Mac
- AI Music Generator for Mac
- How to Perform AI Voice Cloning in Wondershare Filmora?
- Silence detection on Mac
-
-
Text Editing for Mac
-
Basic Text Editing for Mac
-
Advanced Text Editing for Mac
-
AI-Powered Text Editing for Mac
-
-
Video Customizations for Mac
-
Video Effects (Mac)
-
Audio Effects (Mac)
-
Transitions (Mac)
-
Stickers (Mac)
-
Filters (Mac)
-
Color Editing (Mac)
-
Animations (Mac)
-
Templates (Mac)
-
Asset Center (Mac)
-
-
Exporting & Share & Cloud Backup - Mac
Compound Clips for Mac
With the latest version of Filmora, users can explore the newly added features, including the Compound Clip functionality. This feature is capable of merging two or more distinct clips into one, enabling fast editing. If you want to apply the same effects and filters to multiple shots, follow the steps below to create a compound clip:
Index
Creating a Compound Clip
By following this step-by-step guide, users can bring consistency and fluidity to their videos through Compound Clip functionality.
Method 1: Using the Top Toolbar
Step 1: Starting a New Project
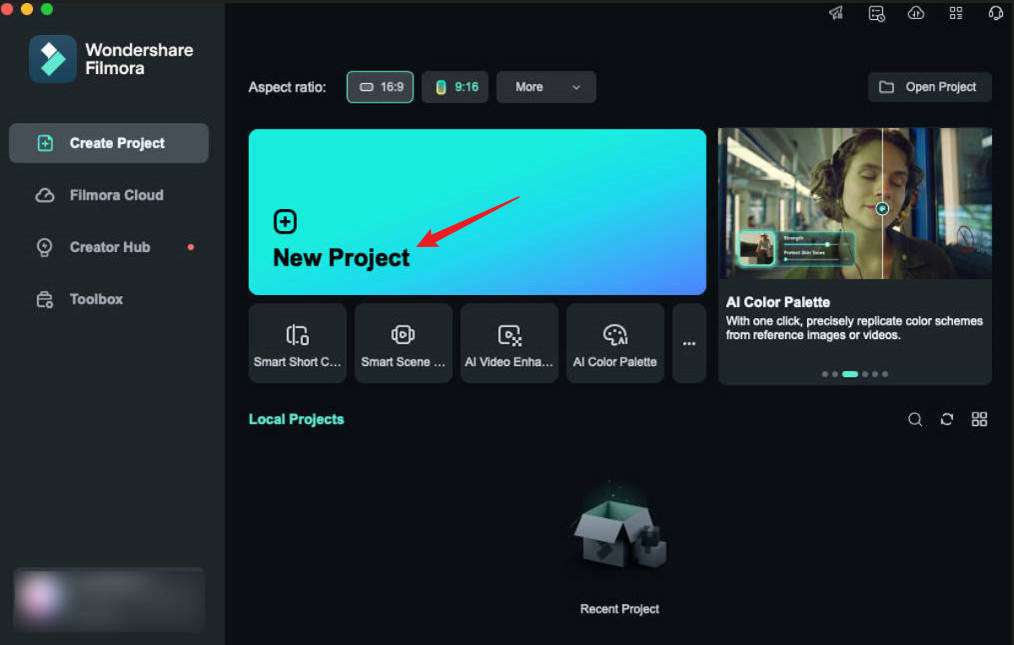
After downloading Filmora for Mac and logging into your account, navigate to the left side panel and click " Create Project". This action will open various tabs on the main screen, where you have to select the "New Project" tab.
Step 2: Importing Clips and Placing Them in the Timeline Panel
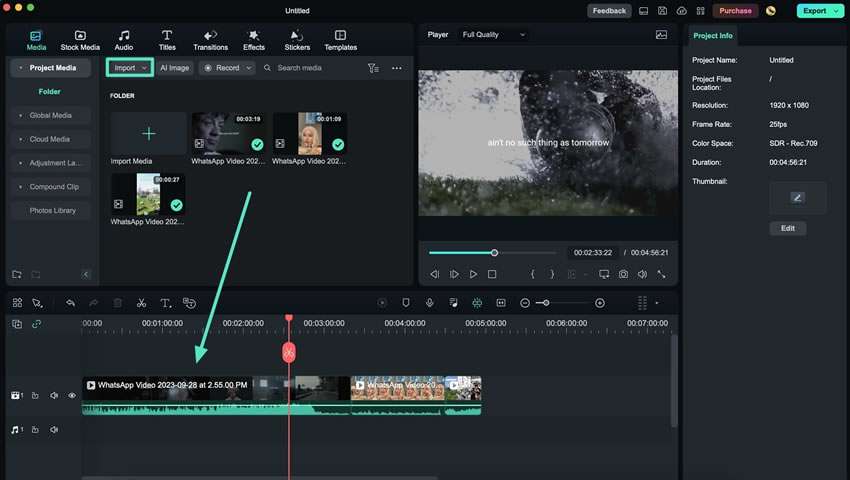
Once you access Filmora's editing window, press the "Command + I" buttons on your keyboard and choose clips to import from your device. Once the media is imported, drag and drop the clips in the same timeline track.
Step 3: Creating a Compound Clip
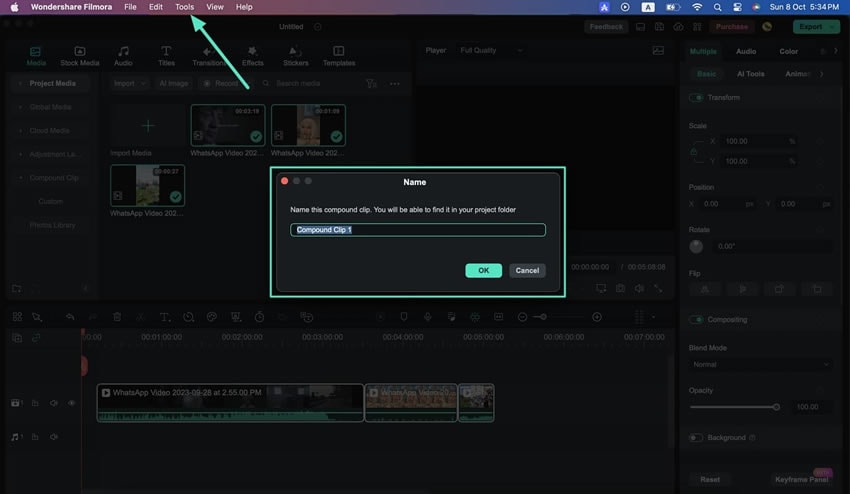
After the clips are in the timeline panel, select them and go to the top toolbar. From the available tabs, click "Tools", and a drop-down menu will show up. Select the "Create Compound Clip" option there. A pop-up window will appear, allowing you to name your compound clip, where you have to click "OK" to proceed.
Step 4: Saving the Compound Clip
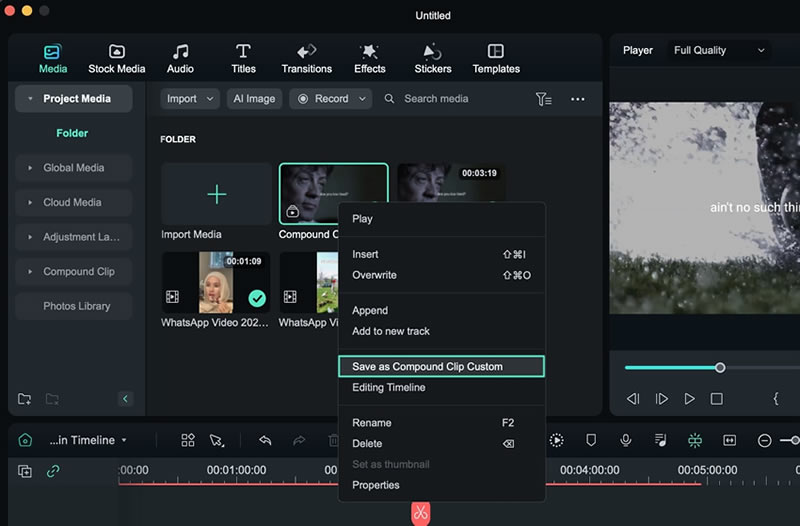
To save your compound clip, locate it in the timeline panel and right-click on it. Afterwards, choose the "Save as Custom Compound Clip" option from the drop-down menu. This clip will be saved and can be accessed through the "Compound Clip" option in the left panel of the editing window.
Method 2: Using the Timeline Control Menu
Step 1: Accessing the Compound Clip Functionality
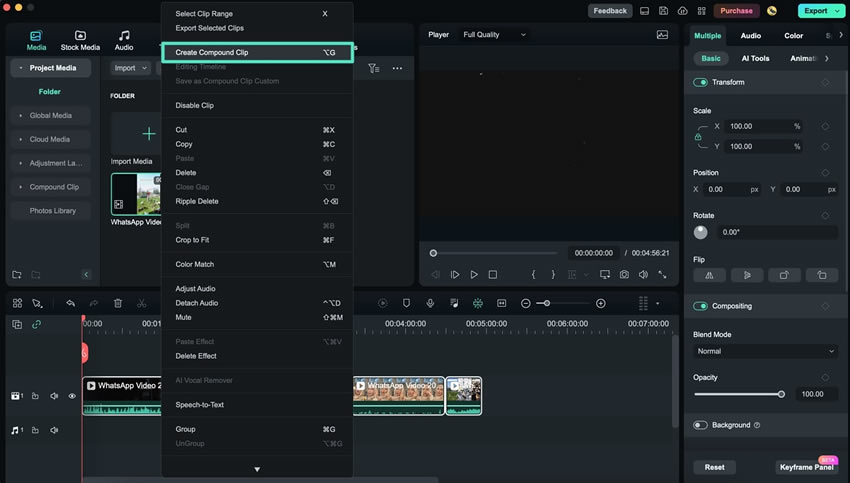
Drag and drop the media into the timeline panel with your available peripherals. Select both clips in the timeline simultaneously by pressing the "Command" key from the keyboard and clicking on clips with your cursor. Right-click on it, and choose the "Create Compound Clip" option from the control panel that appears.
Step 2: Saving the Compound Clip as Custom
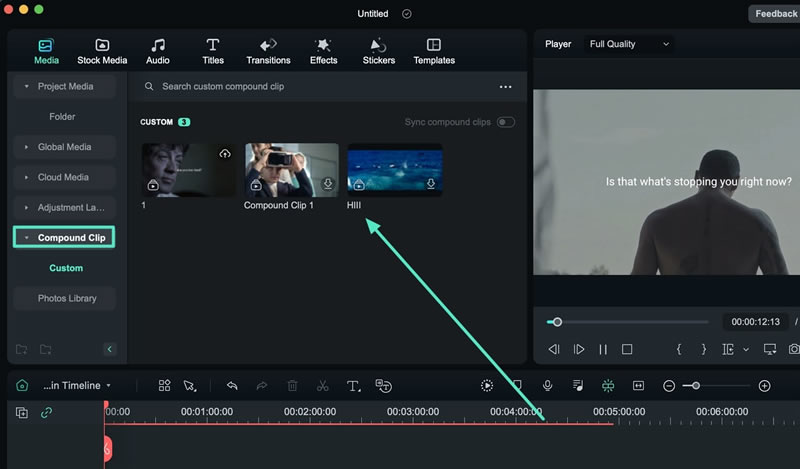
Once you’ve created the compound clip and want to save it, click on the clip in the timeline. Then, select the "Save as Compound Clip Custom" option from the options panel. Further, you can find your saved files in the "Compound Clip" section at the top left panel.
Navigating Through Created Compound Clips
As the compound clip is created in Filmora Mac, you can view the combined clip in the main timeline. However, Filmora has made navigation of clips and their editing easier. To know more about how this navigation operates in Filmora, go through the simple step-by-step instructions below:
Step 1: Viewing the Main Timeline
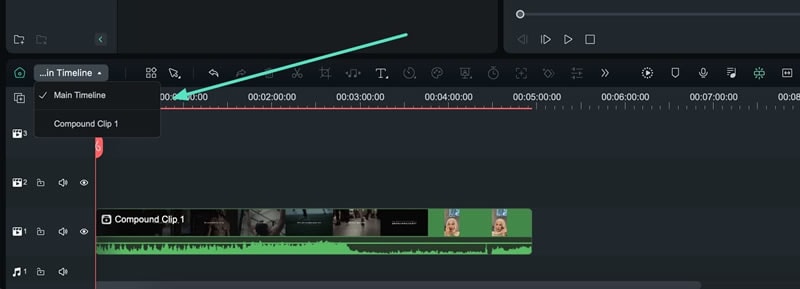
After creating the compound clips in your timeline, a drop-down menu representing the different layers in the timeline appears in the timeline toolbar. Consequently, the "Main Timeline" layer shows the combined compound clip.
Step 2: Changing To Compound Clip Layer
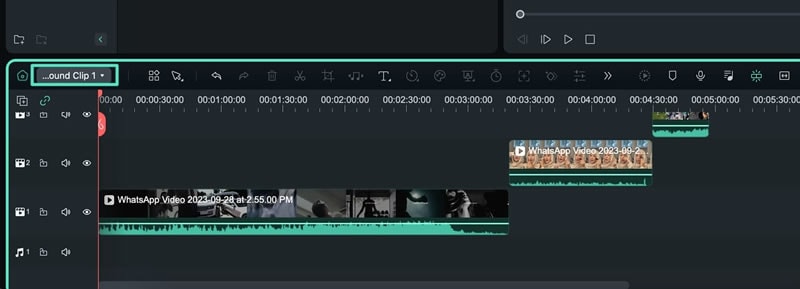
To change this and view the single compound clip and its elements closely, you can simply change the timeline view from the drop-down to "Compound Clip" and view its details across the timeline.
Detach Compound Clips
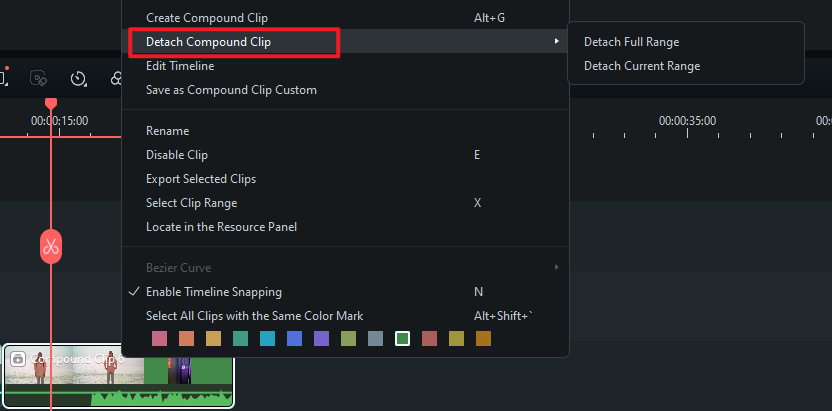
In the new version of Filmora, Detach compound clip is supported. Now you can restore the compound clip, making video editing more flexible.
Right click on the compound clip on the main timeline, then select "Detach Compound Clip" to restore the compound clip.
Related Posts
Featured Articles
What Is Non-Linear Editing (NLE) and the Best Tools to Get Started
Discover how non-linear editing (NLE) revolutionized video production. Learn what NLE is, its key advantages over traditional methods, and explore the best software to start creating professional videos.
International Translation Day 2025: All You Need to Know
Understand the definition, history, and meaning of International Translation Day. Discover why it is celebrated and how linguists bridge gaps between cultures.
Use Grok as Your Video Editing Assistant! Here's How
If you're editing videos, Grok 3 AI adds some serious brainpower to your editing process. Check out our guide to learn how to use it for better, faster edits.
Recommended User Guide
Multi-Clip Editing for Mac
Multiple clip editing makes editing so easy, and Filmora also offers this.
Create Multi-Camera Clip for Mac
Use the multi-camera clip feature to seamlessly combine footage from different camera angles into a cohesive, dynamic view, enhancing the overall visual impact and storytelling of your video.
Text Animation Path for Mac
Filmora has introduced an exciting new feature—Text Path Animation. It enables creators to animate text along a customizable path, making it easier to emphasize key phrases, titles, or special effects in videos. Here's everything you need to know to make the most of this feature and enhance your video content.


