For the Best Results, Use the Latest Version.
-
Preparations for Mac
-
Account (Mac)
-
Get Started & Basic Settings (Mac)
- Release notes for Mac
- Latest Versions and Features for Mac
- Get Started on Mac - Full Guide
- Download/register/uninstall on Mac
- Panel Layout on Mac
- Keyboard shortcuts on Mac
- Touchbar on Mac
- Change playback quality on Mac
- Render preview files on Mac
- Manage timeline on Mac
- Media for use on Mac
- Logo Reveal For Mac
- Marked Favorites for Mac
-
Compatibility & Tech Specs (Mac)
-
Performance Settings (Mac)
-
-
Creating Projects - Mac
-
Creating New Projects (Mac)
-
-
Importing & Recording - Mac
-
Importing (Mac)
-
Recording (Mac)
-
-
Video Editing for Mac
-
Basic Video Editing for Mac
- Edit Live Photos on Mac
- Enable/Disable Clip for Mac
- Magnetic Timeline For Mac
- Select All Clips on Timeline for Mac
- Auto Ripple for Mac
- Split & cut videos on Mac
- Compositing on Mac
- Crop and zoom on Mac
- Playback Zoom Level for Mac
- Change speed on Mac
- Play video in reverse on Mac
- Mark In and Mark Out for Mac
- Markers for Mac
- Group clips on Mac
- Customized Backgrounds for Videos and Images in Mac
- Video snapshot on Mac
- Freeze frame on Mac
- Auto enhance on Mac
- Applying Drop Shadow for Mac
- Adjustment Layer for Mac
- Mark clip on Mac
- Video Editing Ruler – Mac
- Apply Transforming for Mac
-
Advanced Video Editing for Mac
-
AI-Powered Video Editing for Mac
- Smart Scene Cut for Mac
- Smart Short Clips for Mac
- Image to Video for Mac
- AI Idea to Video for Mac
- AI Text-to-Video for Mac
- Instant Cutter Tool on Mac
- AI Face Mosaic for Mac
- Keyframe Path Curve for Mac
- Planar Tracking for Mac
- AI Extend For Mac
- AI Script-to-Video for Mac
- AI Text-Based Editing in Mac
- Create With Instant Mode on Mac
- ChatGPT Plugin - AI Copywriting on Mac
- AI Smart Cutout for Mac
- Auto reframe on Mac
- Lens correction on Mac
- AI Portrait Cutout on Mac
- Scene detection on Mac
- AI Smart Masking for Mac
- AI Mate Editing for Mac
- Motion Tracking on Mac
- Stabilize video on Mac
- AI Object Remover For Mac
- AI Smart Search for Mac
- AI Skin Tone Protection for Mac
- Green screen on Mac
- Super Slow Motion with Optical Flow for Mac
- AI stylizer on Mac
- Video Denoise for Mac
-
-
Audio Editing for Mac
-
Basic Audio Editing for Mac
-
Advanced Audio Editing for Mac
-
AI-Powered Audio Editing for Mac
- Audio To Video for Mac
- AI Sound Effect for Mac
- Smart BGM Generation for Mac
- AI Voice Enhancer for Mac
- Audio Stretch for Mac
- AI Audio Denoise for Mac
- Auto synchronization for Mac
- AI Vocal Remover for Mac
- Auto Beat Sync on Mac
- AI Music Generator for Mac
- How to Perform AI Voice Cloning in Wondershare Filmora?
- Silence detection on Mac
-
-
Text Editing for Mac
-
Basic Text Editing for Mac
-
Advanced Text Editing for Mac
-
AI-Powered Text Editing for Mac
-
-
Video Customizations for Mac
-
Video Effects (Mac)
-
Audio Effects (Mac)
-
Transitions (Mac)
-
Stickers (Mac)
-
Filters (Mac)
-
Color Editing (Mac)
-
Animations (Mac)
-
Templates (Mac)
-
Asset Center (Mac)
-
-
Exporting & Share & Cloud Backup - Mac
Video Editing Ruler – Mac
As video editing requirements continue to grow, so does the demand for assistive tools. One essential tool is the video ruler, which creates reference lines to help manage specific layouts within a video. This is particularly useful for maintaining object positioning over time, as it allows you to set up a scale in accordance with the frame. Filmora offers a video editing ruler that facilitates the creation of these guiding lines. To see how it can be utilized effectively, follow the steps provided:
Index
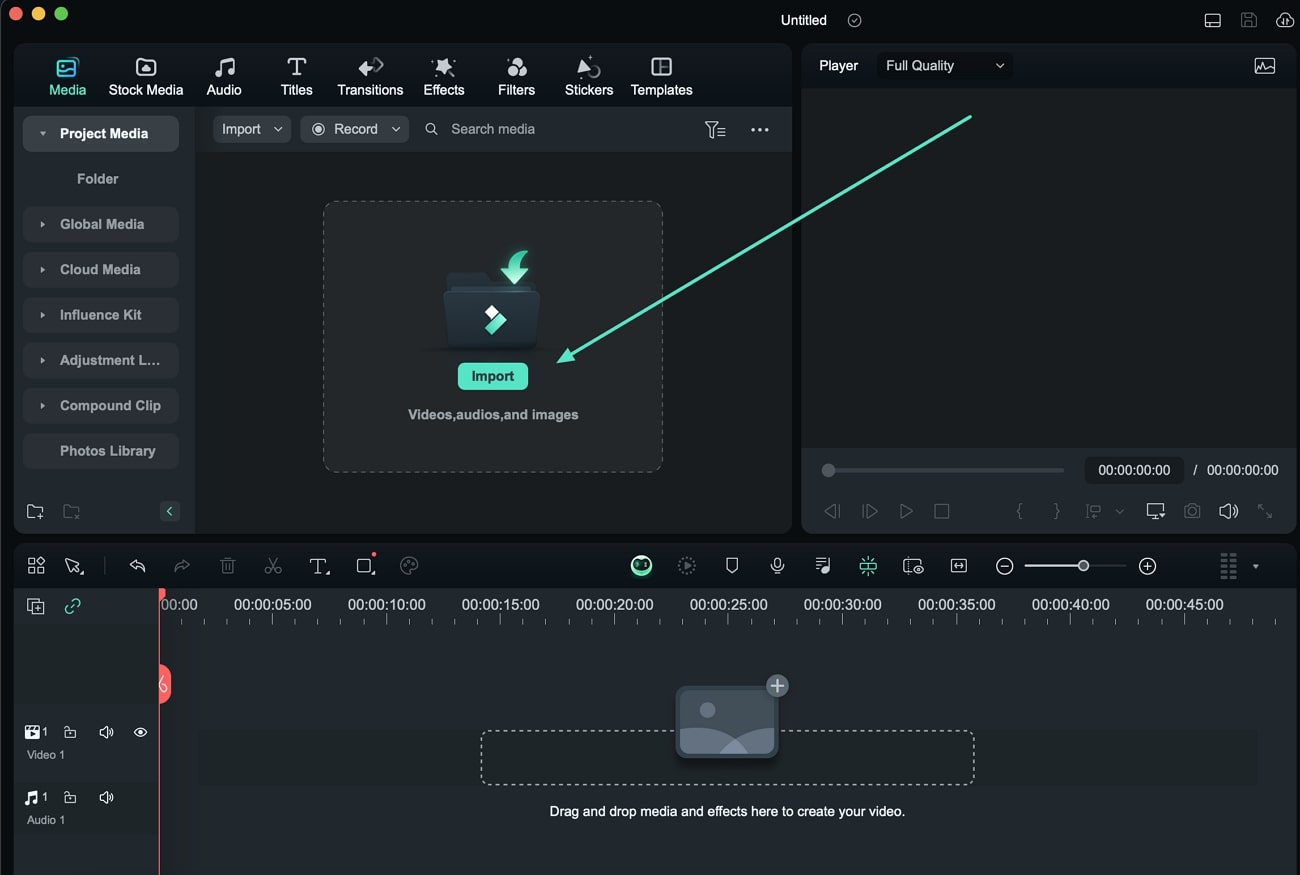
Step 1. Set Up New Filmora Project
Successfully launch Wondershare Filmora on your Mac and continue to create a new project with the "New Project" option. As you find yourself in the editing interface, select the "Import" button to add your video file.

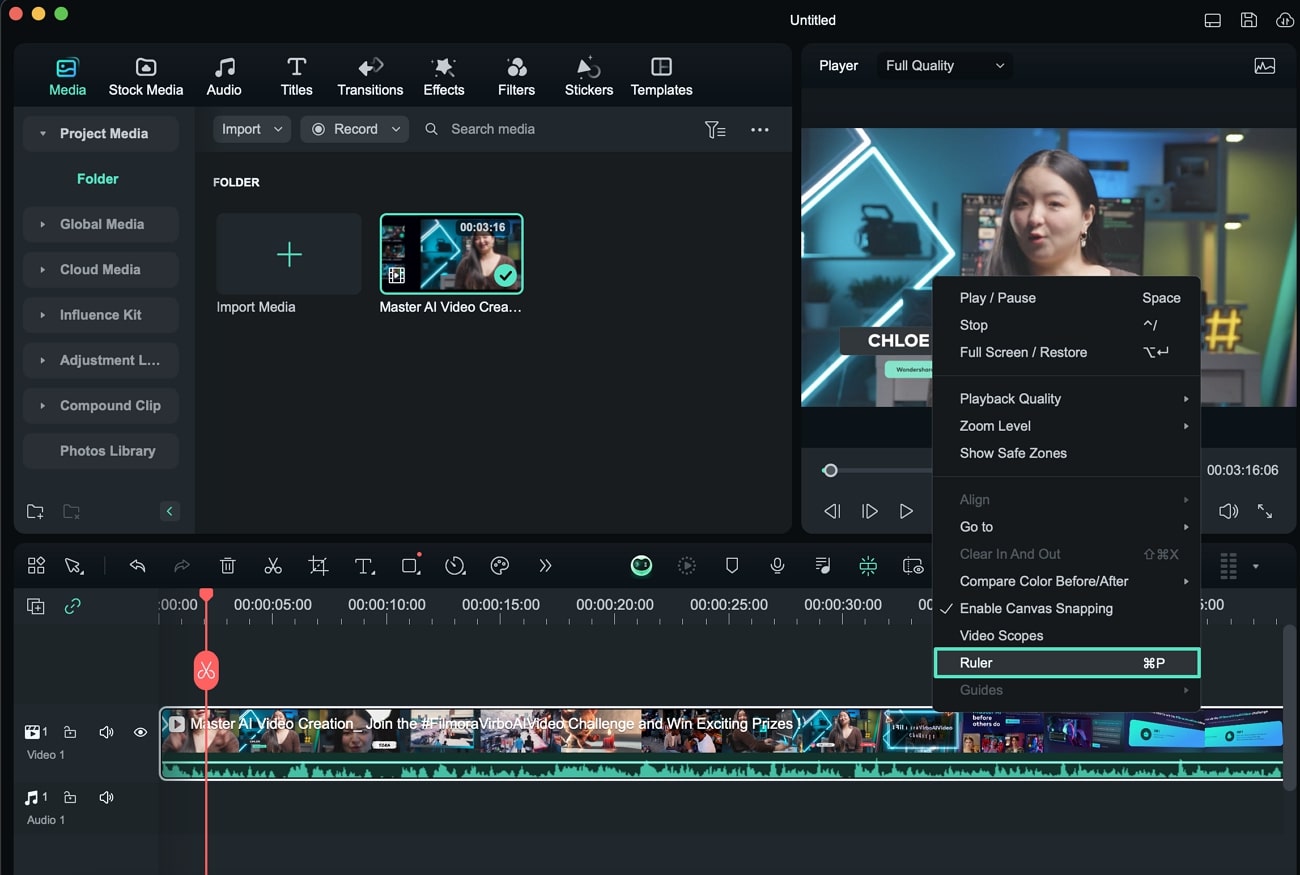
Step 2. Activate Video Ruler From Preview Window
Once you have imported your video file, continue to drag it across the timeline. Following this, proceed to the preview window and right-click to open a list of options. Select the "Ruler" option in the drop-down menu, or use the "Command + P" shortcut key to activate the ruler. This displays the reference lines and a scale within the preview window for precise editing.

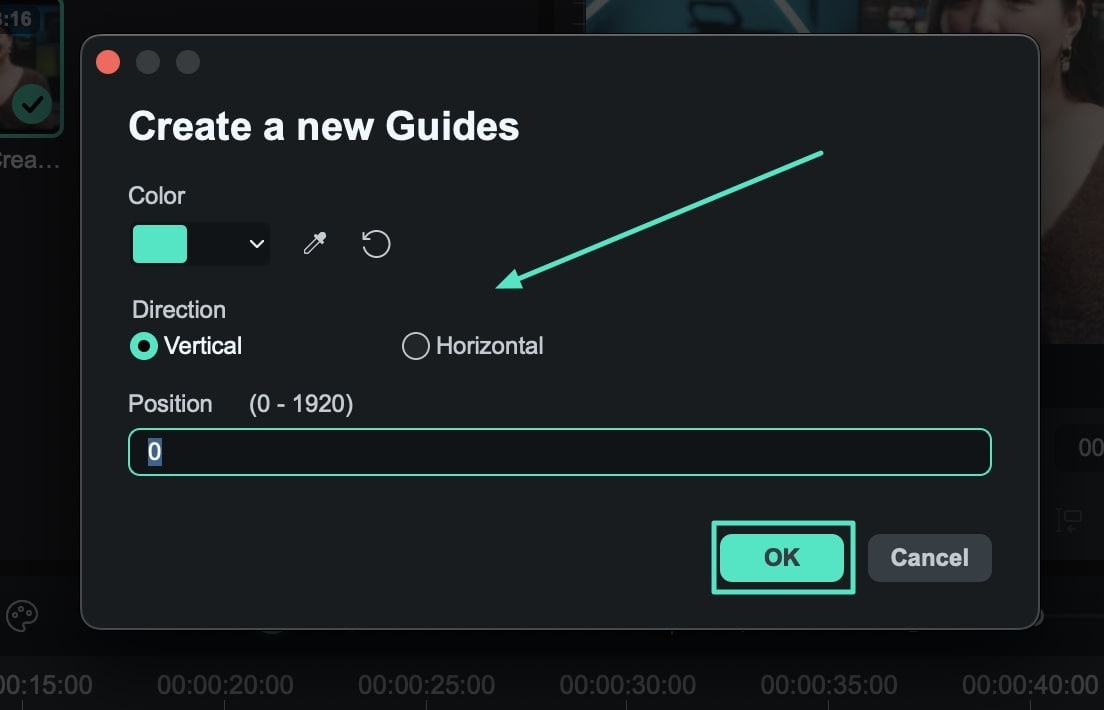
Step 3. Add New Reference Lines
To set up new reference lines, look for the "Guides" option in the same drop-down menu and open a pop-up menu after clicking "Add Guides". There, define the "Color", "Direction", and initiating "Position" of the reference line.

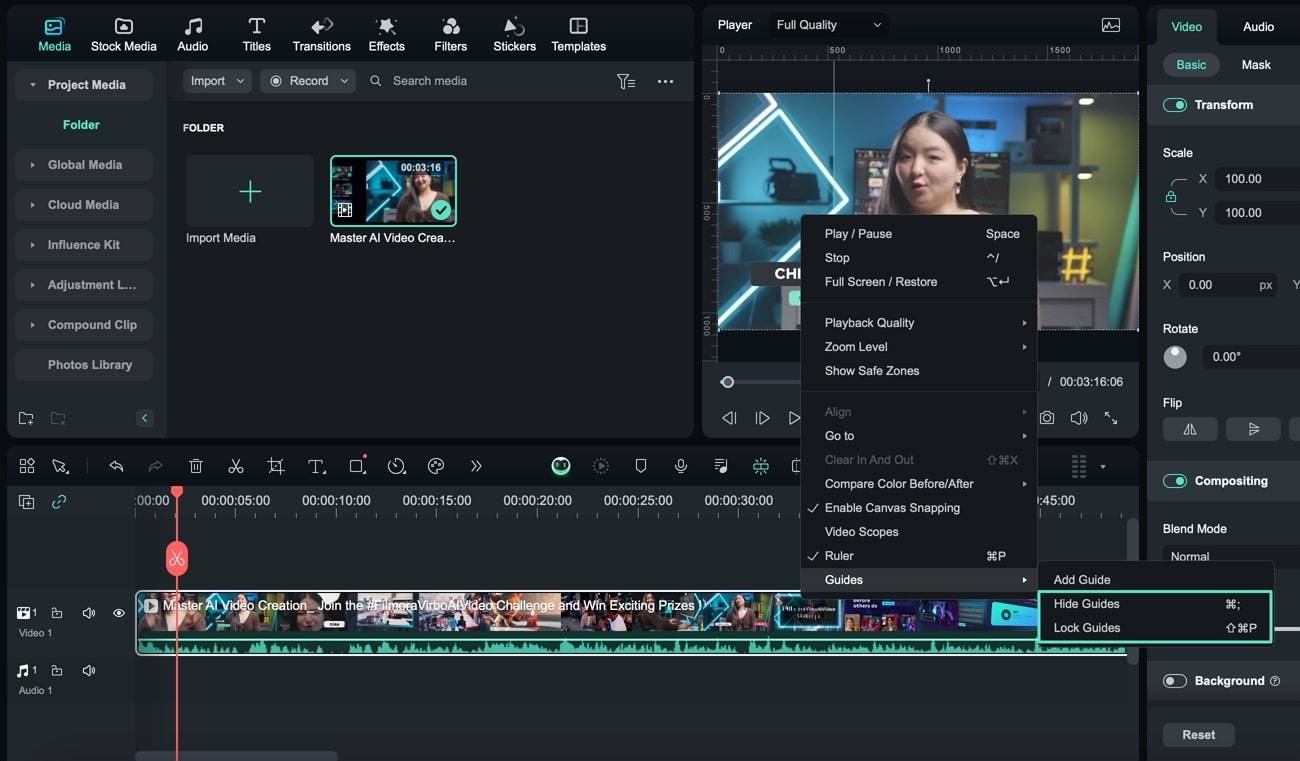
Step 4. Hide and Lock Reference Lines
Furthermore, you can also define other appearance settings for the reference lines in the preview window. If you want to hide all the created reference lines, use the "Hide Guides" option. Similarly, to lock all reference lines in a single position, select the "Lock Guides" option in the drop-down menu.

Related Posts
Featured Articles
Top 3 Ways to Share a YouTube Video on Instagram
Wondering how to share a YouTube video on Instagram? Discover the three best ways, including a time-saving, AI-powered method.
How To Make the Perfect Trailer for Your YouTube Channel
Take your YouTube game to the next level! Our guide breaks down tips, examples, and a step-by-step guide on how to create a YouTube channel trailer that hooks viewers and boosts subscribers!
Master the Magnetic Timeline in Filmora
Discover Filmora's new Magnetic Timeline! Automatically remove gaps and speed up your edits. Try it now in Filmora.
Recommended User Guide
Play video in reverse on Mac
It it necessary to play video in reverse in certain circumstances. Here we are going to tell you how to use Filmora to play video in reverse.
Adjustment Layer for Mac
This guide shows how to add one layer to adjust several clips. The effects applied to an adjustment layer affect all layers below it in the layer stacking order. You only need to edit the layer, dragging the transitions and effects on the layer, to apply the effects to the layers below it.
Auto Ripple for Mac
Filmora offers the Auto Ripple feature that automates removing video gaps and eliminates manual effort.


