For the Best Results, Use the Latest Version.
-
Preparations for Mac
-
Account (Mac)
-
Get Started & Basic Settings (Mac)
- Release notes for Mac
- Latest Versions and Features for Mac
- Get Started on Mac - Full Guide
- Download/register/uninstall on Mac
- Panel Layout on Mac
- Keyboard shortcuts on Mac
- Touchbar on Mac
- Change playback quality on Mac
- Render preview files on Mac
- Manage timeline on Mac
- Media for use on Mac
- Logo Reveal For Mac
- Marked Favorites for Mac
-
Compatibility & Tech Specs (Mac)
-
Performance Settings (Mac)
-
-
Creating Projects - Mac
-
Creating New Projects (Mac)
-
-
Importing & Recording - Mac
-
Importing (Mac)
-
Recording (Mac)
-
-
Video Editing for Mac
-
Basic Video Editing for Mac
- Edit Live Photos on Mac
- Enable/Disable Clip for Mac
- Magnetic Timeline For Mac
- Select All Clips on Timeline for Mac
- Auto Ripple for Mac
- Split & cut videos on Mac
- Compositing on Mac
- Crop and zoom on Mac
- Playback Zoom Level for Mac
- Change speed on Mac
- Play video in reverse on Mac
- Mark In and Mark Out for Mac
- Markers for Mac
- Group clips on Mac
- Customized Backgrounds for Videos and Images in Mac
- Video snapshot on Mac
- Freeze frame on Mac
- Auto enhance on Mac
- Applying Drop Shadow for Mac
- Adjustment Layer for Mac
- Mark clip on Mac
- Video Editing Ruler – Mac
- Apply Transforming for Mac
-
Advanced Video Editing for Mac
-
AI-Powered Video Editing for Mac
- Smart Scene Cut for Mac
- Smart Short Clips for Mac
- Image to Video for Mac
- AI Idea to Video for Mac
- AI Text-to-Video for Mac
- Instant Cutter Tool on Mac
- AI Face Mosaic for Mac
- Keyframe Path Curve for Mac
- Planar Tracking for Mac
- AI Extend For Mac
- AI Script-to-Video for Mac
- AI Text-Based Editing in Mac
- Create With Instant Mode on Mac
- ChatGPT Plugin - AI Copywriting on Mac
- AI Smart Cutout for Mac
- Auto reframe on Mac
- Lens correction on Mac
- AI Portrait Cutout on Mac
- Scene detection on Mac
- AI Smart Masking for Mac
- AI Mate Editing for Mac
- Motion Tracking on Mac
- Stabilize video on Mac
- AI Object Remover For Mac
- AI Smart Search for Mac
- AI Skin Tone Protection for Mac
- Green screen on Mac
- Super Slow Motion with Optical Flow for Mac
- AI stylizer on Mac
- Video Denoise for Mac
-
-
Audio Editing for Mac
-
Basic Audio Editing for Mac
-
Advanced Audio Editing for Mac
-
AI-Powered Audio Editing for Mac
- Audio To Video for Mac
- AI Sound Effect for Mac
- Smart BGM Generation for Mac
- AI Voice Enhancer for Mac
- Audio Stretch for Mac
- AI Audio Denoise for Mac
- Auto synchronization for Mac
- AI Vocal Remover for Mac
- Auto Beat Sync on Mac
- AI Music Generator for Mac
- How to Perform AI Voice Cloning in Wondershare Filmora?
- Silence detection on Mac
-
-
Text Editing for Mac
-
Basic Text Editing for Mac
-
Advanced Text Editing for Mac
-
AI-Powered Text Editing for Mac
-
-
Video Customizations for Mac
-
Video Effects (Mac)
-
Audio Effects (Mac)
-
Transitions (Mac)
-
Stickers (Mac)
-
Filters (Mac)
-
Color Editing (Mac)
-
Animations (Mac)
-
Templates (Mac)
-
Asset Center (Mac)
-
-
Exporting & Share & Cloud Backup - Mac
Adjustment Layer for Mac
This guide shows how to add one layer to adjust several clips. The effects applied to an adjustment layer affect all layers below it in the layer stacking order. You only need to edit the layer, dragging the transitions and effects on the layer, to apply the effects to the layers below it.
Usage Scenarios
The adjustment layer can make the same adjustments to however how many clips are under it all at once. By editing the layer mask, it's more convenient to make adjustments or remove the feature. It allows you to edit a single layer when re-editing, instead of complicatedly adjusting different parts of videos.
Apply Adjustment Layer to Videos on Mac
Follow the detailed steps below to see how to activate this feature.
Step 1: Import media
After launching the application, you can import the video from your computer or the library. Then, drag the clip to the processing interface.
Step 2: Launch the Adjustment Layer
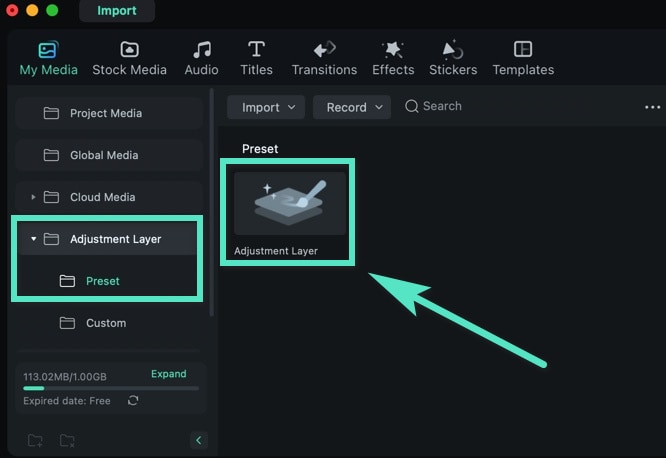
Click My Media>Adjustment Layer>Preset to process a new task. Alternatively, you can modify your saved presets in Custom. Then, drag the Adjustment Layer to the timeline above the video clip.

Step 3: Change the detailed settings
Drag the Adjustment Layer in the timeline back and forth to perfectly match the duration of the video.

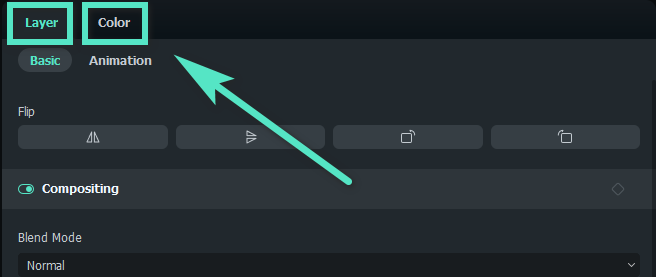
Then, one-click to open the settings interface on the right of the screen. When you are done, click Ok. There are two settings options: Layer and Color.
- The Layer settings include basic modifications, such as Scale, Position, Flip & Rotate, Rotate, Blend Mode, and Opacity, as well as Animation.
- In terms of Color, you can apply various built-in presets and change the White Balance or set Color, Light, Vignette, and Color Match.

Step 4: Add more effects
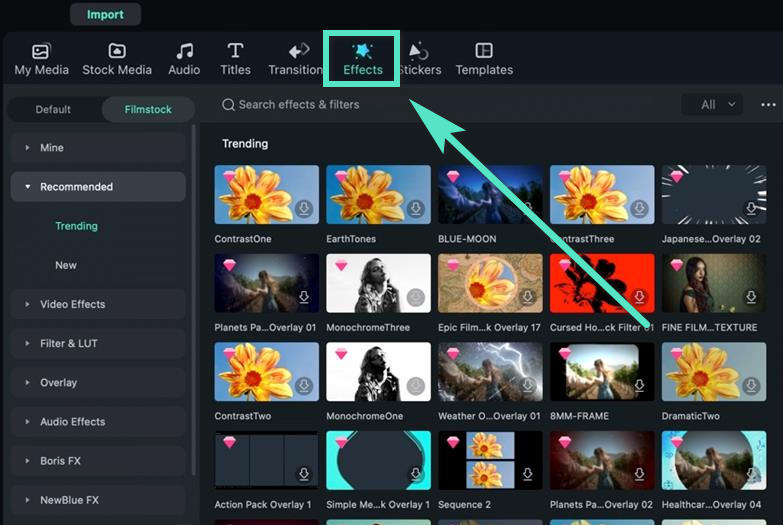
Click Effects in the toolbar at the top of the interface. Besides a variety of Default choices, you can find whatever you want in Filmstock.

Drag your needed effect to the Adjustment Layer in the timeline. After that, the effect settings are available. If you need to adjust the effect, click the layer in the timeline. Then, the settings window will appear on the left side of the interface.
Delete This Feature
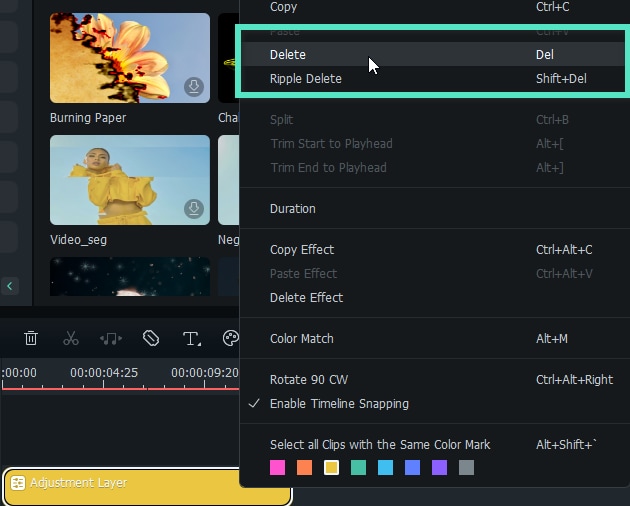
To delete the Adjustment Layer feature, you can select the clip in the timeline, right-click on your mouse, and click Delete.

Related Posts
Featured Articles
Exploring Diverse Parenting Styles Through Videos
Watch parenting videos that highlight gentle, funny, and authoritative styles. Get a closer look and see how different parenting approaches play out in real life.
Most Popular Filmora Intro Templates Perfect for Any Video
Are you searching for ways to create opening videos but do not want to start from scratch? Read this article to learn the top Filmora intro templates for free download.
How To Create Final Cut Pro Speed Ramp (Full Guide)
Learn how to use the Final Cut Pro speed ramp feature. This guide covers tips, common mistakes, and why Filmora might be the best tool for beginners.
Recommended User Guide
Video snapshot on Mac
What is video snapshot? Learn the basic knowleage and how to use it.
Markers for Mac
Filmora can highlight the points of error or add a comment about how to edit a specific part.
Magnetic Timeline For Mac
Achieve seamless video editing with Wondershare Filmora's Magnetic Timeline on Mac


