Are you a content creator struggling to reach a global audience due to language barriers? You're not alone—recent studies show that nearly 75% of internet users prefer content in their native language, which poses a significant challenge for users creating videos, presentations, and audio content. But here's the good news: with advanced AI translation technology, breaking down language barriers is now easier than ever.
In this article, we'll explore how to effortlessly translate your audio files with precision and introduce you to a powerful tool that enhances both your translations and video editing workflow.
In this article
Part 1. Translating Audio Files With AI: Bringing Ease
The demand for audio file translation has grown among businesses and content creators. Traditional methods, like hiring professionals or using online tools, can be costly or inaccurate. Online translation is another option, but this often lacks some basic functionalities, such as accuracy.
Wondershare Filmora offers a smarter, more accessible solution with its AI Translation. By leveraging advanced AI, Filmora accurately translates audio and overcomes the limitations of older methods. This streamlined approach makes it easier to enhance your content and reach a global audience.
Coherent Features of Filmora's AI Translation
- Automatic Translation: The automated translation revolutionizes the process by eliminating the need for manual operations. The AI-driven functionality listens to the audio within the video and translates it into the desired languages.
- Various Language Support: It supports a wide range of languages to make the content versatile for a global reach. This enables audio translation into multiple languages such as Hindi, Korean, and Bangla to cover a wider international audience.
- High Accuracy With Lip Syncing: One of the potential challenges is maintaining the sync between the translated audio and the visual content. Filmora's accurate lip-syncing aligns with the translated audio and lip movements of the speaker.
- AI Transcription: Filmora uses advanced AI to recognize the speech in the content and convert it into written text. This functionality creates subtitles in other languages, which brings a wider audience outreach.
- Voice Cloning for Videos: With voice cloning in Filmora, you can keep your voice even when the language is changed. The tool uploads audio to translate and replicates it in other languages while keeping the tone intact.
Comprehensive Steps for Generating AI Translations Using Wondershare Filmora
As we have gone through Filmora's translation feature, let us go through its procedure:
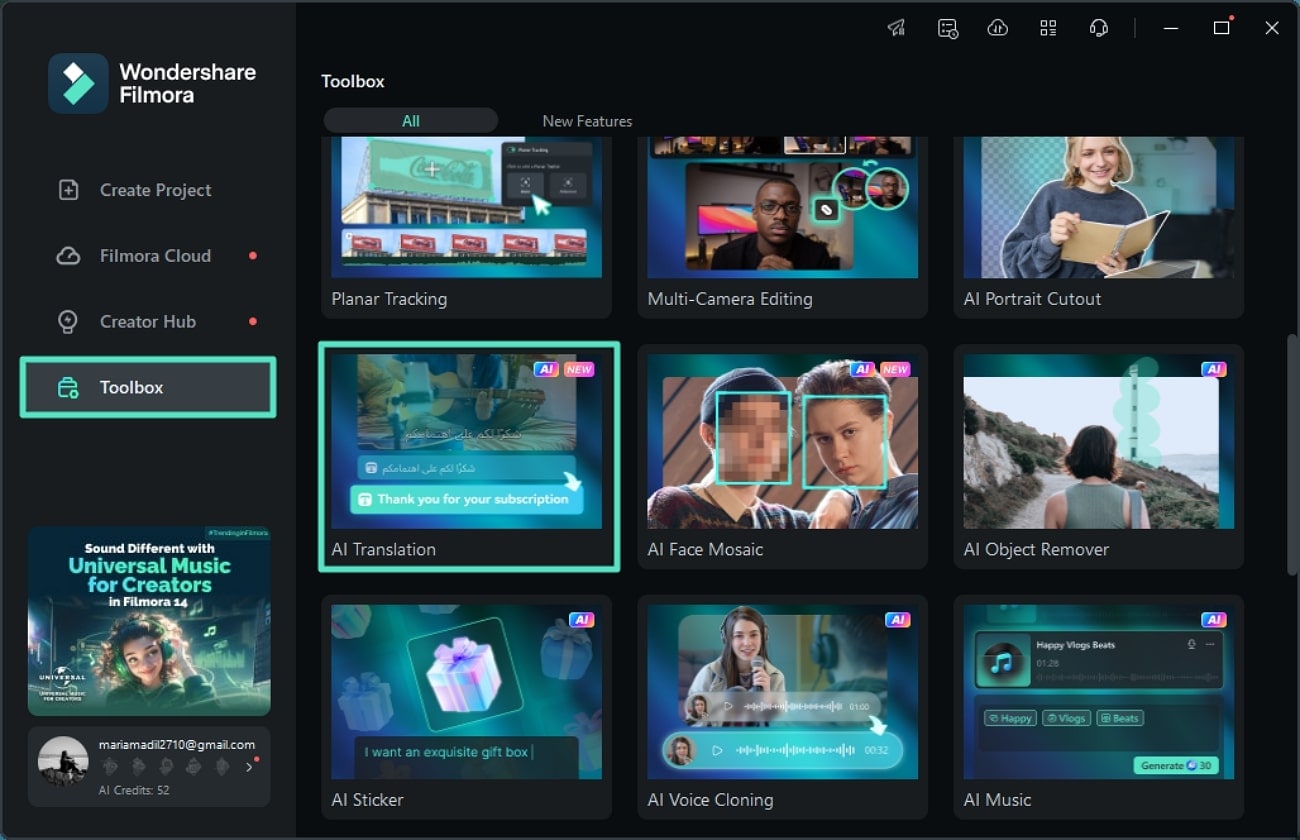
Step 1. Select AI Translation from the Homepage
To start with the process, launch the tool on your computer and navigate across the "Toolbox" section on the left. As this displays a list of functions offered in Filmora, look for "AI Translation" and continue.
Step 2. Import Your Video for AI Translation in Filmora
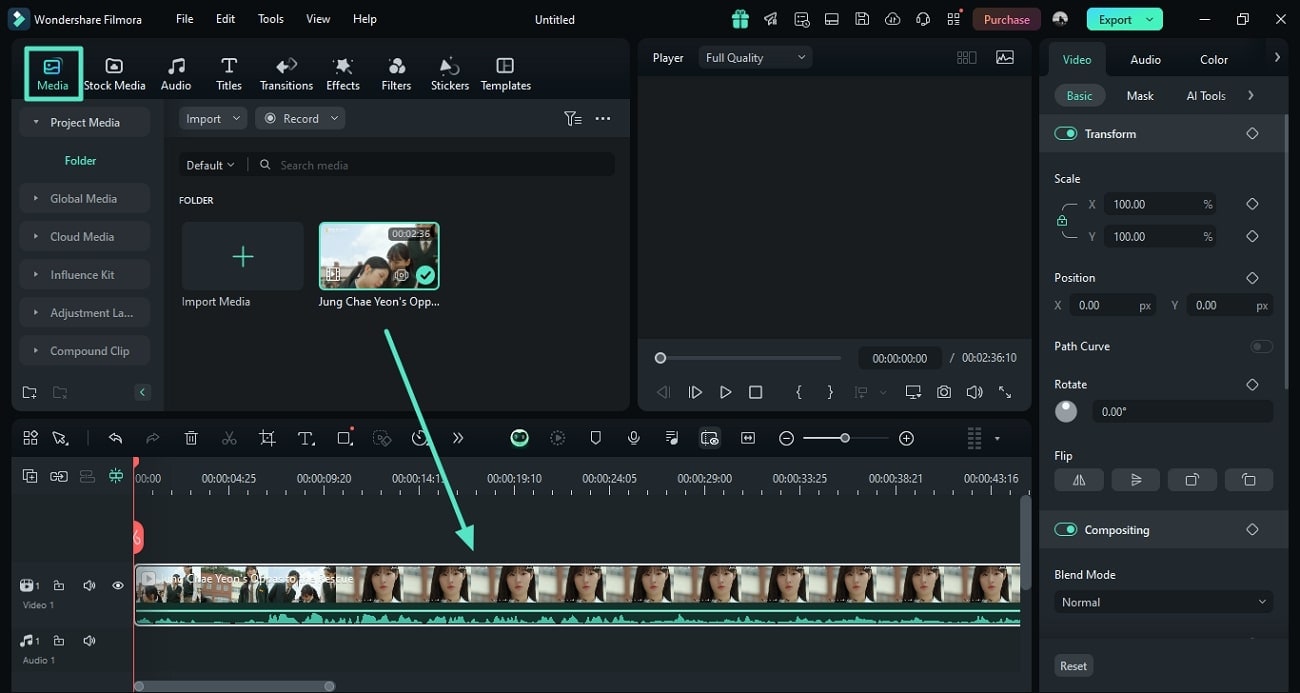
In the main interface of the tool, head to the "Media" tab on the toolbar and press the "Import" button to add your video. Once the video is imported, drag it to the editing timeline located at the bottom to proceed.
Step 3. Access the AI Translation Function in the Titles Tab
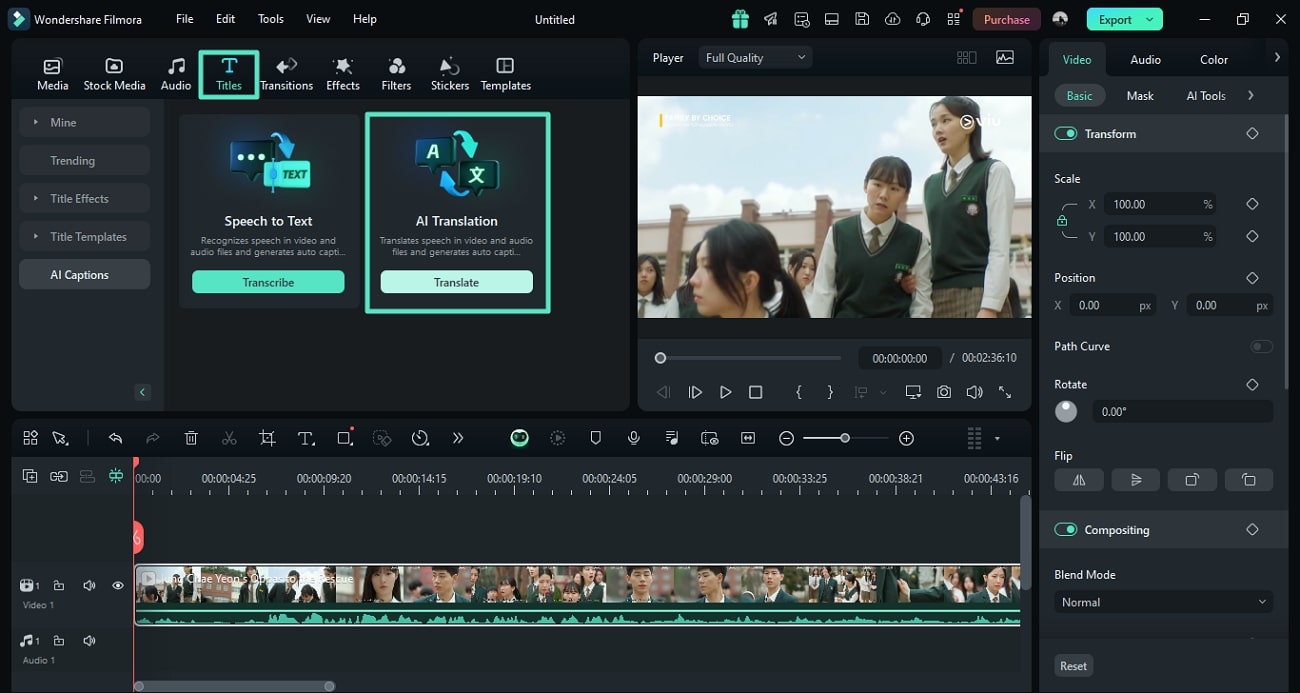
Formally navigate to the "Titles" tab and access the "AI Captions" section. There, discover the "AI Translation" option which needs to be activated with the "Translate" button.
Step 4. Provide Your Desired Languages for Audio Translation
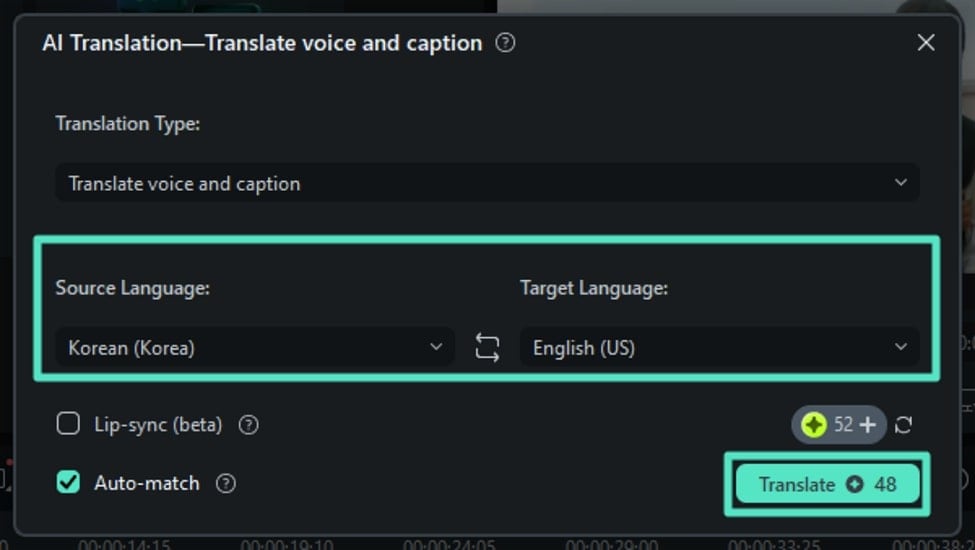
Choose the source and target languages using the respective drop-down menus provided. You can enable the "Lip-sync" and "Auto-match" options for more accurate results. Finally, press the "Translate" button to proceed forward with the process.
Step 5. Review Your Translation and Save the Results
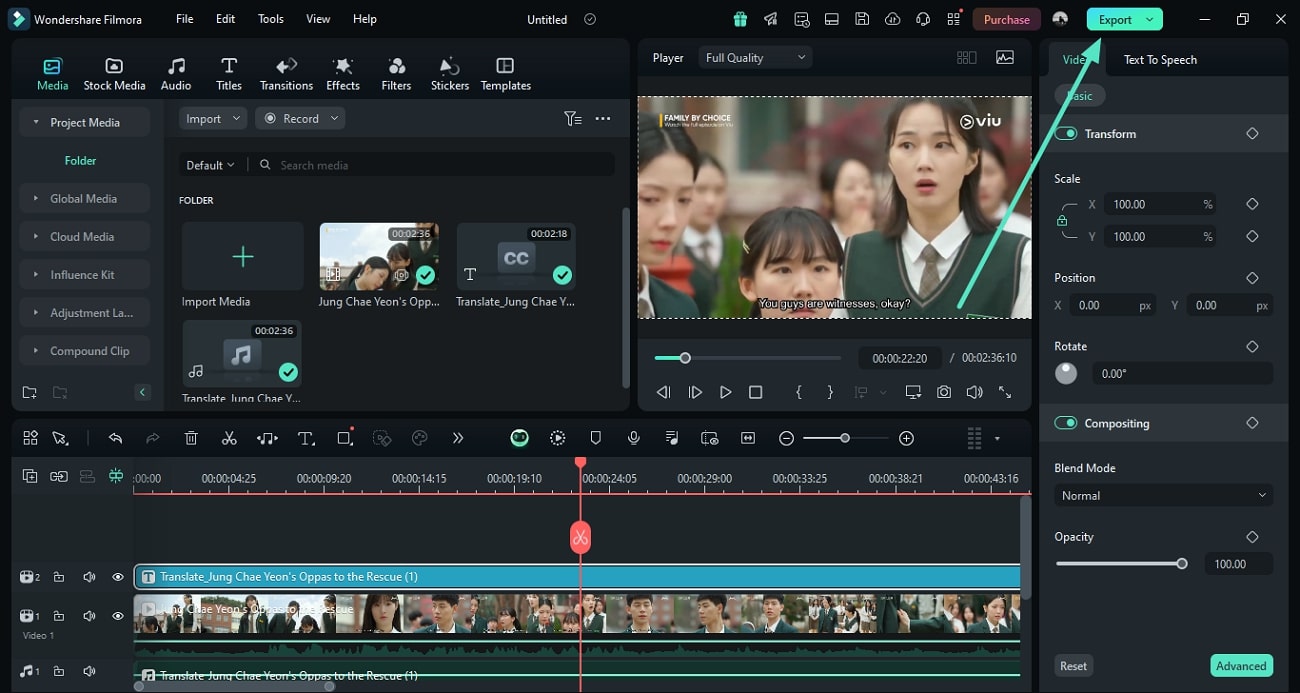
With its successful execution, preview the translated video using the "Play" button on the preview window. Once satisfied, head to the "Export" button on the top-right to save translated audio separately.
Part 2. Performing Audio Enhancements Before Translating Audio
There is a possibility that you might have a raw file that needs to be refined before translation. It is essential to ensure that the audios you want to translate are in optimal condition. Here are some common issues you might face with raw audio files that could impact the accurate translation:
- Background noises can overshadow the main audio, making it difficult for translation tools to capture the spoken content.
- Extended silences in the audio can disrupt the flow of dialogues in the audio that can confuse the translation process.
- In case the audio is recorded outdoors or in windy conditions, it can create a whooshing sound that can mask the speaker's voice.
- A constant high frequency resulting from the recording equipment can also disrupt speech to hinder the clarity needed for accurate translation.
For this, you have to use Filmora's extensive functions to fine-tune the audio. The AI Audio Denoise function of this audio file language translator helps remove unwanted distortions. Moreover, the silence detection feature enables users to eradicate the silent parts to make the sound flawless. Let us explore the steps to fine-tune the audio quality for perfect translation:
Step 1. Access the Audio Settings Panel After Importing Video
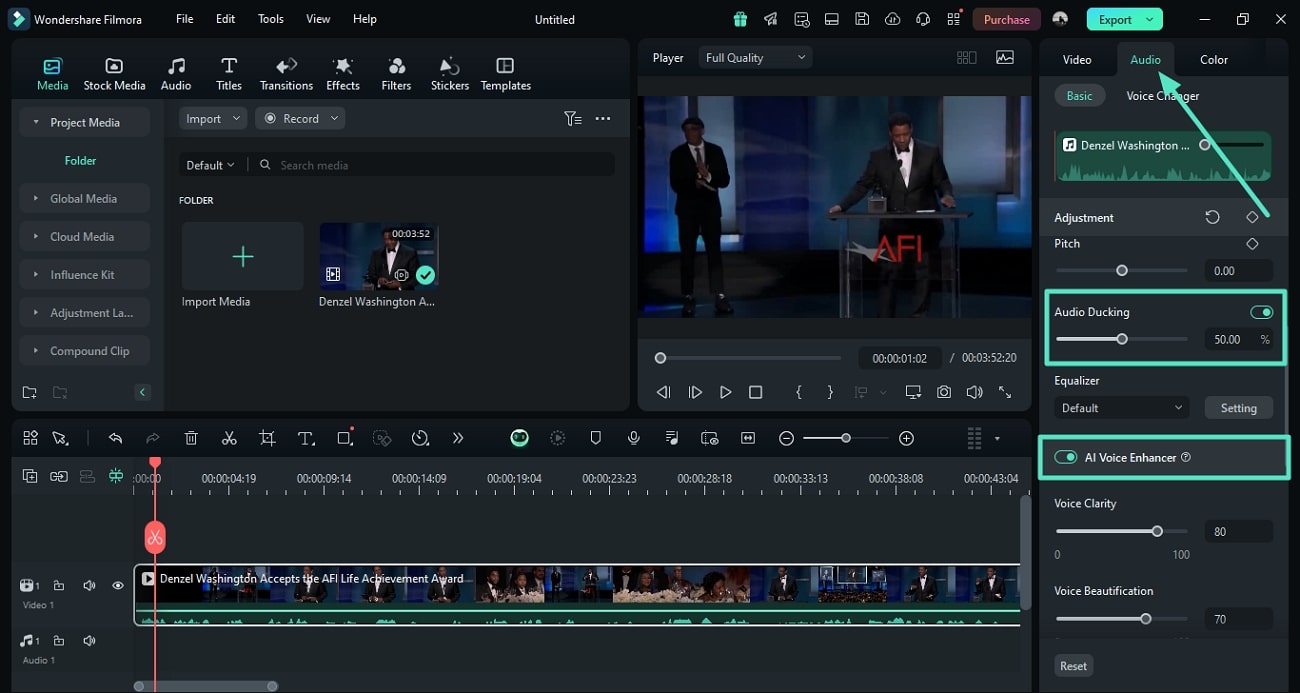
After importing the video file, head to the right side and access the "Audio" panel next to the "Video" panel. From here, enable the "Audio Ducking" option to make the dialogues in your video more prominent. Next, toggle on the "AI Voice Enhancer" to enhance the clarity of your video's voice.
Step 2. Eliminate the Unwanted Noise From the Audio
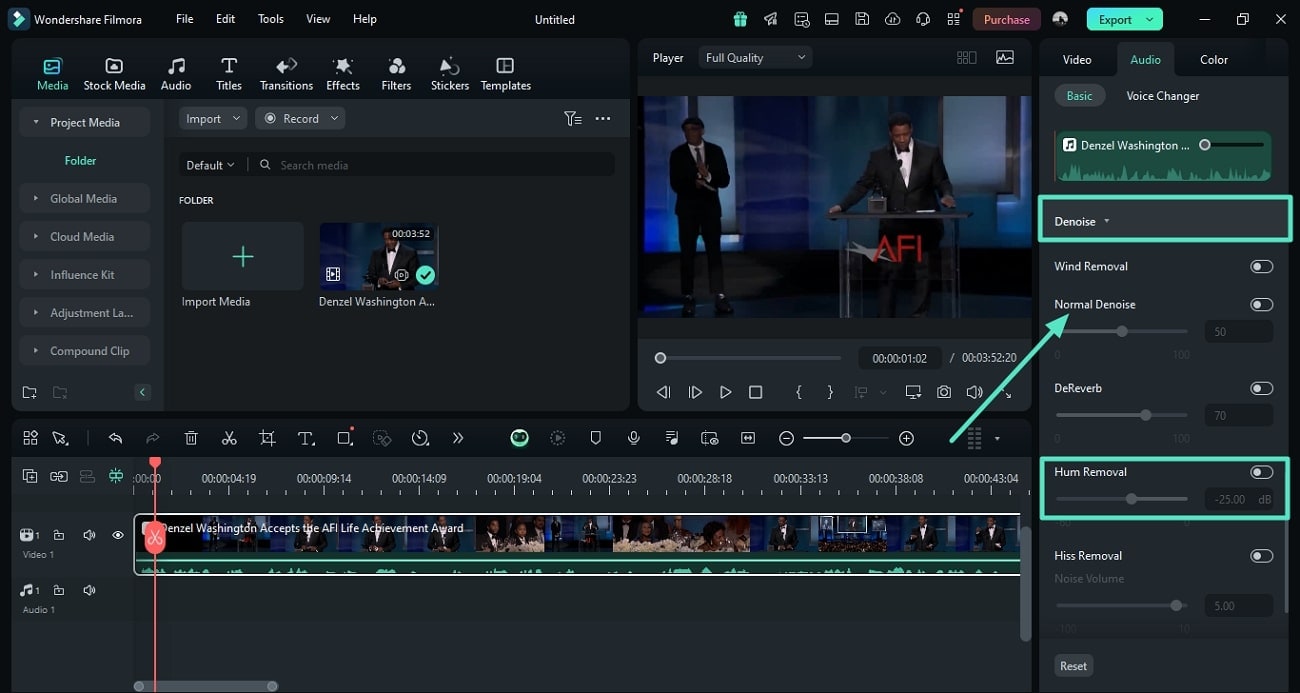
Scroll through the same "Audio" panel to locate the "Denoise" section. Enable the "Normal Denoise" option to remove unwanted noise from the video. Furthermore, if you have any disturbing hums in the audio, toggle on the "Hum Removal" and adjust the slider. Once satisfied with the quality, proceed forward with the translation process using Filmora.
Part 3. Enriching Text Styles After Powerful AI Translation
After generating translation for your audio content in the form of subtitles, improving the overall readability and appearance is crucial for viewer engagement. For this purpose Filmora offers a range of features to help enhance the generated subtitles:
- Animations: Filmora provides a range of animation options for the subtitles, allowing users to create engaging text that appears and disappears smoothly.
- Font Styles and Sizes: Users can also experiment with a wide range of font styles, choosing the fonts that best fits the theme of their content. You can also modify font sizes to ensure that the captions are readable across different screen sizes.
- Font Effects: Using the available Font presets, users get the ability to apply text shadows and glow effects to the subtitles to give them an appealing look.
Another incredible functionality that Filmora offers, along with translating voice files, is customizing captions. The tool uses AI to generate automated subtitles in your desired language and modify its look. It offers various customization options to make the text look appealing to the audience. To make the subtitles of your video look appealing with Filmora, follow the steps provided next:
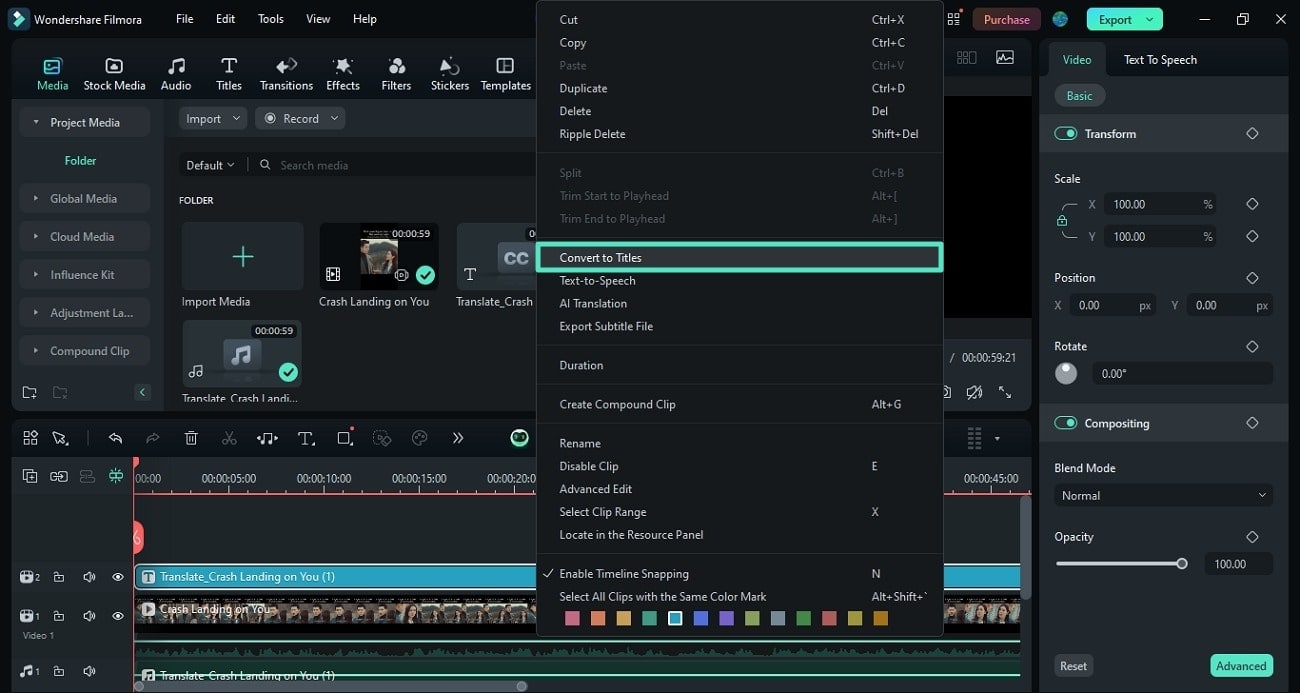
Step 1. Convert the SRT Into Titles
Once the AI translation is executed successfully through Filmora, the captions are generated in the text track above the video on the editing timeline. Right-click on the text track to enable a list of options and select the “Convert to Titles” option.
Step 2. Modify the Appearance of Generated Captions
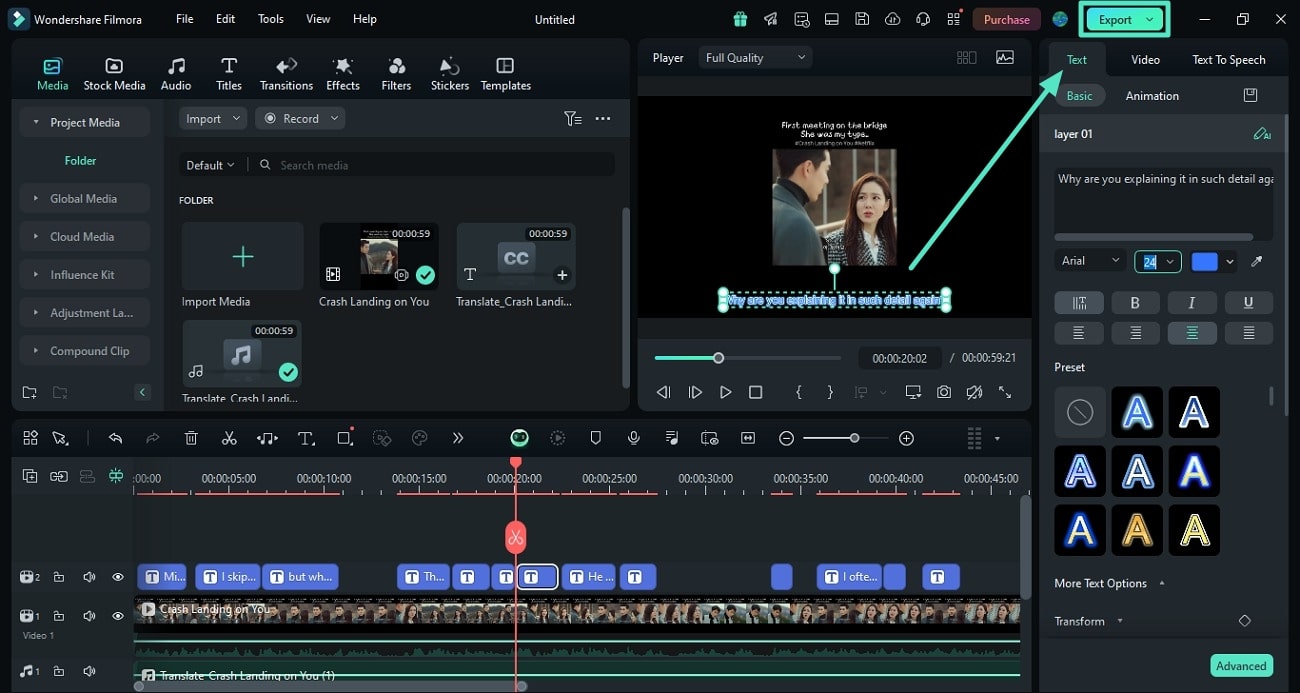
The captions will be converted into titles, click on it and enable the "Text" panel on the right side. You can select from a vast variety of text options like change the font style, size, and color. The tool offers subtitle presets that you can choose to make the text more visually appealing. Once you've made your changes, click the "Export" button in the top-right corner of the screen to save your final video.
Conclusion
In summary, this article highlighted the powerful features of Wondershare Filmora that can help you translate your audio files to perfection. You can easily translate audio files into different languages to reach a wider audience and customize styles to make the translated text look more engaging in your video.


