For the Best Results, Use the Latest Version.
-
Preparations for Mac
-
Account (Mac)
-
Get Started & Basic Settings (Mac)
- Release notes for Mac
- Latest Versions and Features for Mac
- Get Started on Mac - Full Guide
- Download/register/uninstall on Mac
- Panel Layout on Mac
- Keyboard shortcuts on Mac
- Touchbar on Mac
- Change playback quality on Mac
- Render preview files on Mac
- Manage timeline on Mac
- Media for use on Mac
- Logo Reveal For Mac
- Marked Favorites for Mac
-
Compatibility & Tech Specs (Mac)
-
Performance Settings (Mac)
-
-
Creating Projects - Mac
-
Creating New Projects (Mac)
-
-
Importing & Recording - Mac
-
Importing (Mac)
-
Recording (Mac)
-
-
Video Editing for Mac
-
Basic Video Editing for Mac
- Edit Live Photos on Mac
- Enable/Disable Clip for Mac
- Magnetic Timeline For Mac
- Select All Clips on Timeline for Mac
- Auto Ripple for Mac
- Split & cut videos on Mac
- Compositing on Mac
- Crop and zoom on Mac
- Playback Zoom Level for Mac
- Change speed on Mac
- Play video in reverse on Mac
- Mark In and Mark Out for Mac
- Markers for Mac
- Group clips on Mac
- Customized Backgrounds for Videos and Images in Mac
- Video snapshot on Mac
- Freeze frame on Mac
- Auto enhance on Mac
- Applying Drop Shadow for Mac
- Adjustment Layer for Mac
- Mark clip on Mac
- Video Editing Ruler – Mac
- Apply Transforming for Mac
-
Advanced Video Editing for Mac
-
AI-Powered Video Editing for Mac
- Smart Scene Cut for Mac
- Smart Short Clips for Mac
- Image to Video for Mac
- AI Idea to Video for Mac
- AI Text-to-Video for Mac
- Instant Cutter Tool on Mac
- AI Face Mosaic for Mac
- Keyframe Path Curve for Mac
- Planar Tracking for Mac
- AI Extend For Mac
- AI Script-to-Video for Mac
- AI Text-Based Editing in Mac
- Create With Instant Mode on Mac
- ChatGPT Plugin - AI Copywriting on Mac
- AI Smart Cutout for Mac
- Auto reframe on Mac
- Lens correction on Mac
- AI Portrait Cutout on Mac
- Scene detection on Mac
- AI Smart Masking for Mac
- AI Mate Editing for Mac
- Motion Tracking on Mac
- Stabilize video on Mac
- AI Object Remover For Mac
- AI Smart Search for Mac
- AI Skin Tone Protection for Mac
- Green screen on Mac
- Super Slow Motion with Optical Flow for Mac
- AI stylizer on Mac
- Video Denoise for Mac
-
-
Audio Editing for Mac
-
Basic Audio Editing for Mac
-
Advanced Audio Editing for Mac
-
AI-Powered Audio Editing for Mac
- Audio To Video for Mac
- AI Sound Effect for Mac
- Smart BGM Generation for Mac
- AI Voice Enhancer for Mac
- Audio Stretch for Mac
- AI Audio Denoise for Mac
- Auto synchronization for Mac
- AI Vocal Remover for Mac
- Auto Beat Sync on Mac
- AI Music Generator for Mac
- How to Perform AI Voice Cloning in Wondershare Filmora?
- Silence detection on Mac
-
-
Text Editing for Mac
-
Basic Text Editing for Mac
-
Advanced Text Editing for Mac
-
AI-Powered Text Editing for Mac
-
-
Video Customizations for Mac
-
Video Effects (Mac)
-
Audio Effects (Mac)
-
Transitions (Mac)
-
Stickers (Mac)
-
Filters (Mac)
-
Color Editing (Mac)
-
Animations (Mac)
-
Templates (Mac)
-
Asset Center (Mac)
-
-
Exporting & Share & Cloud Backup - Mac
AI Thumbnail Creator For Mac
Thumbnails are crucial in video content, providing a quick glimpse of what to expect. While Filmora has long supported generating thumbnails through the export window, the latest upgrade takes it to the next level with AI. Now, users can choose AI-selected thumbnails from the video or their devices. To explore this feature and its practicality, continue reading the guide below:
Index
Access AI Thumbnail Creator
This is your ultimate step-by-step guide to extracting thumbnails from your videos or generating new ones along with AI's help:
Method 1: Using the Export Window
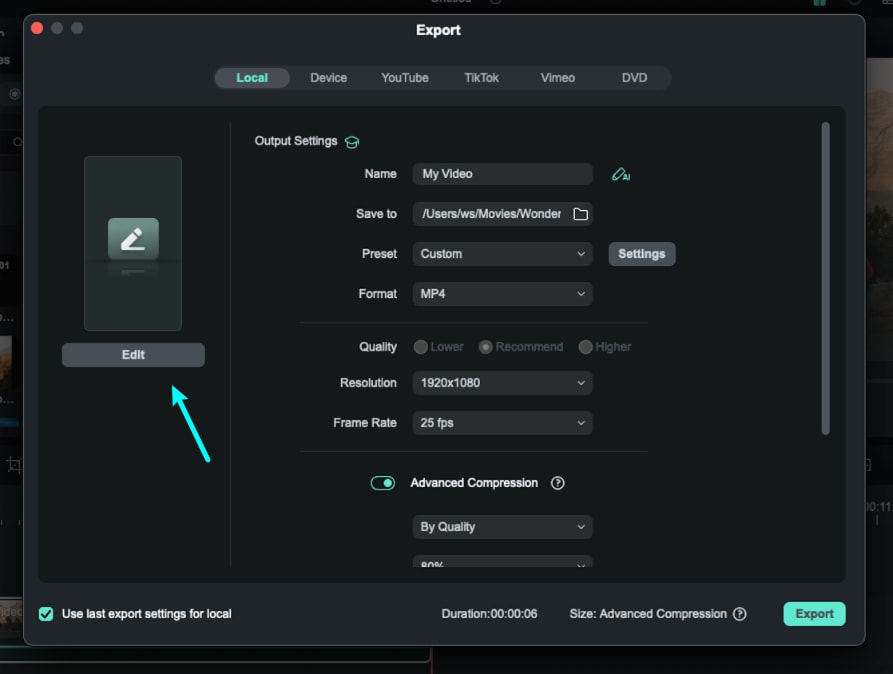
After editing your video completely with Wondershare Filmora, click the "Export" button. The export window will appear; click the "Edit" button at the left top corner of this window. This will take you to the thumbnail generator window.
Method 2: From the Project Info Panel
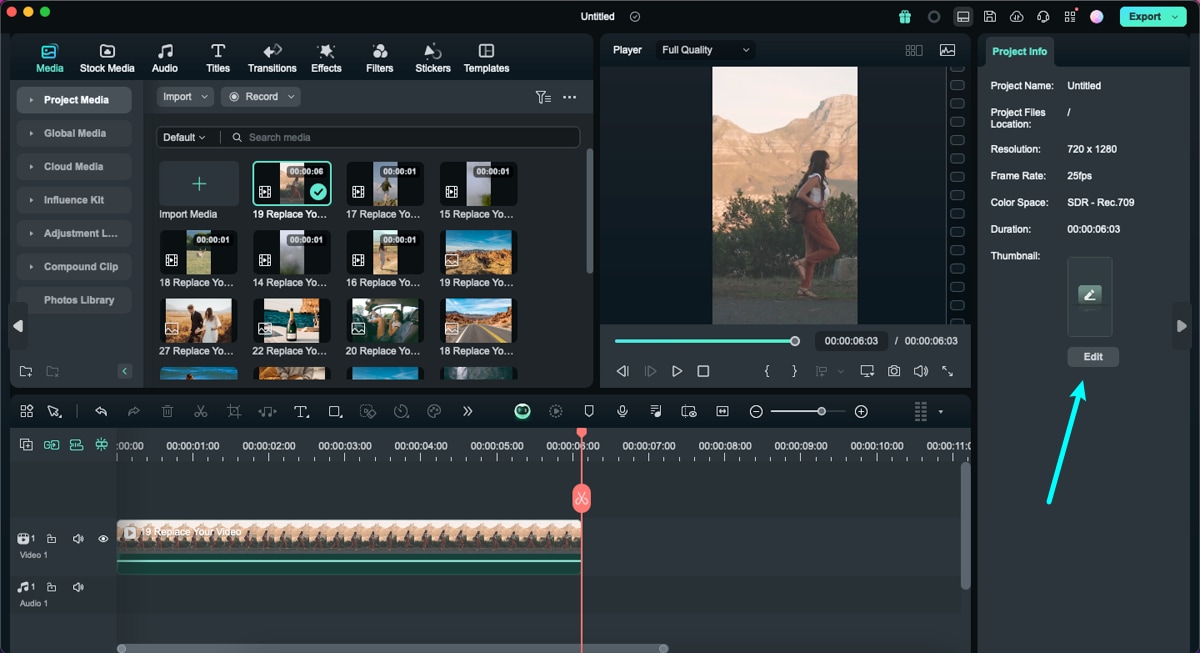
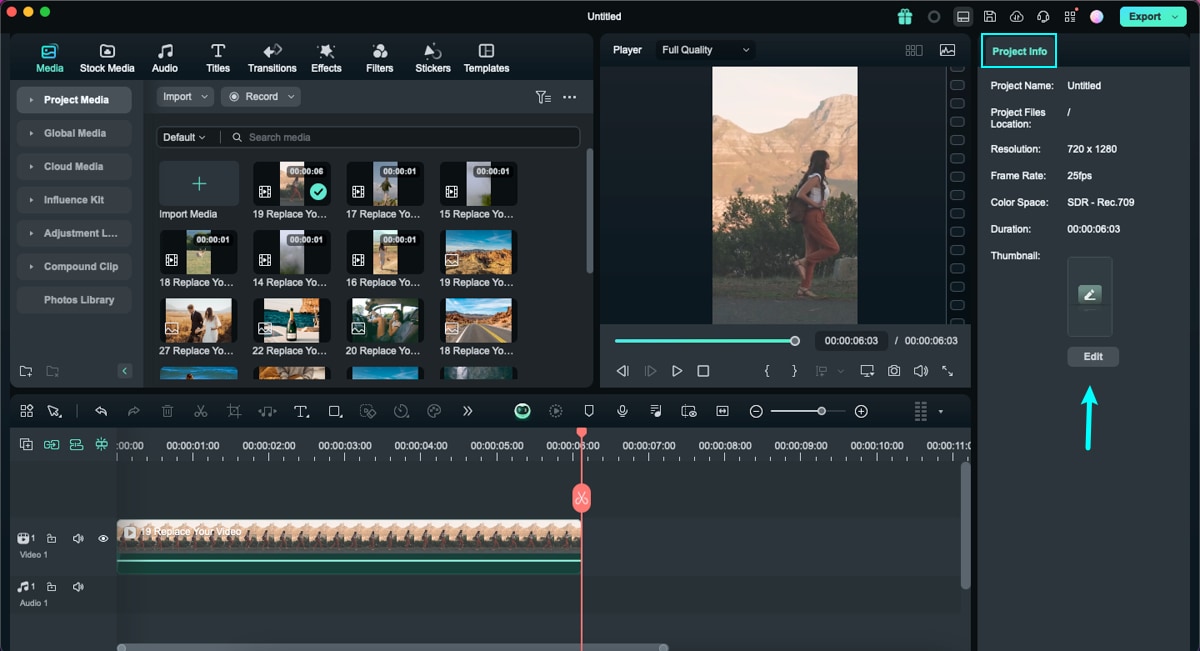
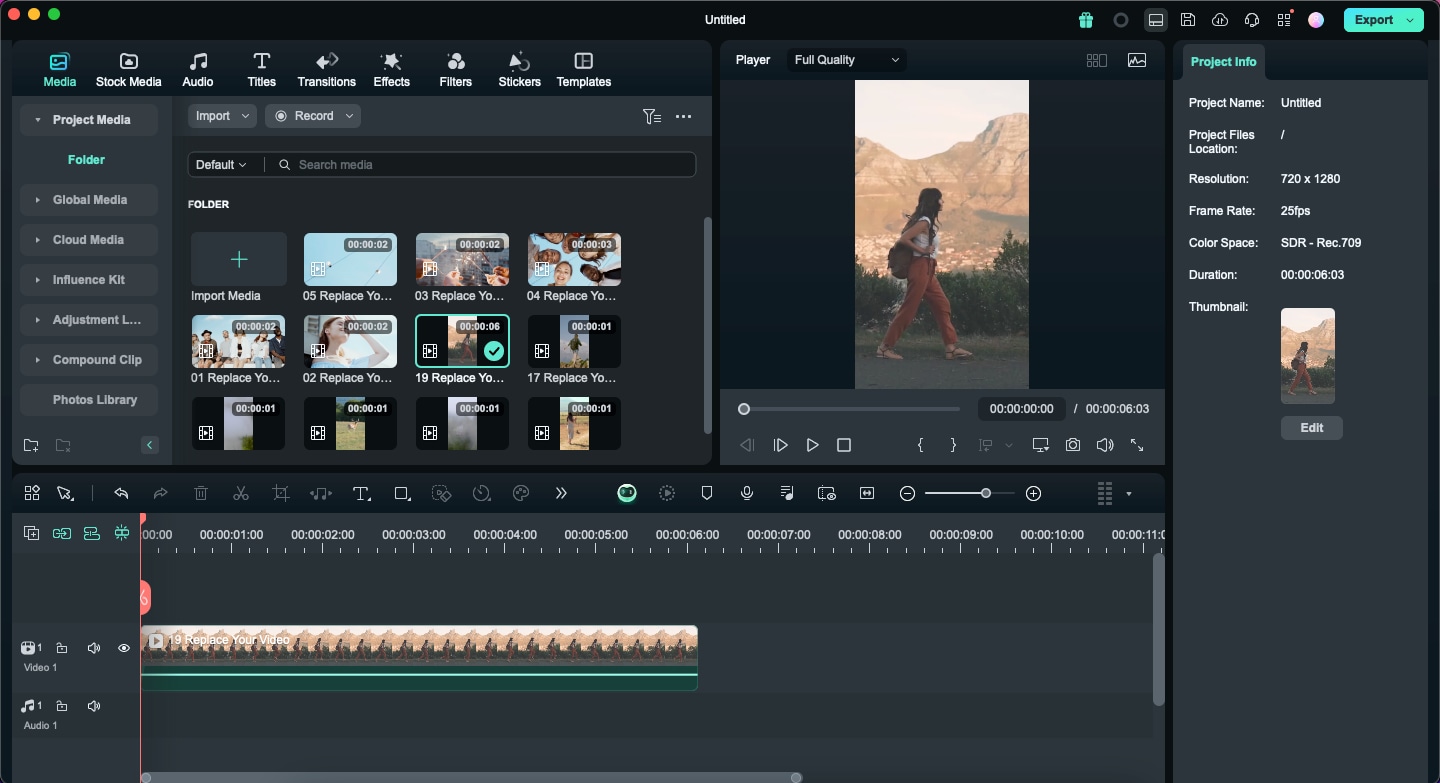
After editing your content, click anywhere in the timeline other than the media clip, and a panel named "Project Info" will appear at the right. From this panel, click the "Edit" button. This will take you to the "Set Thumbnail" window, from where you can generate thumbnails from your video in the "Video" tab and export it in the same manner above.
Create a Thumbnail from a Video
One way to generate thumbnails is selecting a frame within the video, and there are two methods given below to accomplish it:
Method 1: Using the Export Window
Step 1: Using the Export Window
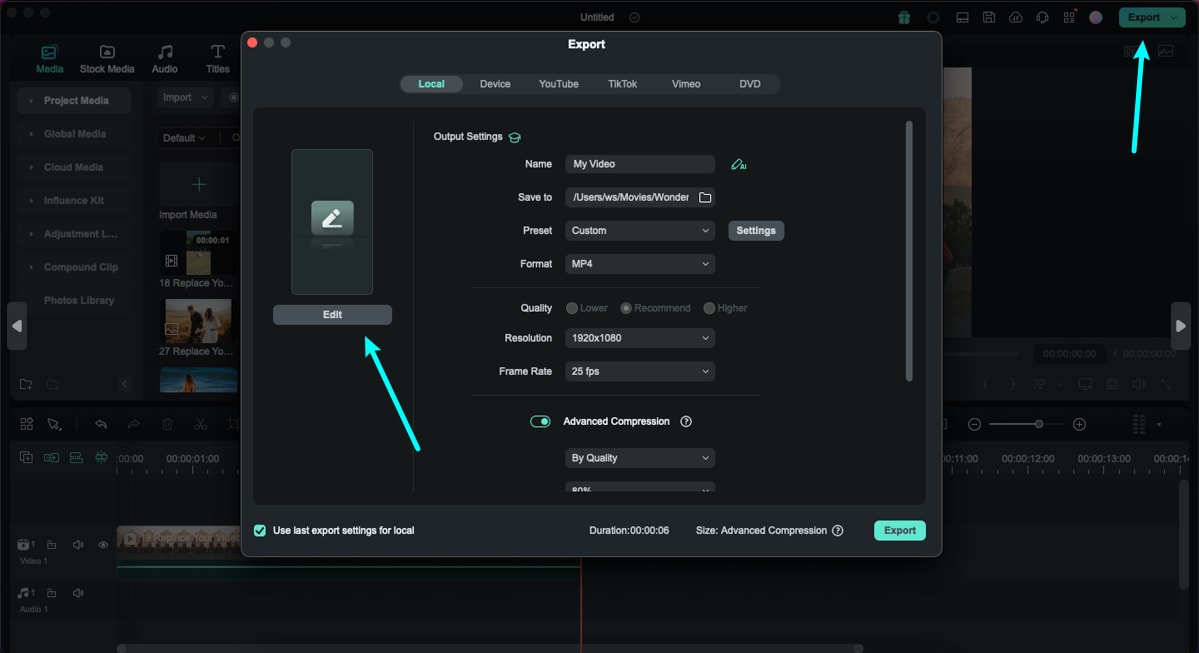
When you click the "Export" button after editing your window, look for the "Thumbnail" option on the left, where you must click "Edit" to proceed.
Step 2: Select or Customize a Thumbnail
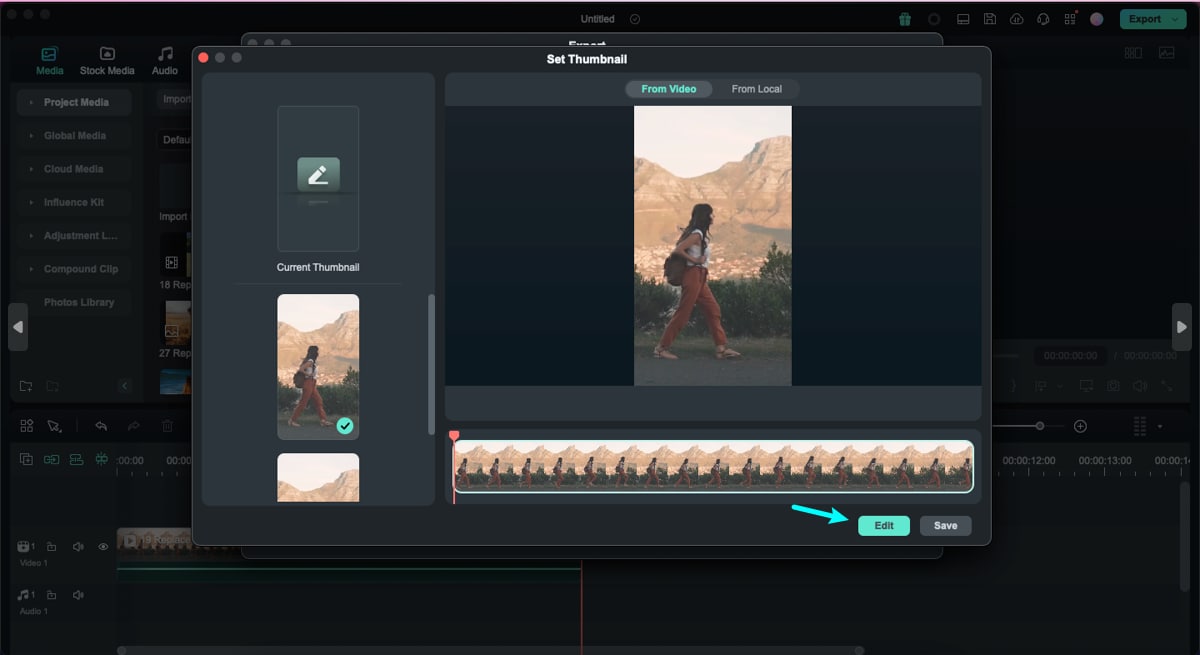
A thumbnail setting window will appear, and under the "From Video" tab, the AI will start generating suitable thumbnail options on the left side. You can select any of the AI-generated thumbnails, or you can manually choose by positioning the playhead. Afterwards, click "Edit" to proceed.
Step 3: Choose a Thumbnail Template and Title
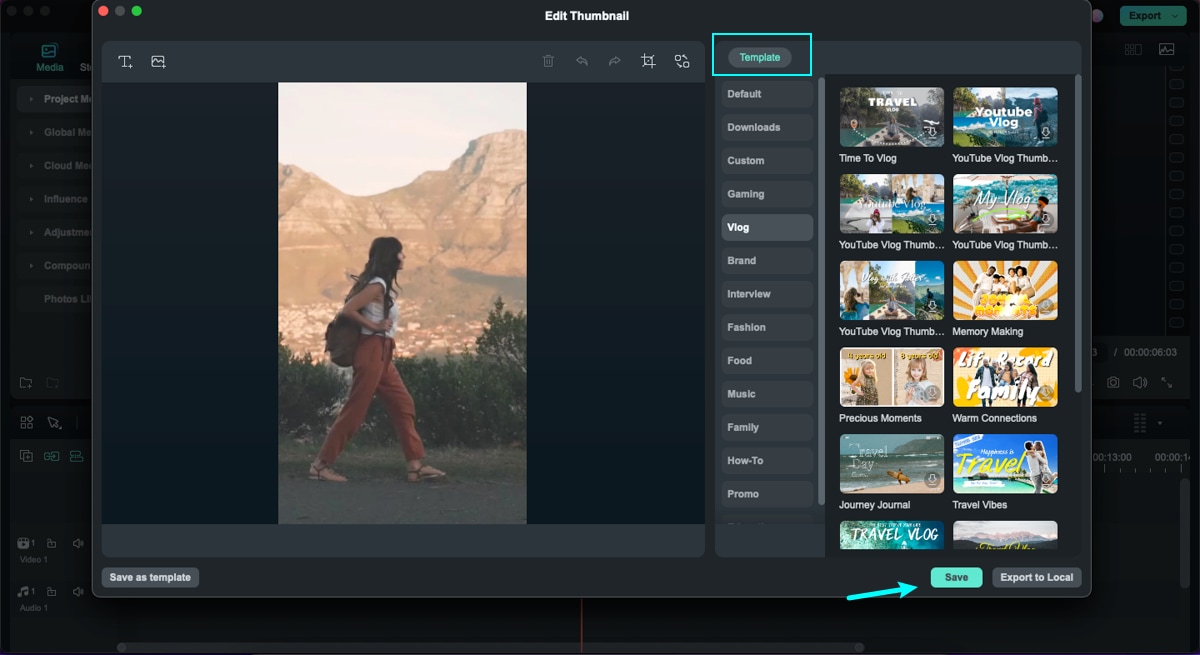
This will lead you to a thumbnail editing window where you can explore a variety of templates for your video. These templates are organized by video context, making it easy to find a suitable template. In the top left corner of this window, add a text or title to your thumbnail. After you’ve finished editing, click the "Save" button.
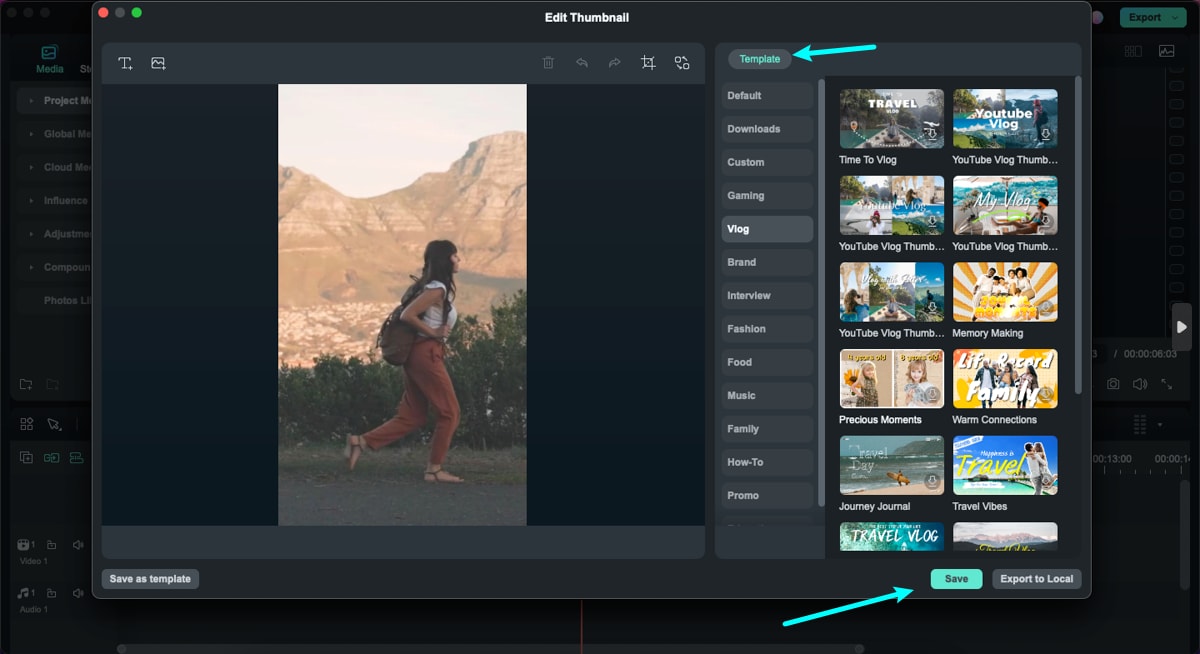
Step 4: Export the Thumbnail to Your Device
This will take you back to the export window, where the thumbnail is visible. On the left side, below the generated thumbnail image, enable the "Add the thumbnail to the beginning" option. Click "Export" to start generating the thumbnail. Afterward, click the "Open Folder" option to view the saved file on your device.
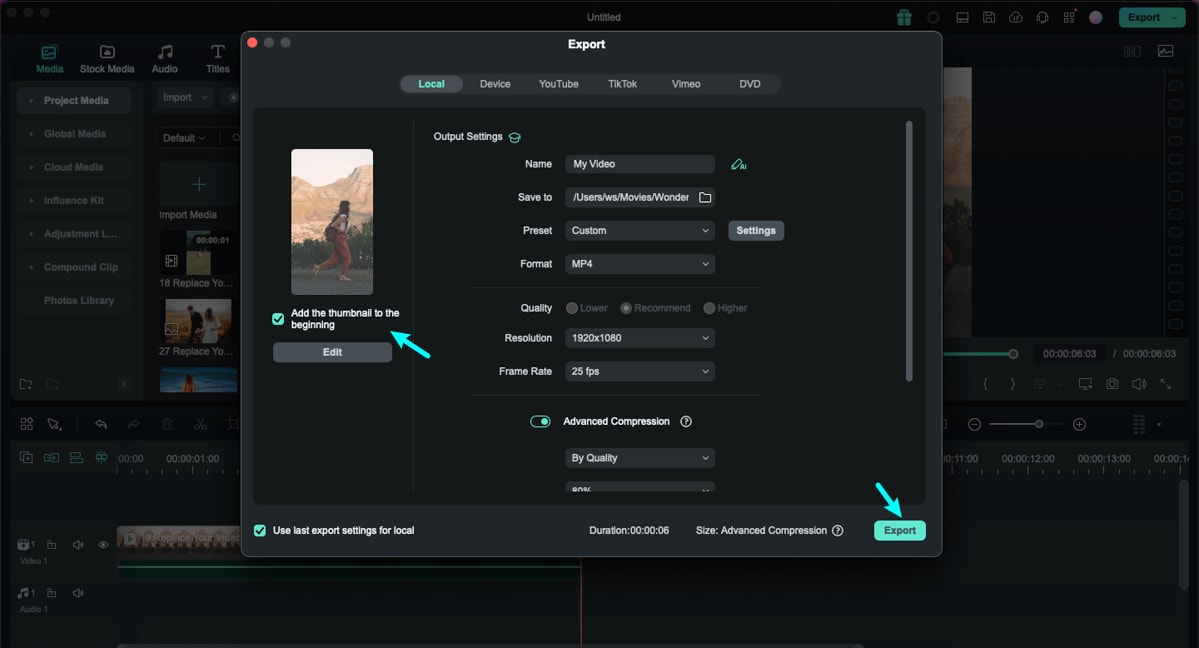
Method 2: Utilizing the Project Info Panel
Deselect the clip in the timeline, and the "Project Info" panel will emerge on the right side of the main editing interface. This panel displays the clip's properties, and at the end of these properties, there is an "Edit" button. Click on it to initiate the thumbnail editing process. Follow the same steps as in the first method for editing the video clip's thumbnail using AI.
Create a Thumbnail from a Local
Applying AI-generated thumbnails is fun. However, users can also add and apply a thumbnail saved on their device, and here is a step-by-step guide to do it:
Method 1: Using the Export Window
Step 1: Access the Local Tab
After editing your video, select the "Export" button, and opt for the "Local" tab at the top of the export window. As it provides various export options, proceed to the thumbnail section on the left and click "Edit". This action opens a new window where you need to move to the "From Local" tab at the top. Import an image and click "Edit" to proceed with thumbnail creation.
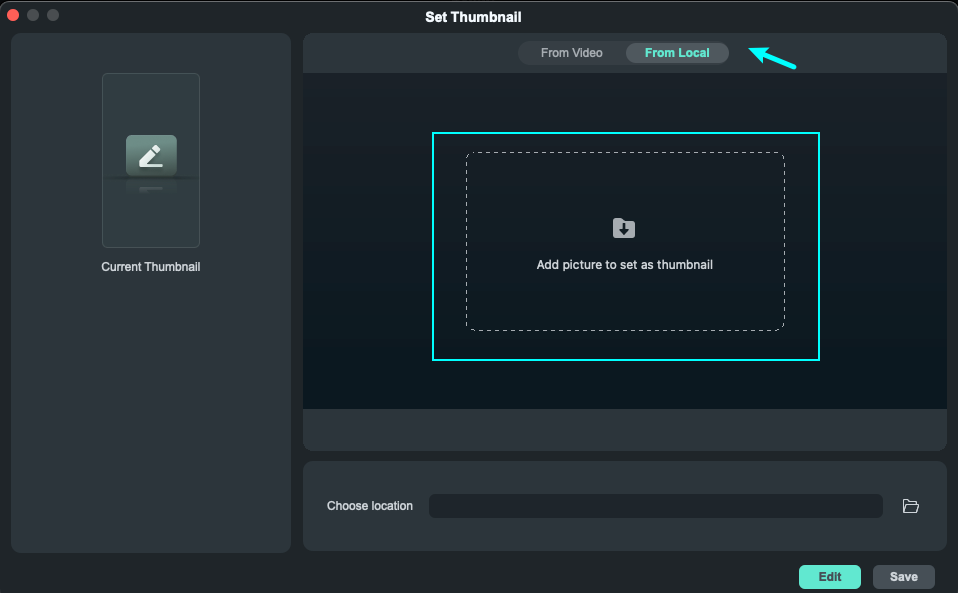
Step 2: Choose an Appropriate Template
A new window will appear where you can select the template for your video. After experimenting with other adjustments, such as cropping or exchanging it with another picture, click the "Save" button. You will be led back into the export window, where you can conclude the process.
Method 2: Using the Project Info Panel
Another way of accessing the thumbnail creator is by double-clicking on anywhere in the editing window. This will open a "Project Info" panel. Find and select the "Edit" button, which will redirect you towards the thumbnail creator. Add in the thumbnail image from your drive and continue with the similar process as discussed above.
Related Posts
Featured Articles
AI Glasses Remover: How to Remove Glasses or Sunglasses from Videos with AI
Learn how to remove glasses or sunglasses from videos using AI-powered tools like Filmora’s new feature, designed to make advanced edits simple and seamless.
Top 6 Facebook Reel Makers | Fast with AI
Explore the best Facebook reel creators to enhance your content. Filmora's Facebook Reel Creator helps you create engaging and professional-looking Facebook Reels for free.
How To Make the Perfect Trailer for Your YouTube Channel
Take your YouTube game to the next level! Our guide breaks down tips, examples, and a step-by-step guide on how to create a YouTube channel trailer that hooks viewers and boosts subscribers!
Recommended User Guide
Export on Mac
To export your video to your computer, click the export button and choose the Local tab. Then, select the format you want to export in. Currently, Filmora supports the following formats: WMV, MP4, AVI, MOV, F4V, MKV, TS, 3GP, MPEG-2, WEBM, GIF, and MP3.
Video Compressor For Mac
Filmora's Video Compressor for Mac shrinks your videos by up to 90% at lightning speed, making it ideal for easy sharing on social media and via email.
Auto Highlight for Mac
You will learn how to use auto highlight feature in Filmora for mac to generate the highlight moment in 1 click.


