"How do you detach the audio from a clip on Final Cut Pro so that you can move the audio to a different part of the timeline, but not the video?" - Quora
As a professional-grade video editing software for Mac users, extracting audio from video in Final Cut Pro is the most basic feature. Don't know how to use it? Check our step-by-step guide to detach audio in Final Cut Pro now!
In this article
How to Detach Audio from a Clip in Final Cut Pro?
Detaching audio from video using Final Cut Pro is relatively simple and very quick. Here are the steps:
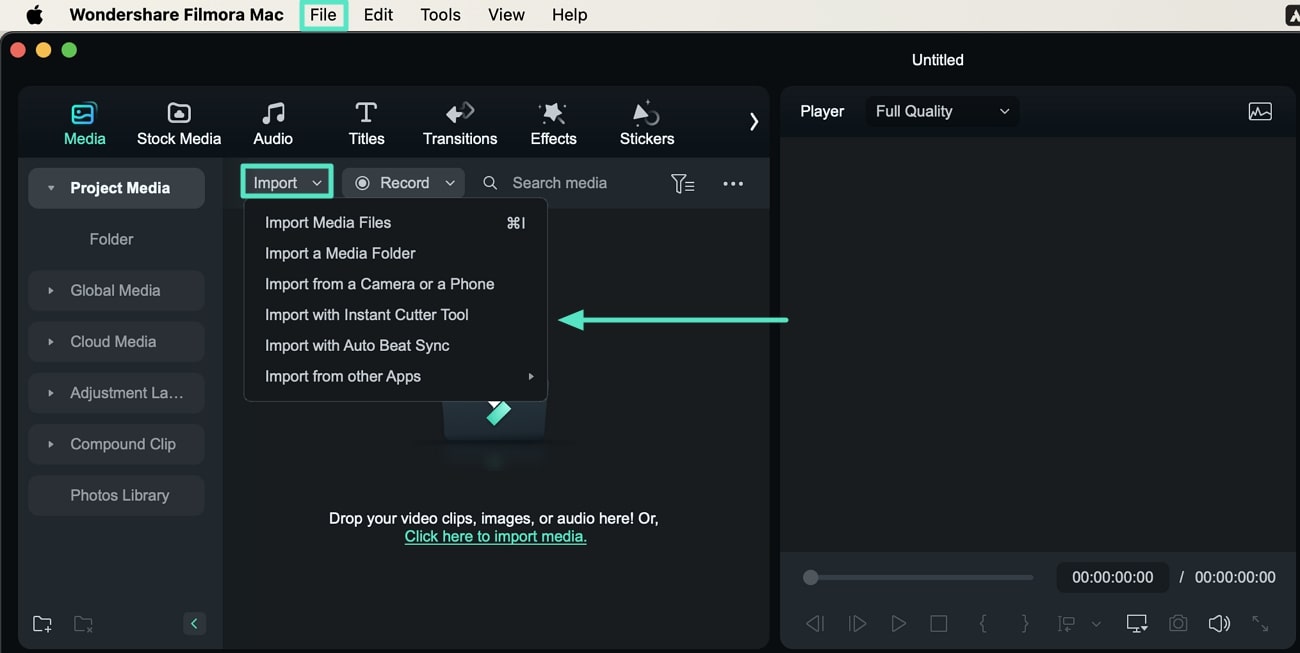
Step 1: First import the video with the audio you want to extract. To do this, Click import media or use the shortcut key "command+I"
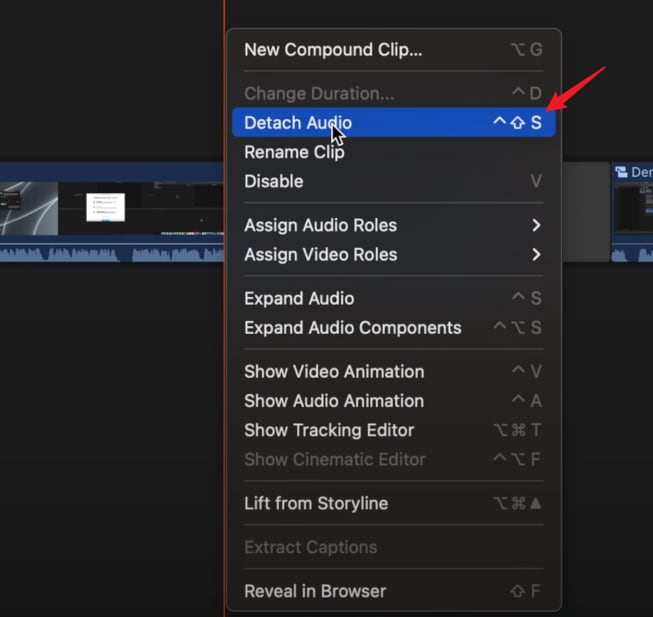
Step 2: Right-click on the video and select Detach Audio from the menu that appears or use the shortcut key "CTRL+Shift+S", the audio will be extracted automatically.

Step 3: Now save your file after detaching the audio. Simply go to Share and select the Save media option. You use the shortcut key "Command+S" to save your file anywhere on the device.
Other Features of Final Cut Pro
- Detach Audio- This lets you separate audio from video quickly and you can move, trim, or edit it.
- Audio Effects- The tool enables you to add effects like compression, background noise removal, and more to the detached audio.
- Syncing Audio and Video - You can watch a separate audio with new recordings.
- Export Audio - The tool allows you to export detached audio as a separate file or track.
- Multicam Editing - It can sync and edit multiple camera footage.
- 360-degree video Editing - Allows editing of 360-degree content and applying effects to 360-degree footage.
- Color grading - It offers advanced color grading.
- Motion Graphics- You can create 2D and 3D titles, apply filters, and use customizable templates for motion graphics.
An Alternative Way for Final Cut Pro to Detach Audio From Video
Final Cut Pro is quite expensive and may be not cost-effective for those users who may only need basic video editing features. And it is not available for Windows users. In that case, if you want a more effective method that also works on Windows, consider Wondershare Filmora.
It is a powerful tool for video editing with robust functionalities yet offers a user-friendly interface. Its cross-platform subscription plan cannot only work on Windows but also on Mac, Android, and iOS. And the price is starting at $49.99 per year. If you are a new user, you can even get a 3-day watermark-free exportation after finishing some tasks, which means you don't need to spend a penny to detach audio from videos for free without watermarks.
In addition to that, as a popular video editing software in the market, Filmora also has many robust editing features.
Key Features:
- Easy audio detachment - Extract or detach audio from video easily and quickly.
- AI vocal remover - Remove vocals from YouTube videos or other files with one click.
- Audio keyframing - Create dynamic changes in volume or other audio properties.
- Audio Effects library - Apply audio effects such as voice-changing and sound effects.
- Noise removal - Remove background noise from your detached audio or videos.
- Audio Editing - Move, cut, or delete your detached audio and adjust its volume and speed to your preference.
- Fading effects- Add smooth fade-in and fade-out effects to the audio.
- Voiceover recording - Record and sync voiceovers to your video.
- BGM Generator - Generate background music according to the video content automatically.
How to Extract Audio From a Video Using Filmora
It takes just a few steps to detach audio from video clips using Filmora. First, you should download and install Wondershare Filmora on your computer, then follow these steps.
Step 1: Click the import button to import videos to Filmora.

Step 2: Next, drag your video from the media library to the video timeline. Right-click on the video clip and select ‘Detach Audio'. The audio will be detached and appear separately from the video track. Right-click the video and choose "Delete" to remove the video from the timeline if you don't want to keep it.

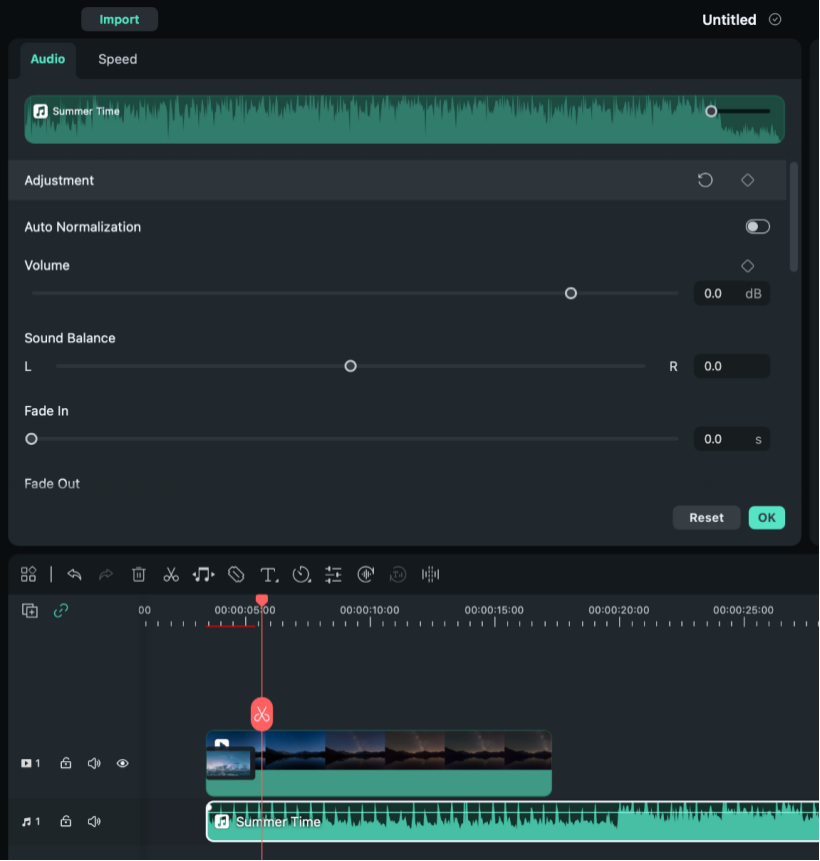
Step 3: Double-click your detached audio on the audio track. The audio editing panel will show up and you can edit your audio. You can adjust the pitch and sound volume, or add fade-in and fade-out effects.

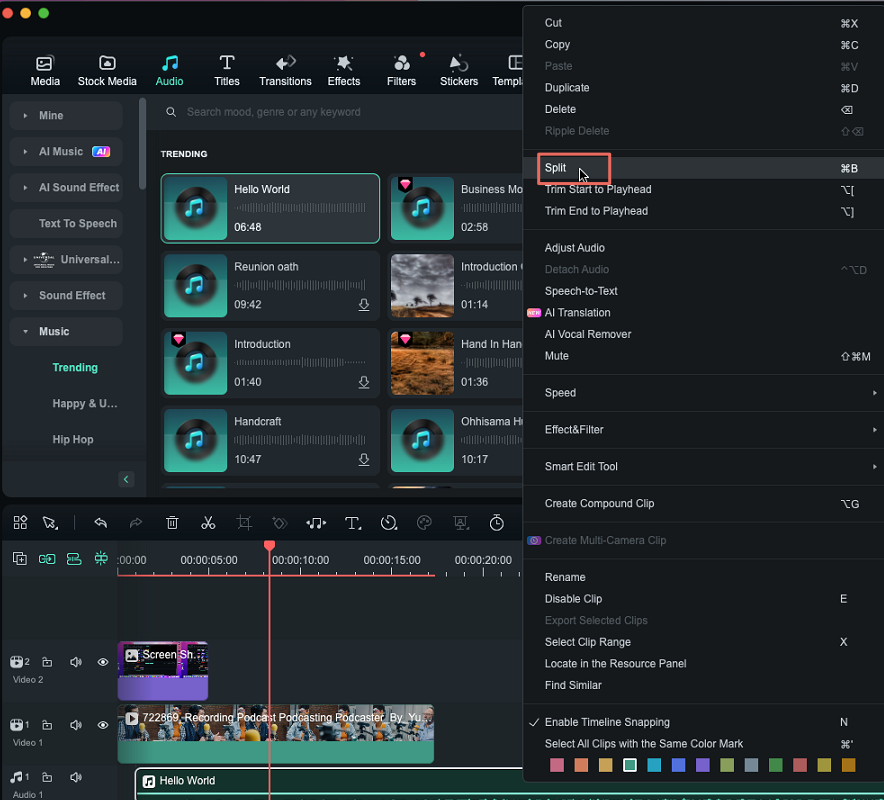
You can remove unwanted parts in your extracted audio. All you need to do is put the cursor at the start of where you want to cut out and click the split button on the audio track. Afterward, delete it.

Step 4: Click the Export button to save your edited audio file.
Conclusion
Detaching audio from video in Final Cut Pro is a wonderful tool for extracting audio from video on Mac. However, if you are looking for an affordable and easy-to-use alternative, you can try out Wondershare Filmora. This tool offers a balance of advanced features, an intuitive interface, and cost-effectiveness making it an ideal choice even if you're a beginner looking for an audio extractor with a smoother learning curve.
FAQs
-
How do I separate clips in FCP?
To separate clips in FCP, you can use the Blade Tool or a shortcut (Command + B) to split or cut clips at specific areas in your timeline. -
How to remove audio from video in FCP?
To remove audio from video in FCP, right-click on your target video on the timeline then select Detach Audio, the audio will be separated and placed below your video timeline and you can edit it independently. -
How to unlink audio in Final Cut Pro?
First, locate the file containing the audio you want to unlink. On the timeline, right-click on the video then select Detach Audio. This will create a separate audio track below the video in the timeline and you can edit, move or delete the audio.


