- After Effects Tutorial
How to Add Audio to After Effects (Step-by-Step)
Jul 14, 2025• Proven solutions
Learninghow to add audio in After Effectscan enhance your video projects with music, voiceovers, and sound effects. In this guide, we’ll walk you through the simple steps to import, edit, and sync audio in Adobe After Effects. Plus, we’ll explore alternative tools like Filmora for seamless audio integration. Whether you're a beginner or a pro, mastering audio in After Effects will take your edits to the next level. Let’s get started!
Part 1: How to Add Audio in After Effects?
1. Start the program and open a new project.
2. Import the files in the project panel. Mute the video sound if neccesary

3. Import the audio file to the project file as well (that is required to be added).
4. Make sure to convert the audio file to .mp3 format.
5. Drag and drop the audio onto the composition.
To preview the audio in After Effects, enable the audio in the timeline first and then Press cmd+0 on Mac to preview.
6. Adjust the audio settings. Double click "L" on you keyboard to show the audio waveform.

Check this video tutorial to know the details on adding, adjusting audio in After Effects
Part 2: Other 5 Best Audio Editing Software to Add Audio to Video
1. Wondershare Filmora
Adding music can enhance the mood and add an extra layer of professionalism to your videos. To improve the audio for your video, you can use tools like Wondershare Filmora. Being a comprehensive video editor, it offers much more than just video editing. The tool lets you add after-effects sound to your videos to elevate your visuals using artificial intelligence.
It offers an AI voice enhancer to improve the richness and clarity of your background music for studio-quality sound. Furthermore, you can remove audio problems like background noise to ensure clean and professional audio, making it a complete editing solution.
Steps to Add Audio in After Effects Using Filmora Desktop
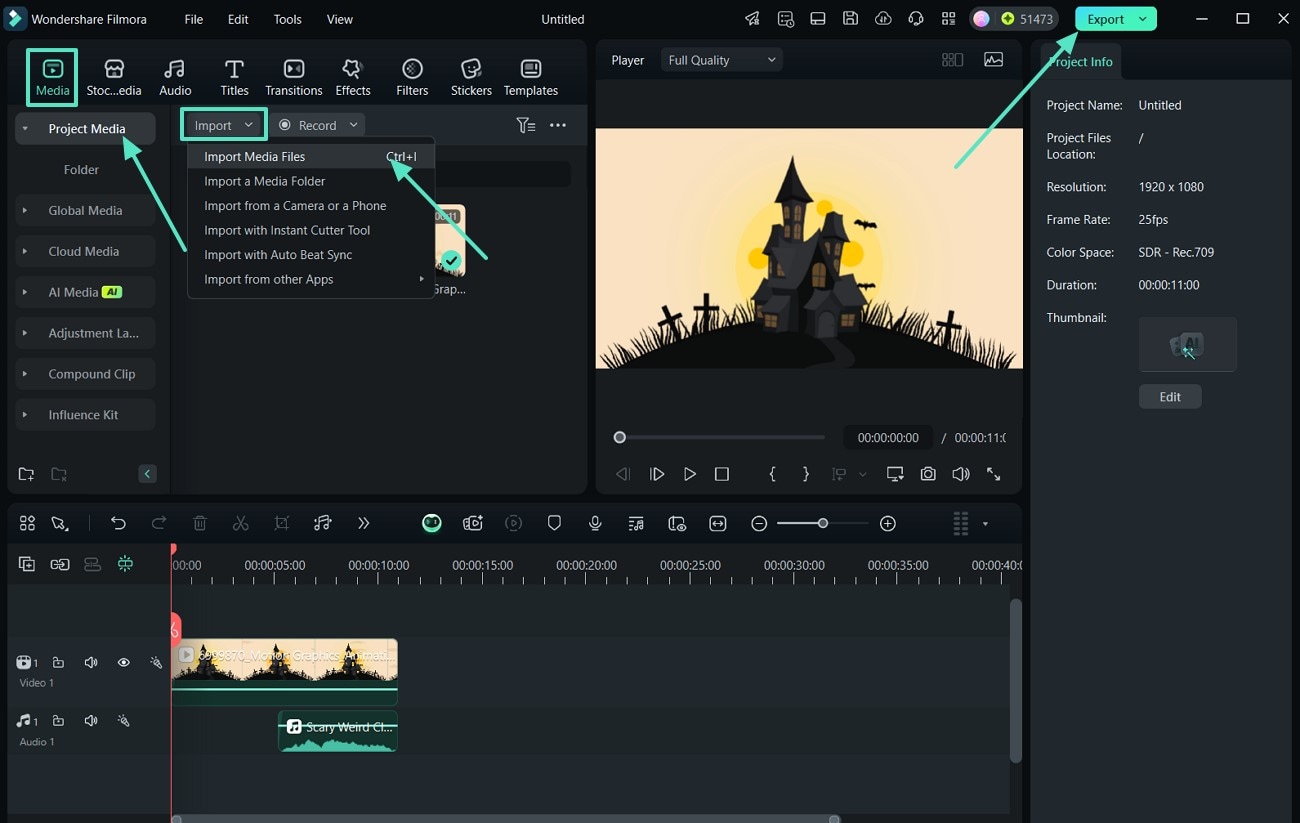
- Step 1. Launch the Tool and Import the Video File. Access the Filmora desktop by clicking on "New Project," then press on "Project Media" in the following interface. Look for the "Import" button that adds video from your system and drag it to the timeline for further processing.
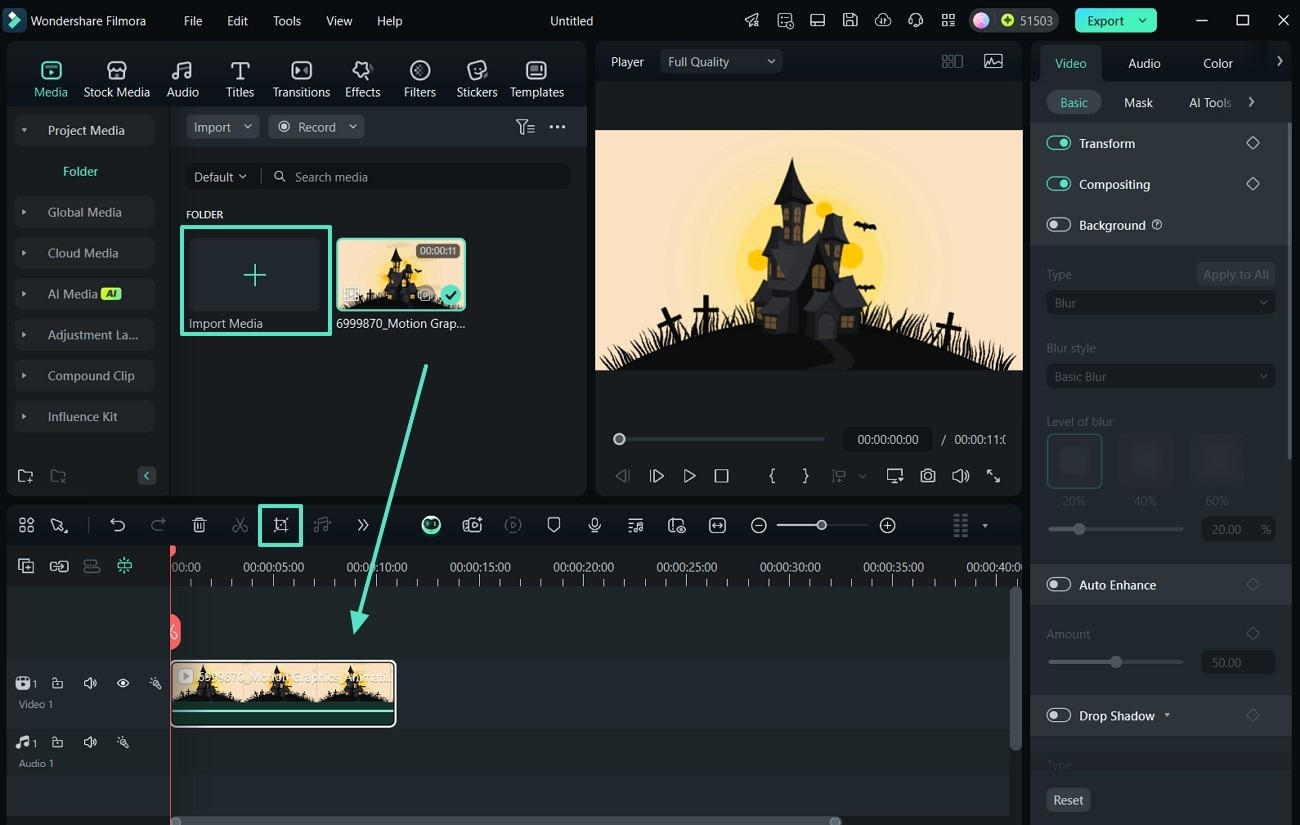
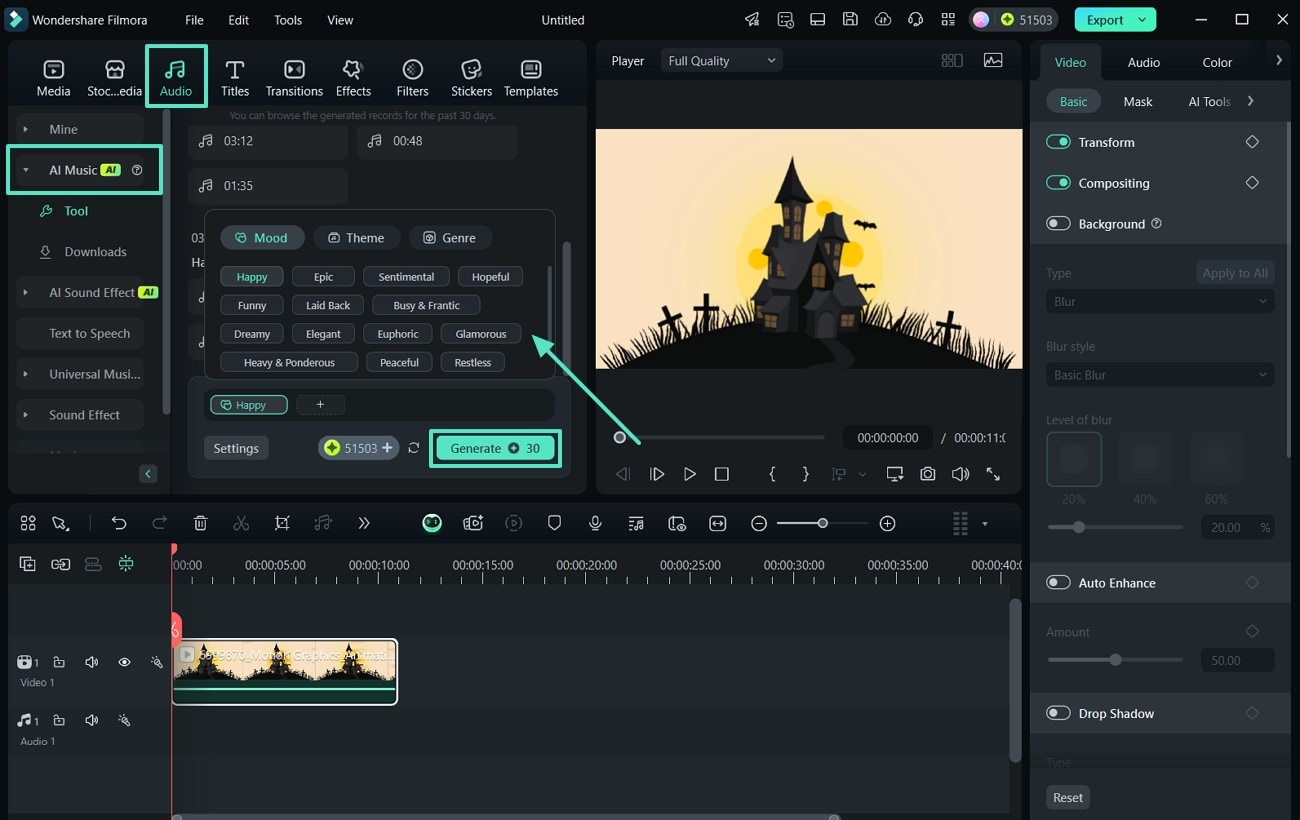
- Step 2. Generate Music Using AI. In the next step, head to the "Audio" section located at the top of the toolbar. Moving forward, expand the "AI Music" list to choose the mood, theme, and genre of the music according to your preferences. Next, hit the "Generate" button to generate AI after-effects audio using AI.
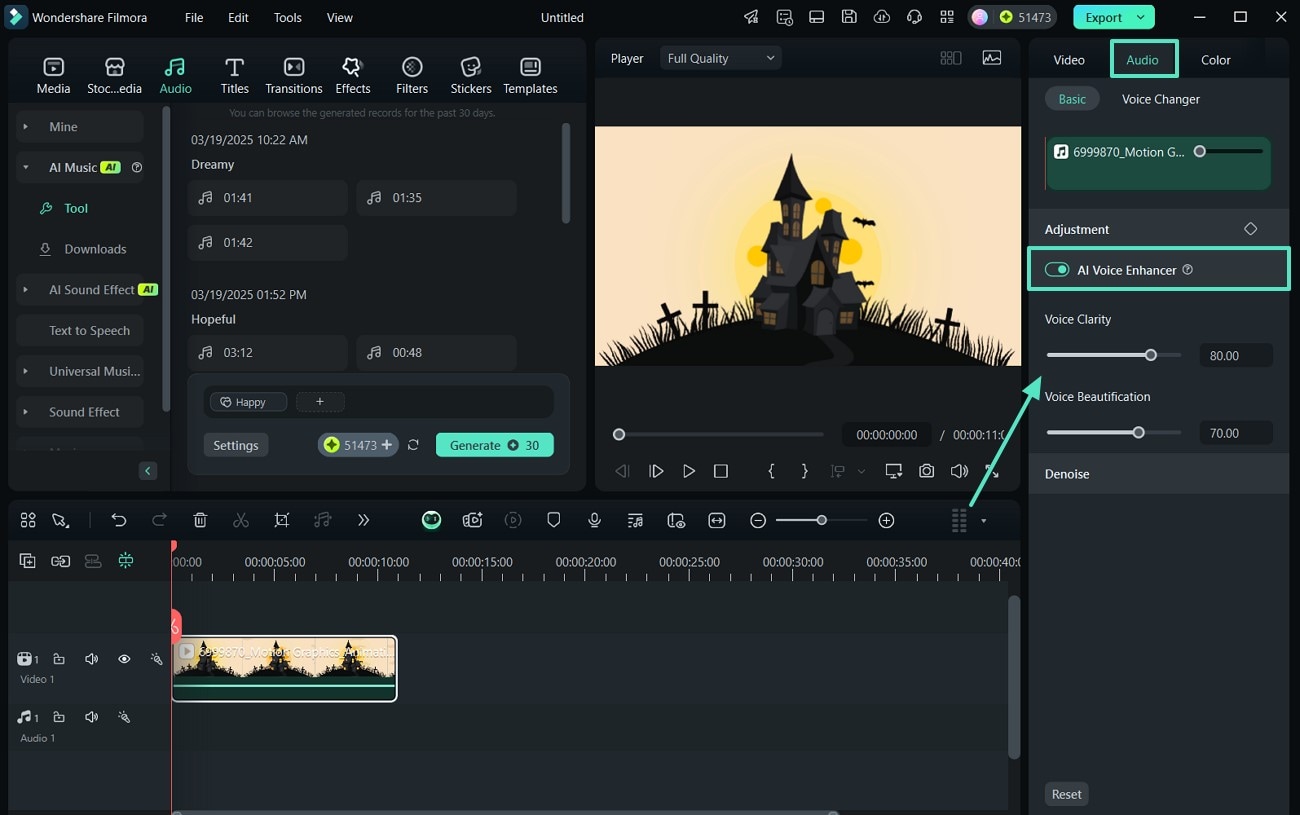
- Step 3. Adjust the Audio Properties According to Video. Once the audio of the video is generated, access the "Audio" panel located at the right side of the interface. Expand "AI Voice Enhancer" to customize the audio results like hiss and noise issues to ensure clarity and beautification.
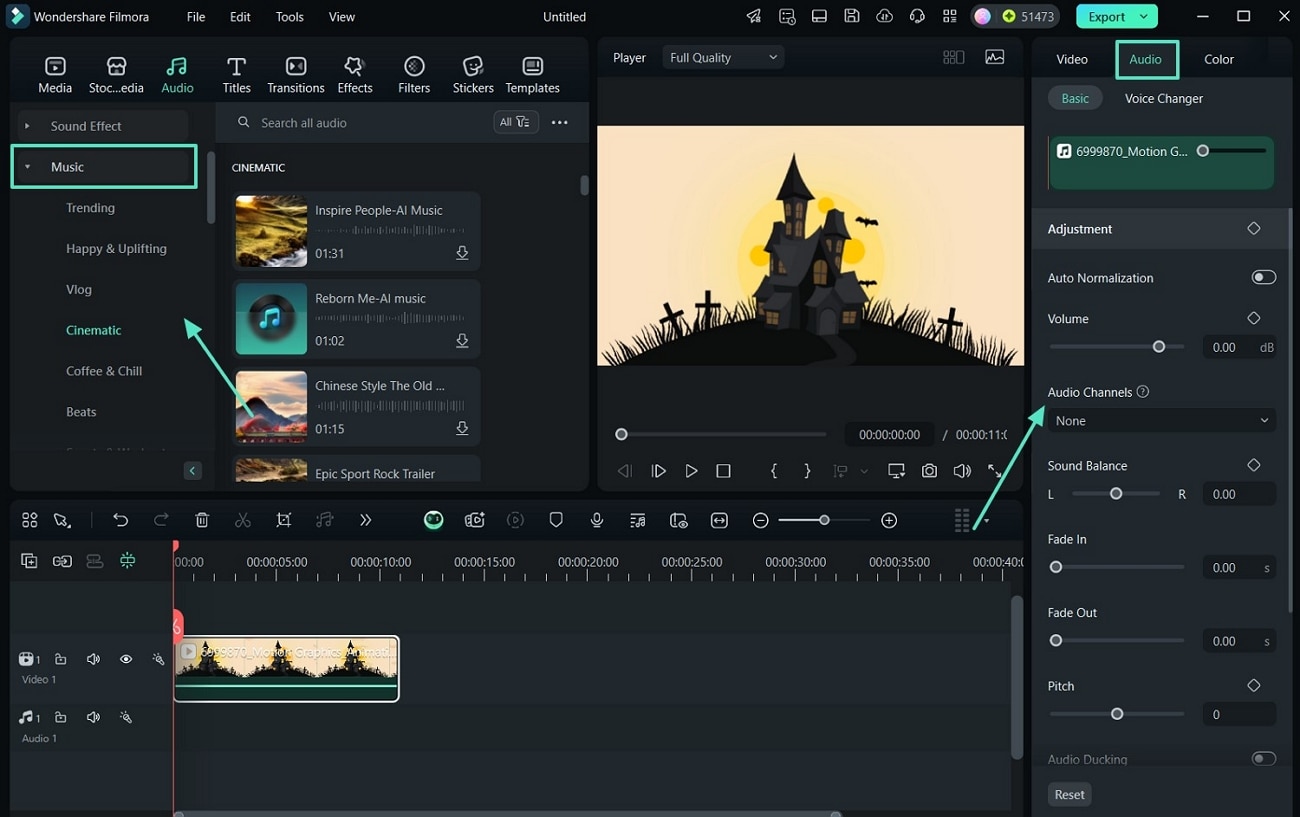
- Step 4. Access the Music Library of the Tool. Get trending songs as BG music for your video by expanding the "Music" option located at the left within the "Audio" section. Choose your required sound according to your video needs. Once done, navigate to the "Audio" panel on the right side to adjust the speed parameters and voice issues.
- Step 5. Choose Pre-Recorded Music and Export Results. Moving forward, press on the "Media" option from the menu bar. After that, click on "Project Media" underneath to use the "Import Media" button to import any audio from your device. Lastly, hit the "Export" button to start the download after-effects sound procedure.
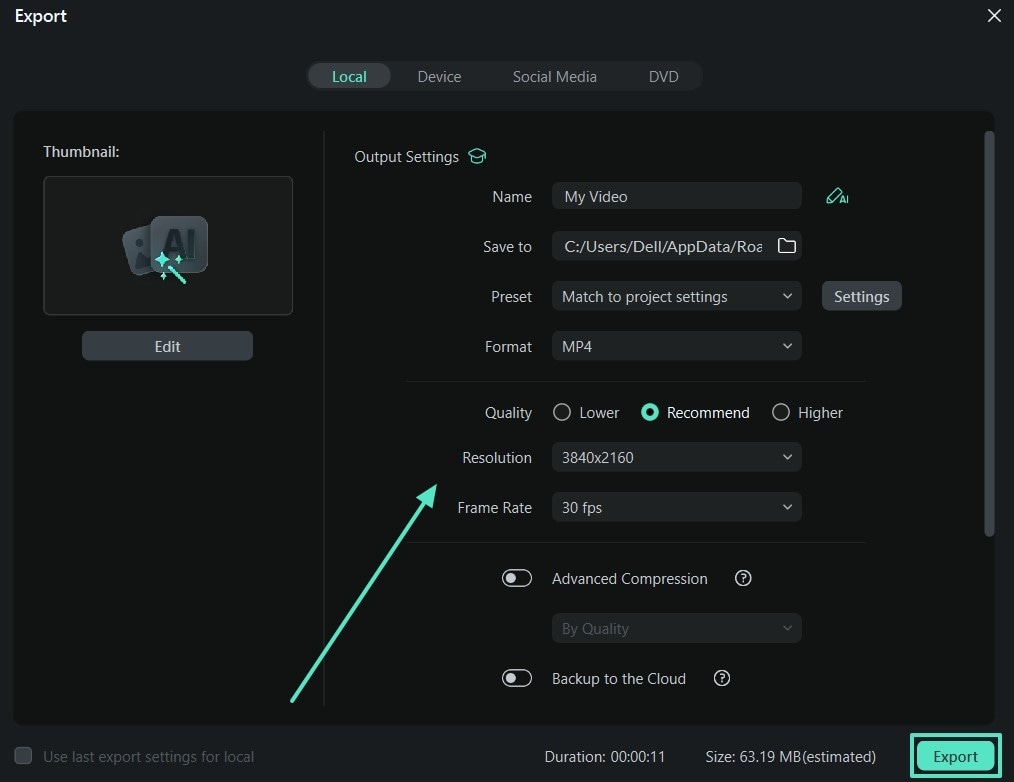
- Step 6. Adjust Export and Format Settings. In the last step, you can edit the thumbnail for your video and customize your settings, including the format and resolution of the video. Finally, hit the "Export" button to save the editing outcomes on your device.
Other Audio Features Offered by Filmora Desktop
- Cut Unwanted Voice Part: You can remove unwanted parts of the audio instantly using this Filmora audio editing feature.
- AI Sound Effects: Create high-quality, realistic sound effects tailored to your project, enhancing your audio experience.
- Universal Music For Creators: Creators can streamline the process of finding a soundtrack for their projects using this tool's unique feature.
- Text to Speech: Using text-to-speech, you can transform your text into assertive after-effects audio which can be used in the video directly.
- Extensive Music Library: By using the Filmora music library, creators can choose particular songs for any scene to resonate with their audience.
- Denoise: With the help of video denoise, you can remove noise and other artifacts from the audio in a click.
- Speed Ramping: Users can adjust the speed of the music according to their needs and add variations to the sound.
- Hiss and Wind Removal: By using this feature, you can remove unwanted hisses and wind noises from the video to make it crisp and clear.
Steps to Add Audio in After Effects Using Filmora Mobile App
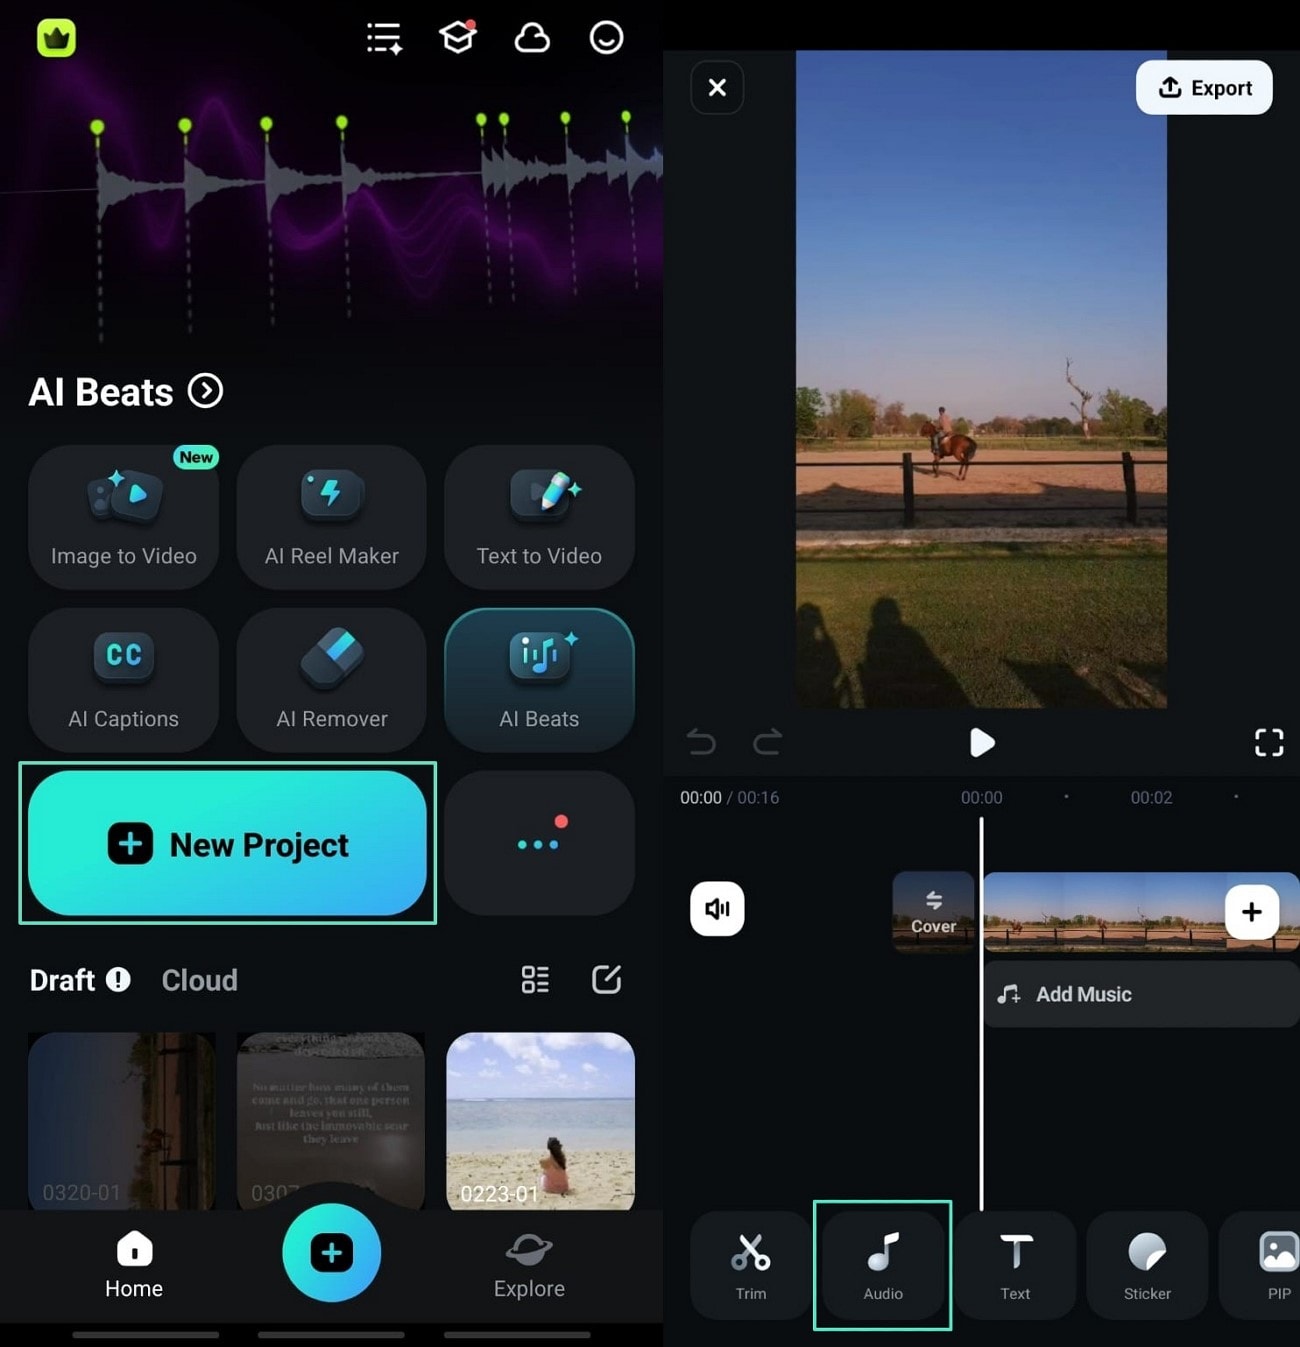
- Step 1. Start With Importing Content and Selecting Audio. Once you install the app on your mobile, start the process by tapping on the "New Project" and importing video from your phone. Next, press the "Audio" button located at the bottom toolbar to move to the music option in the next interface.
- Step 2. Add Existing Music to Your Video. In the following interface, press the "Music" option from the left corner of the interface. After that, choose your required music from the tool's extensive music library for your video.

- Step 3. Adjust Volume and Change Beats. Moving forward, check the generated music of your video and customize it by changing speed and volume. You can also add after-effects, sounds, and beats to your videos.

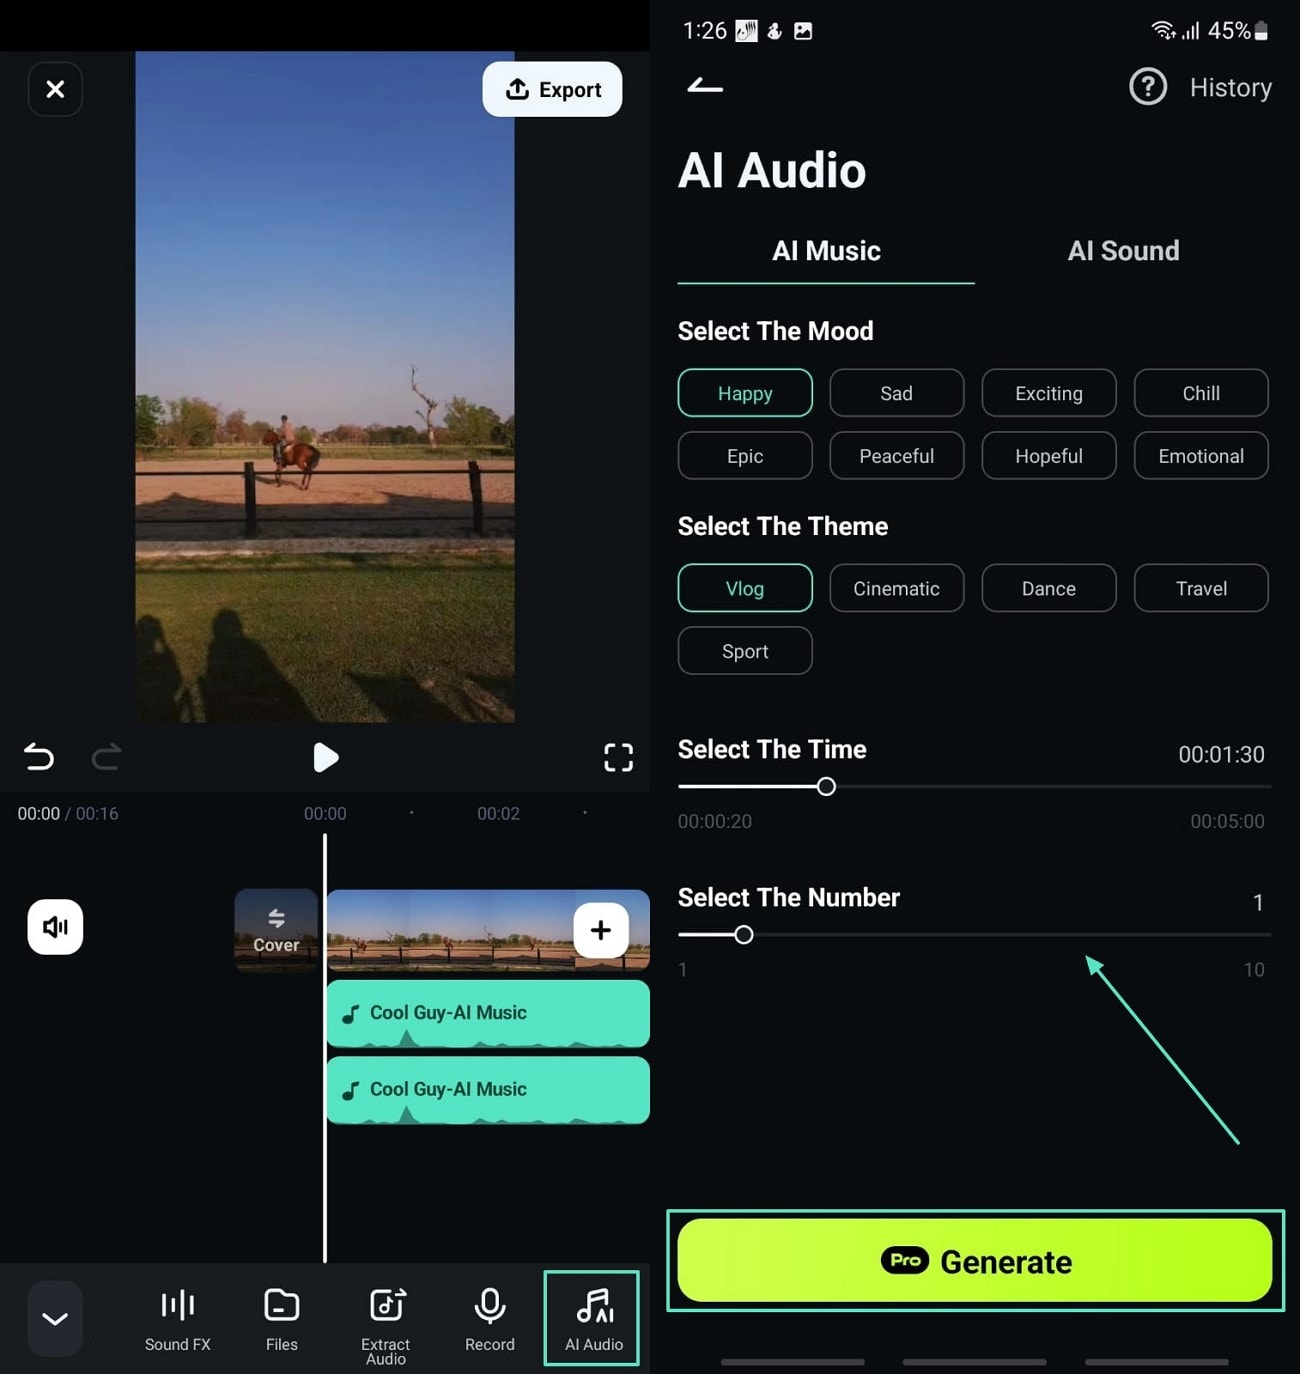
- Step 4. Add AI Audio to Generate AI Music. Conversely, you can generate music using the "AI Audio" option by tapping on it on the right side of the interface. Next, choose the mood and theme of the music according to your preferences. Lastly, hit the "Generate" button to start executing the process.
- Step 5. Generate AI Sound For Enhancing Audio Outputs. In the following step, tap on the "AI Sound" to generate sound effects by describing them in the form of text. Describe your desired sound in the "Describe the Sound Effect" section and hit the "Generate" button.

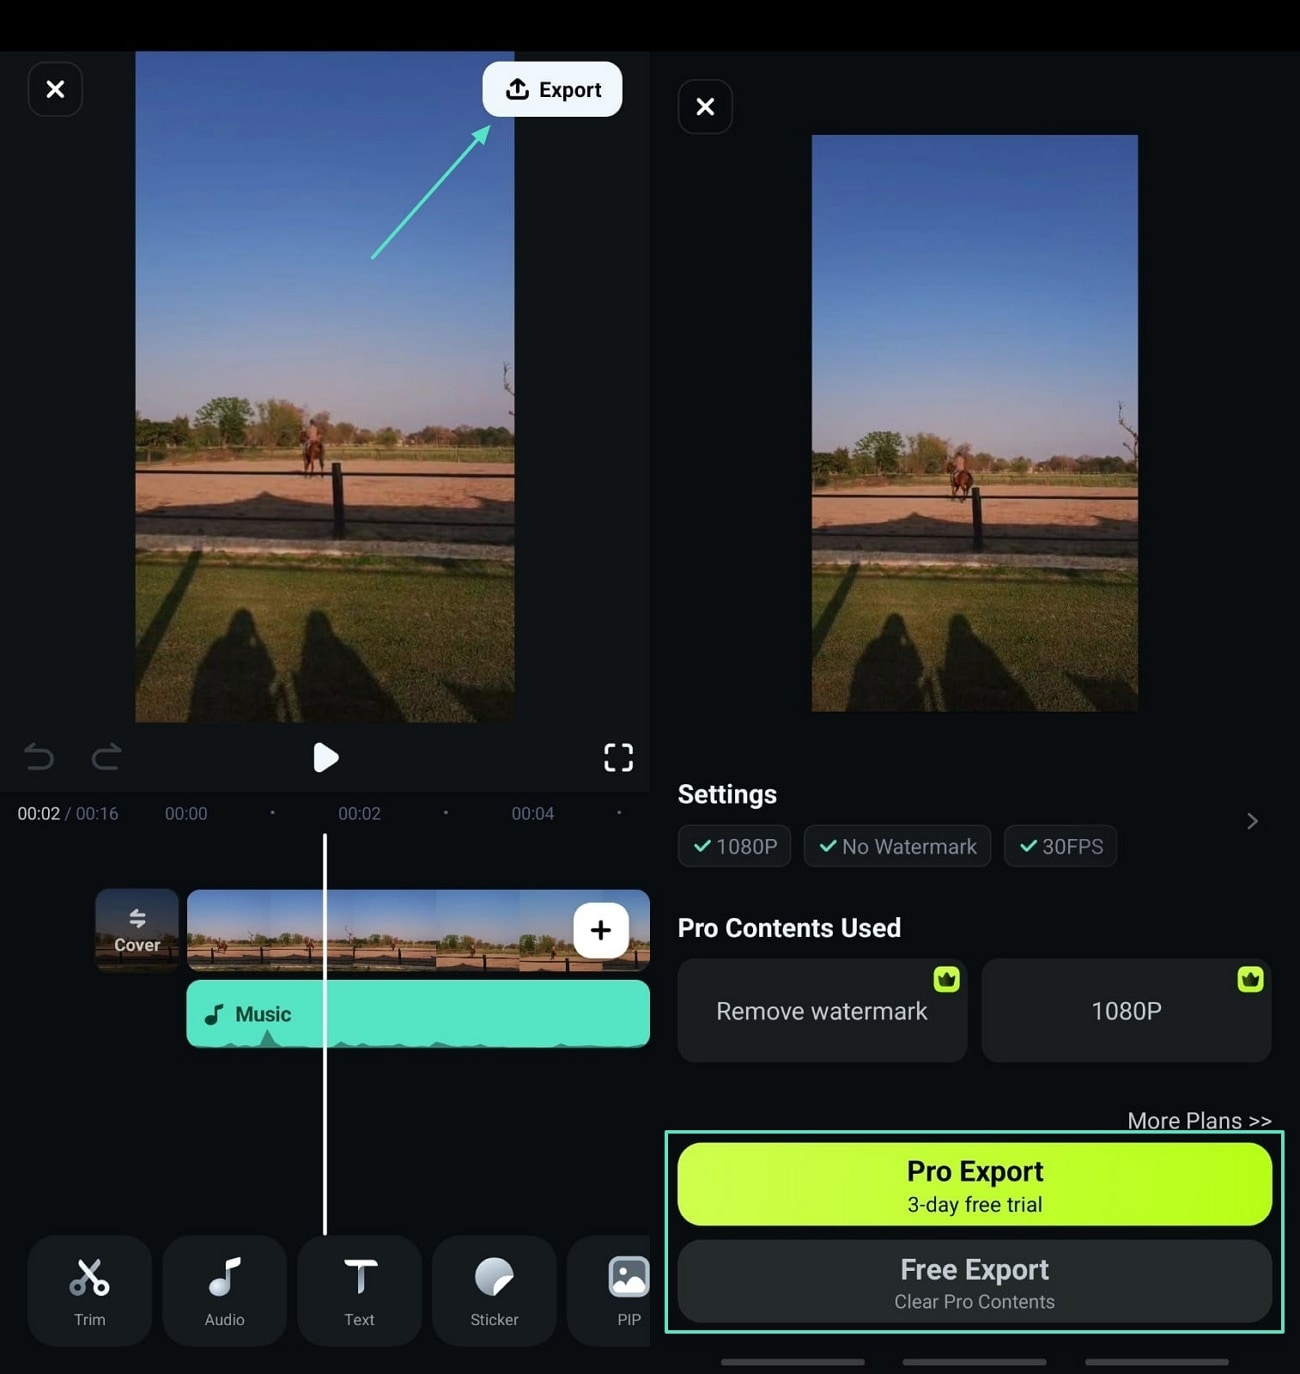
- Step 6. Export the Outcome on Your Device. Once you are done with music creation and editing, tap on the "Export" button located at the top right corner of the interface. In the last step, adjust the resolution and enable your required options, then hit the "Export" button to save after-effects audio results.
Key Audio-Editing Features of the Filmora App
- Track Switching: Using Filmora App's vital feature, you can organize your timeline and manage the multiple audio tracks in the video
- AI Beats: Users get the ability to use AI-powered beats for creating music beats for enhancing video creativity.
- Extract Audio: You can extract audio to isolate it from the video and modify it accordingly.
- Noise Reduction: It lets you remove noise from the audio to improve the after-effects sound in your video.
- Record Audio: If you want to generate an instant voiceover for the video, you can record it using the record audio feature.
- Voice Effects: You can apply various voice effects to the spoken words of the audio in your video to enhance creativity.
- Speed Adjustments: It lets you modify playback speed to create dramatic slow-motion or fast-forward effects without losing audio quality.
- Fade In/Out: Add smooth transitions to the audio with gradual volume changes, ensuring a professional and polished sound experience.
2. WavePad from NCH Software
This is definitely one of the most popular editing tools because of how simple and easy it is to use. It is great for beginners who need professional-level editing tools. It is possible to use any audio format on this software including MP3, WMA, OGG, VOX, GSM, etc.
3. Audacity: Free open source audio editing software
This is free software that works on multiple platforms and supports multi-track editing and even live audio recording. It has a very simple user interface that makes it easy to learn on and get used to while offering professional features and ensuring the best quality.
4. Adobe Audition
Here you will get a mix of simplicity and professionalism. It is easy to get used to but progresses in complexity with time.
5. Wavosaur
Wavosaur is an old tool that doesn't run on most modern computers and laptops. But it does offer many features and methods of processing for audio clips.
Conclusion
Now that you know how to add audio in After Effects, you can easily enhance your videos with music, sound effects, and voiceovers. Whether you're using After Effects for advanced editing or tools like Filmora for a simpler workflow, adding the right audio can make your projects more engaging. Experiment with different techniques and find what works best for your creative vision. Happy editing!


 100% Security Verified | No Subscription Required | No Malware


