- After Effects Tutorial
How to Create a Heat Distortion in Adobe After Effects?

Jul 14, 2025• Proven solutions
 TL;DR:
You can simulate a realistic heat distortion in Adobe After Effects by manually animating built-in effects like Turbulent Displace, CC Particle System II, or Fractal Noise using adjustment layers, or by applying dedicated third-party plugins to automate the displacement.
● Manually creating this effect requires experience with masked solid layers and keyframing Evolution properties, with the strict limitation that there are no universal setting values, demanding custom intensity and blur adjustments per clip to avoid an artificial appearance.
● The three built-in workflows differ technically: Turbulent Displace requires only a masked white solid and an Adjustment Layer, CC Particle System II uses red Faded Sphere particles with reversed gravity linked to a Displacement Map, and Fractal Noise relies on a Luminance color channel setup.
● For paid automation, VideoCopilot's Heat Distortion provides a drag-and-drop, AE-exclusive solution with built-in wind controls for a one-time $24.95 fee, while the Red Giant Universe Heatwave effect costs $20 monthly but extends compatibility to Premiere Pro, FCPX, and Vegas Pro.
Ask AI for a summary
 ChatGPT
 Perplexity
 Gemini
 Claude
 Grok
Grok
Making a shot of a desert or a highway on a hot day more dramatic and dynamic might make a scene or a sequence in a movie more interesting to the audience. In addition, you can add a heat distortion to an explosion to make it look more realistic, but you must do so carefully in order to avoid ruining any illusion of realism the footage had before you applied one of the effects that distort the image and simulate the so-called heatwave. Read on if your cameraman missed the opportunity to capture a heat haze at the filming location or if you’re looking for a way to add a heat distortion effect to an animated video because in this article we are going to show you several different methods of creating this effect in Adobe After Effects.
- Part 1: How to Create Heat Distortion in After Effects [3 ways]
- Part 2: Best Plugins For Creating Heat Distortion in AE
How to Create a Heat Distortion in Adobe After Effects?
Creating a heat distortion may be fun, but it is by no means easy or simple because you need to have experience using solids, masks, adjustment layers and keyframes. To make matters worse, there are no rules you can follow when it comes to the values you assign to individual settings, and you have to try out different things until you get the result that best fits the footage you’re working on. Furthermore, all types of image distortion effects can make a shot to which you applied them look artificial, and you can only use these effects within a well-defined context since there is not much sense in creating a heatwave effect if it is raining in the shot you’re editing. Here’s how you can create a heat distortion effect in Adobe After Effects.
1. Use the Turbulent Displacement Effect
This method of simulating heat haze can be completed in just a few steps and a moderate amount of settings adjustments.
Step 1: You should start by making a new solid. Go to the Layer menu, click on the New submenu and select the Solid option from the list. The Solid Settings window will pop up on the screen, so before clicking on the OK button you should change the solid’s color to white and name it in order to make it easier to find.
Step 2: Select the Pen tool from the toolbar and draw a mask over the area of the solid where you would like the effect to appear on the screen and proceed to feather out the mask’s edges. When done, head over to the Effects&Presets panel and type in Turbulent Displace into the search bar, and then drag and drop the effect to the solid layer you created in the previous step.
Step 3: Heat waves are not stationary, which is the reason why you need to animate the Turbulent Displace effect. You can do this by setting keyframes for both Evolution and Offset options. Which values you’re going to assign to these settings depends on the footage, so it may take you a while to get the movement of the waves to look natural.
Step 3: Create a new Adjustment Layer, by hitting the Command+Y shortcut or go to the Layer menu and select the Adjustment Layer from the New submenu. Make sure that the adjustment layer is positioned directly below the solid and change the Track Matte option to Luma Matte. This should render the solid invisible, and you can then add the Turbulent Displace effect to the Adjustment Layer. Change the Amount and Size values of the effect and add the Fast Blur effect to the Adjustment Layer, but keep in mind that applying too much Fast Blur can make the heat distortion less convincing.
2. Use the CC Particle System II Effect
This method of simulating heat haze in a video involves creating a heat displacement map and applying a built-in effect that imitates particle movement.
Step 1: Go to the Composition menu and select the New Composition option, and add footage to it. Click on the Layer menu and select the Solid option from the New submenu. After you’ve created a new solid you should look for the CC Particle System II effect in the Effects&Presets panel and apply the effect to the solid.
Step 2: You can adjust the effect’s setting in the Effect Controls panel, so the first thing you should after you add the CC Particle System II effect to the solid layer is place it at the exact location in the shot where you want to create a heat distortion. Additionally, you can increase the value of the Radius option to imitate the chaotic behavior or light rays. Expand the Physics menu and reverse the Gravity so that the particles are rising instead of falling. Reduce the Velocity to slow down the movement of the particles
Step 3: Expand the Particle menu, and change the Particle Type from the Line option that is selected by default to Faded Sphere. Increase the Birth and Death size and then change the Birth and Death color to red. Right-click on the solid and select the Precompose option and move all attributes into the new composition.
Step 4: Go back to the Effects&Presets panel and type in Displacement Map into the search bar and drag and drop the effect to the video clip to which you want to add the heat distortion effect. Click on the Displacement effect in the Effect Controls panel and change the Use for Horizontal Display setting to red. Click on the Wrap Pixels Around checkbox and select the solid layer you created from the Displacement Map Layer drop-down menu. Double-click on the solid layer on the timeline if you want to fine-tune the CC Particle System II settings further and try out different values to get the best result.
3. Use the Fractal Noise Effect
The Fractal Noise effect basically mimics the movement of the heat waves, which allows you to create a realistic heat distortion effect.
Step 1: Choose the solid option from the new submenu in the Layer menu and create a new pre-composition. Use the search bar in the Effects&Presets panel to locate the Fractal Noise effect and add it to the solid layer you just created.
Step 2: Go to the Effects Panel and assign a new value to the Evolution setting in order to add a bit of movement to the Fractal Noise effect. Increase the Contrast and Brightness or use the Scale slider to enlarge the fractals. Optionally, you can add a Fast Blur to the solid if you want to make the edges of the fractals softer.
Step 3: Make a new Adjustment Layer and add a Displacement Map effect to it Click on the Displacement Map Layer menu and select the solid layer from the list. Change the color channel to Luminance for both Use for Horizontal Display and Use for Vertical options and proceed to alter the Max Horizontal Displacement setting. Optionally, you can add a Motion Tile if you lost the edges of the image and adjust the Output Width and Output Height properties. Add a Compound Blur to further blur the Fractal Noise effect and then adjust the Compound Blur’s settings to get the heat distortion effect exactly right.
The Best Plugins For Creating a Heat Distortion In After Effects
Professional video editors and animators who don’t want to waste their time creating the heat distortion effect by adding AE’s built-in effects to solids and adjustment layers can try using effects included in some of the plugins for this compositing and visual effects application. Let’s have a look at some of the heatwave effect you can use in your projects.
1. Use The Heatwave Effect From the Red Giant Universe Plugin
Price: Pricing plans start from $20 per month, billed annually
Compatibility: Mac, Windows
Host Applications: After Effects, Premiere Pro CC, FCPX, HitFilm Pro, Magix Vegas Pro 14, Apple Motion
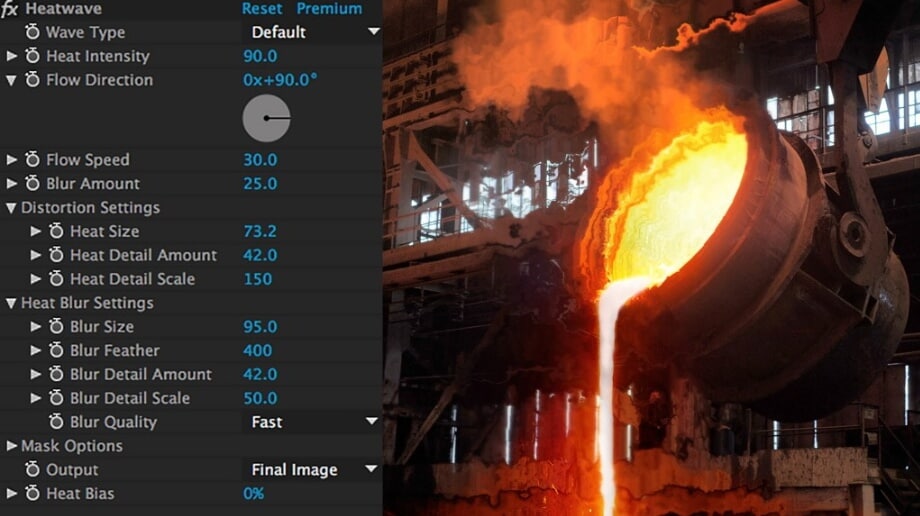
For more than two decades Red Giant has been producing plugins for professional video editing applications, and its Universe plugin features a huge number of different video editing tools. You can use the Heatwave plugin the same way you would use any other effect in AE, but before you apply it to your footage you must first create an Adjustment Layer. Go to the Effects menu and choose the Heatwave effect from the Universe Distort submenu, and the effect will be automatically added to the Adjustment Layer.
Applying the effect will distort the image, so in order to control how distorted the image is going to be, you can tweak the effect’s settings in the Effect Controls panel. Changing the Output property to Distortion will enable you to see the distortion map, while the Heat Intensity option lets you determine how much the effect is going to impact the original footage. The Heatwave is fully customizable so you can adjust it every time you use it in a project. The actual values of each property depend on the footage, and you have to try out different options in order to get the desired effect.
2. Use the Heat Distortion from the VideoCopilot
Price: $24.95
Compatibility: Windows, Mac
Host Applications: Adobe After Effects
Once you install the Heat Distortion plugin you can apply it to any video clip just by dragging and dropping it to the footage. After adding the effect to a video in your project you can adjust its settings in the Effect Controls panel. The Heat Amount and Distortion Amount settings enable you to strike a perfect balance between the distortion of the image and the haze generated by heat. The plugin will also automatically animate the footage and you can control how fast the animation is by increasing or decreasing the Noise Speed value.
The Heat Bias property blends between the distortion and the heat and reducing this value will add more blur to the image. The Heat Distortion plugin doesn’t always have to be used over an entire image since you can just draw a mask after you apply the effect to define the area of the shot to which you want to apply the effect. This VideoCopilot’s plugin also offers the Wind Speed and Wind Directions settings that can be used to make the heat distortion effect look more realistic.
Conclusion
Too much of a good thing can sometimes be a bad thing. The same is true when creating the heat distortion effect in AE because if the effect is too strong it can distract the viewer or make a shot look unconvincing. Regardless of the method of simulating heat haze you choose, the trick is to conceal the effect, so that the viewer can’t easily realize that the footage has been manipulated. Which method of creating a heat distortion effect in Adobe After Effects do you like to use the most? Leave a comment below and let us know.
Do you want to remove object in After Effects? In this article, you will learn how to remove objects with clone stamp in After Effects. Check it out!
by Benjamin Arango Jan 06, 2026 11:37 AM
Do you want to make radio wave in after effects? If you don't know how to make it, check this article to know the steps to make radio radio wave easily!
by Benjamin Arango Jan 06, 2026 11:37 AM
Benjamin Arango
staff Editor
