- After Effects Tutorial
How to Create Motion Graphics in After Effects

Jul 28, 2026• Proven solutions
 TL;DR:
Animating basic motion graphics in After Effects requires generating a shape layer, mapping its trajectory with position keyframes, and exaggerating the physics using speed curve adjustments and dimensional deformations.
● Double-click the desired shape tool to instantly generate a composition-sized object with a perfectly centered anchor point for predictable animation scaling.
● Smooth out uniform, linear animations by applying Easy Ease from the keyframe assistant and manually adjusting the Edit Speed Graph to control acceleration.
● Press the U keyboard shortcut to isolate active keyframes on the timeline before unlinking the size property's proportions to animate exaggerated squash and stretch impacts.
Ask AI for a summary
 ChatGPT
 Perplexity
 Gemini
 Claude
 Grok
Grok
Motion Graphics use video or animation to create the illusion of motion, and have really taken off with the development of programs like After Effects that make creating this style of animation fairly straightforward. Because of the popularity of motion graphics many people want to see what is involved, so let's have a look at the basic concept.
How to Create Motion Graphics in After Effects
1. Setup
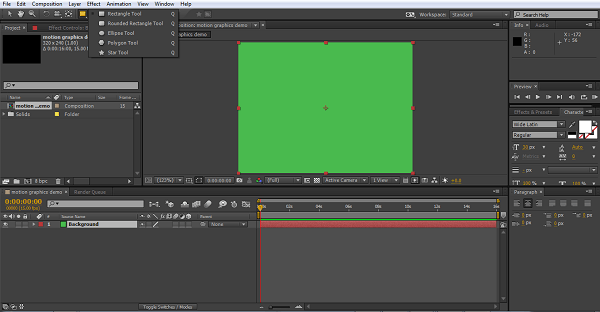
Open up a new composition, use whatever resolution settings you want to work in, and then create a background layer for the project using Layer>New>Solid, you want to choose a nice bright color for this so the animation all stands out.
Then you will have this as the starting point for your project.

2. Creating your shape
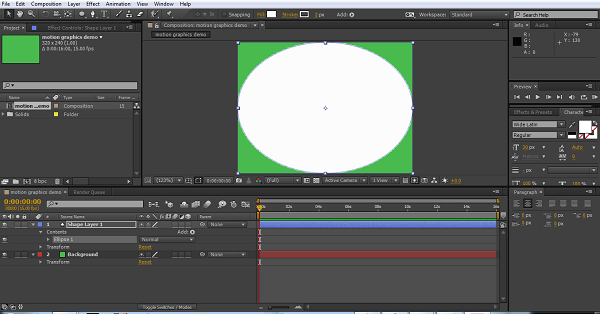
For this Motion Graphic I'm going to be creating a ball and then animating it. The shape tool itself is on the top menu, the default is normally a square, but click and hold it and you can select from the other shapes available. You can also use the Q shortcut to do this.
I chose an ellipse here, you can select the tool and then click in the composition and drag out a shape if you want, however a quick shortcut is to simply double click the tool icon when it is set to your desired shape, and it will automatically create a shape the full size of the composition and centered. This also has the benefit of making the anchor point for the object the center of the frame, which can, depending on you animation idea, be useful.
Another trick when working with shapes is that if you want a perfect circle, you can start with the ellipse, and go to the size property of the object, and alt click the chain icon for constrain proportions, and it automatically makes the height and width the same. For an ellipse, this means it instantly becomes a circle.
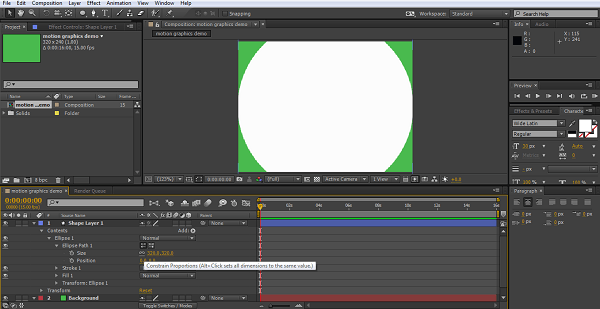
Then it is just case of adjusting the size to suit, we are ultimately going to create a bouncing ball animation so it needs to be quite a bit smaller.
Repeating the same on the 2nd text layer gives us too words with an extrusion depth of 20.

So now we have our ball, ready to animate.
3. Animating the ball
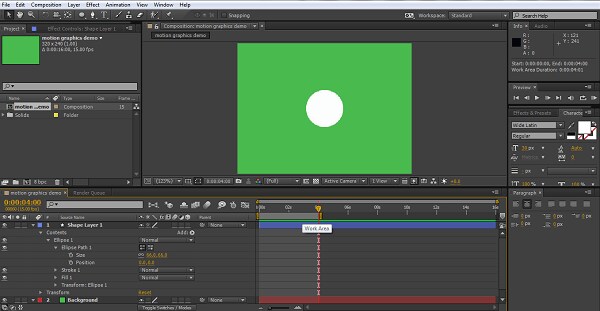
With motion graphics, there are often lots of small elements of movement and so to make things easier to follow we can make our work area for each element smaller. The bouncing ball is actually only going to be a small sequences of about 4 seconds, which we can then just repeat (loop) if necessary. So, we can set out time cursor to 4 seconds and press N on the keyboard and we create our work area from the start to that four second point. You can animate your project without this step of course, but it does make organizing things a little easier.
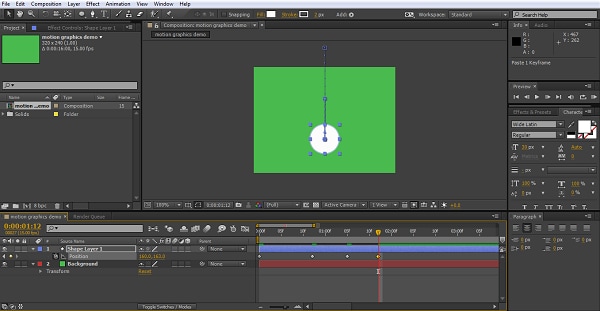
Now, when animating you really need to plan out what you want to do before you start, at least a basic idea. Here I want the ball to come from off the top of the screen and bounce. The first thing I do is to move the timeline to about three quarters of a second in, move the ball down to the lowest point I want to go, and create a keyframe by clicking the stopwatch next to position.

Next, I go back to the beginning and set my start point for the ball off screen. To ensure it drops vertically, so you hold down shift as you drag the object with the mouse (this locks the x axis so it moves in a single plane), or use the position values to adjust the values for a single axis only.

Now you have the ball dropping into the screen and hitting the level we have designated the floor. Now we need to set up the bounce. So we advance the timeline again beyond our first keyframe, another three quarters of a second or so, it isn't an exact science, see what works best here. Now we create our third position. Now as a rule of thumb, for the best effect an object should bounce somewhere between a third to a half of its original height, so we position our ball appropriately on this keyframe.

Obviously what goes up must come down, so the next move is back down to the floor again. To ensure you have the exact same place as before you can simple copy that first floor keyframe we set and paste it into the timeline wherever the cursor is.
Now we have our basic animation, our ball drops into the screen, bounces once and lands.
4. Adjusting the animation
Although we have our movement, it doesn't really give the effect of a bouncing ball, as it moves very uniformly from on point to another. To help here we can select all 4 keyframes, right click and select Easy Ease from the keyframe assistant, this adjusts the speed of movement between pints for a more pleasing motion.

However, we can refine this even further by using the graph tool.

Now, the graph can show many different properties, as we are focused here on speed of movement, we select the Edit Speed Graph selection
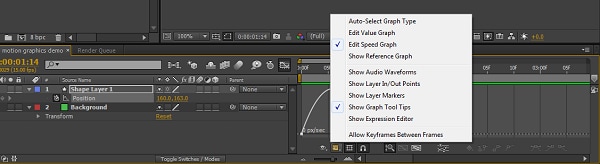
Although here we are focusing on speed, this technique can be applied to any attribute and you can make adjustments to your animations here for pretty much anything.
I adjust the speed curves here to try and create a floating type effect by slowing down the movement at each high point and a faster movement at the ‘bounce' itself. You adjust the graphs be simply clicking and dragging.
Now I have a ball that speeds up on the bounce, and sort of floats a little at the high point before dropping down again. Not realistic but to my eye it looks pleasing.

5. Adding in shape movement
One of the things about motion graphics is you need to exaggerate for effect, we have done this with movement speed, but the ball stays resolutely the same perfect circle throughout its travels. Our next step is to have it stretch a little as it speeds downwards, and squash a little as it hits the floor, adding this in just makes the process more pleasing to the eye, and stretch and squash is indeed a staple of the animation medium precisely for this reason.
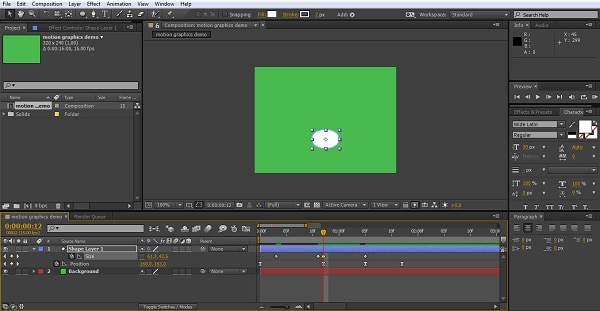
First off we decide where the ball will be perfectly round in its journey, and create our keyframe there for the size property. I decided on the top of the bounce, but it could be anywhere you want really.

Because here we will want to match the shape changes to the bounce keyframes a good tip here is to collapse all the layer properties and press U on the keyboard. This reveals only those properties with a keyframe active (so make sure you set a size keyframe beforehand). This de-clutters the timeline and just makes the work process a little easier.

Next it is a case of creating keyframes for where you want the stretched ball, and where you want the squashed ball, use cop and paste to put them in the right spots, and experiment a bit until you get the transformations you like. You create the actual deformation by unchecking the constrain proportions icon on the size property and then just changing wither the x or y vale to get the effect you want.

This adds that sense of motion so essential for motion graphics, but it is, like the movement, a little linear, so again we can select them all, and go to keyframe assistant and then Easy Ease to smooth out the transformations.
Now obviously this is a very basic animation, but the principles remain the same for all motion graphics, you can add color and color transformation, use the wide range of effects within After Effects, the Simulation selection of particle effects are very popular in Motion Graphics, and so on.
Conclusion
I hope that anyone that thought the concept was beyond them can see that it really is a case of working through each movement and letting After Effects do the work for you, motion graphics are fun, so is creating them. If you want to make motion graphic easily, try Filmora. Download it now to have a try (free)!
As the need for animation from with After Effects is growing, so here we will look at how the basic aspects can be achieved.
by Benjamin Arango Jul 28, 2026 10:40 AM
Benjamin Arango
staff Editor
